Table of Contents
Advertisement
Operations Guide
Before connecting, operating or adjusting this
product, please read these instructions completely.
SC-NC9 is used in the illustrations unless otherwise
indicated.
Please keep this manual for future reference.
Your unit may not look exactly the same as
illustrated.
Note
"EB" on the packaging indicates the United
Kingdom.
Region number
The player plays DVD-Video marked with labels
containing the region number "2" or "ALL".
Example:
2
EB
2
ALL
3
5
Operating Instructions
DVD Stereo System
High-quality picture
#
HDMI capability
, Advanced
progressive scan and more
High-performance
sound effects
Sound quality
enhancement, Bi-Amp TS
USB plug-and-play
Using USB playback
#
Only available for SC-NC9.
SC-NC9
Model No.
SC-NC6
SC-NC9
10
34
#
40
function
RQTX0072-B
Advertisement
Table of Contents

Related Manuals for Panasonic SC-NC9


Summary of Contents for Panasonic SC-NC9
- Page 1 SC-NC6 SC-NC9 High-quality picture Before connecting, operating or adjusting this product, please read these instructions completely. SC-NC9 is used in the illustrations unless otherwise HDMI capability , Advanced indicated. progressive scan and more Please keep this manual for future reference.
-
Page 2: Caution For Ac Mains Lead
Dear customer : indicates features applicable to SC-NC9 only SC-NC9 : SC-NC6 only SC-NC6 Thank you for purchasing this product. For optimum performance and safety, please • Operations in these instructions are described mainly read these instructions carefully. for the remote control, but you can do the operations... -
Page 3: Table Of Contents
Safety precautions TABLE OF CONTENTS Getting Started Placement Caution for AC Mains Lead Set the unit up on an even surface away from direct Safety precautions sunlight, high temperature, high humidity, and excessive Accessories vibration. These conditions can damage the cabinet and Tray/disc handling caution / About DivX VOD other components, thereby shortening the unit’s service content... -
Page 4: Accessories
■ Sales and Support Information • Most major credit and debit cards accepted. • All enquiries transactions and distribution facilities Customer Care Centre are provided directly by Panasonic UK Ltd. • For customers within the UK: 08705 357357 • It couldn’t be simpler! •... -
Page 5: Content
Tray/disc handling caution Adhere to the following to avoid problems. Tray caution Disc handling precautions • Do not attach labels or stickers to discs (This may cause disc warping, rendering it unusable). • Do not write on the label side with a ball-point pen or other hard writing instrument. -
Page 6: Simple Setup
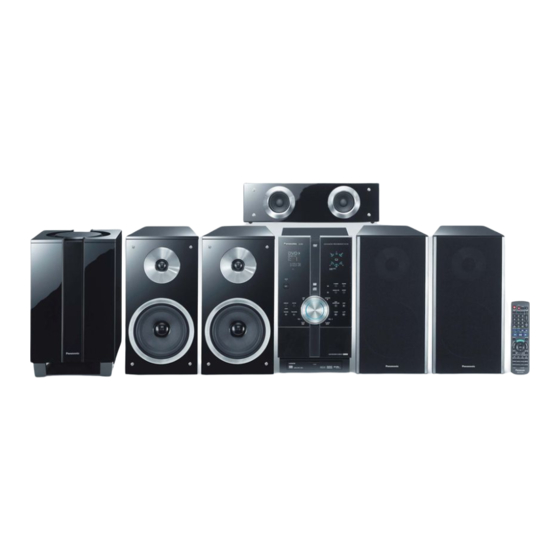
Front speaker Front speaker Leave about 30 cm from the television. (left) (right) SC-NC9 Center speaker Do not place the center speaker directly on the television as vibration may cause it to fall or disrupt the 1 2 0 ( S B - W N C 9 ) picture. - Page 7 Speaker installation options SC-NC9 ■ Assemblying the speakers for Bi-Amp TS mode To enjoy better sound quality in Bi-Amp TS mode (➡ page 34, Refining the sound quality: Fi Mode), stack the surround speakers on the front speakers. 2 Base stands...
-
Page 8: Connecting The Speakers
STEP Connecting the speakers SC-NC9 Speaker cables • Front (2 x 1.5 m) 1 Speaker cable sticker • Subwoofer (1 x 2.5 m) • Attach the speaker cable stickers to make SC-NC9 Supplied • Center (1 x 2 m) connection easier... -
Page 9: Step 3 Television, Antenna And Ac Mains Lead Connections
STEP Television, antenna and AC mains lead connections AM loop FM indoor AC mains lead Video cable antenna antenna Supplied accessories • Connect the AC mains lead after all other connections are complete. Conserving power The unit consumes a small amount of power (approx. 0.9 W) even when it is in standby mode. To save power when the unit is not to be used for a long time, unplug it from the household mains socket. - Page 10 Using the VIERA Link “HDAVI Control ” • Do not use the SCART cable when you use the HDMI If your Panasonic television is an HDMI control cable for the connection. compatible television, you can operate your • When HDMI cable is connected, there will be no...
-
Page 11: Step 4 The Remote Control
■ Using an S VIDEO OUT terminal Back of this Television S Video cable unit (not included) S-VIDEO S VIDEO The S VIDEO terminal achieves a more vivid picture than the VIDEO OUT terminal by separating the chrominance (C) and luminance (Y) signals. (Actual AV OUT results depend on the television.) ■... -
Page 12: Step 5 Quick Setup
Turn on the television and select the appropriate video input on the ^, turn the television to suit the connection for the unit. unit on/off CLOCK/ TIMER SC-NC6 SC-NC9 DVD/CD (Press and hold) Power ON. Select “DVD/CD”. Display the QUICK SETUP screen. -
Page 13: Control Reference Guide
Control reference guide Remote control SC-NC9 Change the television’s video input mode Television power on/off (39) (39) Turn the unit on/off (12, 36) Adjust the television volume (39) Clock and timer setting (12, 36) PLAY/REC timer on/off (36) Sleep timer, Auto off operation setting (36) - Page 14 AC mains supply. r, selection button (34) Standby/on switch (8) MANUAL EQ, SOUND Press to switch the unit from on SC-NC9 FI MODE to standby mode or vice versa. SC-NC6 SUBWOOFER In standby mode, the unit Adjust sound field and...
-
Page 15: Disc Information
Discs recorded on DVD video recorders or DVD video cameras using DVD-Video Format. Recorded using a format different from DVD-Video Format, therefore, some functions cannot be used. Recorded with the Panasonic SD multi cameras or DVD video recorders [conforming to SD VIDEO specifications (ASF standard)/MPEG4 (Simple Profile) video system/G.726 audio system]. -
Page 16: Discs - Basic Play
Discs — Basic play Using this unit Press to open disc tray. Turn the unit on. Start play. • It may take some time for play to start but this is normal. DVD/CD q Adjust the volume. VOL – VOL + Load a disc vertically. -
Page 17: Using The Remote Control
Using the remote control Select Volume On-screen adjustment item select The stopped play position is Confirm memorized when “RESUME” (while stopped) DVD-V is displayed. DVD-VR VCD CD Stop • Press [q, DVD/CD] to Example: To select 12: resume play. > →... -
Page 18: Discs - Convenient Functions
➡ Page 13 for the position of the remote control buttons. Displaying current playback Program play condition (up to 32 items) While stopped SC-NC9 SC-NC6 Press [PLAY MODE] to select “Program Playback” screen. Every time you press the button: Program → Random → off (Normal play) Each time you press the button: Basics →... -
Page 19: Discs - Using Navigation Menus
“On” or “Off” only appears with discs that DVD-VR Original (actual recorded size) contain subtitle on/off information (Subtitle on/off Full (full-screen) information cannot be recorded using Panasonic DVD • This may not work depending on the discs recording. Recorders.) •... - Page 20 Discs — Using navigation menus ➡ Page 13 for the position of the remote control buttons. ■ Using the submenu Selecting a track using CD Press [FUNCTIONS] while the navigation menu text (➡ page 19) is displayed Titles appear with CD Text disc playback. Actual items depend on the disc.
- Page 21 Press [PLAY LIST]. "DTS" is a registered trademark of DTS, Inc. and "DTS 2.0 + Digital out" is a trademark of DTS, Inc.. Press [e, r] to select the item. Example: SC-NC9 Playlist Date Length Title H D M I , t h e H D M I l o g o a n d H i g h - D e f i n i t i o n...
- Page 22 You can play MPEG4 data [conforming to SD VIDEO this. specifications (ASF standard)/MPEG4 (Simple Profile) video system/G.726 audio system] recorded Naming folders and files with Panasonic SD multi cameras or DVD video Example: (Files are treated as contents recorders with this unit. and folders are treated as root •...
-
Page 23: Discs - Using On-Screen Menus
Discs — Using On-screen menus Make the settings. Show the “Functions” menu. Select Select Confirm Select the menu. Example: Select DVD-V Return Functions to the Go to the Title 1 English Chapter 3/10 2 French previous next menu Time 0:24:31 3 Spanish menu Audio... - Page 24 • This does not work when television. DVD-VR playing a playlist. (➡ page 21.) The number displayed depend on the disc being played. One of the above number is displayed. (HDMI connection is available for SC-NC9 only.)
- Page 25 To Sharpen the “720p”, “1080i” and Enhancer “1080p” picture quality • The setting will return to Auto or Auto1 SC-NC9 when the disc tray is opened, the unit is (sharpest picture) turned off or another source is selected. When you play NTSC disc This works when the HDMI connection is Auto1: Automatically detects the film and...
-
Page 26: Display Menu
Expands all images to fill the connected with HDMI AV OUT terminal. HDMI Status screen. SC-NC9 (➡ Confirming HDMI information, below) If your television has a similar feature, To display current playback condition use it instead for a better effect. -
Page 27: Discs - Changing The Player's Settings
Discs — Changing the player’s settings SC-NC9 Display the Setup menu. Select the menu and item. SC-NC9 SC-NC6 Select Go to right (Press and hold) If you have not performed QUICK Confirm Select SETUP (➡ page 12) the QUICK Make the setting. - Page 28 96 kHz. Read your equipment’s operating instructions for details. Dolby Digital • Bitstream Select to suit the type of equipment you SC-NC9 • connected to the HDMI AV OUT terminal (➡ page 10). Select “Bitstream” when the equipment can decode the DTS Digital Surround •...
- Page 29 The QUICK SETUP enables successive settings of the items in the shaded area. ■ “HDMI” menu SC-NC9 RGB Range • Standard Set “HDMI Colour Space” to “RGB” (➡ • Enhanced: When the black and white images are not distinct. Picture Menu, page 25) Video Mode •...
-
Page 30: Language Code List
Nepali: Changing the delay time (Speaker settings) SC-NC9 For optimum listening with 5.1 channel sound, all the speakers, except for the subwoofer, should be the same distance from the seating position. If you have to place the center or surround speakers closer to the seating position, adjust the delay time to make up for the difference. -
Page 31: The Radio
The radio Preset tuning Preset channels to make selection simpler. Up to 30 Numbered stations can each be set in the FM and AM bands. buttons Automatic presetting TUNER Press and hold [ENTER]. (Release when “PROGRAM” appears) FUNCTIONS The tuner tunes to the lowest frequency and start to preset the stations it can receive into the channels in ascending order. -
Page 32: Cassette Tapes - Play And Recording
The radio RDS broadcasting The unit can display the text data transmitted by the radio PTY displays data system (RDS) available in some areas. NEWS VARIED FINANCE COUNTRY If the station you are listening to is transmitting RDS AFFAIRS POP M CHILDREN NATIONAL signals, “RDS”... - Page 33 The disc continues playing. Press [g] to stop it. forward and rewind Note Recording • SC-NC9 Multi-channel sources are automatically down-mixed to 2 channels during recording playback. • The volume, sound field and quality have no effect on Preparation: recording.
-
Page 34: Sound Field And Sound Quality
Sound field and sound quality – SC-NC9 FI MODE SC-NC9 SC-NC6 FI MODE SUBWOOFER SC-NC6 SOUND SUBWOOFER ENTER ENTER MANUAL EQ MANUAL SRND EQ, SOUND C.FOCUS, CH SELECT, % PLII -TEST To make a setting. To adjust the level in the setting. - Page 35 Enhancing the surround sound Speaker level adjustments effect: Surround Press [SRND]. SC-NC9 This is one of the ways to get appropriate surround SRND 1: Adds surround effects to stereo sources. SRND 2: Use this mode when playing movie software. effects.
-
Page 36: Convenient Functions
Convenient functions To change the settings (when the unit is on) The play/record timer • To change the play/record times Do steps 1, 2 and 4. You can set the timer to come on at a certain time to • To change the source or volume wake you up (play timer) or to record from radio station, Press [zPLAY/REC] to clear the timer indicator from... -
Page 37: Using The Viera Link "Hdavi Control
TV’s remote control. (The volume VIERA Link “HDAVI Control” is a convenient function level is displayed on this unit’s FL display.) that offers linked operations of this unit, and a Panasonic • To cancel muting, you can also use the stereo system television (VIERA) under “HDAVI Control”. -
Page 38: Using Other Equipment
Recording to other equipment Sound from the speaker may be distorted if the portable audio equipment’s equalizer (if any) is turned on. Turn it SC-NC9 Audio cable (not included) off before you plug into the MUSIC PORT jack. (There is no output from REC OUT.) - Page 39 Using other equipment Operating a television Aim at the remote control at the television for the To play audio from your television through this following operations. unit's speakers. TV/AV For SCART (AV) terminal connection ➡ page 10. Switching the For AUX terminal connection ➡ page 38. television’s video Turning the Press [EXT-IN] to select "AV"...
- Page 40 To return to the previous screen Press [RETURN] • Other basic operations, ➡ “Playing Discs”, page 16 to Avoiding interference with other Panasonic equipment Other Panasonic audio/video equipment may start This unit and remote control must be set to the same mode.
-
Page 41: Glossary
Glossary Decoder Interlace and progressive output A decoder restores the coded audio signals on DVDs to The PAL video signal standard has 576 interlaced (i) normal. This is called decoding. scan lines, whereas progressive scanning, called 576p, uses twice the number of scan lines. For the NTSC DivX standard, these are called 480i and 480p respectively. -
Page 42: Troubleshooting Guide
Before requesting service, make the following checks. If you are in doubt about some of the check points, or if the remedies indicated in the chart do not solve the problem, consult your dealer for instructions. (HDMI function is only available for SC-NC9.) ■ Power Page No power. - Page 43 ■ A-B repeat Page Point B is • The end of an item become point B when it is reached. automatically set. ■ Markers • You cannot add markers with DVD-RAM or DVD-R/RW (DVD-VR) discs. – Cannot add markers. • You cannot add markers if the disc’s elapsed play time doesn’t appear on the –...
- Page 44 Troubleshooting guide Page • Change the zoom ratio to “x1.00”. Menu is not displayed • Set “Subtitle Position” in Display Menu to “0”. correctly. • Set “4:3 Aspect” in Display Menu to “Normal”. • Turn off television’s zoom function. – Auto zoom function •...
-
Page 45: Maintenance
“DVD U11” • Disc is dirty. Wipe it clean. “ERROR” • Incorrect operation performed. Read the instructions and try again. – Page • Trouble may have occurred. The number following "H" and “F” depend on the – status of the unit”. “DVD H ”... -
Page 46: Specifications
MPEG-1 Layer 3, MPEG-2 Layer 3 Digital audio output SC-NC6 MPEG4 data recorded with the Panasonic SD multi Coaxial digital output Pin jack cameras or DVD video recorders Conforming to SD VIDEO specifications (ASF Phone jack standard) / MPEG4 (Simple Profile) video system /... - Page 47 VIDEO SECTION Center speaker SB-PC9 SC-NC9 Type Video system PAL625/50, PAL525/60, NTSC 2 way, 2 speaker system (Bass reflex) Impedance 3 Ω Speaker unit(s) Composite video output 1 Vp-p (75 Ω ) 1. Full range 6.5 cm Cone type Output level 2.
- Page 48 T H I S U N I T I S I N T E N D E D F O R U S E I N authorities or dealer and ask for the correct method of disposal. MODERATE CLIMATES. Matsushita Electric Industrial Co., Ltd. RQTX0072-B Web Site: http://panasonic.net H0307VT0...
Need help?
Do you have a question about the SC-NC9 and is the answer not in the manual?
Questions and answers