Table of Contents
Advertisement
Advertisement
Table of Contents

Subscribe to Our Youtube Channel
Related Manuals for Kärcher K 5.480


Summary of Contents for Kärcher K 5.480
-
Page 1: Manual De Usuario
K 5.480 OPERATOR MANUAL High Pressure Washer ....2 MANUAL DE USUARIO Limpiador de alta presión ....17 MANUEL D‘UTILISATION... -
Page 2: Table Of Contents
In the U.S. or Canada, please call death or serious injury.” 1-800-537-4129 for warranty issues and WARNING visit www.karcher-help.com for techni- indicates “a potentially hazardous situa- cal support and product assistance. tion which, if not avoided, could result in Please take a moment to register your death or injury.”... -
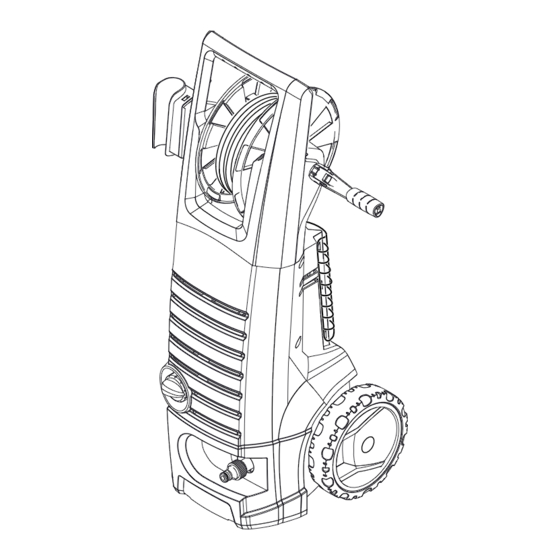
Page 3: Model Overview
MODEL OVERVIEW 1 Garden hose connector (female) 11 Power cord with power plug 2 Water inlet connector 12 Detergent tank (removeable) 3 Water inlet with filter 13 Wheels 4 ON/OFF switch 14 Trigger gun 5 High pressure hose 15 Trigger gun safety lock 6 Hose drum 16 Key to detach the high pressure hose from the trigger gun... -
Page 4: Tions
IMPORTANT SAFETY INSTRUCTIONS WARNING CAUTION When using this product basic precau- Gun Kicks Back – Hold with both tions should always be followed, includ- hands. ing the following: The Trigger Gun Safety Lock pre- vents the trigger from accidentally being engaged. -
Page 5: Grounding Instructions
NOT OPERATE THIS PUMP WITH WATER SUPPLY COMPONENTS RATED LESS THAN (Cold Water Only) 13800 KPA /2000 PSI WORKING PRESSURE (INCLUDING BUT NOT CAUTION LIMITED TO SPRAY GUNS, HOSE When connecting the water inlet to the AND HOSE CONNECTIONS). water supply mains, local regulations of BEFORE SERVICING, CLEANING OR your water company must be observed. -
Page 6: Assembly Instructions
ASSEMBLY INSTRUCTIONS For more detailed information on Connect the high pressure hose to how to assemble this pressure wash- the trigger gun er, please visit STEP 3: www.karcherresidential.com/ Push the high pressure hose into the assembly trigger gun until it locks audibly. Note: Make sure the connection nip- Assembly ple is aligned correctly. -
Page 7: Operating Instructions
OPERATING INSTRUCTIONS STEP 1: STEP 4: Insert the spray wand of your choice Push the garden hose connector on into the trigger gun. Press in against to the water inlet connector and the spring tension and twist into make sure you hear it click into place locked position. -
Page 8: Using The Accessories
STEP 8: Turn on the high pressure washer (I/ ON). The motor starts only if the trigger of the gun is pulled and shuts off when the trigger is released. USING THE ACCESSORIES WARNING Dirtblaster ® To avoid serious injury never point This nozzle features a 0º... -
Page 9: Working With Detergents
WORKING WITH DETERGENTS Detergents can only be applied at low pressure setting (Mix). STEP 1: Install the Vario Power Spray Wand. Set the spray wand to the low pres- sure setting (Mix). STEP 5: Cleaning up: Always draw fresh wa- ter through the detergent tank or si- phon tube when done to flush any remaining detergents from the injec-... -
Page 10: Taking A Break ..Five Minutes Or More
TAKING A BREAK ..five minutes or more STEP 1: STEP 2: Release trigger and engage gun Turn pressure washer to OFF (0) po- safety lock. sition. SHUTTING DOWN & CLEAN-UP STEP 1: STEP 4: Turn the switch to OFF (0) position Release trigger and engage gun and unplug cord from outlet. -
Page 11: Winterizing And Long-Term Storage
WINTERIZING AND LONG-TERM STORAGE 1: Disconnect all water connections. of heat as it may dry out the pump seals. 2: Turn on the machine for a few sec- onds, until the water which had re- CAUTION mained in the pump exits, turn off Failure to follow the above directions will immediately. -
Page 12: Cleaning Tips
CLEANING TIPS work area to sections of approximately CAUTION 6 feet and always apply detergent from Before cleaning any surface an in- bottom to top). Allow detergent to re- conspicuous area should be cleaned main on surface 1-3 minutes. Do not al- to test spray pattern and distance for low detergent to dry on surface, if maximum cleaning results. -
Page 13: Optional Cleaning Accessories
at high pressure in a sweeping motion cleaning surface. For removing ex- keeping the spray nozzle approximately tremely stubborn dirt, it may be neces- 6-8 inches from the cleaning surface sary to move the spray nozzle even (distance should increase when rinsing closer to the surface for greater dirt cut- pin-striping or other sensitive surfaces). - Page 14 Rotating Wash Brush (bayonet) Wet Sandblasting Kit (bayonet) For more effortless cleaning of all Why spend hours stripping old paint and smooth surfaces (painted, glass and rust by hand using harsh chemicals? Let plastic) try the Kärcher Rotating Wash the Kärcher Wet Sandblasting Kit do ®...
-
Page 15: Troubleshooting
TROUBLESHOOTING Disconnect the machine from the power AUTION source before making any repair. Symptom Cause Solution Motor will not start On/Off switch is in the “OFF” Turn switch to the “ON” (I) posi- (0) position. tion Power cord is not plugged in. Plug in power cord. Electrical outlet does not sup- Try a different outlet. - Page 16 Call Customer Support drops per minute is worn. permissible). Oil Drip. Oil seals are damaged or Call Customer Support worn. If you encounter any additional difficulties not listed, please visit our website. USA / Canada: Mexico: www.karcher-help.com www.karcher.com.mx 16 English...
Need help?
Do you have a question about the K 5.480 and is the answer not in the manual?
Questions and answers