Table of Contents
Advertisement
Advertisement
Table of Contents

Related Manuals for UNIVIEW NVR201


Summary of Contents for UNIVIEW NVR201
- Page 1 Network Video Recorders Quick Guide Manual Version: V1.00...
- Page 2 Trademark Acknowledgement and other Uniview’s trademarks and logos are the property of Zhejiang Uniview Technologies Co., Ltd. Other trademarks, company names and product names contained in this manual are the property of their respective owners.
-
Page 3: Environmental Protection
contents of this manual are subject to change without prior notice. Update will be added to the new version of this manual. Use of this manual and the product and the subsequent result shall be entirely on the user's own responsibility. In no event shall we be reliable to you for any special, consequential, incidental, or indirect damages, including, among others, damages for loss of business profits, business interruption, or loss of data or documentation, or... -
Page 4: Safety Symbols
Safety and Compliance Information Safety Symbols The symbols in the following table may be found on installation-related equipment. Be aware of the situations indicated and take necessary safety precautions during equipment installation and maintenance. Symbol Description Generic alarm symbol: To suggest a general safety concern. - Page 5 This device is a class A product and may cause radio interference. Take measures if necessary. While shipping, the device should be packed in its original packing. Verify that installation is correct. Incorrect cable connection may cause personal injury or device damage. The installation must be made by qualified personnel and should ...
-
Page 6: Regulatory Compliance
WARNING! Never look at the transmit laser while the power is on. Never look directly at the fiber ports and the fiber cable ends when they are powered on. Use of controls or adjustments to the performance or procedures ... - Page 7 LVD/EMC Directive This product complies with the European Low Voltage Directive 2006/95/EC and EMC Directive 2004/108/EC. WEEE Directive–2002/96/EC The product this manual refers to is covered by the Waste Electrical & Electronic Equipment (WEEE) Directive and must be disposed of in a responsible manner.
-
Page 8: Table Of Contents
Contents 1 Installation ................... 1 Hard Disk Installation ..................1 Installation Without a Mounting Plate ..........1 Installation with a Mounting Plate ............4 Mounting the NVR ..................7 2 Appearance and Connection ..............8 Front Panel ....................9 Rear Panel ....................13 Connection .................... -
Page 9: Installation
Installation The figures in this manual are for reference only and may be different from the actual device. You need a Phillips screwdriver (#1 or #2) to complete the installation. Hard Disk Installation CAUTION! Disconnect power from the device before you start installation. Wear antistatic gloves during installation. - Page 10 Connect the data cable to the hard disk. Connect the power cable to the hard disk. Align the screws on the hard disk with the screw holes on the bottom plate and then attach the hard disk.
- Page 11 Slide the hard disk into position on the bottom plate as indicated in the figure below. Secure the hard disk by fixing the screws on the bottom plate. Connect data cables and power cables to the motherboard.
-
Page 12: Installation With A Mounting Plate
Repeat the above steps to install another disk. 10. Replace the cover and fix the screws. Do not place cables on the hard disk(s). Installation with a Mounting Plate This section is intended for NVRs with four or eight disks. A mounting plate is delivered with the device. - Page 13 Remove the cover. Remove the two screws that secure the hard disk mounting plate on both sides and then take out the mounting plate. Install the hard disks one by one on the mounting plate. Put the mounting plate back into the device and secure it.
- Page 14 Connect the hard disks and motherboard with data cables and power cables, and arrange the cables appropriately. Replace the cover. Fix the two screws on the rear panel.
-
Page 15: Mounting The Nvr
NOTE! After removing the cover with the rear panel facing toward you, you see the disk data cable connectors (disks) arranged in the following order: Disk 2 Disk 1 Two disks: Disk 1 Disk 2 Disk N Four or eight disks: ... -
Page 16: Appearance And Connection
CAUTION! Do not stack other devices on your NVR or put anything heavy on it. Otherwise, heat dissipation may be affected. Keep your NVR away from any vibration source; for example, an electric generator. Do not expose your NVR to direct strong airflow as from an air conditioner or electric fan. -
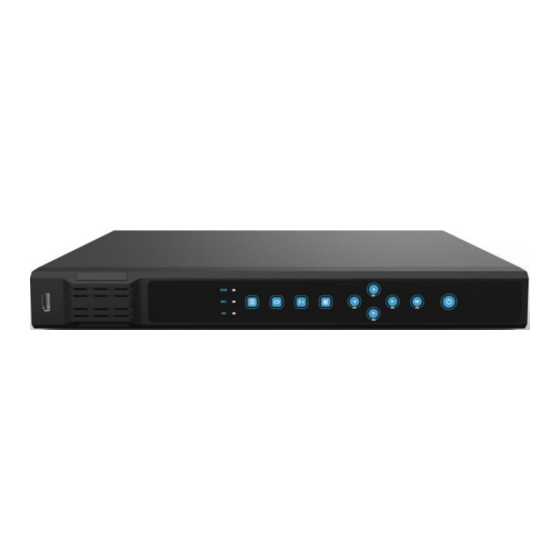
Page 17: Front Panel
Front Panel Figure 2-1 NVR with 1 or 2 Disks Figure 2-2 NVR with 4 Disks Table 2-1 LED Indicators Status Color Description Steady on The NVR is operating properly. Blue Blinking The NVR is starting up. (Operation) The NVR is shut down. Steady on The NVR is connected to network. - Page 18 Table 2-2 Front Panel Buttons Button Description Display the main menu. Switch to the next tab on the screen or switch the input method. Auxiliary function button. Exit the current window. / / / : Switch windows or menu items; or ...
- Page 19 Figure 2-3 NVR with 8 Disks Table 2-3 LED Indicators Status Color Description Steady on The power is normal. Blue (Power) The power is off. Steady on The NVR is operating properly. Blue Blinking The NVR is starting up. (Operation) The NVR is shut down.
- Page 20 Status Color Description Blinking Data is being read or written. The disk is in normal status but no data is being read or written; or the NVR is shut down. Steady on An alarm has occurred. The NVR is operating properly (Alarm) and no alarm has occurred.
-
Page 21: Rear Panel
Button Description Enter 0 or a space. Delete Switch the input method. Auxiliary function button. Exit the current window. Switch to the next tab. / / / : Switch windows or menu items; or control rotation direction of a PTZ camera when the PTZ toolbar is closed. - Page 22 Figure 2-4 NVR with 1 or 2 Disks Power on/off Grounding terminal VGA output Ethernet Audio output DC power Audio input HDMI output Figure 2-5 NVR with PoE Ports and 1 or 2 Disks Audio output PoE port Power on/off Grounding terminal HDMI output DC power...
- Page 23 Figure 2-6 NVR with 4 Disks Power on/off Alarm input VGA output Audio output Ethernet Grounding terminal DC power Alarm output Audio input RS485 HDMI output Figure 2-7 NVR with 8 Disks Power on/off Power input Alarm input RS232 Alarm output RS485 Grounding terminal HDMI output...
-
Page 24: Connection
Connection The following figure takes a model with PoE ports as an example. A PoE port can be used to transfer data and meanwhile provide DC power for a connected IP camera that also supports PoE. Audio output IP network Mouse DC power Audio input... -
Page 25: Shutdown
Shutdown CAUTION! Do not disconnect power directly while the NVR is running or shutting down. A sudden power failure may damage the NVR. Shut down by pressing the power button Press and hold the power button on the front panel for at least three seconds till a confirmation message appears on the monitor. -
Page 26: Adding An Ip Device
CAUTION! The default password 123456 is intended only for your first login. To ensure account security, please change the password immediately after login. Adding an IP Device Make sure the IP device is connected to your NVR through network. Click Menu > Camera > Camera. Click for the desired IP device to add it. -
Page 27: Preview Status Icons
Table 4-1 Preview Window Toolbar Buttons Button Name Description Click to display the PTZ control panel for a PTZ Control PTZ camera. Click to start recording live video to the NVR. Manual The button turns into when recording is Recording started. -
Page 28: Shortcut Menu
Table 4-2 Preview Status Icon Description Icon Description Icon Description Tampering alarm Recording Motion detection Two-way audio alarm Shortcut Menu A shortcut menu appears (see figure in table below) when you right-click in a preview window. Table 4-3 Shortcut Menu Description Menu Description Screenshot... -
Page 29: Scheduled Recording
Scheduled Recording Click Menu > Storage > Recording. Select the desired camera from the drop-down list, select Enable Schedule, and then click Edit. Set recording period(s) and select a recording type. Review the settings and then click OK. NOTE! If you select a recording type under Event, you need to first enable the corresponding alarm function and configure alarm-triggered recording. -
Page 30: Playback
Playback Right-click anywhere in the preview window and then choose Playback from the shortcut menu. Select the desired camera and then double-click the desired date to start playback. Accessing Through the Web Check that your PC and NVR are connected through network. Open a Web browser on your PC and visit the IP address of your NVR (192.168.0.30 by default). -
Page 31: Faqs
CAUTION! The default password is intended only for your first login. To ensure account security, please change the password immediately after login. FAQs Why an added camera appears offline? Log in to the Web interface of the NVR, click Settings > Maintenance > Camera, and you will find the cause in the Status column. - Page 32 Item Description Device without PoE ports: < 24W Maximum power consumption Device with PoE ports (4-ch): < 60W (with disk) Device with PoE ports (8-ch): < 93.6W Operating –10°C to +55°C (14°F to 131°F) temperature Operating 10% to 90% (non-condensing) humidity Altitude –60 m to +5000 m (-196.85 ft to 16,404.2 ft)
- Page 33 Table 6-3 Specifications for NVR with 4 Hard Disks Item Description Height: 1U Dimensions 440.0 mm × 341 mm × 44 mm (with front panel) (W × D × H) (17.3"×13.43"×1.73") Without disk: <3 kg (6.6 lb) Weight With disks: <6 kg (13.2 lb) ...
- Page 34 Item Description Operating 10% to 90% (non-condensing) humidity Altitude –60 m to +5000 m (-196.85 ft to 16,404.2 ft)
- Page 35 BOM: 3101C0C6...
Need help?
Do you have a question about the NVR201 and is the answer not in the manual?
Questions and answers