Table of Contents
Advertisement
Quick Links
Advertisement
Table of Contents

Related Manuals for Denver MMP-390


Summary of Contents for Denver MMP-390
- Page 1 MMP-390 CD MP3 MICROSYSTEM USER MANUAL Please read and keep these instructions...
- Page 2 Important safety instructions – please read carefully and keep for future reference To reduce the risk of fire or electric shock, do not expose this product to water, rain or moisture. To prevent the risk of electric shock, do not remove the cover or back of this product.
- Page 3 No naked flame sources, such as lighted candles, should be placed on the apparatus. The batteries shall not be exposed to excessive heat such as sunshine, fire or the like. Electric supply Please unplug the product in case of prolonged non-use. If the supply cable is damaged, it must be replaced by the manufacturer or qualified after-sales personnel to avoid any danger.
-
Page 4: List Of Main Parts
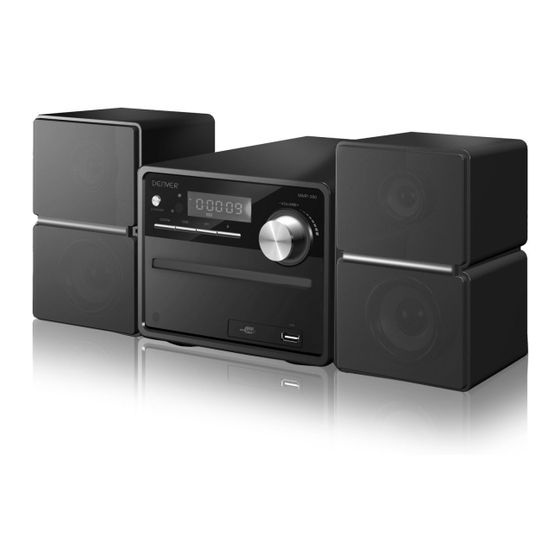
INTRODUCTION Thank you for choosing this product. Here are the main characteristics of your new microsystem: Equipped with a digital PLL tuner, you can easily search and memorize FM radios during playing. With its compact with elegant design, this system can easily find its place at home and be installed in just a couple of minutes. - Page 5 LOCATION OF CONTROLS 1、POWER ON/OFF 7、VOL ADJUST 2、CD/FM 8、USB SLOT 3、CD/USB 9、REMOTE CONTROL SENSOR 4、PLAY/PAUSE 10、LCD DISPLAY 5、OPEN/CLOSE 6、CD DOOR 12、Speaker Output 13、FM antenna...
- Page 6 STANDBY NUMBER KEY MUTE RANDOM SEEK-/LEFT REWIND FORWARD CD/FM BASS 10. AUTO 11. TREBLE 12. OPEN/CLOSE 13. EQ 14. PROG 15. REPEAT 16. CH+/UP 17. SEEK+/RIGHT 18. PLAY/PAUSE 19. CH-/DOWN 20. NEXT 21. PREV 22. STOP 23. CD/USB 24. VOL- 25.
-
Page 7: Install The Remote Control Battery
INSTALL THE REMOTE CONTROL BATTERY 1. Remove the battery cover. 2. Install 2pc ``AAA`` battery into the battery compartment. Make sure that the + symbol is respected 3. Close the battery cover. Note: 1. Battery chemicals can cause a rash. If the batteries leak, clean the battery compartment with a cloth. -
Page 8: Fast Rewind / Fast Forward
MUTE In play status, If the MUTE button is pressed, there will be no audio output, the sound is eliminated. Then press this button again or press VOL+/- buttons to exit the mute status, the sound resumes to be its normal status. RANDOM While playing the CD disc, press the RANDOM button to play the disc in random. -
Page 9: Volume Adjustment
PLAY/PAUSE In play status, press the PLAY/PAUSE button, the play will be paused, and press it again to continue playing. STOP While playing CD disc, press the STOP button on the remote control, and then press PLAY/PAUSE button, the disc will be played from the beginning. CD/USB To exchange between CD and USB VOLUME ADJUSTMENT... -
Page 10: Playing Usb
PLAYING USB Press the “CD/USB” button to switch to CD / USB playback. NOTE: If in FM mode, please press CD/FM first to switch to CD mode before switch to USB. Connecting a USB device 1) Insert a USB in the slot. 2) Press the CD / USB key to start. -
Page 11: Specification
4. The channel number could not exceed 20 5. Cannot input the frequency number directly. SPECIFICATION Output ports L/R speaker output ports Input ports USB In Power supply 230V~ 50/60Hz Max power Frequency 20Hz-20KHz ±3dB TROUBLE SHOOTING Please use the following methods to solve the following problems while using this unit. Fault Phenomenon Possible Cause Handing...
Need help?
Do you have a question about the MMP-390 and is the answer not in the manual?
Questions and answers