Table of Contents
Advertisement
Quick Links
Advertisement
Table of Contents

Related Manuals for Fridgemaster MC60283DFFB


Summary of Contents for Fridgemaster MC60283DFFB
- Page 1 MC60283DFFB...
-
Page 2: Table Of Contents
Safety and warning information_ _ _ _ _ 2 Helpful and hints and tips _ _ _ _ _ _ _ Installing your new appliance_ _ _ _ _ _ Cleaning and care _ _ _ _ _ _ _ _ _ _ _ Description of the appliance _ _ _ _ Troubleshooting_ _ _ _ _ _ _ _ _ _ _ _ _... - Page 3 If you are discarding the -catering and similar non- appliance, pull the plug retail applications out of the socket, cut the WARNING - Do not store connection cable (as explosive substances close to the appliance as such as aerosol cans with you can) and remove the a flammable propellant in door to prevent children...
- Page 4 blowing gas are Any damage to the cord flammable. may cause a shortcircuit, When disposing of the fire, and/or electric shock. appliance, do so only at Electrical safety an authorized waste disposal centre. Do not 1.The power cord must expose to flame. not be lengthened.
- Page 5 sure to apply A.C. manufactures storage Automatic voltage recommendations regulator of more than should be strictly adhered 350W to the fridge. The to.Refer to relevant fridge must employ a instructions for storage. special power socket Do not place carbonated instead of common one or fizzy drinks in the with other electric freeze compartment as it...
- Page 6 hands are damp/wet,as appliance. Use a plastic this could cause skin scraper. abrasions or frost/freezer Installation Important! burns. For electrical connection Never use the base, carefully, follow the drawers, doors etc. to instructions given in this stand on or as supports. manual.
- Page 7 relevant to installation. The appliance must not be locate close to radiators or cookers. Make sure that the mains plug is accessible after the installation of the appliance. Service Any electrical work required to do the servicing of the appliance should be carried out by qualified electrician or competent person.
-
Page 8: Installing Your New Appliance
Installing your new appliance Note: Before using the appliance This appliance performs for the first time, you should ● well within the climate class be informed of the following from SN to T showed in the tips. table below. Ventilation of appliance It may not work properly if In order to improve being left at a temperature... - Page 9 using a suitable spanner. Note: Before you start lay To allow the doors to self- the refrigerator on its back ● close, tilt the top backwards in order to gain access to by about 10mm. the base, you should rest it on soft foam packaging ≤10mm or similar material to avoid...
- Page 10 Place the upper door on ② Corner cover ① Upper cover a smooth surface with its panel upwards. Loose screw ④ and part ③, then loose screw ② and part ①. Install another stop block (in the plastic ③ Right Hinge Cover ⑥...
- Page 11 7. Place the lower door on a 9. Place refrigerator smooth surface with its flatwise, remove part③and panel upwards. Loose then loose screws④. screw ④ and part ③, Remove part ②and part①. then loose screw ② and part ①. Turn part ① by ①...
- Page 12 middle hinge by 180°, 14. Move the upper door change the washer on the to an appropriate position, adjust upper hinge and axis to the upper side, adjust the middle hinge to upper door, then fix the the appropriate position and hinge axis into the hinge front the top down.
- Page 13 Caution! You should fix the axis tightly in order to keep the upper door being steady and durable.
-
Page 14: Description Of The Appliance
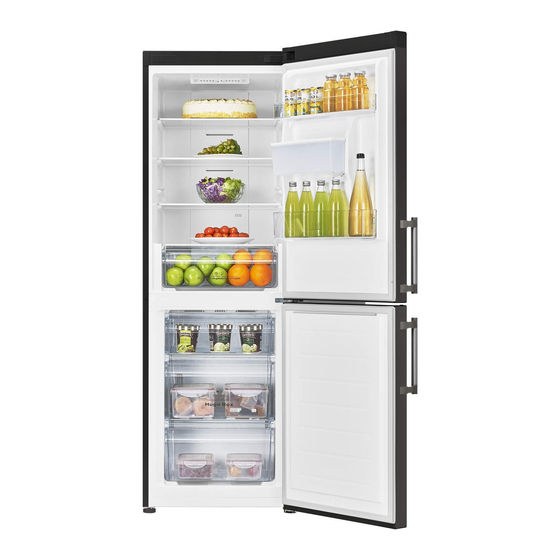
Description of the appliance View of the appliance 1. Cabinet LED light Glass shelf Crisper cover Fruit and vegetables crisper ice tray (inside 7. Upper freezer drawer 8. Upper freezer glass shelf 9. Middle freezer drawer 10. Lower freezer glass shelf Lower freezer drawer Adjustable bottom feet Fridge door... -
Page 15: Control Panel
Control panel Use your appliance according to the following control regulations, your appliance has the corresponding functions as the control panels showed in the pictures below. Controlling the temperature depending on how much food you store and where We recommend that when you place them. - Page 16 2. Freezer pressing the middle part of Press the middle part of button and the freezer button to set fridge temperature setting will temperature between -16℃ revert back to the previous and -24℃ as needed, and setting. control panel will display 4.
-
Page 17: Using Your Appliance
Using your appliance Your appliance Water Dispenser accessories The water dispenser, “Description located in the fridge door, is appliance” showed for storing drinking water. general, with this part instruction you can have the With this appliance you can right way to use them. obtain chilled water easily without opening the Door rack... - Page 18 Assembling Filling water Before assembling, please drain the Before you fill the drinking water into the water inside the tank, and check whether water tank, ensure that the water tank is the washer is reversed or not. steady and in a correct position. 1.Insert the head into the hole.
-
Page 19: Helpful And Hints And Tips
Cleaning Receiving Water 1. Put the water tank out of the door You should use the correct cups to carefully, and then wash the tank, lid, and r e c e i v e w a t e r t h e w a t e r u n d e r n e a t h head lightly in water. - Page 20 airtight foil or plastic film energy efficient configuration. wrap. Hints for fresh food Milk bottles: refrigeration ● Should have a lid and be Do not place hot food ● stored in the door racks. directly into the refrigerator Hints for freezing or freezer, the internal When first starting-up or temperature will increase...
-
Page 21: Cleaning And Care
It is recommended to label Switching off your ● and date each frozen appliance package in order to keep If the appliance needs to be track of the storage time. switched off for an extended Hints for the storage of period, the following steps frozen food should be taken prevent... - Page 22 Don't use Thinner, Car unplug the appliance from detergent, Clorox, ethereal the mains power and leave oil, abrasive cleansers or the doors open. Ventilate organic solvent such as the room thoroughly to Benzene for cleaning. They accelerate the thawing may damage the surface of process.
-
Page 23: Troubleshooting
Replacing the LED light: 1. Unplug your appliance. Warning: The LED light 2. Remove light cover by must not be replaced by the pushing up and out. user! If the LED light is 3. Hold the LED cover with damaged, contact the one hand and pull it with the customer helpline for other hand while pressing... - Page 24 It is normal that the refrigerator is not operating during the automatic defrost Appliance working cycle, or for a short time after the correctly appliance is switched on to protect the compressor. The interior may need to be cleaned. Odours from the compartments Some food, containers or wrapping cause odours.
-
Page 25: Disposal Of The Appliance
● After your installing the appliance or it The motor runs continuously has been switched off for a long time. Check that the air outlets are not blocked by food and ensure food is placed within A layer of frost the appliance to allow sufficient occurs in the ventilation. - Page 26 Correct Disposal of this product This marking indicates that this product should not be disposed with other household wastes throughout the EU. To prevent possible harm to the environment or human health from uncontrolled waste disposal, r e c y c l e i t r e s p o n s i b l y t o p r o m o t e t h e sustainable reuse of material resources.
- Page 27 FRIDGEMASTER Unit 2 Meadow Court Millshaw Lane Leeds, West Yorkshire, LS11 8LZ, United Kingdom...
Need help?
Do you have a question about the MC60283DFFB and is the answer not in the manual?
Questions and answers