Advertisement
TWE - 19000
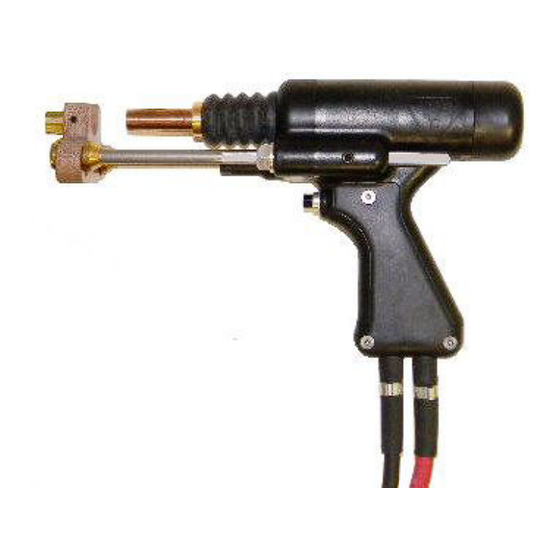
LIGHT-DUTY STUD GUN
Operations Manual
The TWE19000 has been designed to fit comfortably for all hands, including when
wearing a work glove. The neck of the handle has been tapered so that when
grasped, the trigger can be accessed easily, without any unnecessary strain. The han‐
dle length allows for better balance of the stud gun and it keeps the welding cable
and connector away from your hand, minimizing operator fatigue.
TRU‐WELD EQUIPMENT COMPANY
6400 N. Honeytown Road
Smithville, Ohio 44677
(330) 669‐2773 Phone
(330) 669‐2473 Fax
TWE@tfpcorp.com
http://truweldstudwelding.com
Version 1.5 10/31/2012
Advertisement
Table of Contents

Related Manuals for Tru-Weld TWE - 19000


Summary of Contents for Tru-Weld TWE - 19000
- Page 1 TWE - 19000 LIGHT-DUTY STUD GUN Operations Manual The TWE19000 has been designed to fit comfortably for all hands, including when wearing a work glove. The neck of the handle has been tapered so that when grasped, the trigger can be accessed easily, without any unnecessary strain. The han‐ dle length allows for better balance of the stud gun and it keeps the welding cable and connector away from your hand, minimizing operator fatigue. TRU‐WELD EQUIPMENT COMPANY 6400 N. Honeytown Road Smithville, Ohio 44677 (330) 669‐2773 Phone (330) 669‐2473 Fax TWE@tfpcorp.com http://truweldstudwelding.com Version 1.5 10/31/2012 ...
- Page 2 TRU‐WELD EQUIPMENT LIMITED WARRANTY All goods produced by Tru‐Weld Equipment shall be warranted against defects including workmanship and components. No other warranties whether expressed, verbal, or implied will apply. Warranties only apply to the original equipment purchaser. Warranty claims will be limited to either repair or replacement of the defective materials by Tru‐Weld Equipment. At the option of Tru‐Weld Equipment the location of where the warranty evaluation and repairs are made will be determined. All warranty claim items returned to Truweld Equipment or sent to customer by Truweld Equipment will be at the customer’s expense. At the option of Tru‐Weld Equipment the defect will either be repaired or replaced. Notice must be provided to Tru‐Weld Equipment of a warranty defect within 30 days that the defect or failure is incurred. Warranties are not transferable. This warranty does not apply for equipment which is used improperly in any fashion including but not exclusive to the following: Equipment which has been modified. Equipment which has not been installed properly. Equipment which has been used for purposes other than which it had been designed. Equipment which has not been properly maintained. Equipment which was continued to be used after a defect had been found. Equipment which was damaged in any way. Tru‐Weld Equipment will not be liable for consequential damages, loss, or expense occurring directly or indirectly from the use of the equipment covered in this warranty. All cables, cable sets and connectors are not warranted. Two (2) year warranty period from date of purchase SC3402 Power Supply SC3400 Power Supply SC2402 Power Supply SC2400 Power Supply SC1950 Power Supply ...
- Page 3 TWE - 19000 STUD GUN SET‐UP Each stud welding application requires that the stud gun be set up properly for the correct stud and ferrule arrangement. Select the correct style and size of chuck for the stud to be welded ♦ and attach it to the stud gun. Select the proper length leg assemblies for the length of the stud. ♦ Select the proper foot piece best suited for your application. ♦ Select the grip to fit the ferrule which is provided with the stud to be ♦ welded. TRU‐WELD ARC STUD GUN ** Specifications are subject to change without prior notification. 2 ...
- Page 4 TWE - 19000 LIFT ADJUSTMENT Setting the lift when all of the accessories and stud have been properly set on the stud gun, prior to welding, plug the control connector of the stud gun directly into the stud welder (do not attach the weld cable). Turn on the stud welder and actuate the trigger of the stud gun with the stud and ferrule in place. Note the retraction of the shaft of the stud gun. This is designated as the Lift. The lift setting should be about 3/32” for general welding applications and studs rang‐ ing in diameter through 3/4" this adjustment should be suitable. For larger diameter studs and select applications the lift should be adjusted to approximately 1/8”. Adjusting the lift: Remove the back cap of the stud gun. Loosen the two socket set screws around the periphery of the lift adjustment screw. To increase lift rotate the lift adjustment screw counter clockwise and to decrease lift rotate clockwise. With each turn check the lift by actuating the stud gun until the desired lift is achieved. Tighten the socket set screws to hold the lift adjustment screw in place to secure the selected setting. Replace the back cap of the stud gun. 3 ...
- Page 5 TWE - 19000 PLUNGE RATE ADJUSTMENT This adjustment is used to control the rate of speed the stud plunges into the molten pool after the arc has been drawn. Free travel adjustment: This adjustment can be used to control the force with which the stud is plunged into the molten weld pool by moving the engagement point of when the shaft of the stud gun engages the dampener. Both of these adjustments are located at the front of the stud gun under the bellow of the stud gun shaft. The outer adjustment knob can be turned to adjust the plunge rate; clockwise to de‐ crease the rate of plunge and counter clockwise to increase it. The dampener sleeve behind can be turned to adjust free travel by rotating it counter clockwise. Two turns should be the maximum amount of adjustment. Before electing to set the free travel, adjust the plunge rate to see if the desired effect is achieved. 4 ...
- Page 6 TWE - 19000 Attaching the stud gun to begin welding: ♦ Always select the desired of weld and control cable extension that is recom‐ mended for the stud welder selected. ♦ Attach the stud gun weld and control cable to the end of the cable extension. ♦ Actuate the stud gun without placing it on the surface to be welded to assure that the connection through the control cable is correct to complete the cir‐ cuit and actuate the stud gun. ♦ Make certain the stud welder is set up properly for beginning the welding procedure selected. ♦ Place the selected stud into the chuck and attach the ferrule to the ferrule grip. ♦ Place the stud onto the surface to be welded and press the stud gun down until the ferrule is flush with the welding surface. ♦ Trigger the stud gun and hold it in place until the cycle of the stud welding is complete. ♦ Pull straight up off the stud without flexing the stud gun back and forth. ♦ DO NOT depress the trigger of the stud gun again when removing the stud gun from the welded stud. ♦ Remove the ferrule by breaking it off and examine the weld. ♦ Make proper adjustments if required. 5 ...
- Page 7 TWE - 19000 6 ...
- Page 8 TRU-WELD Equipment Company 6400 N. Honeytown Road Smithville, Ohio 44677 (330) 669‐2773 Phone (330) 669‐2473 Fax TWE@tfpcorp.com http://truweldstudwelding.com 7 ...
Need help?
Do you have a question about the TWE - 19000 and is the answer not in the manual?
Questions and answers