
Related Manuals for David White DT8-05P


Summary of Contents for David White DT8-05P
- Page 1 DT8-05P DT8-05LP DT8-05LS FOR CUSTOMER SERVICE, PARTS AND REPAIR CALL (765) 581-4097 www.davidwhite.com IMPORTANT: IMPORTANT : IMPORTANTE: Read Before Using Lire avant usage Leer antes de usar...
-
Page 2: Precision And Accuracy
David White is not responsible for errors caused by instruments that are out of adjustment. Contact your distributor, dealer or David White for information on the nearest facility to check if your instrument is properly adjusted. -
Page 4: General Safety Rules
GENERAL SAFETy RULES Read all instructions. Failure to follow all instructions listed below WARNING may result in serious injury. When moving a tripod-mounted instrument, handle with care. Carry WARNING only in an upright position. Do not carry over your shoulder or in a horizontal position. -
Page 5: Technical Data
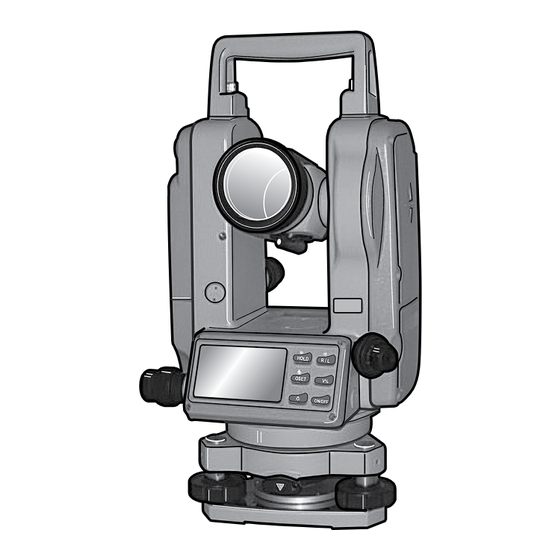
10. Horizontal Tanget Fine Motion Screw instrument on the graphic page. 11. Optical Plummet with Focus (DT8-05P and DT8-05LS only) 1. Carrying Handle 12. Leveling Screw (3) 2. Hand Screw (2) 13. Tribrach Locking Lever 3. - Page 6 DT8-05P DT8-05LP DT8-05LS Description Tilt Sensor Automatic Compensation Range of Compensation +/-3’ +/-3’ +/-3’ Plummet Plummet Type Optical Laser Optical Magnification Field of view 5° 5° Focusing range 20 in to infinity 20 in to infinity (0.5 m to infinity) (0.5 m to infinity)
-
Page 7: Operating Keys
OPERATING KEyS HOLD R / L ON/OFF OSET TILT HOLD R / L ON/OFF HOLD R / L OSET ON/OFF R / L OSET Button Primary Function Secondary Function ON/OFF ON/OFF button for displays 1. Function button for entering into Instrument Setup. -
Page 8: Removing The Battery Pack
PREPARATION Inserting/Replacing the Battery The batteries are supplied partially charged. To ensure full capacity of the This instrument has two power options: batteries, completely charge the batteries Disposable AA batteries or rechargeable before the first use. batteries. • Connect the charger to the AC power The rechargeable batteries are supplied source. -
Page 9: Initial Operation
OPERATION Initial Operation The DT8-05P and DT8-05LS is equipped with an optical plummet. The DT8-05LP Protect the instrument WARNING is equipped with a laser plummet. against moisture and This eliminates the need to use a plumb direct sun light. bob. The instrument is set up over a... - Page 10 HOLD R / L HOLD Use the tubular vial 17 to accurately level If necessary, the instrument can be shifted by loosening the tripod center stud and the instrument. Unlock 13 and turn the sliding the instrument from side to side for instrument so that the tubular vial 17 is OSET OSET...
-
Page 11: Auto Off
direction. Do not rotate the instrument. Recheck leveling and repeat until instruments is level and over the ground 360° ’ ” point at the same time. With practice, this becomes easier. UNIT A Telescope Eyepiece Focus HOLD R / L HOLD R / L •... - Page 12 OSET TILT TILT TILT OSET 30 OFF TILT 90°00’02” DSP 1 65°59’35” 90°00’02” Setting of Tilt Sensor • If the battery symbol blinks, the ’ 10” AUTO OFF 359°59’49” 356°65’55” 359°59’49” 356°65’55” battery is low and needs recharging • V TILT ON: Turn on the tilt sensor ON/OFF or replacing.
- Page 13 TILT TILT NO BEEP 92°26’16” 90°0 OSET 359°59’49” 0°0 Compensation of the Tilt Sensor to Note: When vertical angle is converted TILT to slope, the precision of the slope Vertical Angle reading is two digits after the decimal. • If the instrument is inclined The value of slope is displayed only TILT TILT...
- Page 14 Ground ON/OFF 59’35” 272°36’06” 90°00’02” half the Target distance 59’49” FACE - 2 356°65’55” • Holding the Horizontal Angle. Read the length “ ” of a level rod TILT Ground HOLD R / L HOLD 00’ 10” Press button, the shown between the stadia hairs.
-
Page 15: Checks And Adjustments
8. original position. 3. Check and adjust the optical plummet 11 (DT8-05P & DT8-05LS) Always recheck your adjustments. We recommend that any adjustments, other than those above, be done by a qualified repair technician. -
Page 16: Optical Plummet
Circular Leveling Vial If the circular vial is centered after leveling the plate vial, then no further adjustment is necessary. If not, proceed with the following adjustment. Ground half the A. Using the adjusting pin, provided in Target distance the case, turn the adjusting screws until the bubble is centered in the vial. -
Page 17: Error Codes
ON/OFF Index Error of Vertical Circle ON/OF • Attach the instrument on a tripod and precisely level. R / L HOLD R / L • Aim at any object, point P, in the normal position and R / L HOLD R / L TILT HOLD... -
Page 18: Maintenance And Service
MAINTENANCE AND SERVICE Store and transport the tool only in the model number and serial number of the supplied protective case. instruments. Keep the tool clean at all times. All precision instruments should be cleaned, lubricated, checked and adjusted Do not immerse the tool into water or ONLy at a qualified instrument repair other fluids. -
Page 19: Limited Warranty
THIS LIMITED WARRANTY APPLIES ONLY TO PRODUCTS SOLD WITHIN THE UNITED STATES OF AMERICA, CANADA AND THE COMMONWEALTH OF PUERTO RICO. FOR WARRANTY COVERAGE WITHIN OTHER COUNTRIES, CONTACT YOUR LOCAL SITEPRO DEALER OR IMPORTER. David White is a registered trademark and offered exclusively by SitePro. -19-... - Page 20 © Dave White’s SitePro 7619 S 1150 E Otterbein, IN 47970 Tel. +1 (765) 581 4097 42346D8895 09/15 Printed in China...
Need help?
Do you have a question about the DT8-05P and is the answer not in the manual?
Questions and answers