
Subscribe to Our Youtube Channel
Related Manuals for JLCooper Electronics Nuage Surround Panner


Summary of Contents for JLCooper Electronics Nuage Surround Panner
- Page 1 Nuage Surround Panner For Yamaha & Steinberg Nuage Console User Manual for Windows ...
- Page 2 142 Arena St, El Segundo, CA, 90245, USA Phone: +1 (310) 322-9990 Fax: +1 (310) 335-0110 web: www.jlcooper.com email: info@jlcooper.com Nuage Panner and Eclipse PX are trademarks of JLCooper Electronics. All other brand names are property of their respective owners. Page 2...
-
Page 3: Table Of Contents
Nuage Panner User Manual Ta bl e Of Con ten ts Introduction ..................Configuring the Hardware ..............Installing the software ................. Installing the MIDI Driver ................. Configuring the MIDI Driver ................Configuring the Nuendo Plug-In ..............Using the Nuage Panner in Nuendo .............. -
Page 4: Introduction
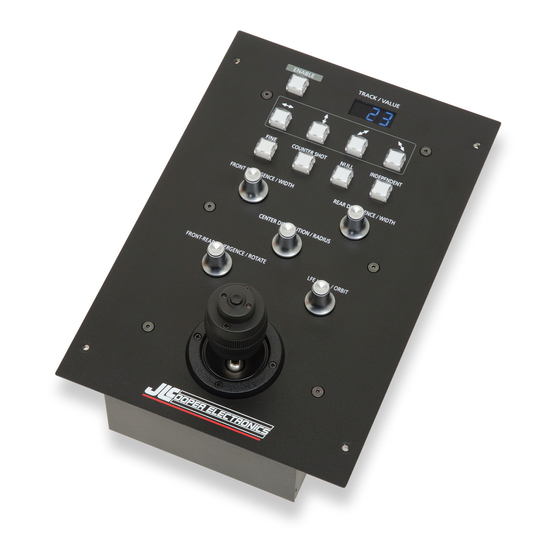
Nuage Panner User Manual Introduction The Nuage Panner and the Eclipse PX are identical functionally. The Nuage Panner’s form factor is intended to fit into a Yamaha/Steinberg Nuage Console System. The labels for its various controls reflect the function of those controls when used with Steinberg Nuendo software. -
Page 5: Configuring The Hardware
Nuage Panner User Manual Configuring the Hardware The unit has an Ethernet Interface that can be configured directly from the front panel of the unit. To configure the Ethernet Interface from the front panel of the unit, do the following: Turn unit off or remove power plug. -
Page 6: Installing The Software
Nuage Panner User Manual Installing the software Installing the MIDI Driver To install the MIDI Driver and Nuendo Plug-In: Launch the installer by double clicking on the appropriate installer. If you are using a 32-bit version of Windows, use EclipsePXNuageSetupx32.exe. If you are using a 64-bit version of Windows, use EclipsePXSetupx64.exe. - Page 7 Nuage Panner User Manual The installer will start installing the MIDI driver. A User Account Control dialog box will appear. If it does, simply click on the Yes button. The Installation Wizard dialog box will appear. Click on the Next > button.
- Page 8 Nuage Panner User Manual The License Agreement dialog box will appear. Select I Agree and click on the Next > button. The Select Installation Folder dialog box will appear. Click on the Next > button. Page 8...
- Page 9 Nuage Panner User Manual The Confirm Installation dialog box will appear. Click on the Next > button. A User Account Control dialog box may appear. Click on the Yes button. Page 9...
- Page 10 Nuage Panner User Manual The installation is complete. Click on the Close button. The MIDI Drivers and Configuration software are now installed. Page 10...
-
Page 11: Configuring The Midi Driver
Nuage Panner User Manual Configuring the MIDI Driver Before the Nuage Panner can be used, the driver needs to be configured. To do that, complete the following steps: 1. Launch the Panner Preferences application. 2. Enter the IP address and TCP port of your panner and verify that the Load at Windows Start option is enabled. - Page 12 Nuage Panner User Manual 4. The Panner Ethernet Adapter icon will appear in the System Tray. It will initially appear red when the software launches. 5. The Panner Ethernet Adapter icon will turn green when the software establishes a connection to the panner. Page 12...
-
Page 13: Configuring The Nuendo Plug-In
Nuage Panner User Manual Configuring the Nuendo Plug-In Before using the Nuage Panner in Nuendo, the Nuage Panner must be added as a device. This is done by the following: 1. Launch Nuendo. 2. Click on Devices from the menu. 3. - Page 14 Nuage Panner User Manual 6. Verify that the MIDI port settings are correct. MIDI Input is set to JLCooper Panner MIDI Out MIDI Output is set to JLCooper Panner MIDI In 7. Click OK. Page 14...
-
Page 15: Using The Nuage Panner In Nuendo
Nuage Panner User Manual Using the Nuage Panner in Nuendo 1. After loading a project, display the MixConsole. This can be done by pressing F3. 2. Select the track you wish to control by clicking the channel strip. Page 15... - Page 16 Nuage Panner User Manual 3. To enable the Nuage Panner press the Enable button on the Nuage Panner. 4. To move the position of the audio track in the surround field, press the button on the joystick and move the Nuage Panner as desired. Page 16...
-
Page 17: Panner Operation In Nuendo
Nuage Panner User Manual Panner Operation in Nuendo The ENABLE Button must be lit for the panner to have an effect on the software. The joystick is used to position the sound source. The button at the top of the joystick is known as the GRAB button. -
Page 18: The Display
Nuage Panner User Manual When the FINE button (S5 on the PX) is held down, the rotary encoders and joystick operate with greater precision. The COUNTER-SHOT button (S6) rotates the sound source by 180°, effectively flipping the entire surround image to the opposite side. When the NULL (S7) button is lit, the sound source always moves relative to its current position, no matter where the joystick happens to be when the GRAB button is pressed. -
Page 19: Jlcooper Limited Warranty
Nuage Panner User Manual JLCooper Limited Warranty JLCooper Electronics ("JLCooper") warrants this product to be free of defects in materials or workmanship for a period of 12 months from the date of purchase. This warranty is non-transferable and the benefits apply only to the original owner. Proof of purchase in the form of an itemized sales receipt is required for warranty coverage.
Need help?
Do you have a question about the Nuage Surround Panner and is the answer not in the manual?
Questions and answers