Table of Contents
Advertisement
Quick Links
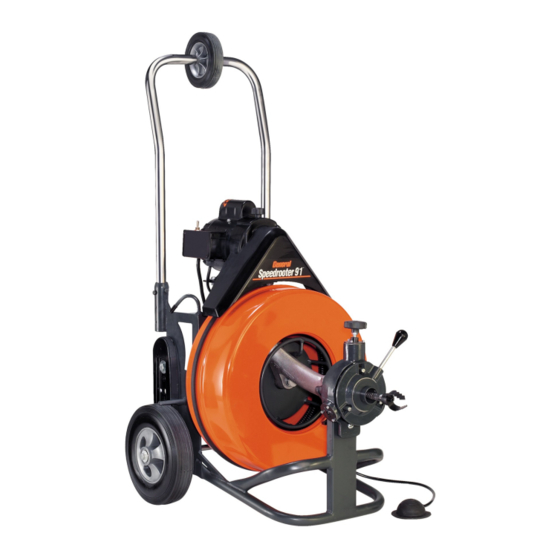
Speedrooter 91
™
Operating Instructions
For 3" through 10" lines
(75mm – 250mm)
Y
our Speedrooter 91 is designed to give
you years of trouble-free, profitable
service. However, no machine is better
than its operator. We therefore suggest
you read these directions through
carefully before using your machine on a
job. This will enable you to operate the
Speedrooter 91 more efficiently and more
profitably. Failure to follow these
instructions may cause personal injury to
operator or damage to equipment.
SAVE THESE INSTRUCTIONS!
Advertisement
Table of Contents

Subscribe to Our Youtube Channel
Related Manuals for General Pipe Cleaners speedrooter 91

Summary of Contents for General Pipe Cleaners speedrooter 91
- Page 1 ™ Operating Instructions For 3" through 10" lines (75mm – 250mm) our Speedrooter 91 is designed to give you years of trouble-free, profitable service. However, no machine is better than its operator. We therefore suggest you read these directions through carefully before using your machine on a job.
-
Page 2: Safety Instructions
Speedrooter 91™ Safety Instructions Work Area Safety 1. Keep your work area clean and well lit. Cluttered benches and dark areas invite WARNING accidents. 2. Do not operate power tools in explosive Machine must be plugged atmospheres, such as in the presence of... -
Page 3: Personal Safety
Speedrooter 91™ 7. Use only three-wire extension cords which Tool Use and Care have three-prong grounding plugs and 1. Use clamp or other practical way to secure three-pole receptacles which accept the and support the workpiece to a stable tool’s plug. Use of other extension cords will platform. -
Page 4: Specific Safety Information
11. Before starting each job, check that the cable in the drum is not broken or kinked, by One person can easily load the Speedrooter 91 pulling the cable out and checking for wear onto a truck. The swept-back handle and loading or breakage. - Page 5 Speedrooter 91™ Operating Instructions Cable Applications (Table 1) Cable Size Pipe Size Typical Applications Set-up 3/4" 4" to 10" Large Drains, Long (Large Drum) Runs, Roots 1. Place machine within approximately two feet of drain opening. Be sure the Speedrooter Guide 5/8"...
-
Page 6: Operation
Speedrooter 91™ Operation in the opposite direction to relieve the twist on the cable. Push any excess cable back into the 1. Before stepping on foot pedal, pull cable from drum and then continue. the drum and slide it into the drain as far as it 7. -
Page 7: Special Operations
Speedrooter 91™ 3. Slide the distributor tube off the shaft and out of Special Operations the drum. (See Figure 2.) IF CABLE GETS CAUGHT IN LINE The motor can be reversed to free the cable if it Figure 2 gets caught in line. (Note: if using Power Cable Feed, putting motor in reverse will cause the feed control lever to operate opposite of normal.) -
Page 8: Maintenance
Speedrooter 91™ 6. Loosen knob on rear drum shaft clamp (S91- 130), then open cap. Note: The cable should lay in the 7. Lift drum clear of machine. drum in a clockwise direction. Maintenance To keep your machine operating smoothly, it is essential that all bearings and distributor tube bushings be lubricated. - Page 9 Speedrooter 91™ TROUBLE SHOOTING GUIDE (Table 3) Problem Probable Cause Solution Cable kinks or Operator forcing the cable. Do not force the cable. Let the cutter do the breaks work. Too much slack between Allow no more than two feet between machine machine and drain.
-
Page 10: Speedrooter 91 Parts List
Small Drum V-Belt (57") S91-421 Distributor Tube Only S91-TB Tool Box S91-422 Bushing S91-GT Guide Tube for Speedrooter 91 S91-423 Retaining Ring Guide Tube Extension S91-424 Thrust Bearing Race S91-DECAL Set of Safety Decals See back cover for Speedrooter 91 Schematic Diagram. - Page 11 Speedrooter 91™ Speedrooter 91 Power Feed Parts List S91-7000 Power Cable Feed Assembly S91-7341 Cover Screws and Washers (3) S91-7101 Feed Body S91-7400 Bottom Roller Assembly S91-7101-A Lifting Spring S91-7410 Bottom Carrier Only S91-7101-B Guide Pins (2) S91-7420 Swing Pin...
- Page 12 Speedrooter 91™ IMPORTANT: When ordering, please give Serial Number of Machine. General Wire Spring Co. 1101 Thompson Avenue McKees Rocks, PA 15136 © General Wire Spring Co. 2003 C-S91-OI-11/03...
Need help?
Do you have a question about the speedrooter 91 and is the answer not in the manual?
Questions and answers
What's the price