
Related Manuals for Amplicomms TCL 300


Summary of Contents for Amplicomms TCL 300
- Page 1 NHANG TCL 300 Bedienungsanleitung Operating Instructions Mode d’emploi Bedieningshandleiding Istruzioni d'uso Instrucciones de uso...
- Page 2 Diese Ausklappseite zeigt Ihnen eine Übersicht über Ihr TCL 300. Please open this page for “At a glance“ guide to your TCL 300. Cette page dépliante vous offre un aperçu de votre TCL 300. Dit uitvouwblad toont u een overzicht van uw TCL 300.
- Page 3 TCL 300...
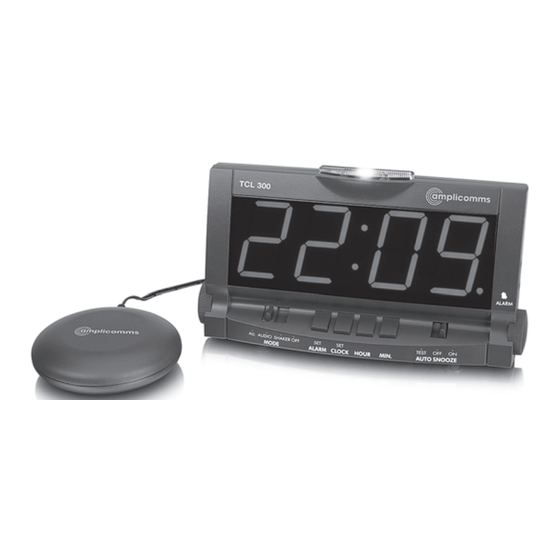
- Page 4 TCL 300 NHANG ALARM STOP-Taste Anzeige „Alarm eingestellt“ Einstellung Wecktonlautstärke Alarmauswahl-Schalter (Weckton + Vibration, Weckton, Vibration, Aus) Einstelltasten für Uhrzeit und Alarm Einstellung Schlummerfunktion Einstellung Wecktonklang Batteriefach (für Pufferbatterie) Einstellung Vibrationsfunktion 10 Anschluss für Vibrationskissen 11 Anschluss für Netzteil Packungsinhalt •...
- Page 5 ETRIEB NEHMEN Wecker anschließen Achtung: Verwenden Sie nur das mitgelieferte Steckernetzteil, da andere Netzteile das Gerät beschädigen können. Versperren Sie den Zugang zum Steckernetzteil nicht durch Möbel oder andere Gegenstände. Achten Sie darauf, dass das Verbindungskabel zum Vibrationskissen unter der Matratze/dem Kopfkissen unsichtbar und unerreichbar verlegt ist, um mögliche Gefahren auszuschließen.
- Page 6 ETRIEB NEHMEN angezeigt, der Vibrationsalarm funktioniert nicht. Es ertönt nur der Weckton. Ist nur Vibration (SHAKER) eingestellt, leuchtet zum Wecken nur die ALARM STOP-Taste. Ist keine Batterie eingesetzt, gehen die Zeit- und Weckein- stellungen bei einem Stromausfall verloren. Bei einem nächtlichen Stromausfall hätte das zur Folge, dass Sie am Morgen nicht zur gewünschten Zeit geweckt werden.
- Page 7 INSTELLUNG EDIENUNG NHANG Einstellen der Zeit 1. Drücken und halten Sie die SET CLOCK-Taste. 2. Stellen Sie mit HOUR die Stunden und mit MIN die Minuten ein. 3. Lassen Sie die SET CLOCK-Taste wieder los. Einstellen der Weckzeit 1. Drücken und halten Sie die SET ALARM-Taste. 2.
- Page 8 INSTELLUNG EDIENUNG oder ALL (Weckton + Vibration) um den Weckmo- dus auszuwählen und den Wecker einzuschalten. Hinweis: In den Stellungen ALL, AUDIO und SHAKER leuchtet die Anzeige „Alarm eingestellt“ im Display. Sie blinkt, wenn der Alarm ausgelöst wird. Einstellen des Vibrationsmodus 1.
- Page 9 INSTELLUNG EDIENUNG NHANG Einstellen der Lautstärke 1. Stellen Sie mit VOL die Wecktonlautstärke ein. Einstellen des Klangs 1. Stellen Sie mit TONE den Wecktonklang ein. Technische Daten / Funktionen Funktionen: Uhr, Wecker Weck-Modi: Weckton, Vibration, Weckton & Vibration Stromversorgung: Steckernetzteil Eingang 100~240 V AC, Ausgang 12 V DC / 800 mA.
- Page 10 NHANG Sicherheitshinweise Lesen Sie diese Bedienungsanleitung sorgfältig durch und bewahren Sie sie gut auf. Gefahren durch Elektrizität • Schützen Sie die Geräte vor Tropf- oder Spritzwas- ser. Stellen Sie keine mit Flüssigkeit gefüllten Gefä- ße, wie z. B. Vasen, auf oder in die nähere Umge- bung der Geräte.
- Page 11 NHANG NHANG - bei Gewitter - bevor Sie das angeschlossene Gerät reinigen - wenn während des Betriebes Störungen auftreten - wenn Sie das Gerät längere Zeit nicht nutzen. Ziehen Sie dabei immer am Netzteil, nicht am Anschlusskabel. • Öffnen bzw. entfernen Sie auf keinen Fall Teile der Gehäuse.
- Page 12 NHANG das Anschlusskabel sichtbare Schäden aufweist, oder wenn ein Gerät heruntergefallen ist. Entsorgung Sie sind gesetzlich zur sachgerechten Entsorgung von Gebrauchsgütern verpflichtet. Das nebenste- hende Symbol auf Ihrem Gerät bedeutet, dass elektrische und elektronische Altgeräte und Bat- terien getrennt vom Hausmüll zu entsorgen sind. Elektrische oder elektronische Geräte entsorgen Sie bei einer Sammelstelle eines geeigneten Ent- sorgungsträgers.
- Page 13 • Reinigen Sie die Gehäuseoberflächen mit einem weichen und fusselfreien Tuch. • Verwenden Sie keine Reinigungsmittel oder Lösungsmittel. Garantie AMPLICOMMS - Geräte werden nach den modernsten Produktionsverfahren hergestellt und geprüft. Ausge- suchte Materialien und hoch entwickelte Technologien sorgen für einwandfreie Funktion und lange Lebens- dauer.
- Page 14 NHANG Material- oder Herstellungsfehler zurückzuführen sind, kostenlos beseitigt. Der Garantieanspruch erlischt bei Eingriffen durch den Käufer oder durch Dritte. Schäden, die durch unsachgemäße Behandlung oder Bedienung, natürliche Abnutzung, durch falsches Aufstellen oder Aufbewahren, durch unsachgemäßen Anschluss oder Installation sowie durch höhere Gewalt oder sonstige äußere Einflüsse entstehen, fallen nicht unter die Garantieleistung.
- Page 15 NHANG Garantiezeit aufweisen, wenden Sie sich bitte unter Vor- lage Ihrer Kaufquittung ausschließlich an das Geschäft, in dem Sie Ihr AMPLICOMMS - Gerät gekauft haben. Alle Gewährleistungsansprüche nach diesen Bestim- mungen sind ausschließlich gegenüber Ihrem Fach- händler geltend zu machen. Nach Ablauf von zwei Jah- ren nach Kauf und Übergabe unserer Produkte können...
- Page 16 Dieses Gerät erfüllt die Anfor- derungen der EU−Richtlinie: 2004/108/EU über die elektromagnetische Verträglich- keit. Die Konformität mit der o. a. Richtlinie wird durch das CE−Zeichen auf dem Gerät bestätigt. Für die komplette Konformitätserklärung nutzen Sie bitte den kostenlosen Download von unserer Website www.amplicomms.com.
- Page 17 TCL 300 NHANG ALARM STOP button Indicator “Alarm set“ Volume setting Alarm mode selection (Buzzer + Shaker, Shaker, Buzzer, Off) Buttons for setting clock / alarm Snooze function setting Alarm tone setting Battery compartment (for back-up battery) Vibration function setting...
- Page 18 ETTING STARTED Installation Attention: Only use the power adapter plug con- tained in the material supplied since other power adapter plugs could damage the product. Ensure access to the power adapter plug is not obstructed by furniture or such. To avoid possible danger from the shaker cord, ensure that the cord is pulled back under the mattress/pillow, and is not visible or reachable.
- Page 19 ETTING STARTED If no battery is installed and a power cut occurs, then the clock will lose its time and alarm setting. This is important as if there is a power cut in the night then the alarm will not be set correctly to wake you up in the morning at the required time.
-
Page 20: Setting The Time
ETTING PERATION Setting the time 1. Press and hold down the SET CLOCK button. 2. Press HOUR to set the hours and press MIN to set the minutes. 3. Release the SET CLOCK button. Setting the alarm time 1. Press and hold down the SET ALARM button. 2. - Page 21 ETTING PERATION NHANG function on. Note: When set to ALL, AUDIO and SHAKER the indicator “Alarm set“ is illuminated. It flashes, when the alarm goes off. Setting the vibration mode 1. Select the mode with the VIBRATION switch: - PULSE: with interruption - CONTINUE: continuous.
-
Page 22: Specifications
ETTING PERATION Setting the alarm tone 1. Adjust the alarm tone with TONE. Specifications Functions: Clock, Alarm clock Alarm modes: Buzzer, Vibration, Buzzer & Vibration Operating voltage: Power supply Input 100~240 V AC, Output 12 V DC / 800 mA. Back-up battery (optional): 9 V battery, PP3 / MN1604, change once a year Helpline UK 0844 800 6503... -
Page 23: Safety Information
PPENDIX NHANG Safety Information Please read this operating instruction manual tho- roughly. Hazards due to electricity • Protect the devices from dripping or spraying water. Do not place any containers with liquid, such as vases, on or near the devices. The container may tip over and the liquid may limit the electrical safety. - Page 24 PPENDIX - if faults arise during operation - if you do not use the device for a longer period of time. Always unplug the power supply, not the connection cable. • Do not open or remove parts of the casing under any circumstances.
- Page 25 PPENDIX NHANG Disposal You are obliged to dispose of consumable goods properly in accordance with the appli- cable legal regulations. The symbol on this product indicates that electrical and electro - nic apparatus must be disposed of separately from domestic waste at suitable collection points provided by the public waste authori- ties.
- Page 26 • Please clean your equipment’s surfaces with a soft, fluff-free cloth. • Never use cleaning agents or solvents. Guarantee AMPLICOMMS equipment is produced and tested according to the latest production methods. The implementation of carefully chosen materials and highly developed technologies ensure trouble free functioning and a long service life.
- Page 27 If your equipment shows signs of defect during the period of guarantee, please return to the sales outlet in which you purchased the AMPLICOMMS equip- ment together with the purchase receipt. All rights to Helpline UK 0844 800 6503...
- Page 28 PPENDIX claims under the terms of guarantee in accordance with this agreement must be asserted exclusively with regard to your sales outlet. Two years after the purchase of our products, claims under the terms of guarantee can no longer be asserted.
-
Page 29: Declaration Of Conformity
CE symbol on the device. To view the complete Declaration of Conformity, please refer to the free download available on our www.amplicomms.com website Helpline UK 0844 800 6503 (See chapter “Helpline“ for costs and hours of operation) - Page 30 TCL 300 Touche ALARM STOP Affichage « Alarme réglée » Réglage du volume de la sonnerie du réveil Bouton de sélection de l’alarme (sonnerie du réveil+ vibration, vibration, sonnerie du réveil, arrêt) Touches de réglage de l’heure et de l’alarme De la fonction d’arrêt avec répétition de la sonnerie...
- Page 31 ISE EN SERVICE NHANG Mise en service Attention : utilisez seulement le bloc d'alimentati- on livré, car d’autres blocs d'alimentation peu- vent endommager l'appareil. Ne bloquez pas l’ac- cès au bloc d’alimentation par des meubles ou d’autres objets. Veillez à ce que le câble de connexion du coussin vibrant soit posé, invisible et inaccessible, sous le matelas/l'oreiller pour exclure de possibles dan- gers.
- Page 32 ISE EN SERVICE Pendant une panne de courant, l’heure n’est pas affi- chée, le vibreur ne fonctionne pas. Seule la sonnerie du réveil retentit. Seule la touche ALARM STOP s’allume pour réveiller si seulement la vibration (SHAKER) est réglée. Si aucune batterie n’est insérée, les réglages de l’heure et du réveil sont perdus en cas de panne de courant.
- Page 33 ÉGLAGES PÉRATION Réglage de l’heure 1. Appuyez sur la touche SET CLOCK et maintenez-la appuyée. 2. Réglez les heures avec HOUR et les minutes avec MIN. 3. Relâchez la touche SET CLOCK. Réglage de l’heure du réveil 1. Appuyez sur la touche SET ALARM et maintenez-la appuyée.
- Page 34 ÉGLAGES PÉRATION 2. Poussez le bouton de sélection de l’alarme dans la position AUDIO (sonnerie du réveil), SHAKER (Vibrati- on) ou ALL (sonnerie du réveil + vibration) pour sélecti- onner le mode de réveil et activer le réveil. Remarque : l’affichage « Alarme réglée » s’allume sur l’écran dans les réglages ALL, AUDIO et SHAKER.
- Page 35 ÉGLAGES PÉRATION NHANG - ON : après une pression sur la touche ALARM STOP, le signal d’alarme est répété après 9 minu- tes (durée totale max. : env. 2 heures). Réglage du volume 1. Réglez le volume de la sonnerie du réveil avec VOL. Réglage de la sonorité...
- Page 36 NNEXE Consignes de sécurité Lisez très attentivement ce mode d’emploi et conser- vez-le soigneusement. Risques liés à l’électricité • Protégez les appareils contre les gouttes et les pro- jections d’eau. Ne placez aucun récipient contenant du liquide, tel qu’un vase, sur les appareils ou à leur proximité.
- Page 37 NHANG NNEXE - en cas d'orage - avant de nettoyer l’appareil raccordé - en cas de défaillances pendant le fonctionnement - si vous n’utilisez pas l’appareil pendant un temps prolongé. Ce faisant, tirez toujours sur le bloc d'alimentation et pas sur le câble de raccordement. •...
- Page 38 NNEXE d'alimentation ne sont pas endommagés. Ne mettez aucun appareil en service quand l’un de ses compo- sants, le bloc d'alimentation ou le câble de raccorde- ment, présente des dommages visibles ou quand un appareil est tombé. Élimination La loi vous oblige à éliminer de manière appro- priée les biens de consommation.
- Page 39 • N’utilisez aucun produit nettoyant ou solution de nettoyage. Garantie Les appareils AMPLICOMMS sont fabriqués et testés selon les procédés de production les plus modernes. Les matériaux choisis et la haute technologie assurent un fonctionnement parfait et une longue durée de vie.
- Page 40 NNEXE gratuitement. La garantie expire en cas d’interventions de l’acheteur ou d’un tiers. Les dommages engendrés par une manipulation ou une utilisation inadéquate, par un mauvais emplacement ou rangement, par un raccor- dement ou une installation inadéquate ainsi qu’en cas de force majeure ou d’autres influences extérieures ne sont pas inclus dans la prestation de garantie.
- Page 41 NHANG NNEXE acheté votre appareil AMPLICOMMS en présentant votre bon d’achat. Tous les droits de garantie basés sur ces dispositions ne peuvent être revendiqués qu’auprès de votre revendeur. A l’échéance des deux ans après l’achat et le transfert de nos produits, les législations en matière de garantie ne sont plus applicables.
- Page 42 2004/108/EC relative à la compatibilité électromagné- tique. La conformité avec la directive mentionnée ci−dessus est confirmée sur l’appareil par le symbole CE. Pour obtenir la déclaration intégrale de conformité, veuillez la télécharger gratuitement sur notre site Inter- www.amplicomms.com...
- Page 43 TCL 300 NHANG ALARM STOP-knop Weergave „Alarm ingeschakeld“ Volumeregeling audiosignaal Schakelaar alarmoptie (audiosignaal + trilling, trilling, audiosignaal, uit) Instelknop voor tijd en wekker Instelling sluimerfunctie Instelling klank audiosignaal Batterijvak (bufferbatterij) Instelling trilfunctie 10 Aansluiting voor trilkussen 11 Ingang voor adapter Verpakkingsinhoud •...
- Page 44 N GEBRUIK NEMEN In gebruik nemen Opgelet: Gebruik enkel de meegeleverde adapter, want andere adapters kunnen het apparaat beschadigen. De toegang tot de adapter mag niet worden belemmerd door meubels of andere voorwerpen. Zorg ervoor dat u de aansluitkabel van het tril- kussen onder uw matras/hoofdkussen legt zodat het niet zichtbaar of bereikbaar is, om mogelijke gevaren te voorkomen.
- Page 45 N GEBRUIK NEMEN Tijdens een stroomuitval wordt de tijd niet aangegeven en werkt het trilalarm niet. Alleen het audiosignaal werkt dan. Als u de wekker op alleen trilling (SHAKER) hebt ingesteld, wordt alleen de ALARM STOP-knop verlicht. Als u geen batterij hebt gebruikt, gaan bij een stroomuit- val de instellingen van de tijd en de wekker verloren.
- Page 46 NSTELLING EDIENING De tijd instellen 1. Hou de knop SET CLOCK ingedrukt. 2. Stel met de knop HOUR het uur en met de knop MIN de minuten in. 3. Laat de knop SET CLOCK terug los. De wektijd instellen 1. Hou de knop SET ALARM ingedrukt. 2.
- Page 47 NSTELLING EDIENING NHANG (audiosignaal + trilling) om de wekmodus te kiezen en de wekker in te schakelen. Tip: in de standen ALL, AUDIO en SHAKER brandt in het scherm de indicator „Alarm ingeschakeld“. De indicator knippert wanneer het alarm geactiveerd wordt.
- Page 48 NSTELLING EDIENING Het volume instellen 1. Stel met de knop VOL het volume van de wektoon De klank instellen 1. Stel met de knop TONE de klank van het audiosig- naal in. Technische gegevens / Functies Functies: tijd, wekker Wekmodus: audiosignaal, trilling, audiosignaal + trilling Stroomvoorziening: Adapteringang 100-240 V AC, Aus- gang 12 V DC / 800 mA.
- Page 49 NHANG IJLAGE Veiligheidsaanwijzingen Lees deze handleiding zorgvuldig door en bewaar hem goed. Risico's i.v.m. elektriciteit • Bescherm het apparaat tegen druppels en spatwater. Zet geen met vloeistof gevulde reservoirs, bijvoor- beeld vazen, op of nabij het apparaat. Het reservoir kan omvallen en de vloeistof kan de elektrische vei- ligheid aantasten.
- Page 50 IJLAGE - voordat u het aangesloten apparaat reinigt; - wanneer een storing optreedt; - wanneer u het apparaat langere tijd niet gaat gebruiken. Trek daarbij altijd aan de adapter zelf, niet aan de aansluitkabel. • Open de behuizing nooit en haal e nooit onderdelen uit.
- Page 51 NHANG IJLAGE zichtbare schade vertoont of wanneer het apparaat gevallen is. Afvalverwijdering U bent wettelijk verplicht consumentengoede- ren op geschikte wijze af te voeren. Het sym- bool hiernaast, dat zich ook op de telefoon bevindt, betekent dat elektrische en elektroni- sche apparaten en batterijen gescheiden van het huisvuil moeten worden afgevoerd.
- Page 52 • Reinig de behuizing met een zachte en pluisvrije doek. • Gebruik geen reinigingsmiddelen of oplossingsmid- delen. Garantie AMPLICOMMS-apparaten worden geproduceerd en getest met de modernste productieprocessen. Nauw- keurig geselecteerde materialen en geavanceerde technologieën zorgen voor een probleemloze werking en een lange levensduur.
- Page 53 Aanspraken op schadevergoeding zijn uit- gesloten, in zoverre ze niet gebaseerd zijn op opzet of grote nalatigheid vanwege de fabrikant. Indien uw apparaat toch een defect vertoont binnen de garantieperiode, neemt u uitsluitend contact op met de handelszaak waar u het AMPLICOMMS-appa-...
- Page 54 Servicehotline In geval van technische problemen kunt u contact opnemen met onze service-hotline. Het telefoonnum- mer daarvan vind u op onze website www.amplicomms.com Bij garantieaanspraken neemt u contact op met uw handelaar. De garantieperiode bedraagt 2 jaar.
- Page 55 NHANG IJLAGE Conformiteitsverklaring Dit apparaat voldoet aan de Europese richtlijn: 2004/108/EG betreffende elektromagnetische compatibi- liteit. De conformiteit met bovengenaamde richtlijn wordt bevestigd door het CE-kenteken op het apparaat. De volledige conformiteitsverklaring kunt u gratis downloaden van onze website www.amplicomms.com...
- Page 56 TCL 300 Tasto ALARM STOP Indicazione “allarme impostato” Impostazione volume suoneria sveglia Interruttore di selezione allarme (Suoneria + vibrazione, vibrazione, suoneria, off) Tasti di impostazione per ora e allarme Impostazione funzione snooze Impostazione tono suoneria Scomparto batterie (per batteria tampone)
- Page 57 ETTERE IN FUNZIONE NHANG Mettere in funzione Attenzione: Utilizzi solo l'adattatore fornito visto che altri adattatori potrebbero danneggiare l’ap- parecchio. Non deve bloccare l'accesso all'adatta- tore per mezzo di mobili o altri oggetti. Accertarsi che il cavo di collegamento al cuscino a vibrazione sia nascosto e irraggiungibile sotto al materasso/guanciale, onde escludere possibili pericoli.
- Page 58 ETTERE IN FUNZIONE ria. In caso venga impostata solo la vibrazione (SHAKER), si illumina solo il tasto ALARM STOP per la sveglia. Se non è stata inserita alcun batteria, le impostazioni di ora e sveglia vanno perse in caso di caduta di corrente. In caso di caduta di corrente notturna, al mattino non potrà, di conseguenza, essere svegliato(a) all’ora desiderata.
-
Page 59: Impostazione Della Sveglia
MPOSTAZIONE MPIEGO Impostazione dell’ora 1. Prema e tenga premuto il tasto SET CLOCK. 2. Imposti con HOUR le ore e con MIN i minuti. 3. Rilasci il tasto SET CLOCK. Impostazione della sveglia 1. Prema e tenga premuto il tasto SET ALARM. 2. - Page 60 MPOSTAZIONE MPIEGO Avvertenza: nelle posizioni ALL, AUDIO e SHAKER sul display si illumina l’indicazione “Allar- me impostato”. Lampeggia se scatta l’allarme. Impostazione della vibrazione 1. Selezioni con l’interruttore VIBRATION - PULSE: vibrazione con interruzione - CONTINUE: vibrazione continua. Impostazione della funzione snooze 1.
- Page 61 MPOSTAZIONE MPIEGO NHANG Impostazione del suono 1. Imposti la suoneria con TONE. Dati tecnici / Funzioni Funzioni: orologio, sveglia Modalità di sveglia: suoneria, vibrazione, suoneria e vibrazione Alimentazione: alimentatore di rete ingresso 100~240 V CA, uscita 12 V CC / 800 mA. Batteria tampone (opzionale): block da 9 V, da sostituire annualmente...
- Page 62 PPENDICE Avvisi di sicurezza Legga con attenzione queste istruzioni d’uso e Le con- servi per bene. Pericoli dovuti all'elettricità • Proteggere gli apparecchi da gocce o spruzzi d’acqua. Non mettere mai recipienti colmi di liquidi, come p.es. vasi, sugli apparecchi o nelle loro vicinanze. Il recipiente può...
- Page 63 PPENDICE NHANG - qualora sopravvengano delle anomalie durante il funzionamento - se l’apparecchio non viene utilizzato per un lungo lasso di tempo. Estrarre sempre afferrando l’alimentatore, non il cavo di collegamento. • Non aprire o rimuovere in alcun caso parti degli invo- lucri.
- Page 64 PPENDICE mento alcun apparecchio qualora uno dei suoi compo- nenti, l’alimentatore o il cavo di collegamento presenti- no danni visibili o qualora un apparecchio sia caduto. Smaltimento Vige l’obbligo legale di smaltire correttamente i prodotti di consumo. Il simbolo qui a lato ripro- dotto sul Suo apparecchio indica che le appa- recchiature elettriche ed elettroniche e le batterie devono essere smaltite separatamente dai rifiuti...
- Page 65 • Non utilizzi detergenti o solventi. Garanzia AMPLICOMMS – Gli apparecchi vengono prodotti e verificati secondo modernissimi processi di produzione. I materiali ricercati e tecnologie altamente sviluppate servono a garantire una funzione perfetta e un ciclo di vita lungo.
- Page 66 Se il Suo apparecchio dovesse comunque evidenziare un difetto all’interno del periodo di garanzia, la preghia- mo di rivolgersi esclusivamente al negozio in cui ha acquistato il Suo apparecchio di AMPLICOMMS,...
- Page 67 Service Hotline In caso di problemi tecnici rivolgersi alla nostra Service Hotline. Il numero telefonico è reperibile sul nostro sito Internet www.amplicomms.com In caso di reclami entro il periodo di garanzia, rivolgersi al rivenditore autorizzato. Il periodo di garanzia ricopre...
- Page 68 2004/108/CE relativa alla sostenibilità elettromagnetica. La conformità con la direttiva sopra menzionata viene confermata dal simbolo CE sull‘apparecchio. Per scaricare il testo completo della dichiarazione di conformità, La preghiamo di far uso del download gra- www.amplicomms.com tuito dal nostro sito...
- Page 69 TCL 300 NHANG Tecla de ALARM STOP Indicador "Alarma configurada" Ajuste volumen tono de despertador Interruptor selección de alarma (Tono de desperta- dor + vibración, vibración, tono de despertador, apagado) Teclas de ajuste para hora y alarma Ajuste función de repetición de alarma Ajuste sonido del tono de despertador Compartimiento batería (batería de respaldo)
- Page 70 NTES DEL USO Antes del uso Precaución: Use sólo la fuente de alimentación incluida, ya que otras fuentes de alimentación pueden dañar el aparato. No bloquee el acceso a la fuente de alimentación por muebles u otros objetos. Asegúrese de conectar el cable conexión al vibra- dor de almohada de manera que pase por debajo del colchón / almohada y de que no sea visible o accesible para evitar posibles peligros.
- Page 71 NTES DEL USO vibrador de almohada no vibra. Únicamente sonará el tono del despertador. Si tan sólo se ha activado la vibra- ción (SHAKER), únicamente se encenderá la tecla de ALARM STOP. Si no se está utilizando ninguna batería y tiene lugar un corte de corriente se perderá...
- Page 72 ARÁMETROS UNCIONAMIENTO Ajuste de la hora 1. Mantenga pulsada la tecla SET CLOCK. 2. Utilice HOUR para programar las hora y MIN para los minutos. 3. Suelte la tecla SET CLOCK. Ajuste de la hora del despertador 1. Mantenga pulsada la tecla SET ALARM. 2.
- Page 73 ARÁMETROS UNCIONAMIENTO NHANG (vibración) o ALL (tono de despertador + vibración) para seleccionar y activar el modo del despertador. Nota: En las posiciones ALL, AUDIO y SHAKER se enciende en la pantalla el mensaje "alarma progra- mada". El mensaje parpadea cuando se activa la alarma.
- Page 74 ARÁMETROS UNCIONAMIENTO (duración máxima total de unas 2 horas). Ajuste del volumen 1. Use la tecla VOL para configurar el volumen de tono del despertador Ajuste del tono 1. Use la tecla TONE para configurar el tono del des- pertador Especificaciones Funciones: Reloj, despertador Modos de alarma: Tono de despertador, vibración, tono...
- Page 75 PÉNDICE NHANG Notas de seguridad Asegúrese de leer esta guia con atención y guárdela por si la necesita más adelante. Riesgos eléctricos • Proteja el aparato de goteos o salpicaduras. No colo- que objetos que contengan líquidos, como jarrones, encima o al lado del aparato. El recipiente podría vol- carse y afectar la seguridad eléctrica.
- Page 76 PÉNDICE - antes de limpiar el dispositivo conectado. - si se producen averías durante el funcionamiento. - si no ha utilizado el dispositivo durante mucho tiempo. Siempre tire de la fuente de alimentación y no del cable. • No abra ni quite ninguna parte de la carcasa. Dentro de la carcasa hay piezas bajo tensión, cuyo contacto puede causar una descarga eléctrica.
- Page 77 PÉNDICE NHANG Eliminación Si quiere deshacerse del aparato, llévelo a los puntos de recogida autorizados por sus autori- dades locales. De acuerdo con la Ley de apara- tos eléctricos y electrónicos, los dueños de los aparatos están obligados por ley a deshacerse de los viejos equipos eléctricos y electrónicos en una recogida selectiva de residuos.
- Page 78 • No utilice detergentes o disolventes Garantía Los dispositivos AMPLICOMMS son fabricados y pro- bados de acuerdo con los últimos métodos de produc- ción. Los materiales seleccionados y el uso de tecnolo- gías avanzadas garantizan un funcionamiento sin pro- blemas y de larga vida.
- Page 79 Si dentro del periodo de garantía el dispositivo sigue mostrando defectos, póngase en contacto con su reci- bo de compra únicamente en la tienda donde compró su dispositivo AMPLICOMMS. Todas las reclamaciones de garantía conforme a estas disposiciones sólo ten-...
- Page 80 En caso de que surjan problemas técnicos, por favor póngase en contacto con nuestro centro de atención. Encontrará el número de teléfono en nuestra página web www.amplicomms.com Para reparación y las reclamaciones de garantía pónga- se en contacto con su distribuidor. El plazo de garantía...
- Page 81 Directiva 2004/108/CE sobre compatibilidad electromag- nética. La conformidad con la directiva mencionada anteriormente se confirma mediante el símbolo CE que aparece en el dispositivo. Para obtener la declaración de conformidad completa utilice por favor la descarga gratuita de nuestro sitio web www.amplicomms.com...
- Page 82 4 250711 992040 Audioline GmbH D-41460 Neuss 01/2014 – Ausgabe 1.0...
Need help?
Do you have a question about the TCL 300 and is the answer not in the manual?
Questions and answers