Table of Contents
Advertisement
Advertisement
Table of Contents

Related Manuals for ausdom AD282


Summary of Contents for ausdom AD282
- Page 1 HD Car DVR Camcorder Instruction Manual AD 282...
-
Page 2: Table Of Contents
CONTENTS INTRODUCTION PACKAGE CONTENTS FEATURES SAFETY PRECAUTIONS APPEARANCE FUNCTION BUTTONS MOUNTING THE UNIT INSERTING THE MEMORY CARD CONNECTING TO POWER POWER THE UNIT ON AND OFF POWER INDICATION LED INDICATORS MENU CONFIGURATIONS VIDEO RECORDING VIEWING ON TV SPECIFICATIONS EN 1... -
Page 3: Introduction
DVR Camcorder. Please read it carefully before using the DVR Camcorder, and keep it available for future reference. Package Contents - AD282 DVR Camcorder Recorder *1 - Car Charger *1 - Mount Bracket *1 - Power/Transmission Cable *1... -
Page 4: Safety Precautions
- Image resolution up to 16M - Warning before the camera will auto power off. Will auto-save videos when the power is low (before auto power off). Battery recharge reminder. - Auto power on and video recording when auto engine started - Time-lapse power off after disconnecting with car power - Instant mute function - Video restore function if damaged... -
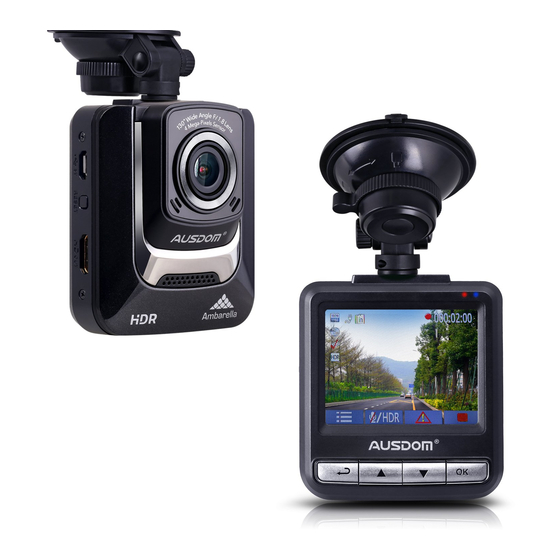
Page 5: Appearance
Appearance 1. Menu/Return 6. Micro SD Slot 2. Playback/UP/Mute 7. Fixed sucker socket position 3. Snap/Down/Lock 8. USB Connector 4. Recording/OK 9. Reset Button 5. Power On/Off 10. HD out Function Buttons Mode Normal Enter/Exit Enter Saved Video Shooting Recording Settings Recording Lock... -
Page 6: Inserting The Memory Card
Windshield Mount Bracket Car DVR Recorder Picture 1 Picture 2 Note: 1.Dirty or moist glass will prevent the mounting bracket from firmly mounting onto the windshield. 2.Insert the mounting bracket into the mount socket located on the top of DVR Camcorder Recorder and slide sideways until the mounting bracket is mounted on the DVR Camcorder Recorder firmly. -
Page 7: Connecting To Power
Memory Card Picture 5 Picture 6 2.Press button to enter menu configurations, press the button to select format item and press button to start formatting the memory card. (Refer to Picture 6) Note: -Make sure the memory card has been formatted before the initial using. -Do not remove the memory card during recording and firmware updating. -
Page 8: Power The Unit On And Off
5.When the car engine is off, the unit will keep on recording for 15 seconds, and then automatically power off after saving the recordings. Note: -The unit can be recharged by connecting to the car’s lighter socket, PC or USB power supplier with the supplied cable. When the unit is connected to the PC for charging, please power the unit off to avoid any potential damage caused by high circuit. -
Page 9: Led Indicators
Note: - Whether the unit is in the power on or power off status that will not affect the charging. - When the battery is running out of power (low power status), the unit will sound an alert tone and then power itself off immediately. LED Indicators The unit provides you the LED Indicators located on the right top corner of the unit that specifying the unit current status. - Page 10 video recordings. For instance, if you choose “3 minutes” as loop recording time, the video recording will be saved onto a micro SD card as a 3 minutes’ video. When the storage of memory card is full, the oldest files will be overwritten automatically.
- Page 11 When the car is detected vibration and collision, the built-in G-Sensor feature will automatically enter the emergency recording mode to lock the recorded images. A lock sign will appear on the right top corner of the screen. Real-time locked files will not be overwritten by Loop Recording.
- Page 12 you complete the setting if no operating submitted. Values: Off/1 minute/3 minutes/5 minutes Backlight Off Setting You can set the Backlight Off if you don’t want the screen stay on all the way, once you complete the setting, the screen will power off automatically.
-
Page 13: Video Recording
TF Card doesn't support the pluggable function, it will power off automatically when pull out SD card, then manually to power on the unit. Driving time warning Values: off/1Hour/2Hours/3Hours/4Hours Voice prompt:Long time driving is dangerous,please have a rest at service zone. Format Press OK button to Format the memory card. -
Page 14: Viewing On Tv
Note: - In the recording mode, you can press button to enable /disable the microphone function. - In the recording mode, you can press and hold button for 5 seconds to enable/disable HDR function. The HDR function avoid the video recordings being overexposed or underexposed. Recycle Record Saving Locked File... -
Page 15: Specifications
HD Out cable Picture 11 Specifications Item Description Display 2.4 inch TFT LCD monitor Lens F/1.8, 130°wide angle - 2560*1080 30P 21:9 - 2304*1296 30P 16:9 - 1920*1080 45P 16:9 Resolution - 1920*1080 30P 16:9 - HDR 1920*1080P 30P 16:9 - 1280*720 60P 16:9 - 1280*720 30P 16:9 Video... - Page 16 For more information, please visit our official website www.ausdom.com Your valuable comments and suggestions on improving AUSDOM products are welcomed!
Need help?
Do you have a question about the AD282 and is the answer not in the manual?
Questions and answers