Table of Contents
Advertisement
Quick Links
Advertisement
Table of Contents

Subscribe to Our Youtube Channel
Related Manuals for Planet NVR-915


Summary of Contents for Planet NVR-915
- Page 1 9-Channel Network Video Recorder NVR-915 9-Channel Network Video Recorder NVR-915...
- Page 2 Further, PLANET reserves the right to revise this publication and to make changes from time to time in the contents hereof without obligation to notify any person of such revision or changes.
- Page 3 DC-plug for the device if this device is not intended to be active. Revision User’s Manual of PLANET 9-ch Network Video Recorder Model: NVR-915 Rev: 1.0 (Jul, 2014) Part No. EM-NVR-915_v1.0...
-
Page 4: Table Of Contents
9-Channel Network Video Recorder NVR-915 Table of Contents Chapter 1. Product Description..............6 1.1 Product Features ................6 1.2 System Requirements................ 7 1.3 Packet Contents ................7 1.4 Specifications..................7 1.5 Physical Specifications ..............10 Chapter 2. Hardware Installation..............12 2.1 Accessories Check ................12... - Page 5 9-Channel Network Video Recorder NVR-915 6.5. Samba Server..................40 Chapter 7. Event Setting................41 7.1 Add a New Event ................41 7.2 Modify Existing Event Schedule or Output Action......42 7.3 Delete Existing Event Schedule or Output Action ......43 7.4 Event Action Type................43 Chapter 8.
-
Page 6: Chapter 1. Product Description
The NVR also helps the administrators to monitor the surveillance system more efficiently by providing multi-monitors. The NVR-915 not only supports PLANET IP cameras but also is compatible with most of major IP camera brands with ONVIF in the market. Furthermore, the NVR-915 can automatically search and find the available cameras in the network and provide smart setup wizard program, so it greatly reduces users’... -
Page 7: System Requirements
9-Channel Network Video Recorder NVR-915 Supports PPPoE / DHCP / Static network connection Supports low bit-rate connection for remote access Easy Installation & Management ONVIF compliant for interoperability Supports multiple languages Automatically discovered by management software Web-based and management utility for easy configuration... - Page 8 9-Channel Network Video Recorder NVR-915 Video Interface VGA / HDMI video interface 1 x Mic-in (phone jack 3.5mm), 1 x Audio-out (phone jack Audio Interface 3.5mm) Storage Device 2 x 3.5” SATA III hard disk connectors, 1 x e-SATA connector...
- Page 9 9-Channel Network Video Recorder NVR-915 Network and Configuration Network Service Fix IP / DHCP / PPPOE / DIPS Report / UPNP / DDNS Notification SMTP / HTTP / FTP / TCP Triggers and Event Event type Motion Alarm...
-
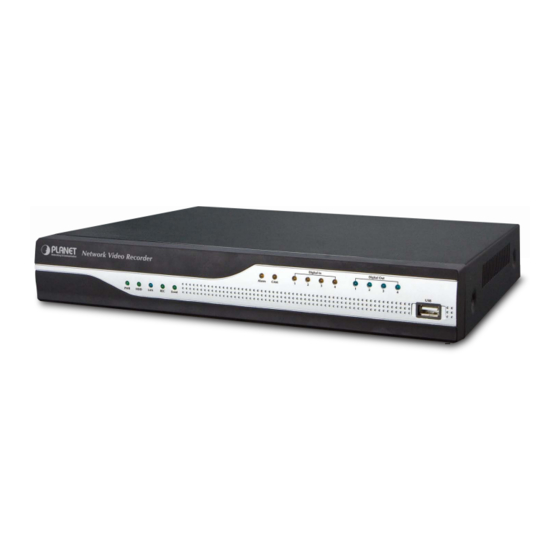
Page 10: Physical Specifications
9-Channel Network Video Recorder NVR-915 1.5 Physical Specifications Front Panel Alarm/Camera Status LEDs DI/DO Status LEDs Network Video Recorder Digital In Digital Out Alarm Event PWR/HDD/LAN/REC/Event Status LEDs LEDs Color Description Green LED on when system is ready... - Page 11 9-Channel Network Video Recorder NVR-915 10/100/1000Mbps network. DI x 4 / DO x 4 Audio Audio out / Mic in ...
-
Page 12: Chapter 2. Hardware Installation
9-Channel Network Video Recorder NVR-915 Chapter 2. Hardware Installation 2.1 Accessories Check 2.2 Installation 1. Remove all screws on the box. 2. Lift up and remove the cover. ... - Page 13 9-Channel Network Video Recorder NVR-915 3. Assemble the hard disk cradles with the silver screws. 4. Install the hard disks in the case with the black screws. ...
- Page 14 9-Channel Network Video Recorder NVR-915 5. Connect the SATA data cable and SATA power cable between hard disk and main board. 6. Put the cover back. 7. Assemble all the screws back to the box. ...
-
Page 15: Chapter 3. Connecting To The Nvr
If the NVR is placed in a corporate network or a local area network where a DHCP server is already presented, please install the “PLANET IP Wizard II” utility from the bundled CD disk. To begin, launch the “PLANET IP Wizard II” utility from the CD and proceed with the installation. - Page 16 9-Channel Network Video Recorder NVR-915 Please click “Next” to continue. Please click “Install” to start the installation. ...
- Page 17 Once the installation is completed, please click “Finish”. Please go to Start => Programs => PLANET IP Wizard II => PLANET IP Wizard II to run the search tool. Then you will see the utility start searching the network.
-
Page 18: Access Nvr With Its Default Ip Address
9-Channel Network Video Recorder NVR-915 You may change NVR’s IP address by clicking on the button highlighted below. You will be prompted for the NVR’s login information before proceeding to change device’s IP address. Enter 3.2 Access NVR with its default IP address The NVR comes with a pre-configured static IP address “192.168.0.20”. - Page 19 9-Channel Network Video Recorder NVR-915 You should be prompted for the user name and password. Enter its default username “admin” and password “admin” and then click” OK” to enter the system. ...
-
Page 20: Chapter 4. System
9-Channel Network Video Recorder NVR-915 Chapter 4. System 4.1 Main Console This is the main control panel of the system providing live stream preview, system setup, two-way audio, playback, volume control, snapshot, start or stop monitoring, and PTZ controls. -
Page 21: Sub-Screen Functions
9-Channel Network Video Recorder NVR-915 Switch to Full screen, and click mouse right button to cancel Full Screen. Logout / firmware version display 4.4 Sub-screen Functions Sub-screen window supported digital zoom; operating steps are as follows: 1. Click on preview image for switch current focus channel. - Page 22 9-Channel Network Video Recorder NVR-915 Click it to make camera return to home position PTZ Control Home Move the thumb to control speed Select a tour setting from combo box and click “go” button to start tour, click “Stop” button to stop tour...
-
Page 23: Chapter 5. System Setting
9-Channel Network Video Recorder NVR-915 Chapter 5. System Setting Click setup button and select “System Setting” from pop-up menu to approach system setting dialog. 5.1 Camera Setup 5.1.1 Audio Setting Click the “Auto Setting” button for adding cameras to system automatically, and maximum number of cameras depends on NVR’s model. -
Page 24: Template Setting
9-Channel Network Video Recorder NVR-915 Auto setting could insert Intranet’s cameras even these cameras are located behind several switch hubs. Besides, you could directly insert cameras on NVR’s switch hub and then click “ Auto Setting “ button to add them to system. Through “ Auto Setting “ function , you do not need to key-in any network IP address or sub-mask parameter. -
Page 25: Camera List
9-Channel Network Video Recorder NVR-915 5.1.3 Camera List List all inserted IP camera model names and IP addresses. It is able to display detailed information and live streaming video by clicking the row of camera. Check the box to make the camera available for video streaming; otherwise, the camera will be disabled if the check box is empty. -
Page 26: Parameter Setting
9-Channel Network Video Recorder NVR-915 Vendor: You may select camera vendor or use ONVIF protocol for camera connection. Detect: Check camera available and receive camera model name. Camera Name: Key-in camera name. IP Address: Key-in camera’s IP address. -
Page 27: Search Camera
9-Channel Network Video Recorder NVR-915 Delete Camera: 1. Select a camera from installed camera list. 2. Click “Delete” button to remove selected camera from list. Update Camera setting: 1. Select a camera from installed camera list. 2. Modify camera’s setting at each setting fields. - Page 28 9-Channel Network Video Recorder NVR-915 The step to configure recording schedule Select a camera: Select a camera for schedule configuration Select a weekday: Select a weekday bar; system will list time periods with this weekday. Add / Configure: Select the time period and type of recording.
-
Page 29: Network Setting
9-Channel Network Video Recorder NVR-915 5.3 Network Setting 5.3.1 Network DHCP Setting: Check the “Obtain IP address automatically (DHCP)” to get IP address from DHCP server automatically. MAC Address: Display MAC address of this NVR. IP Address: Input the fixed IP address If you have disabled the DHCP function, and then click “Test”... -
Page 30: Upnp
Enable RTSP over HTTP function and the remote live streaming will use HTTP protocol and HTTP port. 5.3.6 DDNS The NVR-915 provides PLANET DDNS function to allow you to map a domain name to the dynamic IP address of a network device. Sever Name: Select a DDNS server (e.g. -
Page 31: System Setting
9-Channel Network Video Recorder NVR-915 5.4. System Setting 5.4.1 Device Information The “Device Information” provides the general information of the device such as firmware version and model name. Model Name: Display model name. Device Title: Key-in device title here. -
Page 32: User Setting
9-Channel Network Video Recorder NVR-915 User: Key-in auto login user name. Password: Key-in auto login password. System Setting: Enable “Auto full screen” to switch to full screen mode when system boots 1. Change display language from language combo box. -
Page 33: Motion Detection Setting
9-Channel Network Video Recorder NVR-915 5.6. Motion Detection Setting You may set up to 10 regions of each camera for motion detection setting. Select a camera: Click on camera list and select a camera to set up motion detection. -
Page 34: Address Book Setting
9-Channel Network Video Recorder NVR-915 5.7. Address Book Setting Add e-mail and other information to address book for sending e-mail alert. Key-in the personal e-mail account information and then click on “Add” to add the information to the address book; you may also click on “Modify” to change the information or “Delete” to remove the account from the list. -
Page 35: Smtp Settings
9-Channel Network Video Recorder NVR-915 SMTP Settings SMTP Server SMTP sever IP or domain name. SMTP Port SMTP service port number User Name Login SMTP server user ID Password Login SMTP server Password From E-mail sender’s name Subject Mail’s subject... -
Page 36: Chapter 6. System Management
9-Channel Network Video Recorder NVR-915 Chapter 6. System Management The system management is for you to set up the NVR for video image, return to default, firmware upgrade, event, and storage management. Click setup button and select “System Management”... -
Page 37: Disk Management
9-Channel Network Video Recorder NVR-915 6.2. Disk Management The NVR supports up to two 4TB HDDs installed in the system. You may also manage all USB storage devices on this page. Device List: Display all devices detected on NVR and their information. - Page 38 9-Channel Network Video Recorder NVR-915 Source Snapshot List: Search snapshot image: 1. Select a hard disk path 2. Select a time period 3. Click “search” button 4. The search result will display in the list box. 5. Select a snapshot file name; the snapshot image will display on the right of window Copy: Clicking “Copy”...
-
Page 39: Event Snapshot
9-Channel Network Video Recorder NVR-915 6.4. Event Snapshot Event Snapshot: Event Type: Select trigger snapshot event type. Input: Select DI input port number. Time: Select search time period. Search: To search event snapshot based on the condition you set above. -
Page 40: Samba Server
9-Channel Network Video Recorder NVR-915 6.5. Samba Server Name: Key-in Samba server name to identify server. IP Address: Samba server IP address. Path: Key-in Samba server recording path. Account: Login Samba server account. Password: Login Samba server password. -
Page 41: Chapter 7. Event Setting
9-Channel Network Video Recorder NVR-915 Chapter 7. Event Setting You may define each event alarm on a different day and actions for each camera or NVR system. Please refer to the operating instructions below. 7.1 Add a New Event 1. -
Page 42: Modify Existing Event Schedule Or Output Action
9-Channel Network Video Recorder NVR-915 4. Click “Add” button in the below Event Schedule List. 5. Selecting event will detect weekdays and the time of each day. 6. Set up alarm detail parameter. Weekdays: Select weekdays for event notification. -
Page 43: Delete Existing Event Schedule Or Output Action
9-Channel Network Video Recorder NVR-915 4. Modify setting values from schedule setting dialog. 5. Click “OK” button when the modification is done. Modify Output Action: 1. Select an event from event list. 2. Select a schedule from event schedule list. - Page 44 9-Channel Network Video Recorder NVR-915 Record: When event is triggered, system will force selected channels record. 1. System must switch to “Schedule Monitoring” when event is triggered. 2. The selected channels must set to “Recording schedule” when event is triggered.
- Page 45 9-Channel Network Video Recorder NVR-915 HTTP: Send notification to HTTP server when event is triggered. FTP: 1. Select channels for snapshot or record a file when event is triggered. 2. Select Snapshot or record a video file in a specified time.
-
Page 46: Chapter 8. Log Viewer
9-Channel Network Video Recorder NVR-915 Chapter 8. Log Viewer 8.1 System Log Log Type: Select a log type to filter data. Time: Set up search logs in time period. Limit Record: Set up maximum number records of search result. -
Page 47: Event Log
9-Channel Network Video Recorder NVR-915 8.2 Event Log Device: Select a Device for search filter. Log Type: Select a log type to filter data. Input: Set up DI input port search filter; only works on search DI event. -
Page 48: Bitrate Log
9-Channel Network Video Recorder NVR-915 8.3 Bitrate Log You may search bitrate for selected time period; it will show a different color of bitrate data as seen below Select a date: Click on the calendar with blue background days. -
Page 49: Chapter 9. Playback
9-Channel Network Video Recorder NVR-915 Chapter 9. Playback You may search and play back the recorded video files with selectable time period and is also able to convert the video into AVI or back up the video files. -
Page 50: Playback Control Buttons
9-Channel Network Video Recorder NVR-915 Search by Event: Input search filter first by clicking the “Search” button; the search result will display on the list as shown above. Select a log that you need to play back. System will fill the event period automatically, and select which cameras you need to play back together. -
Page 51: Convert Into Avi File
9-Channel Network Video Recorder NVR-915 Close playback and return to live view Change of playback speed Adjust playback audio volume Select play audio way as shown below 1. Mute : Mute sound output 2. Live Audio: Play live focus channel sound 3. -
Page 52: Chapter 10. Web Remote Management
9-Channel Network Video Recorder NVR-915 Chapter 10. Web Remote Management The NVR is able to be viewed from Internet Explorer when the network is available. You can have live view or playback, and most of the functions are the same as the NVR system. -
Page 53: Live View On Internet Explorer
9-Channel Network Video Recorder NVR-915 You may select channel(s) you would like to view on your computer. Please also check the “Low Bitrate” to reduce the bandwidth consumption on IE. Click on “OK” to see the live view. -
Page 54: System Information
9-Channel Network Video Recorder NVR-915 10.3 System Information Date Time Recording Status Event Alarm Status HDD Status 10.4 Screen Division Switch to 1 division Switch to 4 division Switch to 9 division Switch to Full screen and right-click mouse to cancel Full Screen. -
Page 55: Sub-Screen Functions
9-Channel Network Video Recorder NVR-915 Logout / firmware version display 10.5 Sub-screen Functions Right-click mouse to select an option from the popup menu. Popup Menu You may select any connected camera to display on selected Show Live Camera... -
Page 56: Playback On Internet Explorer
9-Channel Network Video Recorder NVR-915 Move the thumb to control speed Select a tour setting from combo box and click “go” button to start tour, click “Stop” button to stop tour Tour Select a preset position from combo box and camera will move to... - Page 57 9-Channel Network Video Recorder NVR-915 To select which information you would like to show as seen below Search recorded video files; please see chapter 9.1 for information Take a snapshot to hard disk Back up video files; please see chapter 9.4 for information...
Need help?
Do you have a question about the NVR-915 and is the answer not in the manual?
Questions and answers