
Subscribe to Our Youtube Channel
Related Manuals for Rehau NEA H 24 V


Summary of Contents for Rehau NEA H 24 V
- Page 1 NEA H 24 V & NEA H 230 V REHAU ROOM THERMOSTAT USER INSTRUCTIONS AND QUICK INSTALLATION GUIDE www.rehau.co.uk...
-
Page 2: Table Of Contents
Contents Scope of supply ... . 30 Safety Introduction ....31 Product compliance and safety ..31 Important info Safety information . -
Page 3: Introduction
Introduction Product compliance and safety Thank you for purchasing the REHAU room Product compliance thermostat Nea. The Nea H is a parameter- This product is CE compliant and meets the izable digital room thermostat which is following EC Directives available in 24 V and 230 V versions and... -
Page 4: Installer Parameter Settings, Expert Level
See the Nea Service and Expert Parameters section at www.rehau.com/nea - Electrical Equipment Installer or Electronics Engineer Please note that the parameter sections must only be entered by an According to international regulations, as installer or competent person. -
Page 5: Mounting Position And Installation
Mounting position and installation To ensure trouble free operation and not position the thermostat near any heat 130cm efficient control. The room source, behind curtains, direct sunlight or in thermostat Nea is best positioned in a draft an area of high humidity. - free area and at 130 cm from the floor. - Page 6 The Nea is suitable for wall max 1.5 mm² square boxes with a center hole distance of 55 mm 60 mm. 8 mm * screw head maximum size 88 mm 75 mm Wiring connection Nea H 24 V & 230 V 60 mm...
- Page 7 Nea H wiring 230 V AC / 0.2 A 230 V AC Resistive Load 24 V AC / 1 A 24 V AC Resistive Load 230 V 24 V Optional External Time Switch L/L1 N/L2 Max. 5 Thermal Actuators External time switch (Phase balance) Load (Thermal Actuators) Neutral 230 V...
- Page 8 230 V AC / 0.2 A 230 V AC Resistive Load 24 V AC / 1 A 24 V AC Resistive Load 230 V 24 V Optional External Time Switch L/L1 N/L2 Max. 5 Thermal Actuators Max. 5 Thermal Actuators External time switch, phase balance Load (Thermal Actuators) Neutral...
- Page 9 230 V AC / 0.2 A 230 V AC Resistive Load 24 V AC / 1 A 24 V AC Resistive Load L/L1 N/L2 230 V 24 V External time switch (Phase balance) Load (Thermal Actuators) Neutral Phase 230 V 24 V * Room thermostat Nea H 230 V and 24 V are separate models...
- Page 10 Ensure that the cable is contained Ensure that the two arrows are within the shaded area. aligned properly before closing. Locate the front cover on rear case, Locate hinge first ensuring that the hinged clips are located first.
-
Page 11: Removing Cover From The Nea
Gently locate the cover locking clip in Recommended width 5 mm for tool. rear case location and close it. Pull the base of the cover assembly away from rear case. Ensure cover locking clip is secure in the rear case. Removing cover from the Nea Use tool to gently push the cover Remove cover and put in safe place. -
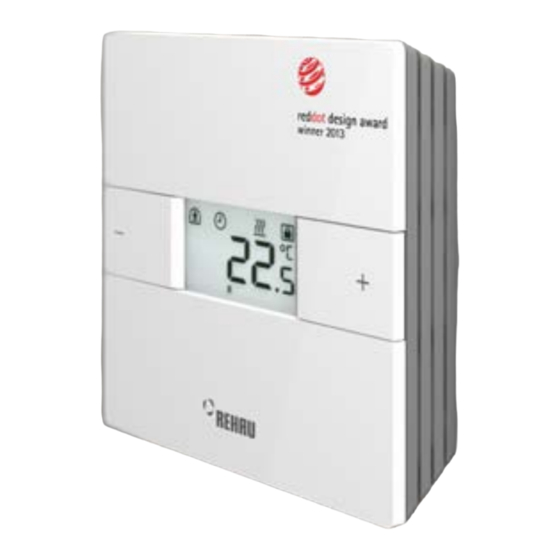
Page 12: Thermostat Control And Display
Thermostat control and display Key assignment Powering up for the first time Decrease temperature. Also back in menu settings Increase temperature. Also forward in menu settings Enter / Exit 1234567 Flashing symbols or numbers are changeable After power up, all LCD segments are turned on for two seconds. - Page 13 LCD icon Indicator Description Explanation Temperature Shows the actual room (R) temperature or the set (S) point temperature. The set point temperature is your required room temperature Room temperature The displayed temperature is the current room temperature Set point temperature The displayed temperature is the required room temperature Heating active Heating mode is active...
-
Page 14: Adjusting Set Temperature
Adjusting set temperature Operational modes Reducing set temperature Selection - Standard thermostat To view the set point temperature only press once Normal operation: Default set point 22ºC Reduced operation: Default set point 18ºC Auto operation: Only with external time switch Operational mode off (optional) When the Nea is set to OFF there is automatic frost protection active. -
Page 15: Display Messages
temperature falls below 5 ºC the heating Display messages valve will be activated. If an external time switch is activated and the clock is displayed then the change in set temperature is temporary. The set point will return to normal / reduced on next time switch program change. -
Page 16: Technical Data
Insofar as the intended application deviates from that described in the relevant Technical Information brochure, the user must consult REHAU and must receive express written consent from REHAU before commencing this utilization. If the user fails to do so, the sole responsibility for the utilization shall lie with the individual user. In this case, the application, use and processing of products are beyond our control. - Page 17 REHAU AG + Co, Otto Hahn Str. 2, 95111 Rehau, Germany www.rehau.com © REHAU 954609 de/en/cz/es/fr/gr/hu/it/nl/pl/ro/rs/ru/se/tr 04.2013...
Need help?
Do you have a question about the NEA H 24 V and is the answer not in the manual?
Questions and answers