Table of Contents
Advertisement
Quick Links
The DVD video display of the in-dash unit will not operate while the vehicle is moving. This is a safety feature
to prevent driver distraction. In-dash DVD video functions will only operate when vehicle is in Park and the
parking brake is engaged. It is illegal in most states for the driver to view video while the vehicle is in motion.
Advertisement
Table of Contents

Related Manuals for Dual XDVDN9131


Summary of Contents for Dual XDVDN9131
- Page 1 The DVD video display of the in-dash unit will not operate while the vehicle is moving. This is a safety feature to prevent driver distraction. In-dash DVD video functions will only operate when vehicle is in Park and the parking brake is engaged. It is illegal in most states for the driver to view video while the vehicle is in motion.
- Page 2 This product incorporates copyright protection technology that is protected by method claims of certain U.S. patents and other intellectual property rights owned by Macrovision Corporation and other rights owners. Use of this copyright protection technology must be authorized by Macrovision Corporation, and is intended for home and other limited viewing uses only unless otherwise authorized by Macrovision Corporation.
-
Page 3: Table Of Contents
Warning Statement ..........Safety Information/Precautions . - Page 5 Due to its technical nature, it is highly recommended that your DUAL XDVDN9131 is installed by a professional installer or an authorized dealer. This product is only for use in vehicles with 12VDC negative ground only. cause the unit to malfunction.
- Page 6 Mounting sleeve opening dimensions...
- Page 7 When replacing a fuse, make sure to use the correct type and amperage. Using an incorrect fuse could damage the unit. The XDVDN9131 style fuses. There is one fuse located on the back of the unit and one fuse located inside the in-line filter box.
- Page 8 mounted in the center of the vehicle roof with a minimum of 6” from any window. The antenna can also be mounted to the rear trunk lid at least 4” from the rear window. dashboard or rear deck tray. antenna cable. Use a grommet when running wires through any metal openings. Installation of the external microphone is optional but recommended for the highest sound external microphone.
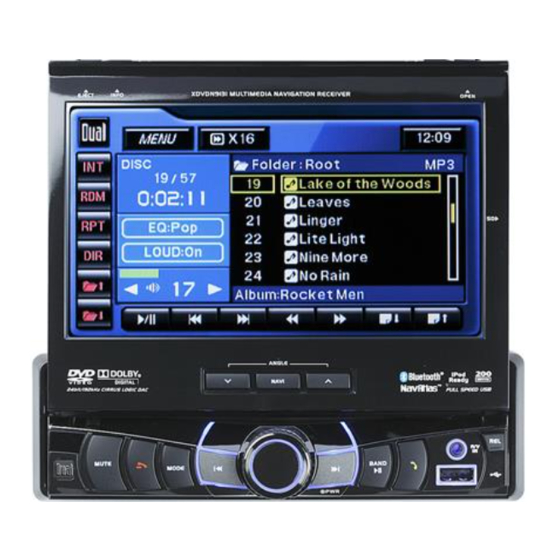
- Page 10 Bluetooth Microphone Talk Band/Play/Pause Display/Info Channel/Chapter/Track Up/Fast Forward Secondary LCD Power/Volume/EQ Auto Store/Preset Scan Channel/Chapter/Track Down/Fast Reverse Open/Close Monitor Mode Front Panel Release End Call 3.5mm A/V Input Mute/Loudness USB Input Infrared Sensor Stereo indicator Local indicator Main information display Disc-in indicator Bluetooth call indicator Bluetooth connection indicator...
- Page 11 Built-in microphone for Bluetooth hands-free calls. Press When the monitor is closed, press to toggle display between song or chapter information. Additional LCD for system information while monitor is closed. Press momentarily to start station Preset Scan function. Press for 2 seconds to start Auto Store station preset function in current band. Press to open or close the monitor.
- Page 12 Press inputs. Each time the button is pressed the next mode is chosen. Modes of operation are indicated on the OSD or the secondary LCD. Optional iPod device, USB flash drive, SD card or Bluetooth device must be connected/inserted to appear in the mode selection string. Press to silence audio output.
-
Page 13: Main Setup Menu
Close Monitor SD Card Input Screen Angle Up Navigation Screen Angle Down Press to open or close the monitor. Be careful not to not touch or obstruct the occur. Insert SD card to play audio files. the monitor inwards. Press to toggle the display between the current mode and the navigation map. -
Page 14: Dvd Setup
Power Key #9 Root Escape Repeat Navigation Open/Close Search Chapter/Track/Seek Tune Down Mode Key #0/DVD Setup Chapter/Track/Seek Tune Up Volume Up Audio Select Fast Reverse/Manual Tune Down Key #1 Menu Fast Forward/Manual Tune Up Key #2 4-Way - Up Zoom Key #3 Play Audio... -
Page 15: Operation Of Ipod
Power Press once to turn the unit on, press again to turn unit off. Navigation Press to select between navigation mode and current source. Open Press once to open monitor; press again to close the monitor. Mode Press once to incrementally select desired source. Volume Up Increase Keys 0-9... -
Page 16: Operation Of Ipod
or any other button Press to silence the audio; will appear in the OSD Press again to cancel. Press on the OSD to turn the Loudness on/off. Pressing and holding the button on the front panel or remote will also turn the Loudness on/off. Press 2 inputs. -
Page 17: Auxiliary Inputs
Press momentarily to display DVD disc information. Press and hold to access brightness menu. Press and hold for 3 seconds to change monitor Turn the rotary 4 or 3 When a video source is connected to the front or rear auxiliary inputs, press Press Turn the rotary 4 or 3 Turn the rotary 4 or 3... - Page 18 Press button on the remote control. or the upper left corner of the touch screen from Touch to access mode. Touch to access flash drive Touch to access Touch to access mode. Bluetooth icon will illuminate when a Bluetooth device is connected. Current time is displayed.
- Page 19 Press icon to access the Main setup mode. Select desired parameter you wish to change. Page will return back to previous screen after 15 seconds of inactivity or by pressing the arrow in the top right corner. Press the icon to access Main Setup page 2. Setup Menu matrix - page 1 Settings Default...
- Page 20 Setup Menu matrix - page 2 Settings Default Options Function Camera Image Normal Normal Normal image Reverse Mirror camera image 180 degrees TFT panel will automatically open when ACC is turned on TFT Auto Open TFT panel will not auto open when ACC is turned on Manual TFT will only open/close when button is pressed...
- Page 21 Touch at the top left corner of screen. Touch icon. Touch Touch the setting for your region. Touch to exit.
- Page 22 Touch at the top left corner of screen. Touch icon. row. , followed by to exit. For 24Hr format, select 24Hr from , then follow steps 1-6.
- Page 23 The default Anti-theft password is 0000 and is turned off by default. To turn this feature on, follow the steps below. This will lock your unit from operating if battery power is disconnected. icon. then press OK. to exit.
- Page 24 From the main menu, press icon to access the Screen Setup mode. Press the Select desired parameter you wish to change. Page will return back to previous screen after 15 seconds of inactivity or by pressing the arrow in the top right corner. Press the icon to access Screen Setup page 1.
- Page 25 at the top left corner of screen. icon. to exit. is 0 - 20 and the default is 10.
- Page 26 at the top left corner of screen. icon. to decrease the screen angle. to increase the screen angle. The range is 1 - 4 Default = 1 to exit.
- Page 27 at the top left corner of screen. icon. in TS Calibration row. when the calibration procedure is complete.
- Page 28 From the main menu, touch TUNER icon on the screen to select AM/FM Tuner mode. Current Source Indicator Displays source currently playing. Main Menu Touch to access the main menu. Stereo Indicator Information Indicator Displays status of various tuning functions including Auto Station Store, Preset Scan, Scan tuning, etc.
- Page 29 function can also be performed by pressing the corresponding function can also be performed by pressing the corresponding key on the Seek Next Station - Up Touching this icon will tune to the next strong station at a higher corresponding key on the front panel Seek Next Station - Down Touching this icon will tune to the next strong station at a lower...
- Page 30 From the main menu, touch TUNER icon to select AM/FM Tuner mode. Press until the current station information is displayed on the screen. Touch on the screen repeatedly until the desired band is displayed, FM1, FM2 or AM. Press the button on the front panel to switch between bands, FM1, FM2 or AM.
- Page 31 To select a desired station from the preset station list, touch any of the down arrows on screen to select between the preset pages, if necessary. Press to scroll through the presets. When the correct preset is highlighted press Touch on the screen and it will tune you to all stations available with good reception for 10 seconds at a time.
- Page 33 CAUTION !!! moving. This is a safety feature to prevent driver distraction. In-dash video IT'S UNLAWFUL TO OPERATE functions will only operate when vehicle is in Park and the A VEHICLE WHILE VIDEO IS is engaged. It is illegal in most states for the driver to view video while the vehicle is in motion.
- Page 34 Some DVD discs can be played only in certain playback modes according to the intentions of the software. As the XDVDN9131 plays discs according to their intentions, some functions may not work as intended. Please be sure to read the instructions provided with each disc. This player has been designed to play back DVD software that has been encoded for specific region areas.
- Page 35 Press to fold down the front panel. With the label facing up, insert a standard size disc into the slot. Gently close the front panel, the disc will automatically begin playback. Sub-menus may have to be pressed to access the DVD movie/music content. Read the directions of your specific DVD disc for other features.
- Page 36 There are several hidden "A" area can be used in DVD, A/V 1 and A/V 2 modes to access menu. A - Displays menu B - Displays disc information C - Selects chapter D - Selects chapter E - Displays the transport controls F - Displays search menu...
- Page 37 the remote to access the DVD setup menu. The LANGUAGE setup menu will automatically be displayed. Press the current selection to select desired disc subtitle language. English French Spanish Auto Off = DEFAULT Press the current selection to select desired disc audio language. English = DEFAULT French Spanish...
- Page 38 the remote to access the DVD setup menu. The LANGUAGE setup menu will setup menu. Press to select desired TV shape. Normal/PS Normal/LB Wide Select On to activate angle mark.
- Page 39 the remote to access the DVD setup menu. The LANGUAGE setup menu will setup menu. Touch the current rating, select desired rating, then input password. Default password is "0000". 1. Touch ****, enter current password, then press OK. 2. Enter new password, then press OK. 1.
- Page 40 From the main menu, touch the DISC icon on the screen to select DVD mode. Setup Menu Touch to access the DVD Setup menu. Stop Touch the Fast Reverse Touch the icon to fast reverse at 2x speed. Each touch changes speed from 2x to 4x to 8x to 16x to 32x, then back to 1x play.
- Page 41 Some DVD discs can be played only in certain playback modes according to the intentions of the software. As the XDVDN9131 plays discs according to their intentions, some functions may not work as intended. Please be...
- Page 42 Touch Area E to bring up the on-screen buttons. Touch to fast forward or to fast reverse. to 4x to 8x to 16x to 32x and back to 1x. Press and hold to fast forward. Press and hold to fast reverse. Press to fast forward.
- Page 43 Touch to change the audio stream. Each touch will cycle the audio stream. Press the button to select the stream. limited. stream can only be changed while the DVD is playing. Touch Area B or press to bring up the Press the button to bring up the Press the...
- Page 44 From the main menu, touch the icon on the screen to select CD mode. Current Source Indicator Displays source currently playing. Track Number Indicator Displays current track number and total number of tracks on the disc. Track Time Indicator Shows the elapsed time of the current track. Track Title List Displays up to 6 tracks on the disc in order, with track number.
- Page 45 Page Down Touch the icon to see the next 6 tracks on the disc. Fast Forward Touch the icon to fast forward at 2x speed. Each touch changes speed from 2x to 4x to 8x to 16x to 32x then to 1x play. Fast Reverse Touch the icon to fast reverse at 2x speed.
- Page 46 To select a desired track from the track title list, touch any track on the list. Press to scroll through the tracks. When the correct track is highlighted press To navigate forwards or backwards through all tracks, press on the Press to skip to the next track.
- Page 47 Touch to repeat a track. will appear next to the button while this feature is activated. Touch again to exit Repeat Mode. Press to select Repeat. Press it a second time to disable Repeat. modes can not be used simultaneously and button to temporarily stop or resume playback.
- Page 48 From the main menu, touch the icon on the screen. Current Source Indicator Displays source currently playing. File Number Indicator Displays current file number and total number of files in the current folder. Elapsed Time Indicator Shows the elapsed time of the current song. Audio to Image Indicator Press to switch from audio files to image files.
- Page 49 Page Down Touch the icon to see the next 6 files in the current folder. Fast Forward Touch the icon to fast forward at 2x speed. Each touch changes speed from 2x to 4x to 8x to 16x to 32x then to 1x play. Fast Reverse Touch the icon to fast reverse at 2x speed.
- Page 50 Indicates that audio files are currently displayed. Press to switch to viewing image files. Indicates that image files are currently displayed. Press to switch to viewing audio files. Press the Folder Name area at the top of the screen to display the first six folders. Press or use the buttons on the remote control to view...
- Page 51 Touch again to preview all tracks. will appear next to the button while this feature is activated. Touch again to exit Intro Mode. Touch on the screen to shuffle all tracks in the current folder. will appear next to the button while this feature is activated.
- Page 52 From the main menu, touch the icon on the screen. Current Source Indicator Displays source currently playing. File Number Indicator Displays current file number and total number of files in the current folder. Elapsed Time Indicator Shows the elapsed time of the current song. Audio to Image Indicator To provide the highest Press to switch from audio files to *image files.
- Page 53 Page Down Touch the icon to see the next 6 files in the current folder. Fast Forward Touch the icon to fast forward at 2x speed. Each touch changes speed from 2x to 4x to 8x to 16x to 32x then to 1x play. Fast Reverse Touch the icon to fast reverse at 2x speed.
- Page 54 Connect a USB device or insert an SD card. When inserting an SD card, the label mode when an SD card is inserted. To provide the highest level of navigation performance, this model does not support JPG image file playback from SD cards. Indicates that audio files are currently displayed.
- Page 55 Use the Fast Forward or Fast Reverse on-screen buttons to speed up the normal to 2x to 4x to 8x to 16x to 32x and back to 1x. Press to fast forward. Press to fast reverse. Press to fast forward. Press to fast reverse.
- Page 56 ISO9660 Level 1, Level 2 Level 3 ISO9660 JOLIET Playback Extension Filename 32 bytes 32 bytes Other ROMEO Playback Extensions Filename Apple ISO .mp3/.MP3/.Mp3/.mP3 .wma/.WMA .rmp/.m4a MPEG 1 MPEG 2 MPEG 2.5 MPEG 1 8/11.025/12/16/22.05 24/32/44.1/48kHz MPEG 2 32/44.1/48kHz MPEG 2.5 8/11.025/12/16/22.05 24/32/44.1/48kHz 22.05/32/44.1/48kHz...
- Page 57 FAT 12 FAT 16/FAT 32 .mp3/.MP3/.Mp3/.mP3 .wma/.WMA .rmp/.m4a MPEG 1 MPEG 2 MPEG 2.5 MPEG 1 8/11.025/12/16/22.05 24/32/44.1/48kHz MPEG 2 32/44.1/48kHz MPEG 2.5 8/11.025/12/16/22.05 24/32/44.1/48kHz 22.05/32/44.1/48kHz MPEG 1 8 ~ 320kbps MPEG 2 64 ~ 912kbps MPEG 2.5 8 ~ 320kbps 32 ~ 192kbps Directory Depth Unlimited...
- Page 58 The following types of discs/files are Some recordable DVD's and CD's may be incompatible with this unit, depending on media type and recording method. in the root folder of the disc, USB flash drive or SD card. Any empty folders or folders that do not include MP3/WMA/JPG files are skipped.
- Page 59 Connect an iPod device using the included cable. From the main menu, touch the icon of the iPod device on the screen. Current Source Indicator Displays source currently playing. Song Number Indicator Displays current song number and total number of songs. Elapsed Time Indicator Shows the elapsed time of the current song.
- Page 60 Fast Forward Touch the icon to fast forward at 2x speed. Touch again to cancel. Fast Reverse Touch the icon to fast reverse at 2x speed. Touch again to cancel. Album Information Displays available album information for the current song. Track Up Touch to skip ahead to the next song.
- Page 61 The content is organized by groups. Touch the on the screen to access the search menu. Once in search menu, select one of the group types from the menu, then select an item in that group. Then select an artist from this list to hear some or all songs from that artist. Touch the on-screen button to go back to a previous menu.
- Page 62 Touch to repeat a song. will appear next to the button while this feature is activated. Touch again to exit Repeat Mode. Press to select Repeat. Press it a second time to disable Repeat. modes can not be used simultaneously and Press to temporarily stop playback of the current song.
- Page 63 1. Touch icon to access the search menu. 2. Touch , then select desired video. Touch Area C to select the previous chapter and Area D to select the next chapter. Not all movies support this feature. Touch Area A to return to the search menu. Press to skip to the next chapter.
- Page 64 1. Touch icon to access the search menu. 2. Touch , then begin slideshow from your iPod device. Touch Area A to return to the search menu. Character support - only alphanumeric characters can be displayed on the The Video and Photo modes are not supported when using the 1st and 2nd generation iPod Nano.
- Page 65 Select AV/1 from the Main Menu to listen to audio. Engage parking brake as described on page 32 to watch video. Select AV/2 from the Main Menu to listen to audio. Engage parking brake as described on page 32 to watch video. Refer to page 6 for details.
- Page 66 ® Make sure the Bluetooth option is set to On in the Bluetooth Setup menu. From the main menu, touch the icon on the screen. A Bluetooth icon will appear anytime a Bluetooth device is connected. Audio Transfer Button Press to transfer audio between the head unit and mobile phone. Talk button Press to answer an incoming call or to place an outgoing call.
- Page 67 ® Phone book Icon Press to access the phone book menu. Keypad Interface Icon Press to display the keypad interface. Bluetooth Setup Menu matrix Settings Default Options Function Bluetooth Turns off the Bluetooth functionality and resets the device list Turns on the Bluetooth functionality Search cancel the search/pairing process.
- Page 68 ® Before you can use a Bluetooth device to make hands-free calls or stream audio, it must be authenticated. This is also referred to as "pairing" a device. Please make sure that Bluetooth is activated on your mobile device before you begin the pairing process.
- Page 69 ® Press Dialed Calls to retrieve the list of dialed calls from the mobile device. Touch the desired number to call. Press the page up/down buttons to navigate through the pages. Press Received Calls to retrieve the list of received calls from the mobile device. Touch the desired number to call.
- Page 70 Track Up Touch to skip ahead to the next song. Press on the remote control to stop playback. or when the device or the XDVDN9131 is powered off/on. Refer to the owner's manual of your mobile device for more information.
- Page 71 From the main menu, touch the icon on the screen or press the button on the front panel. The image above shows the map screen features when in guidance , or > Next street name Current street name Current speed Current time Expected time to arrive at destination Remaining travel time from current position to destination...
- Page 72 The main menu can be accessed by pressing the button on the map Allows you to search for a location in various ways. Provides editing of the current route or retrieving the current route information. Stops route guidance and removes all existing locations from route. Allows you to customize navigation system settings.
- Page 73 Press to easily search for a location in various ways according to your purpose or preference. Search for locations saved to your Favorites list. current position without entering any additional information. Recalls a list of recently traveled destinations. Allows you to create or edit itineraries. Search for destination by address.
- Page 74 For your convenience, previously searched state/province name and city name are initially selected on the first stage of address search. If you want to change state/province, tap . For State/Province search, you can search by either Type letters and/or choose from the list of to access numbers.
- Page 75 My Route allows you to create a new route or to edit an existing route. Create Route / Edit Route buttons will change depending on situation. Available if a route has not been set. Available if a route has already been set. Use this option to edit your existing route. Allows you to avoid part of the route, a roadblock, or to set a travel via point.
- Page 76 Settings allows you to customize the settings of the Navigation system. Change voice/text language of navigation. Change routing options. Set time and apply options such as time. Select time zone. Turn on/off the speed warning and set a tolerance level for receiving a warning alert.
-
Page 77: Warranty
4. For more information and for the location of the original retail purchaser for products purchased from nearest authorized service center please contact an authorized Dual dealer and used in the U.S.A. This warranty covers all defects in material and workmanship in this product. The... -
Page 78: Eula
USING THE SOFTWARE. It applies to the software that accompanies these license terms. By using all or any portion of the Software you accept all the terms and conditions of this EULA. The breaking or removal of the seal of a DVD, CD-ROM, floppy disc, memory card Software. -
Page 79: Eula
as to the accuracy or completeness of map data or other third-party content in the application. EnGIS does not and errors may occur when using Software for instance caused by local environmental conditions and/or incomplete VIRUSES, AND REASONABLE CARE AND SKILL, ALL WITH REGARD TO THE SOFTWARE, AND THE PROVISION OF OR FAILURE TO PROVIDE SUPPORT OR OTHER SERVICES, INFORMATION, SOFTWARE, AND RELATED CONTENT THROUGH THE SOFTWARE OR OTHERWISE ARISING OUT OF THE USE OF THE SOFTWARE. -
Page 80: Specifications
CEA-2006 Power Standard Specifications <... - Page 81 Problem Cause Action Red wire not connected or incorrect voltage Black wire not connected Check connection to ground Fuse blown Speaker wires not connected Check connections at speakers One or more speaker wires touching each Insulate all bare speaker wires from each other and other or touching chassis ground chassis ground Check for pinched wire...
- Page 82 Problem Cause Action There is no mobile device connected to the head unit Pair and or connect a mobile device to the head unit as described on page Bluetooth function is not active on the head unit Activate Bluetooth function as described on page Bluetooth function is not active on the mobile device Refer to the owner's manual of your mobile device A mobile device is already connected to the head...
- Page 83 Please call Dual Customer Service for assistance or expired 1-866-382-5476 Please keep your original sales receipt and be prepared to provide this receipt proof of purchase and indicates the date you purchased your Dual product. Dealer Name Dealer Phone Purchase Date...
- Page 84 Dual Electronics Corp. www.dualav.com ©2009 Dual Electronics Corp. All rights reserved. NSA1209-V01.4 Printed in China...
- Page 86 Contents...
- Page 87 01. Basic Screen a) Getting started. Initial Screen. < Declaration screen > After Gogo starts, you will see the declaration screen as shown above. < Map screen features – Normal mode> The navigation system automatically locates your current position on the map by receiving GPS signals.
- Page 88 01. Basic Screen b) Map screen features – Driving Guidance Mode <Map screen features> Zoom out: Zooming out from level 1 to level 21 Compass: By tapping this icon, you can change the map display mode To Track up, North up or 3D view. (Refer to Settings>Map View for more information) Next street name Zoom in: Zooming in from level 1 to level 21...
- Page 89 01. Basic Screen Current time Expected time to arrival at destination Remaining travel time from current position to destination Remaining travel distance from current position to destination (To go to Route Summary page, tap anywhere from 9-12) Menu button: Tap to go to Menu Map scale: Indicates current map scale level Voice guidance repeat button: Repeats the last voice instruction...
- Page 90 02. Menu 02. Menu 01) [Where to?] Search for a location in various ways. 02) [My Route] Editing the current route or retrieving the current route information. 03) [Clear route] Remove all existing locations from route. 04) [Settings] Customizing settings of the navigation system.
-
Page 91: Main Function
03. Main Function a) Where to? The following ‘Where to?’ screen is accessed by pressing the ‘Where to?’ button on the <Menu> screen. Users can easily search for a location in different ways according to their purpose or preference. 01) [Go home] Searching for your home location saved on your favorites list. - Page 92 03. Main Function 09) [Zip Code] Searching for locations by zip code. 10) [Point on Map] Searching for locations by pointing on the map. 11) [Cities] Searching for locations by city name. 12) [POI Category] Searching for POI around your current position. 13) [POI Name] Searching for locations by POI (Point Of Interest) name.
- Page 93 03. Main Function Home This function allows you to quickly navigate to your home. You can also search for your home location via ‘Favorites’. Select ‘Go Home’ on [Where to?] screen. This [Go Home] button will be activated if you registered your home location via [Add to favorites] explained on page 9 or [Settings]>[Home].
- Page 94 03. Main Function Favorites This function allows you to save addresses or Points of Interest (POI) that you frequently visit; for example, you may want to save your work address or friend’s address so that you can quickly and easily navigate to it. 1.
- Page 95 03. Main Function Emergency Recent Destination 1. Select ‘Recent Destination’ on [Where to?] screen. 2. It will list recent destinations. 3. Select one of locations on the list then tap ‘Next’ button. For sorting by name tap . For sorting by time tap -10-...
- Page 96 03. Main Function Address 1. Select ‘Address’ on [Where to?] screen. 2. For your convenience, previously searched state/province name and city name are initially selected on the first stage of address search. If you want to change state/province, tap [Change] button. For State/Province search, you can search by either the full name (e.g.
- Page 97 03. Main Function (Instead of searching [House No.], searching by intersection is also possible. Tap this intersection image button , then it will list intersections of the selected street. Select one on the result list, then tap 'Done' button.) Intersections Searching for a location by using intersection.
- Page 98 03. Main Function Zip Code 1. Select ‘Zip Code’ on [Where to?] screen. 2. After searching zip code, proceed to the next searching steps [Street]- [House no.] or [Intersection]. (Refer to address search on page 10.) Point on Map 1) Tap: Tap anywhere on the map and you will see the street address. Press the done button to set this location as your destination or via point.
- Page 99 03. Main Function ‘Point on Map’ may be accessed at any time simply by tapping on the main map window. To change the labeling option on the map, tap the button . You can turn on and off three map labeling options: ‘Street Name’, ‘POI Symbol & Name’, and ‘Favorites Symbol &...
- Page 100 03. Main Function 1. The initial itinerary page is empty. To plan a new itinerary, tap 2. Select [New] button, then enter a name for a new itinerary. Tap 'Done' button. • Start Navigation: Start traveling. • New: Create a new itinerary. •...
-
Page 101: Poi Name
03. Main Function Cities Search for the center of city. After taking searching steps [STATE]-[CITY], press [Done] when ready. Refer to searching steps on page 11. POI Name 1. Select ‘POI Name’ on the [Where to?] screen. 2. The previously searched state/province name and city name are initially selected. -
Page 102: Poi In City
03. Main Function POI In City Searching for a POI in a particular city. 1. [POI Category] screen (left screen image) is shown when you finish [State/Prov]-[City] searching steps. The 28 POI categories are arranged in the order of frequency of driver’s use. (Refer to ‘Address’ search on page 11 for [State/Prov]-[City] search.) 2. - Page 103 03. Main Function Start Traveling Guidance To start guidance, you should tap the start button on the [Route Summary] page. The above screen image is the captured image when traveling guidance has begun. (Refer to <Map screen features – Traveling guidance mode> on page 3 for an explanation of map features.) Turn by Turn The Turn by Turn Screen offers a more simplified guidance mode.
- Page 104 03. Main Function < Turn List > The Turn List presents a full list of all maneuvers for the journey. This screen may be accessed by pressing the List button in the Turn by Turn mode. The default setting of this option is ‘Distance from position’. If you want to change this option, tap ‘Options’...
- Page 105 03. Main Function Turning off device before journey is complete. In case of unexpected shutdown during the journey, the navigation system will remind you of the last destination when restarted. If you want to restore your previous route, select 'Done' button. Otherwise select ‘Cancel’ button. In addition to this, any VIA point that was unreached in the journey will be remembered.
- Page 106 03. Main Function b) Route Options Manage your route Routing Options may be used to create a new route or to edit an existing route. Create Route / Edit Route buttons will change depending on situation. • Create Route / Edit Route [Create Route] is available if a route has not been set.
-
Page 107: Create Route
03. Main Function Create Route This function is available if no route has been set. • Add a Location to your route Press the ADD button to add a location to your route. For short routes, you may add up to 20 Via Points . The number of Via Points may be less for longer routes. -
Page 108: Edit Route
03. Main Function Edit Route This function is available if a route already exists. • Add a Location to your route Press the ADD button to add another location to your route. • Position the location within the route The first location you set automatically becomes the destination. You may add another location to this route by pressing the ADD button. - Page 109 03. Main Function Detour This function is for editing your route. After editing your route preferences, the navigation system will recalculate a new route automatically. <Avoid Roadblock> <Detour Menu> <Travel via> <Avoid Part of Route> You can change your route via four functions as follows: •...
- Page 110 03. Main Function • Travel Via Add a via point to your route. This will bring you into the normal [Where to] screen. Choose from any of the available methods to find a location to add to your route. • Recalculate Original This button allow you to recalculate the original route by removing any detours or others changes that may have been set.
- Page 111 03. Main Function Route Summary Page If your decision on [Route Decision] page created a route and [Settings]- [Routing Options]-[Show ‘Route Summary’ page automatically] option in setting is enabled, the [Route Summary] page will show up. In this page, you can check route information such as total distance, time, etc.
- Page 112 04. Settings 04) Settings In this page, you can customize the settings of the Navigation system. Descriptions of each option are as follows: ‘ ’ ‘ ’ [Color Mode] ‘ ’ ‘ ’ ‘ ’ [Map View] ‘ ’ [Set Brightness] [Map Colors] [Auto Zoom] 06.
- Page 113 04. Settings 08. [Label on Map] You can turn on/off displaying some labels on map. 09. [Voice/Text Language] You can change voice/text language of Navigation. 10. [Routing Options] Changing routing options. 11. [Units] Change distance units (miles or meters) 12. [Set Clock] Setting your navigation time and apply some options such as ‘Daylight saving’...
- Page 114 04. Settings Color Mode ‘ ’ ‘ ’ ‘ ’ • Daytime: Daytime color mode. • Nighttime: Nighttime color mode. (Refer to the right side image.) • Auto: Automatically change the map color by time. Map View • Track up: The direction of car is always upside of map screen. •...
- Page 115 04. Settings Set Brightness • Day: Adjust day brightness of map screen. • Night: Adjust night brightness of map screen. Map Colors • Day Color: Select day color of map screen. • Night Color: Select night color of map screen. A darker map color is used to reduce glare and eye strain while driving.
- Page 116 04. Settings Home Label on Map Select options that you wish to be displayed on the map screen, then tap the 'Done' button to apply these settings on the map screen. Street Name POI Symbol & Name Pressing this button will allow you to hide or display POIs based on category type.
-
Page 117: Routing Options
04. Settings Voice / Text Language • Voice Language: Gogo offers three voice languages (English, Spanish and French), and each language has a male/female voice. And if you want to hear the sample voice of the selected one, tap . To apply the selected voice language, tap 'Done' button. - Page 118 04. Settings Units • Miles/Feet • Kilometers/Meters Set Clock • Sync with GPS: Synchronize the time on your device with GPS time. • Daylight Saving: Apply daylight saving. Time Zone • Select one of 30 time zones. The default time zone is US-Pacific. -33-...
- Page 119 04. Settings Speed Limit ’ Speed warning: Speeding tolerance: Show on Map: The Speed Limit Sign displays miles or kilometers according to the system’s unit settings. This may be changed by going to [Menu] > [Settings] > [Units]. -34-...
- Page 120 04. Settings Fuel Your journey’s fuel cost estimate will appear on the ‘Route Summary’ page. You can access this screen via [Menu] > [My Route] > [Route Summary]. • Fuel Price € ‘ ’ ‘ ’ • Consumption ’ ’ ’...
- Page 121 04. Settings Volume – Keyboard About -36-...
- Page 122 04. Settings Restore Settings -37-...
- Page 123 05. GPS 05) GPS • Blue satellite: GPS fix is established. • Pink satellite: GPS fix is unavailable. Pressing the <Reset> button will reset the GPS module. It may take up to one minute to reacquire the GPS signal It may take some time to receive GPS signals. Please refer to page 39 <Information>...
- Page 124 06. Information User information and precautions 1. We are not responsible for any accident that occurs while operating our software. 2. The suggested route and guidance may be different with actual traffic and road conditions. Please drive safely and obey traffic rules. 3.
- Page 125 Information 12. This product is designed as an aid to safer driving. You may receive speed alerts to help you monitor your speed. EnGIS accepts no liability whatsoever for you receiving any speeding fines or points on your license through using this software.
- Page 126 Copyright Copyright 1. Copyright and intellectual property rights of all documents written by EnGIS Technologies, Inc. are the property of EnGIS Technologies, Inc. 2. EnGIS Technologies, Inc. has copyright and intellectual property rights of our software and documents including this manual, and the use of product follows license agreement.
- Page 127 Information More information If you have any problems or any difficulties with our software, please refer to the FAQ section on our website, or register your question on the Q&A section. We will supply support as soon as possible. Website: www.gogonav.com Email: support@engistech.com...
Need help?
Do you have a question about the XDVDN9131 and is the answer not in the manual?
Questions and answers