Table of Contents
Advertisement
Quick Links
Home
& Away
Portable
Digital Video Monitor
Before returning this product to the store for any reason,
Often, we can provide helpful tips and instructions to resolve your
Check our website: www.thefirstyears.com/homeandaway for the most
up-to-date instruction manual as well as tips and troubleshooting advice.
Y7294
please contact our Customer Care at
1-800-704-8697 or www.thefirstyears.com
problem quickly over the phone or by e-mail.
™
Advertisement
Table of Contents

Subscribe to Our Youtube Channel
Related Manuals for The First Years home & away portable


Summary of Contents for The First Years home & away portable
- Page 1 Home & Away Portable ™ Digital Video Monitor Before returning this product to the store for any reason, please contact our Customer Care at 1-800-704-8697 or www.thefirstyears.com Often, we can provide helpful tips and instructions to resolve your problem quickly over the phone or by e-mail. Check our website: www.thefirstyears.com/homeandaway for the most up-to-date instruction manual as well as tips and troubleshooting advice.
-
Page 2: Safety Instructions
Home & Away Portable Digital Video Monitor ™ SAFETY INSTRUCTIONS This symbol is intended to warn the user of potential safety hazards. This symbol is intended to alert the user to a potential risk of electric shock and other electrical safety issues. WARNING: • To prevent electric shock or strangling by the cord, KEEP OUT OF CHILD’S REACH. - Page 3 English • Observe all warnings. • Follow all operating instructions. • Do not tamper with the plug under any circumstances. • Power Source – This product should be connected only to the power supply provided. • Cleaning – Before cleaning, be sure to unplug. Clean only as recommended in these instructions.
- Page 4 Home & Away Portable Digital Video Monitor ™ The First Years Home and Away Portable ® ™ Digital Video Monitor The First Years ® Home and Away Portable ™ Digital Video Monitor enables you to see and hear your infant from just about anywhere in your home.
-
Page 5: Table Of Contents
English Contents Safety Instructions Parts Diagram Parent Unit Child Unit Quick Start Instructions To Set Up—Child Unit To Set Up—Parent Unit To Use Display Sleep Mode Sound Activation Range Night Vision Talkback Feature: Two Way Communication Beltclip/Stand Headphone Capability Parent Unit Finder Feature Parent Unit Indicators and Controls Menu Choices –... -
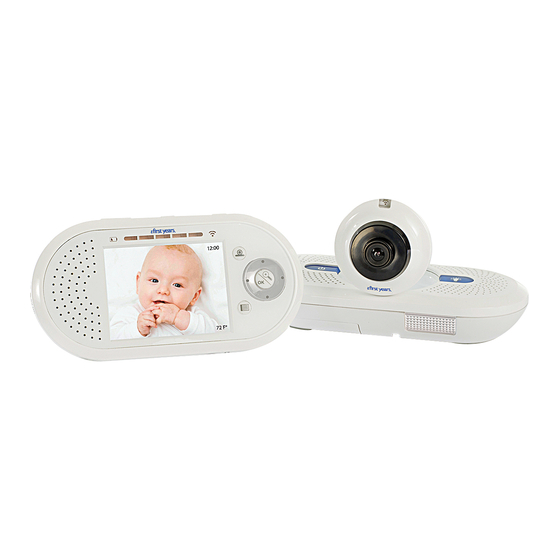
Page 6: Parts Diagram
Home & Away Portable Digital Video Monitor ™ Parts Diagram Parent Unit Volume control button Power button Talkback button PC connector (USB port) OK/Zoom button Directional pad Menu button Headphone jack Power jack Speaker/microphone Power/battery indicator Sound level indicator Connection indicator Camera scan button Display screen Also Included –... -
Page 7: Child Unit
English Child Unit Antenna Connection indicator Nightlight button Camera Nightlight Adjustable-angle camera base Speaker/microphone Power button Also Included – not shown: • Talkback volume switch • AC adapters (2) • Wall mount slots • Cord channel • Battery cover • Power jack •... -
Page 8: Quick Start Instructions
Home & Away Portable Digital Video Monitor ™ Quick Start Instructions You’ll find detailed instructions on the pages that follow. Please read the Safety Instructions on pages 2–3. Set up the Parent Unit For portable use: Install the rechargeable battery pack provided. Battery compartment is on back of unit. -
Page 9: To Set Up-Child Unit
English To Set Up —Child Unit 1. Position the Child Unit 4 to 6 feet from your child’s crib or the area you wish to view. NEVER position the unit within a child’s reach. 2. Insert the connector on the AC adapter into the jack on the back of the unit, then plug the adapter into an electrical outlet. - Page 10 Home & Away Portable Digital Video Monitor ™ Optional Stand For Child Unit An optional stand has been included with the Home and Away™ Digital Video Monitor. This stand allows you to better view your baby from tough angles. To Install: For temporary/battery-powered operation Loosen the screw to release the battery compartment cover, then slide and lift it...
-
Page 11: To Set Up-Parent Unit
English To Set Up – Parent Unit To install and charge battery pack 1. Loosen the screw to release the battery compartment cover, then slide the cover off. 2. Insert the plug on the battery pack into the connector inside the battery compartment. -
Page 12: To Use
Home & Away Portable Digital Video Monitor ™ To Use Child Unit Parent Unit 1. Hold down the power button on the Child Unit until connection indicator lights up. The connection indicator will blink to indicate it is searching for the Parent Unit. -
Page 13: Display Sleep Mode
English To turn the Parent Unit off Hold down the power button until the power light goes out. This takes a few seconds. To turn the Child Unit off Hold down the power button until the power light goes out. This takes a few seconds. -
Page 14: Range
Home & Away Portable Digital Video Monitor ™ Range The distance you can separate the units and still maintain a connection will vary based on the layout and construction of your home. To test the Monitor’s workable range, walk though your house and yard to check for the volume of sounds being transmitted and the clarity of images being displayed. -
Page 15: Beltclip/Stand
English Note: • While the Talkback button is depressed, you will not hear any sounds being transmitted by the Child Unit. • When using more than one camera, the talk feature will link to the camera in the location you are currently viewing. Belt Clip/Stand Press on the top of the belt clip to open;... -
Page 16: Parent Unit Indicators And Controls
Home & Away Portable Digital Video Monitor ™ Parent Unit Indicators and Controls Volume Control [ + , - ] Press either side of the volume control button to make sounds louder (+) or softer (-). Power/Battery Level Indicator •Blue glow indicates full power. •Red glow indicates battery power is low. - Page 17 English Camera Scan Button This button allows you to scan through multiple cameras if you have added cameras to your video monitoring system. OK/Zoom Button Zoom Function Press the button once to zoom in on the image. Press the button again to revert to original size. Sample video display OK Function The button is also used to select options when...
-
Page 18: Menu Choices-Your Preferences For Selected Features
Home & Away Portable Digital Video Monitor ™ Menu Choices—Your Preferences for Selected Features You have the option of setting menu preferences for the Monitor features listed below. To review or change any preferences, press the Menu button. Use the directional pad to scroll through the available menu choices. - Page 19 English 4. A “12hr/24hr” preference screen will appear. The current setting will be highlighted. Use the sides of the directional pad to move the box to the right 12HR 24HR to choose a 24-hour clock, , or to the left to choose a 12-hour clock, and press OK button to accept.
- Page 20 Home & Away Portable Digital Video Monitor ™ Language You can choose to view displays in English, Spanish or French. To change your language selection: 1. Press the Menu button. 2. Use the top or bottom of the directional pad to scroll through the list of preferences until “Language”...
- Page 21 English Camera Scan Mode When multiple cameras are connected to your video monitoring system, the camera scan mode can be used. Scan mode will display an image from each camera for a short period of time and then advance to the next camera. For 2 cameras the display time is 10 seconds each.
- Page 22 Home & Away Portable Digital Video Monitor ™ 4. The “Default” screen will appear. Use the sides of the directional pad to highlight either “NO” or “YES.” If you choose “YES,” all Menu options will revert to the Factory Presets listed below. If you choose “NO,” all Menu options will remain as you have most recently set them.
-
Page 23: Child Unit Indicators And Controls
English Child Unit Indicators and Controls Power button • Hold down to turn unit on or off. • Blue glow indicates full power. • Red glow indicates battery power is low. Replace batteries as soon as possible. • No light indicates no power. Unit will not work until turned on, connected to AC adapter or powered by good batteries. -
Page 24: Recharging/Replacing Batteries
Home & Away Portable Digital Video Monitor ™ Recharging/Replacing Batteries Parent Unit: If Power Indicator on the Parent Unit glows red when unit is turned on, batteries are low. If indicator does not light at all, batteries may be dead. Recharge batteries by connecting AC adapter cord to power jack and plugging it into wall outlet. - Page 25 English WARNING: Keep batteries away from children. Parents are urged to exercise care in the storage, use and disposal of all batteries. Do not dispose of batteries in a fire. They may explode. To avoid battery leakage: • Do not use rechargeable batteries; • Batteries must be removed and inserted under adult supervision; •...
-
Page 26: Pairing Of Parent And Child Units
Home & Away Portable Digital Video Monitor ™ Pairing of Parent and Child Units The Parent Unit and Child Unit are digitally paired at the factory. This means they are digitally encrypted with the same electronic code so that they can securely communicate with each other and not be confused by the signals sent out by other electronic devices, such as cell phones or other monitors. -
Page 27: Care (To Clean/Storage)
English Care To Clean Do not immerse the Parent and Child Units in water. Do not use cleaning spray or liquid cleaners. 1. Disconnect units from adapters (if connected) and unplug adapters from electrical outlets if they are plugged in. 2. -
Page 28: Using Your Computer As Parent Unit
Home & Away Portable Digital Video Monitor ™ Using Your Computer as Parent Unit Installing Software Insert the provided CD into the CD drive on your computer and install the software following on-screen directions. Note: Software will search the Internet every time it opens to look for updates. - Page 29 English Windows 7 and Vista 1. Select “Control Panel” from the “Start” menu. 2. Click on “Hardware and Sound”, Select “Sound.” 3. Select “Playback” tab, • From “Speakers”, select the desired speakers or sound device and set as default. This will change the “Default device” from “Wireless Baby Monitor” to the appropriate device for your computer.
- Page 30 Home & Away Portable Digital Video Monitor ™ Talkback Feature 1. Click on the Talkback Button, and hold your mouse button depressed while speaking. 2. Your child will be able to hear your voice. An on-screen display in red tells you that you are transmitting your voice.
- Page 31 English Still Image Capture Click on the camera icon . You will hear a shutter sound. The image file will automatically be saved to the default location. File location will be displayed in the lower left corner of the window. You can click on this file location to see the picture you took.
-
Page 32: Keyboard Shortcuts
Home & Away Portable Digital Video Monitor ™ Keyboard Shortcuts S = Still photo Z = Zoom C = Camera Select V = Video M = Mini Display Screen - toggle Spacebar = Talkback (hold while talking) h = Pan image up i= Pan image down f= Pan image left g= Pan image right... - Page 33 English File Menu Options: Change Language — allows you to chose between English (default), Spanish and French. Once selection is made the language used in the software will change. Preferences — opens the Preferences Screen with the following topics: Still Image – allows you to change the location that your still images are stored and the naming convention for these images.
-
Page 34: Using Your Home And Away Portable ™ Digital Video Monitor With Skype
Home & Away Portable Digital Video Monitor ™ Using your Home and Away Portable ™ Digital Video Monitor with Skype ® Your Home and Away Portable Digital Video Monitor comes ready to use with Skype . Skype is a free program that allows you to make video and voice calls ®... - Page 35 English 8. Select “Tools” then “Options.” Go into “Video Settings” and verify that “Wireless Baby Monitor” is an option for “Webcam.” Select “USB Video Device” and check for image. 9. Still under “Options,” go into “Audio Settings” and verify that “Wireless Baby Monitor”...
-
Page 36: Troubleshooting
Home & Away Portable Digital Video Monitor ™ Troubleshooting For latest troubleshooting information, please check our website www.firstyears.com/ homeandaway Problem Possible Cause Solution Parent Unit(s) No power • Press and hold power • Unit is not turned on. button. (No lights on unit) •... - Page 37 English Troubleshooting Problem Possible Cause Solution Parent Unit No display image or sound, • Unit is getting little or no • Recharge batteries or or very weak reception power. plug in adapter. Child Unit • Make sure adapter is plugged in and outlet is receiving power.
-
Page 38: Fcc Statement
Home & Away Portable Digital Video Monitor ™ Note: This equipment has been tested and found to comply with the limits for a Class B digital device, pursuant to Part 15 of the FCC Rules. These limits are designed to provide reasonable protection against harmful interference in a residential installation. -
Page 39: Warranty
English Warranty Our Limited Warranty and Warranty Period When we use the terms “we,” “us,” and “our,” we are referring to TOMY and when we use the terms “you and “your,” we mean the original end-user customer. Our products are guaranteed to be free from defects in material and workmanship under normal and intended use for a period of 90 days from the date of your purchase.
Need help?
Do you have a question about the home & away portable and is the answer not in the manual?
Questions and answers