Advertisement
KOBALT
and the K Design
®
trademarks of LF, LLC. All Rights Reserved.
ATTACH YOUR RECEIPT HERE
Serial Number _______________ Purchase Date _______________
Questions, problems, missing parts? Before returning to your retailer, call our customer
service department at 1-888-3KOBALT (1-800-356-2258), 8 a.m. - 8 p.m., EST, Monday - Friday.
AB1315
are registered
®
20-VOLT CORDLESS
COMPACT DRILL/DRIVER
ITEM #0437506
MODEL #KT300A
Français p. 19
Español p. 37
kobalttools.com
Advertisement

Related Manuals for Kobalt KT300A


Summary of Contents for Kobalt KT300A
- Page 1 COMPACT DRILL/DRIVER KOBALT and the K Design are registered ® ® MODEL #KT300A trademarks of LF, LLC. All Rights Reserved. Français p. 19 Español p. 37 ATTACH YOUR RECEIPT HERE Serial Number _______________ Purchase Date _______________ Questions, problems, missing parts? Before returning to your retailer, call our customer service department at 1-888-3KOBALT (1-800-356-2258), 8 a.m.
-
Page 2: Table Of Contents
TABLE OF CONTENTS Product Specifications ............. . 2 Safety Information . -
Page 3: Safety Information
SAFETY INFORMATION Know the Tool to operate this tool, carefully read this manual and all labels affixed to the drill/driver before using it. Keep this manual available for future reference. Important This tool should only be serviced by a qualified service technician. Read All Instructions Thoroughly General Safety Rules For All Power Tools WARNING: Read all safety warnings and all instructions. - Page 4 SAFETY INFORMATION Personal Safety • Stay alert, watch what you are doing and use common sense when operating a power tool. Do not use a power tool while you are tired or under the influence of drugs, alcohol or medication. A moment of inattention while operating power tools may result in serious personal injury. • Use personal protective equipment. Always wear eye protection. Protective equipment such as dust mask, non-skid safety shoes, hard hat, or hearing protection, used for appropriate conditions, will reduce personal injuries.
- Page 5 • Use power tools only with specifically designated battery packs. Use of any other battery packs may create a risk of injury and fire. • When a battery pack is not in use, keep it away from other metal objects, such as paper clips, coins, keys, nails, screws or other small metal objects that can make a connection from one terminal to another. Shorting the battery terminals together may cause burns or a fire. • Under abusive conditions, liquid may be ejected from the battery; avoid contact. If contact accidentally occurs, flush with water. If liquid contacts eyes, seek medical help. Liquid ejected from the battery may cause irritation or burns. Service • Have your power tool serviced by a qualified repair person using only identical replacement parts.
-
Page 6: Preparation
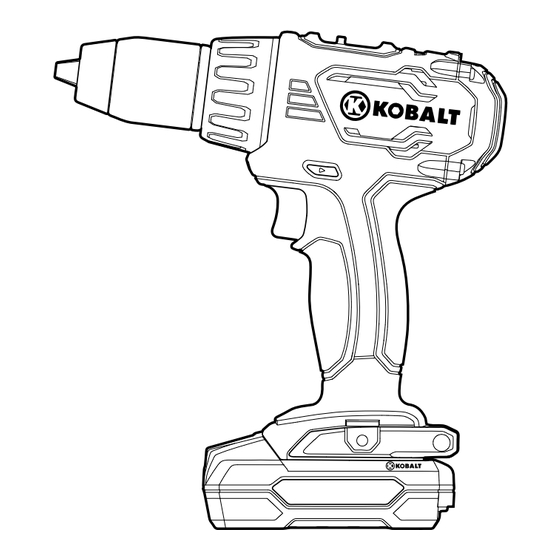
PREPARATION Know Your Cordless Drill/Driver Before attempting to use the drill/driver, familiarize yourself with all of its operating features and safety requirements. PACKAGE CONTENTS PART DESCRIPTION Variable-speed trigger switch Direction-of-rotation selector (forward/center lock/reverse) Torque-adjustment ring LED work light Handle Gear selector Battery pack Battery-release button Keyless chuck... -
Page 7: Operating Instructions
OPERATING INSTRUCTIONS 1. To Attach Battery Pack a. Place the direction-of-rotation selector (B) in the center (locked) position. b. Align the raised portion on the battery pack (G) with the grooves on the bottom of the drill/driver, and then slide the battery pack onto the drill/driver as shown. c. - Page 8 OPERATING INSTRUCTIONS 3. Two-Speed Gear Box a. The drill/driver has a two-speed gear box designed for drilling or driving at two different variable-speed ranges. A gear selector (F) is located on the top of the drill/driver to select either 1 (Low) or 2 (High) speed.
- Page 9 OPERATING INSTRUCTIONS 4. Direction-of-Rotation Selector (Forward/Center Lock/Reverse) The direction of bit rotation is reversible and is controlled by a selector located above the trigger switch (A). With the drill/driver held in the normal operating position, pointing away from you: a. Position the direction-of-rotation selector (B) to the left of the tool for forward rotation.
- Page 10 OPERATING INSTRUCTIONS 6. Adjustable Torque Clutch a. The torque clutch can be adjusted to 23 driving settings and 1 drilling setting. The higher the torque setting, the more force the drill/driver produces to turn an object. b. When using the drill/driver for different driving applications, it is necessary to increase or decrease the torque to help prevent the possibility of damaging screw heads, threads, workpiece, etc.
- Page 11 OPERATING INSTRUCTIONS 8. LED Work Light a. The LED work light (D), located above the trigger switch (A), will illuminate when the trigger switch is depressed. This provides additional light on the surface of the workpiece for operation in lower-light areas.
- Page 12 OPERATING INSTRUCTIONS 10. Installing the Bit Holder The bit holder (K) at the base of the tool can store 2 bits. a. Align the rib of bit holder with the hole on the base of the drill. b. Insert the screw (L) and tighten the screw securely with a Phillips screwdriver (not included).
- Page 13 OPERATING INSTRUCTIONS 12. Removing Bits a. Lock the trigger switch by placing the direction-of- rotation selector (B) in the OFF (center) position. b. Open the chuck jaws. NOTICE: Rotate the chuck body in the reverse direction to loosen the chuck jaws. Do not use a wrench to tighten or loosen the chuck jaws.
- Page 14 OPERATING INSTRUCTIONS NOTICE: This drill/driver is equipped with an electric brake. When the brake is functioning properly, sparks may be visible through the vent slots in the housing. This is normal and is the action of the brake. Wood Drilling a.
- Page 15 OPERATING INSTRUCTIONS 14. Screw Driving Try to use modern screws for easy driving and improved grip. a. Install the correct driver bit. b. Ensure that the torque-setting ring is set to the most suitable setting. If in doubt, start with a low setting and gradually increase the setting until the most suitable position is found.
-
Page 16: Care And Maintenance
CARE AND MAINTENANCE General Maintenance All repairs should be carried out only by an authorized service organization. Before cleaning or performing any maintenance, remove the battery pack from the tool. For safe and proper operation, always keep the tool and its ventilation slots clean. Always use only a soft, dry cloth to clean your drill/driver;... -
Page 17: Troubleshooting
This warranty excludes blades, bits, bulbs and accessories. This warranty gives you specific legal rights, and you may also have other rights that vary from state to state. Printed in China KOBALT and the K Design are registered trademarks ®...
Need help?
Do you have a question about the KT300A and is the answer not in the manual?
Questions and answers
Switch does not work on a 20v drill model KT300A. This is the 2nd drill I've owned with the same problem.
Possible causes of the switch not working on the Kobalt 20V drill model KT300A include:
1. The direction-of-rotation selector is set to the OFF (center) position, which locks the trigger switch.
2. The tool may have an internal fault and may require servicing by a qualified technician.
3. The battery may be low or not properly connected, preventing the switch from activating the motor.
Always check the selector position and battery first before seeking service.
This answer is automatically generated