Table of Contents
Advertisement
Advertisement
Table of Contents

Related Manuals for Technika TDX6SS-3


Summary of Contents for Technika TDX6SS-3
- Page 1 TDX6SS-3/TDX6W-3...
-
Page 2: Table Of Contents
Control Panel...........2 Dishwasher Features........2 A Fill the Rinse Aid Dispenser 、 ......3 RINSE AID DISPENSER........3 Dear Customer, Adjusting Rinse Aid Dispenser......3 Please read this User Information carefully and keep it B Function of Detergent ..、... - Page 3 • Do not abuse, sit on, or stand on the door or dish rack of the dishwasher • Do not touch the heating element during or immediately after use • Do not operate your dishwasher unless all enclosure panels are properly in place. Open the door very carefully if the dishwasher is operating.
-
Page 4: Control Panel
To get the best performance from your dishwasher, read all operating instructions before using it for the first time. 1 On/Off button: To turn On/Off the power supply. 6 Door Handle: Pull it to open the door. 2 Power Light : To come on when the ON/OFF Button is 7 Program Button: To select washing program when press Pressed down. -
Page 5: A Fill The Rinse Aid Dispenser
Rinse aid is automatically added during the last rinse, ensuring thorough rinsing, and spot and streak free drying. Only use branded rinse aid for dishwasher. Never fill the rinse aid dispenser with any other substances (e.g. dishwasher cleaning agent, liquid detergent). This would damage the appliance. -
Page 6: B Function Of Detergent
The rinse aid dispenser has six or four settings. Always start with the dispenser set on “2”. If spots and poor drying are problems, increase the amount of rinse aid dispensed by removing the dispenser lid and rotating the dial to “3”. If the dishes still are not drying properly or are spotted, adjust the dial to the next higher number until your dishes are spot-free. -
Page 7: Fill In Detergent
If the lid is closed: press release button. The lid springs open. Always add the detergent just before starting each wash cycle. Only use branded detergent aid for dishwasher. Dishwasher detergent is corrosive! Take care to keep it out of reach of children. Proper Use of Detergent Use only detergent specifically made for use in dishwashers. -
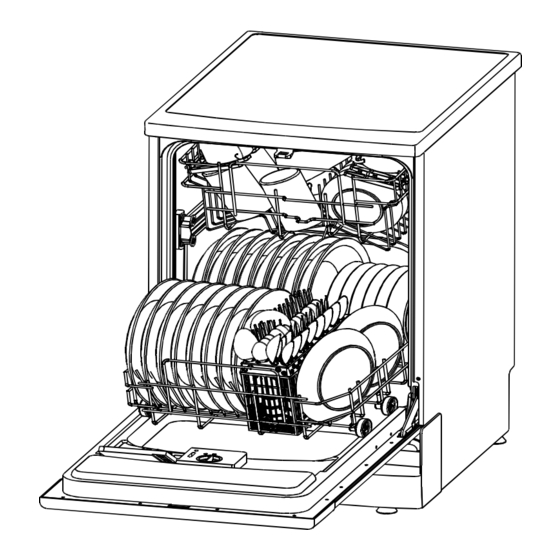
Page 8: Attention Before Or After Loading The Dishwasher Racks
For best performance of the dishwasher, follow these loading guidelines. Features and appearance of racks and silverware baskets may vary from your model. Attention before or after Loading the Dishwasher Racks Scrape off any large amounts of leftover food. It is not necessary to rinse the dishes under running water. Place objects in the dishwasher in following way: 1.Items such as cups, glasses, pots/pans, etc. -
Page 9: Loading The Lower Rack
We recommend that you place large items which are most difficult to clean in to the low er rack: pots, pans, lids, serving dishes and bowls, as shown in the figure to the right. It is preferable to place serving dishes and lids on the side of the racks in order to avoi d blocking the rotation of the top spray arm. -
Page 10: Silverware Basket
Silverware Basket Silverware should be placed in the silverware basket with handles at the bottom: If the rack has side baskets, the spoon should be loaded individually into the appropriate slots, especially long utensils should be placed in the horizontal position at th e front of the upper rack. -
Page 11: Attention
shes and items of cutlery must not lie inside one another, or cover each othe r avoid damage to glasses, they must not touch Load large items which are most difficult to clean into the lower rack he upper rack is designed to hold more delicate and lighter dishware such as glasses, coffee and tea cups Attention! Long bladed knives stored in an upri ght position are a potential hazard! -
Page 12: Wash Cycle Table
For the heaviest soiled loads, -wash(45℃ such as pots,pans,casserole Wash (65 ℃) Intensive 5/25 g 1.55 17.7 dishes and dishes that have Rinse been sitting with dried food Rinse (65 ℃) on them for a while. Drying For heavy soiled loads, Pre-wash Wash (50 ℃) such as... -
Page 13: Turning On The Appliance
Turning on the Appliance Starting a wash cycle... Draw out the lower and upper basket, load the dishes and push them back. It is commended that loading the lower basket first, than the upper one (see the section entitled “Loading the Dishwasher”). Pour in the detergent (see the section entitled “Salt, Detergent and Rinse Aid”). -
Page 14: Filtering System
The filter prevent larger remnants of food or other objects from getting inside the pump. This residue can occasionally clog up the filters. The filter system consists of a coarse filter,a flat (Main filter) And a microfilter(Fine filter). Main filter Food and soil particles trapped by this filter are pulverized by a special jet on the lower spray arm and washed down the drain. -
Page 15: Filter Assembly
Filter assembly For best performance and results, the filter assembly must be cleaned. The filter efficiently removes food particles from the wash water, allowing it to be reci rculated during the cycle. For this reason, it is a good idea to remove the larger food particles trapped in the filter after each wash cycle by rinsing the semicircular filter and cup under running water. -
Page 16: Cleani Ng The Door
To clean the edge around the door, you should use only a soft warm, damp cloth. To prevent penetration of water into the door lock and electrical components, do not use a spray cleaner of any kind. Also, never use abrasive cleaners or scouring pads on the outer surfaces because they will scratch the fini sh. -
Page 17: Levelling The Appliance
Once the appliance is positioned,adjust the feet (screwing them in or out) to adjust the height of the dishwasher, making it level. In any case ,the appli ance should not be inclined more than 2 . SINK DISHWASHER P O W E R O U T L E T Inlet pipe connector Drain pipe connector Min 100mm FRONT VIEW... -
Page 18: Water Connection
Please see the rating lable to know the rating voltage and connect the dishwasher to appropriate power supply,Use required fuse 12 amp. Fused electrical supply is required-copper wire only. Time delay fuse or circuit breaker recommended and provide separate circuit serving only this appliance. Outlet should be placed in adjacent cabinet. After making sure that the voltage and the frequency values for the current in the home correspond to those on the rating plate and that the electrical system is sized tor the maximum voltage on the rating plate, insert the plug into an electrical socket which is earthed properly. -
Page 19: Starting Dishwasher
How to Drain Excess Water From Hoses If the sink is 1000mm higher from the floor, the excess water in hoses cannot be drained directly into the sink. It will be necessary to drain excess water from hoses into a bowl or suitable container that is held outside and lower than the sink. -
Page 20: Before Calling For Service
Before Calling for Service Review the charts on the following pages may make you be free of calling for service. Fuse blown, or the Replace fuse or reset circuit breaker. Remove any other circuit breaker acted appliances sharing the same circuit with the dishwasher Make sure the dishwasher is turned on and the door is Power supply is not turned on... -
Page 21: Error Codes
Combination of soft Use less detergent if you have soft water and select a water and too much shortest cycle to wash the glassware and to get them clean. detergent Tea or coffee stains using a solution of 1/2 cup of bleach and 3 cups warm water to remove the stains by hand. -
Page 22: Technical Information
Height : 850mm Width : 600mm Depth : 580mm Voltage connected Load : see rating label Water pressure: 0.04-1.0MPa Hot water connection : max 60 ℃ Power supply: see rating label Capacity: 12 Place settings...
Need help?
Do you have a question about the TDX6SS-3 and is the answer not in the manual?
Questions and answers