Table of Contents
Advertisement
Thank you for purchasing the FLEX 3S.
You can enjoy various types of massage for relieving or soothing fatigue.
We hope the FLEX 3S will be a valued partner in your daily health
preservation for many years to come.
Please read this Operating Manual before use.
●
Keep this Operating Manual nearby so that you can refer to it anytime.
●
This product is designed for home use.
●
ENGLISH
HCP-S373A
CONTENTS
■
SAFETY PRECAUTIONS ..................1
■
MAIN FEATURES .............................4
■
COMPONENTS & DESCRIPTION ....5
■
BEFORE USE....................................7
■
POSITION ADJUSTMENT .............12
■
AFTER USE ....................................15
■
SESSIONS & SELECTION ..............16
■
PRESET SESSIONS ........................17
■
MANUAL SESSIONS .....................19
■
TROUBLESHOOTING ....................23
■
■
FAQ ................................................25
■
CARE AND STORAGE ....................27
■
AFTER SALES SERVICE .................28
■
SPECIFICATIONS ..........................29
Operating Manual
Warranty card provided separately
Advertisement
Table of Contents

Related Manuals for inada Flex 3s HCP-S373A


Summary of Contents for inada Flex 3s HCP-S373A
-
Page 1: Table Of Contents
ENGLISH HCP-S373A Thank you for purchasing the FLEX 3S. You can enjoy various types of massage for relieving or soothing fatigue. We hope the FLEX 3S will be a valued partner in your daily health CONTENTS preservation for many years to come. ■... -
Page 2: Safety Precautions
SAFETY PRECAUTIONS Types of Indications Warning This action could result in serious injury or death. Caution This action could result in personal injury or damage to property. Types of Symbols and Description Prohibited. Do not disassemble. Do not Prohibited disassemble Do not use in a location where the chair Do not handle with wet hands. - Page 3 Safety Precautions: Before Use Warning ● The following persons must not use this massage chair: ◎ Persons who have been instructed by a doctor to avoid massage therapy. Ex. Thrombosis, severe aneurism, acute varicosity, or dermatitis and/or skin infection including infl ammation of the typodermis. ◎ Persons with suspected acute neck sprain (whiplash injury) ●...
- Page 4 Prohibited ● Do not try to repair any malfunction of the chair. Contact your local Inada distributor (see back page) for assistance. ● For safety, if the power cord is damaged contact the “Repair Service Center“ (see back page) for assistance.
-
Page 5: Main Features
The chair is equipped with heaters for the fi ngertips and toes. Benefi ts As a therapeutic massage device for household use, the Inada Chair provides the following benefi ts: ● Relieves fatigue ● Alleviates muscle fatigue ● Relieves muscle pain... -
Page 6: Components & Description
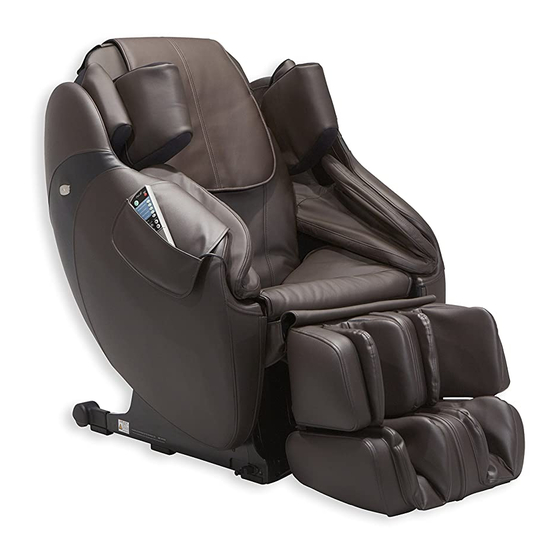
COMPONENTS & DESCRIPTION Chair ① ⑱ ② ⑤ ⑩ ④ 1 1 2 2 ③ ⑧ ⑨ ⑥ ⑦ ⑪ ⑰ ⑯ ⑫ ⑮ ⑭ ⑬ ① Headrest (small) ② Headrest (large) Arm Air Cushion ③ Back Pad ⑨... -
Page 7: Remote Control
Remote Control Turns the remote control power ON and OFF. Pushing the POWER button while the chair is activated causes the ① ② rollers to return to the starting position, after which the ① Button chair turns itself off . The button lights in green while the power to the remote control is ON, lights in orange while the power is OFF, and fl ashes in red while the chair is stopped in an emergency. -
Page 8: Before Use
BEFORE USE ● This product is shipped with the reclining seat back in its fully reclined position. Be sure to raise the seat back to its fully upright position. ● Do not expose the chair to sudden bursts of heat. If the room where the chair is to be used is cold, turn the heat up slowly. - Page 9 How to Remove and Install the Armrests If the clearance of the transportation passageway is less than 87 cm (34 inch), removing the armrests is recommended before transporting the chair. Minimum product width when armrests installed: Approx. 83 cm (32 inch) Minimum product width when armrests removed: Approx.
- Page 10 BEFORE USE ③ Remove the screws and washers. (3 locations on each side, shown by the dotted line circles) Fabric Washer Cover (Concave Surface) Screw ② ① ③ ● Installation precautions Install by using the T-shaped wrench in the direction shown in the diagram. (Ensure that the washer direction is correct.) If the screw is installed at an angle, the threads may be crushed.
- Page 11 How to Transport or Move the Chair Before moving the chair, turn off the main power, unplug the power plug from the wall outlet, and also disconnect the power cord connector from the power connector on the chair. To Move with the Wheels To Carry Raise the reclining seat back to its upright position, hold Fully recline the seat back and carry the chair by holding...
- Page 12 BEFORE USE Checking the Seat Cover Before using the chair, check the seat cover for tearing with the following procedure. ① Peel open the Velcro at the top. ② Fold the back pad forward, and check by touching with your hands that the chair fabric is not damaged. Chair Covering Back Pad Velcro...
-
Page 13: Position Adjustment
POSITION ADJUSTMENT How to Sit When the chair is off , the rollers are normally drawn back into the left and right sides of the upper part of the seat back (Storage Position). For safety, fi rst check the position of the rollers. If they are in any position other than the storage positions, turn the main POWER switch ON before sitting down to allow the rollers to return to their storage position. - Page 14 POSITION ADJUSTMENT How to Use the Buff er Pad If you feel that the massage is too intense, place the supplied buff er pad onto the back pad and start the massage again. ● Make sure that the buff er pad does not curl up or become lop-sided. Caution →...
- Page 15 How to Use the Leg Rest Vertical Adjustment ■ To raise the leg rest Press the top LEG REST button to raise the leg rest. ■ To lower the leg rest Press the bottom LEG REST button to lower the leg rest. When you press the button for approximately 2 seconds, the leg raise (lower) operation automatically Hold Function...
-
Page 16: After Use
POSITION ADJUSTMENT How to Use the Reclining Seat Back ■ To raise the reclining seat back Press the top RECLINE button to raise the reclining seat back. ■ To lower the reclining seat back Press the bottom RECLINE button to lower the reclining seat back. Reclining Movement Range The chair reclines up and down in conjunction with the movement of the seat back and leg rest. -
Page 17: Sessions & Selection
SESSIONS & SELECTION The preset sessions make it easy to select a session that suits your Preset Sessions preferences or objectives. Massage & Stretch This session includes light stretching in a full-body massage. Full Body Stretch Healthcare Sessions This session includes light stretch actions where the entire body is stretched. -
Page 18: Preset Sessions
PRESET SESSIONS Preset Session Massages ● 6 automatic sessions provide a variety of diff erent massages to relieve fatigue. ● With the preset session buttons, you can choose your favorite session to give you a massage according to the preset menu. ❶... - Page 19 Air Massage Intensity Adjustment and Cancelation The air massage intensity can be adjusted. Each time the air intensity button is pressed, the intensity changes in the order of Low, Medium and High. (The default setting when the session starts is Medium.) In the same way, the intensity can be changed in the order of Low, Medium and High even when Max Intensity mode is ON.
-
Page 20: Manual Sessions
MANUAL SESSIONS Description of Manual Session Operations Select the massage operation of your choice from among menus ① to ④ . ● A circle in the adjustment column means that the particular adjustment can be made in the course of that massage action. ●... - Page 21 ③ ② ① ④ ④ Air Massage Press the button for the area that you want to massage. Intensity Button Operation Action Adjustment An air massage from your Arm Air ○ shoulders to fi ngers. An air massage from your Seat Air ○...
- Page 22 MANUAL SESSIONS Operation of Parts and Position Adjustment ❶ Press the button. If no session is made within 5 minutes, the power shuts off ❶ automatically. ❷ Press the button for the desired massage. Select a combination of your operations of choice from basic operations, rolling, special operations and air massage.
- Page 23 Width Adjustment During a basic operation where width adjustment is possible, the width of the rollers can be adjusted in 3 steps (Narrow, Medium and Wide). Speed Adjustment During a basic operation where speed adjustment is possible, the speed of action can be adjusted in 3 steps.
-
Page 24: Troubleshooting
If there is still a problem after trying the solutions given in this troubleshooting guide, stop using the chair immediately to prevent accident or injury, and unplug the power plug from the wall outlet. Contact your local Inada distributor (see back page) for assistance. Problem Cause &... -
Page 25: Regular Maintenance For Safety
The chair fabric (roller fabric) is a consumable part, and its service life is 3 years (conditions of use: two 15-minute sessions a day, every day). For safe use, periodic inspection by your local Inada distributor is recommended before the end of the service life. -
Page 26: Faq
Can I put the chair onto a wooden Can I use the chair even if I am fl oor or a heated fl oor? overweight? We recommend the chair be used Yes. by people weighing less than 100 kg. However, because the chair could damage the If you weigh more than that, try sitting slightly fl oor surface, we recommend laying a carpet or up in the chair, and not reclining too far. - Page 27 After performing the above, contact the your local Inada distributor for assistance. ❷ Lightly push the panel in the direction of the arrow and insert the projection on the top left of the panel into the hole on...
-
Page 28: Care And Storage
CARE AND STORAGE Storage ● After wiping off any dust or dirt, store your chair in a place that is relatively dry. ● If the chair is left unused for a while, put a cover on it that will protect it from dust and dirt. ●... -
Page 29: After Sales Service
Before calling for repairs or service, use the Troubleshooting guide on pages 23-24 to see if the problem can be solved easily. If the problem persists, contact your local Inada distributor for assistance. Have the following information ready. 1) Your name, address, and phone number 2) Product name and model number (see the Back Cover) 3) Serial No. -
Page 30: Specifications
SPECIFICATIONS Name & Model Number HCP-S373A Power Supply AC120V~ Power Consumption 150W Power Frequency 60Hz Rated Time 30 minutes Kneading Speed 3 levels, from minimum 6 times/minute to maximum 20 times/minute (approx.) Tapping Speed 3 levels, from minimum 180 times/minute to maximum 500 times/minute (approx.) Roller Width 3 steps (narrow, medium and wide) One full cycle in approx. - Page 32 Manufactured by FAMILY INADA CO., LTD. DATE OF ISSUE(day/mo/yr) 2-1-3 Nishi-Miyahara,Yodogawa-ku, Osaka 532-0004, Japan 1/2/2014 Made in JAPAN 778575900...
Need help?
Do you have a question about the Flex 3s HCP-S373A and is the answer not in the manual?
Questions and answers
Can I purchase a replacement cord for my INADA massage chair remote? The chair is model HCP-S373A with serial number 001932