
Related Manuals for Sharper Image SI724


Summary of Contents for Sharper Image SI724
- Page 1 Hybrid GP ™ Germicidal Air Purifier SI724 Instructions INCLUDES IMPORTANT SAFETY INSTRUCTIONS. READ ALL INSTRUCTIONS BEFORE USING THIS APPLIANCE. SAVE THESE INSTRUCTIONS.
- Page 2 Dear Sharper Image Customer, Thank you for your purchase of a Sharper Image product. We appreciate your business very much. Our goal is that you will be completely satisfied with this product’s quality and performance. We offer generous return privileges and excellent warranties on all our products.
- Page 3 WArnIng: To reduce the risk of fire, electric shock or injury when using any electrical appliance, basic precautions should always be followed, including: • T his appliance operates at 110V AC and 50/60Hz only. • C onnect to a properly grounded outlet only. • U se indoors only. • U nplug when not in use and before servicing. • D o not allow the appliance to be used as a toy. Close attention is necessary when the appliance is operated near children. • U se only as described in this user manual. • D o not use if cord or plug appears to be damaged. If the appli- ance is not working properly, or has been dropped, damaged, left outdoors or dropped into water, return it to a service center or to the original place of purchase. • D o not pull, lift or carry by the power cord. Do not use the cord as a handle, close a door on the cord, or pull the cord around or against sharp edges or corners.
- Page 4 WArnIng: To reduce the risk of fire, electric shock or injury when using any electrical appliance, basic precautions should always be followed, including: • D amaged power cord must only be replaced by qualified service personnel. There are no user-serviceable parts inside the unit. Any attempt to open the unit will void the warranty and could lead to serious damage to the unit and/or personal injury to the operator. • T urn off the unit before unplugging it from outlet. • D o not unplug by pulling the cord. grasp the plug itself, not the cord, when unplugging from an outlet. • D o not handle the plug or appliance with wet hands. • D o not put any object into openings. Do not continue to use with any opening blocked. Keep all openings free of dust, lint, hair or anything that may reduce airflow. • K eep hair, loose clothing, fingers and all parts of the body away from openings. • D o not operate the unit in areas where flammable or combus- tible products or vapors may be present. READ AND SAVE THESE INSTRUCTIONS...
- Page 5 Hybrid gP™ air purifier complies with current U.S. safety requirements for low ozone emissions for consumer products. We recommend that individuals with a history of respiratory disease consult with their doctor about possible heightened sensitivity to very low ozone. IMPORTANT NOTE: Candles, gas heaters and other oil-burning products create soot. This soot can be distributed through a venti- lation system and cause a sudden overload of soot to build up on and around your Hybrid gP . For better air quality and reduced cleaning, avoid burning candles indoors and have gas appliances checked on a regular basis. The energy efficiency of this EnErgY STAr qualified model is ® measured based on a ratio between the model’s CADr for dust and the electrical energy it consumes, or CADr/watt.
-
Page 6: Setup And Operation
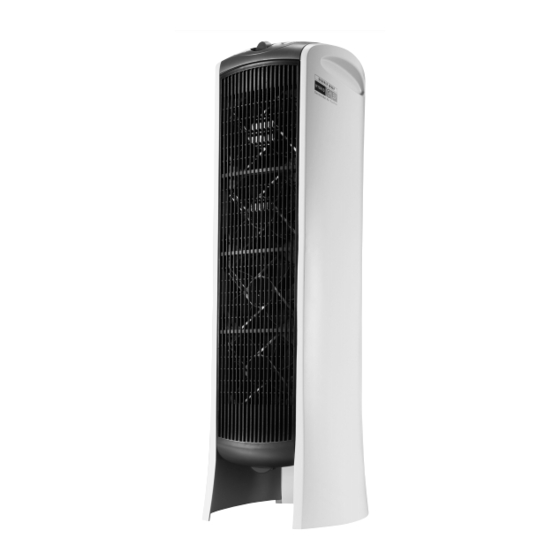
Features • r emovable, washable collection grid, front and rear grills. • F our user-selectable speeds (from quiet to high) and 20-minute Boost option. • P ower-interrupt memory (resets to last power setting when power is restored). • S torage for excess cord. Setup and Operation CAUTION: To reduce the risk of electric shock, this equipment has a grounding-type plug that has a third (grounding) pin. This plug will only fit into a grounding-type power outlet. If the plug does not fit into the outlet, contact qualified personnel to install the proper outlet. Do not alter the plug in any way. 1. P lug into a grounded three-prong outlet. 2. W rap excess cord into storage area at the bottom of the unit. 3. P lace the unit so the air intake (back of the unit) is at least 12" from the wall. Ensure that you do not obstruct the air intake. The air outlet (front of the unit) should have at least 3 feet of open space in front of it. -
Page 7: Basic Cleaning
Setup and Operation 5. S elect desired speed: • Q UIET for small rooms with poor ventilation. • L OW and MED for average to large rooms. • HIGH for extra large rooms and open areas. 6. P ress BOOST to activate the unit at maximum airflow and for 20-minute cleaning. After 20 minutes, the operation returns to the selected setting. Basic Cleaning The collection grid can be pulled out from the top of the unit for cleaning. Cleaning should be done weekly or as needed. We recommend checking the collector assembly after first two days of operation to see how fast dust accumulates in your residence. Different locations could have different dust-accumulation rates. To clean the grid, use the special cleaning tool with a mild deter- gent and warm water. run the bristles along the grid to allow them to enter at an angle. The bristles can then be used to dislodge attached particles inside the grid. (See figure on the next page.) - Page 8 Basic Cleaning Note: Avoid aggressively “jamming” the bristles in and out of the grid. This could bend the cleaning tool bristles and make it difficult to use. Do not use towel, sponge, abrasive or sharp objects to clean the collector grid. Collector plates are fragile and covered with plastic insulation that could be easily damaged. Before reinstalling, allow the grid to dry overnight. If the grill is still slightly damp, the unit performs a “drying cycle” to remove excess moisture before normal operation resumes. Note: This drying cycle functions to remove small amounts of residual moisture. Do not rely upon this feature to dry a wet grid.
-
Page 9: Grill Removal
OzoneGuard™ Filter The Ozoneguard™ filter is located on a separate, removable frame, just in front of the collection grid. First, remove the collec- tion grid, then grasp the Ozoneguard frame and slide it out. 1. r emove and check the Ozoneguard filter once a month. If dusty, clean it with your vacuum cleaner. 2. I f a dust deposit is still visible, soak the filter with warm water and a mild detergent. 3. r inse clean. Do not scrub the Ozoneguard filter or subject it to harsh cleaning agents. Standard detergent used to wash dishes by hand is a safe cleaning agent to use. Grill Removal The front and rear grills can be removed for periodic cleaning as needed. Pull the blue tab forward, located at the bottom of the grills, and slide the grill down. After washing, allow to dry, reinstall and slide up to lock in place. -
Page 10: Ambient Light Sensor
Ambient Light Sensor A small unmarked sensor is built into the control panel. This sensor detects the light level in the room and adjusts the control LEDs, dimming them in dark environments. Attention-Required LED This LED indicates that a problem has been detected. Clean the grids, grills and ionizing wires. If the problem persists, call our customer service department at 1-800-344-5555. Statement of FCC Compliance — Model SI724 WARNING: Changes or modifications to this unit not expressly approved by the party responsible for compliance could void the user’s authority to operate the equipment. This equipment has been tested and found to comply with the limits for a Class B digital device, pursuant to Part 15 of the FCC rules. These limits are designed to provide reasonable pro- tection against harmful interference in a residential installation. This equipment generates, uses and can radiate radio frequency energy and, if not installed and used in accordance with the... - Page 11 Statement of FCC Compliance — Model SI724 instructions, may cause harmful interference to radio communi- cations. However, there is no guarantee that interference will not occur in a particular installation. If this equipment does cause harmful interference to radio or television reception, which can be determined by turning the equipment off and on, the user is encouraged to try to correct the interference by one or more of the following measures: • r eorient or relocate the receiving antenna. • I ncrease the separation between the equipment and receiver. • C onnect the equipment into an outlet on a circuit different from that to which the receiver is connected. • C onsult the dealer or an experienced radio/TV technician for assistance.
-
Page 12: One Year Warranty
One-Year Warranty What Is Covered This warranty covers any defects in materials or workmanship, with the exceptions stated below. How Long Coverage Lasts This warranty runs for one year from the date of original purchase. What Is Not Covered This warranty does not cover damage caused by misuse or use other than as intended and described in the product instruction manual, or loss or damage to batteries or removable parts. What The Sharper Image Will Do The Sharper Image warrants this product against defects in materials and workmanship. When repair is not practical, The Sharper Image will have the option to replace the defective product with a fully warranted, factory-reconditioned product that is the same or has similar functionality. How to Obtain Service return the product and receipt, along with a brief explanation of the problem, to: T.S.I. - Returns Department 2901-A West 60th Street Little Rock, AR 72209 If you have questions please feel free to contact our customer service representatives at 1-800-344-5555 or by email at care@web.sharperimage.com.
Need help?
Do you have a question about the SI724 and is the answer not in the manual?
Questions and answers
hi, the red attention light wont go off. .sharper image hybrid gp germicidal air purifier SI724
The red attention light on the Sharper Image Hybrid GP Germicidal Air Purifier SI724 may not turn off if the collector grid is still damp. The unit performs a drying cycle to remove small amounts of moisture, but if the grid is too wet, it may not dry completely, keeping the light on. Allow the grid to dry overnight before reinstalling.
This answer is automatically generated