RetroSound One B/C Owner's Installation Manual
Model one am / fm radio w/ usb/sd mp3 playback
and infinimount shaft/bracket system
Hide thumbs
Also See for One B/C:
- Owner's installation manual (29 pages) ,
- Owner's installation manual (29 pages)
Table of Contents
Advertisement
Quick Links
Model One B/C
Owner's & Installation Guide
Model One AM / FM Radio w/ USB/SD MP3 Playback
and Infinimount Shaft/Bracket System
Copyright
2011 Retro Manufacturing, LLC
No text, illustrations, or format of this
manual in printed or electronic form
may be copied without written permission
from Retro Manufacturing, LLC or any of its subsidiaries.
All Rights Reserved.
Version 3.2
June 2011
Advertisement
Table of Contents

Subscribe to Our Youtube Channel
Related Manuals for RetroSound One B/C


Summary of Contents for RetroSound One B/C
- Page 1 Model One B/C Owner's & Installation Guide Model One AM / FM Radio w/ USB/SD MP3 Playback and Infinimount Shaft/Bracket System Copyright 2011 Retro Manufacturing, LLC No text, illustrations, or format of this manual in printed or electronic form may be copied without written permission from Retro Manufacturing, LLC or any of its subsidiaries.
-
Page 2: Welcome, Warning & Precautions
Welcome! Thank you for your purchase of the third generation of our Retrosound Model One Radio! We hope it will provide you with years of enjoyment. Below are some features of this unit: LCD Display w/ enhanced viewing angle & daylight compatible LCD Display shows Mp3/WMA track names AM/FM PLL tuner w/ 30 presets &... -
Page 3: Table Of Contents
Table of Contents Page Number Welcome, Warning & Precautions........1 Table of Contents.............2 Installation & Use Warnings..........3 Location of Controls, Remote, Connectors, etc...4-8 What's in the Box.............9 Preparing to Install Your Unit..........10-16 Model One Specifications & Dimensions......17 Using Your Unit..............18-26 Setting the Clock.............18 Turning the Unit On/Off...........18 Volume Adjustment..........18 Selecting Your Listening Source......18... -
Page 4: Installation & Use Warnings
Installation & Use Warnings ❑Disconnect the lead from the negative (–) battery Observe the following warnings when using terminal before installation. this unit. Wiring and installation with the negative (–) battery terminal ❑The driver should neither watch the display nor connected may cause electrical shock and injury due to a operate the system while driving. -
Page 5: Location Of Controls, Remote, Connectors, Etc
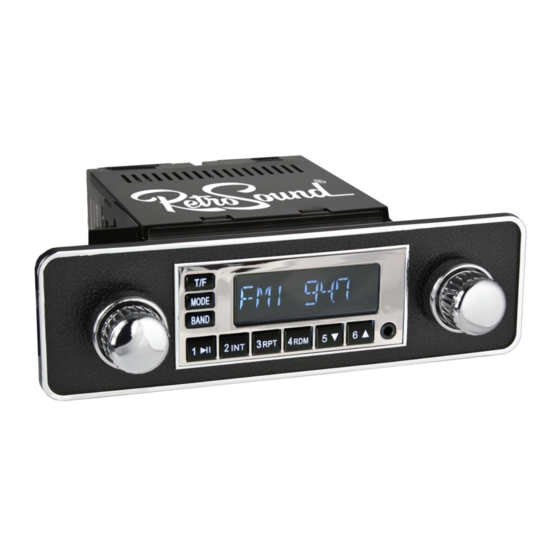
Location of Controls (Quick Start Guide) 10 11 3 4 5 6 7 8 9 Please review this section for quick reference, as it contains information on the location of controls and basic operations. For specific details on the particular operation, please refer to the table of contents. POWER on/off: Press the left center knob to turn the unit on. - Page 6 (CONTINUED) Location of Controls 10 11 3 4 5 6 7 8 9 Please review this section for quick reference, as it contains information on the location of controls and basic operations. For specific details on the particular operation, please refer to the table of contents. T/F Button: Use this button to view the clock, and toggle through various modes.
- Page 7 (CONTINUED) Location of Controls Please note that some remotes included with our Model One radios may not come coded to the radio from the factory. Follow the procedure below to code the remote to the radio. HOW TO CODE A NEW REMOTE INTO YOUR MODEL ONE RADIO (FOR QUESTIONS CALL 888-325-1555 OR SEND EMAIL TO SUPPORT@RETROSOUNDUSA.COM) 2.
- Page 8 (CONTINUED) Location of Controls & Connectors REAR View of Model One Internal Amplifier Heatsink Threaded mount for metal backstrap (included) used for rear support of Female ISO wire harness connector main body w/ 1 male power/ground harness & 1 male speaker lead harness External Antenna Input Input for included SD/USB/AUX...
- Page 9 (CONTINUED) Location of Controls & Connectors Remote Mountable SD/USB/Aux-In Box SD Card Input (Up to 32 gig) can be plugged into this slot SD/MMC/SDHC AND Mini & Micro SD Cards can be used with SD adapters. Plug your flash memory drive 3.5mm Aux input into this USB port (Up to 32 Gig) Connect your Ipod, satellite, or other portable...
-
Page 10: What's In The Box
What’s in the Box (accessories & parts) What’s in the box: (1) Retro Sound Model One* (1) 16-key remote control (includes Battery/already installed**) NOTE: RETRO CLASSIC UNIT DOES NOT INCLUDE REMOTE (OPTIONAL) (2) Infinimount Brackets (2) Infinimount Shaft System (1) Metal backstrap w/ hardware, used to secure main unit behind dash (2) ISO Wiring harness to connect to Model One Remote Mountable SD/USB/Aux-In Box (misc) Screws, washers &... -
Page 11: Preparing To Install Your Unit
Preparing to Install Your Unit PLEASE NOTE THAT THIS UNIT REQUIRES +12V TO BOTH THE RED & YELLOW WIRES, OTHERWISE THE UNIT WILL NOT OPERATE. CALL US OR EMAIL US IF YOU HAVE QUESTIONS! (Support@retrosoundusa.com) Familiarize yourself with the Model One wiring harness (Note: There are 2 plug connectors: Plug "A"... - Page 12 Preparing to Install Your Unit (Continued) Find the Infinimount shafts & brackets (2 of each enclosed) Assemble the Model One unit's Infinimount bracket and shaft system using the supplied screws and shaft nuts. Note: you can move our brackets forward , backward, and in any direction to accommodate your fit needs! You can even cut, trim or bend the...
- Page 13 Tighten shaft nuts and make sure that shaft depth works with your dash configuration; the Retrosound Infinimount bracket shaft and bracket system are extremely adjustable and care should be taken to ensure proper final fit for the perfect installation.
- Page 14 We also have a 3.5” H x 9”W Universal plate you can trim and cut to get the desired appearance. Retrosound Model One B w/ Black Control Face shown above with Chrome dash bezel and Model One C w/ Chrome Control Face...
- Page 15 Preparing to Install Your Unit (Continued) The Retrosound Model One is available with an optional set of metal knobs and a faceplate (for the front of the dash) or bezel (mounts from behind the dash) that fits around the control face of your Model One/Apache or Retro Classic radio(s).
- Page 16 Preparing to Install Your Unit (Continued) NOTE: The following installation option is for advanced knowledgeable custom installation specialists. The Retrosound Model One faceplate is removable to allow for unique angled installations, canted angles, upside-down mounting and other unique configurations limited only to your installation skills. Below is a photo illustrating what the unit looks like with the control face removed, connected by a ribbon cable from the body of the main unit to the radio’s control...
- Page 17 Preparing to Install Your Unit (Continued) Metal Knob Install Guide Sometimes the Retrosound Shafts need to be adjusted to allow you to mount our metal knobs to the shafts. Once your radio is installed follow the steps below to ensure a proper knob fit.
-
Page 18: Model One Specifications & Dimensions
1.5”H (Radio Face) 3.5”W (Radio Face) -
Page 19: Using Your Unit
(release, when you see the blinking clock) Turning The Unit On/off: ook for "RETROSOUND" on power up. Press the Left center knob to turn the unit on. L he LCD display Press and hold the left center knob for 2 seconds to turn the unit off. T will show "GOODBYE"... -
Page 20: Adjusting The Sound Properties
Using Your Unit (Detail) Adjusting the Sound Properties: The Retrosound Model One has many sound adjustment modes to help you tailor the radio to your preference. To access these modes of adjustment, press the left knob (SEL) in and turn the knob to the right or left to adjust. -
Page 21: Special Modes Of Operation/Sub Menu
EUR The Retrosound Model One has the capability to receive AM/FM broadcast frequencies in other countries. To modify the default setting (USA) to EUR (Europe), press and hold the SEL (right center shaft knob). Repeatedly press the right center shaft button to scroll through the sub menu and turn the knob to the right, on screen you will see "AREA USA". - Page 22 Using Your Unit (Detail) SUB-MENU FUNCTION: LOUDNESS ON/OFF LOUD ON To Activate the LOUDNESS function from the Sub Menu, press the center right shaft “SEL” button and hold it for 2 seconds, release button when you see the menu. Then turn the shaft control right or left to toggle the LOUD function ON or OFF.
-
Page 23: About Rds/ Using Rds Functions
RDS enables your receiver to display text messages (usually call letters and format info) that many FM stations include on a subcarrier signal within their normal broadcast signal. How to use RDS on your Retrosound Radio The RDS function is always active, and if the FM station you are listening to is broadcasting RDS information, the radio station call letters, song info, artist info and other messages will appear. - Page 24 Using Your Unit (Detail) RDS MODES CONTINUED... How to use the PTY function when in the AREA EUR tuner mode RDS has a function called PTY (Program Type). This coding of up to 31 pre defined program types allow you to find similar programming by genre. When the tuner searches for this desired programming type, the tuner will study all strong FM stations to see what programming type they are broadcasting.
-
Page 25: Selected Source Mode: Radio
Using Your Unit (Continued) Selected Source: Radio Once you've selected the radio function, you can start storing your presets or tuning to your preferred station. 94.7 Press "BAND" to select FM1,2,3 or AM1,2 for a total of 30 Presets To save a preset, tune to the station using the right shaft knob, then choose the preset number you wish to assign to that station. -
Page 26: Selected Source Mode: Usb
Using Your Unit (Continued) Selected Source: USB/SD (All About MP3 WMA files MP3 (MPEG Audio Layer-3) and WMA (Windows Media™ Audio) is a format for compressed audio files. Common facts about these compressed-sound formats: High bit rate and high sampling frequencies are recommended for high sound quality. Selecting VBR (Variable Bit Rate) is not recommended because playing time is not displayed properly and there may be some audible skipping artifacts. - Page 27 Using Your Unit (Continued) Playback Modes available in USB Mode Please note that the function buttons on the front of the faceplate (1-6) will allow you to play/pause, listen to 10 seconds of each song (INT) or repeat the track you're listening to (RPT) or randomly select from all songs from a USB thumb/flash drive or SD card.
-
Page 28: Selected Source Mode: Auxiliary Input
Using Your Unit (Continued) Selected Source: AUXILIARY INPUT 1 (FRONT OF RADIO) AUXILIARY INPUT 2 (REAR OF RADIO) Plug in your external music source using a 3.5mm (1/8") connector. An example of an external source would be a portable CD player, mini disc player, portable cassette recorder, Ipod, Mp3 player. -
Page 29: Limited Warranty
LIMITED WARRANTY If your product does not work properly because of defects in materials and workmanship RetroSound a division of Retro Manufacturing, LLC (collectively referred to as “the warrantor”) will, for the length of the period indicated in the chart below, which starts with the date of original purchase (“warranty period”), at its option either... - Page 30 MODERN SOUND FOR YOUR CLASSIC Retro Manufacturing, LLC, 7370 Eastgate Road, Suite 125 Henderson, NV 89011 p) 888.325.1555 | f) 702.483.2229 | www.retromanufacturing.com...
Need help?
Do you have a question about the One B/C and is the answer not in the manual?
Questions and answers