
Related Manuals for Blaupunkt AMSTERDAM 130


Summary of Contents for Blaupunkt AMSTERDAM 130
- Page 1 CAR RADIO AMSTERDAM 1 011 402 110 001 ADELAIDE 1 011 402 100 001 Enjoy it. Operating and installation instructions...
-
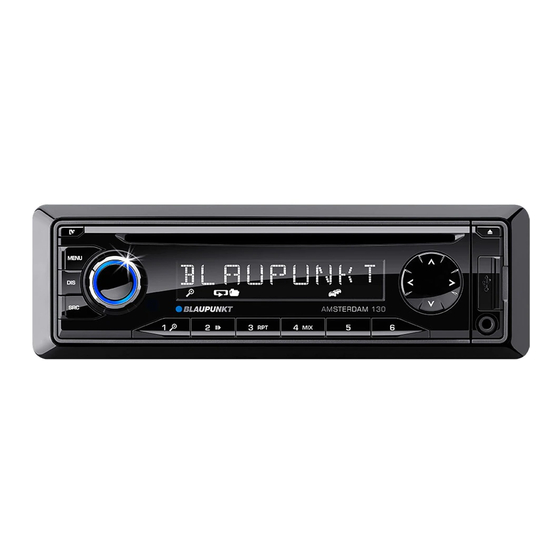
Page 2: Control Panel
Controls button (Eject) (Amsterdam 130 only) button Eject a CD Unlock the detachable control panel USB socket MENU button Short press: Call up/close menu Front AUX-IN socket Long press: Start scan function Keys 1 - 6 On/Off button < Infrared receiver... -
Page 3: Table Of Contents
Switching display............9 CD/MP3/WMA mode ......... 9 Basic information ............9 Changing to CD/MP3/WMA mode ...... 9 Inserting/ejecting a CD (Amsterdam 130 only) ...........10 Connecting/removing a USB data carrier ..10 Inserting/removing the memory card (Adelaide 130 only) ..........10 Selecting tracks ............11 Selecting a folder (only in MP3/WMA mode) ........11... -
Page 4: Safety Notes
• Do not modify or open the device. The device DANGER! contains a Class 1 laser that can cause injuries to your eyes (Amsterdam 130 only). Warns about injuries • Do not increase the volume during mute phases, e. g. when changing the audio source. -
Page 5: Declaration Of Conformity
Safety notes | Cleaning notes | Disposal notes | Scope of delivery | Placing the device in operation Declaration of conformity Placing the device in operation The Blaupunkt Europe GmbH declares that the Attention car sound system complies with the basic require-... -
Page 6: Setting The Reception Area
Placing the device in operation Removing the control panel Switching on/off via vehicle ignition u Press the button to unlock the control The car sound system will switch off /on simulta- panel. neously with the ignition if the device is correctly connected to the vehicle's ignition as shown in the The left side of the control panel detaches installation instructions and you did not switch... -
Page 7: Switching Demo Mode On/Off
Placing the device in operation | Traffi c information | Radio mode Switching demo mode on/off Radio mode The demo mode shows the functions of the car sound system as scrolling text on the display. By pressing any button, the demo mode is interrupt- Many FM stations broadcast an RDS (Radio Data ed and you can operate the device. -
Page 8: Tuning Into A Station
Radio mode Tuning into a station Scanning receivable stations u Press the MENU button for approx. 2 sec- There are various ways of tuning into a station: onds to start scanning. Tuning into stations manually During the scan, the display alternately dis- u Briefl y press the button once or... -
Page 9: Switching Display
This car sound system can be used to play MP3 or WMA fi les on USB data carriers and SD(HC)/MMC • "CD" (Amsterdam 130 only): Inserted CD memory cards. • "SD(HC)" (Adelaide 130 only): Inserted... -
Page 10: Inserting/Ejecting A Cd (Amsterdam 130 Only)
CD/MP3/WMA mode Inserting/ejecting a CD Connecting/removing a USB data (Amsterdam 130 only) carrier Inserting a CD Connecting a USB data carrier u Switch off the car sound system so that the Risk of severe damage to the CD data carrier will be correctly registered. -
Page 11: Selecting Tracks
Gen. MIX OFF Regular playback Note: * Amsterdam 130 only If the current track plays longer than 3 sec- If the MIX function is switched on, the icon onds, pressing once restarts the track. MIX (mix all tracks) or MIX... -
Page 12: Switching Display
The playback starts. You are exiting the * Amsterdam 130 only browse mode. ** Track name, artist and album name must be stored as ID3 tag to be able to display them. -
Page 13: External Audio Sources
CD/MP3/WMA mode | External audio sources | Sound settings Fast browsing is switched on or off in the user Calling and exiting the "AUDIO" menu (see the chapter "User settings", section menu "Making settings in the "VARIOUS" menu", menu u Briefl y press the MENU button to open item "BROWSE"). -
Page 14: User Settings
Sound settings | User settings BALANCE User settings Left/right volume distribution. Settings: L9 (left) to R9 (right). Calling the user menu and selecting u Press the On/Off button to change the a menu setting. u Briefl y press the MENU button to open u Turn the volume control until the desired... -
Page 15: Making Settings In The "Tuner" Menu
User settings Making settings in the "TUNER" SEEK SENS Setting the sensitivity of station seek tuning. Set- menu tings: LOW, HIGH. TRAFFIC (traffi c information) u Press the On/Off button to change the (only for reception area EUROPE) setting. Switching priority for traffi c announcements on or u Turn the volume control to change be- off . -
Page 16: Making Settings In The "Display" Menu
User settings Making settings in the "DISPLAY" Making settings in the "VOLUME" menu menu DIM MODE ON VOLUME Select automatic or manual switching of the dis- Setting the power-on volume. Settings: 1 – 50. play brightness for day or night. Settings: AUTO u Press the On/Off button to change the (display brightness is automatically switched by... -
Page 17: Making Settings In The "Clock" Menu
User settings BEEP SET CLOCK Switching the confi rmation beep on or off . Set- Setting the time. tings: ON, OFF. u Press the On/Off button to change the setting. Note: u Turn the volume control When storing radio stations, a confi rma- counterclockwise tion beep sounds even if the OFF setting is to set the hours. -
Page 18: Factory Settings
User settings | Factory settings SCAN TIME Factory settings Setting the scan time in seconds. Settings: Important factory settings in the user menu: 4/8/12/16/60 seconds . u Press the On/Off button Menu item Factory setting to change the setting. AREA EUROPE u Turn the volume control to change be-... -
Page 19: Useful Information
W x H x D (incl. antenna connection adapter): Service Amsterdam 130: 178 x 52 x 170 mm In some countries, Blaupunkt off ers a repair and Adelaide 130: 178 x 52 x 116 mm pick-up service. Information about the availability of this service in Weight: your country can be found at www.blaupunkt.com. -
Page 20: Installation Instructions
• Do not connect the vehicle’s plug connec- tors to the radio! You can obtain the adapter cable required for your vehicle type from any BLAUPUNKT dealer. • Depending on the model, your vehicle may diff er from the description provided here. We... - Page 21 Installation instructions Supplied mounting hardware Available as an optional accessory 7 607 621 … Installation kits 7 608 … …...
- Page 22 Installation instructions Steering wheel remote control SWC-2 SWC-1 Antenna connection 1 2 V 2. Amsterdam 130 only Antenna Preamp out (2 channels) 1-20 0° - 30° +/– 10° +/– 10°...
- Page 23 Installation instructions Removal 1 2 V...
- Page 24 Installation instructions Speaker out RR+ Telephone Mute Speaker out RR– Speaker out RF+ Permanent +12V Speaker out RF– Auto antenna* Speaker out LF+ Illumination Speaker out LF– Kl.15/Ignition Speaker out LR+ Ground Speaker out LR– Switched power supply +12 V / max. 150 mA Relais +12V 1 3 5...
- Page 25 This product is protected by certain intellectual property rights of Microsoft. Use or distribution of such technology outside of this product is prohibited without a license from Microsoft. © 2013 All rights reserved by Blaupunkt. This material may be reproduced, copied or distributed for personal use only.
- Page 26 Passport Name: ........................1 011 402 _ _ _ 001 Type: ........................Serial no.: BP ....................... Blaupunkt Europe GmbH Robert-Bosch-Straße 200 D-31139 Hildesheim http://www.blaupunkt.com 03/14...
Need help?
Do you have a question about the AMSTERDAM 130 and is the answer not in the manual?
Questions and answers