Table of Contents
Advertisement
Quick Links
Advertisement
Table of Contents

Related Manuals for DigiTech BP355


Summary of Contents for DigiTech BP355
- Page 1 Bass Multi-Effects Processor Owner’s Manual Professional audio equipment...
- Page 2 Warranty We at DigiTech® are very proud of our products and back up each one we sell with the following warranty: Please register online at digitech.com within ten days of purchase to validate this warranty. This warranty is valid only in the United States.
-
Page 3: Table Of Contents
Tone Library ..............34 Presets ................. 3 Effects Library ...............34 Create Your Sound in Three Easy Steps ....3 A Guided Tour of the BP355........4 Front Panel ..............4 Rear Panel ..............7 Section 2 - Getting Started......8 Making Connections ............8 Mono Operation - Amplifier ........ -
Page 4: Section 1 - Introduction
When you easily dial up a tone or effect from the Tone Library or the Effects Library, you’ll appreciate the accuracy in each model, and the dynamic interaction in each tone. Add USB support for computer recording and a built-in drum machine, and you have the BP355: the key to unlock your creative potential. -
Page 5: Tuner Mode
Tuner Mode The Tuner in the BP355 allows you to quickly tune or check the tuning on your bass. Enter Tuner mode by pressing and holding the Up and Down Footswitches simultaneously for 2 seconds. The Display briefly shows tuner indicating that you are in Tuner mode. To begin tuning, play a note on your bass (a harmonic at the 12th fret usually works best). -
Page 6: X-Edit Tm Editor/Librarian
Footswitches. The active effects in each preset are indicated by lighted LEDs in the Effect Matrix. The BP355 comes with 70 User presets (1-70) and 70 Factory presets (F1-F70). The User presets are locations where your creations may be stored. The Factory presets do not allow you to store any changes to them. -
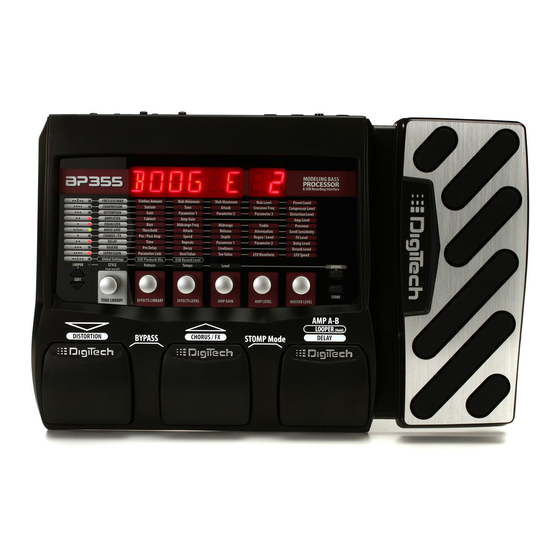
Page 7: A Guided Tour Of The Bp355
1. Up/Down Footswitches These two Footswitches are used to select presets, access the Tuner, or bypass the BP355. The Footswitch on the right will select the next preset up, and the Footswitch on the left will select the next preset down. - Page 8 Knob 1 for this parameter to be available. Master Volume (Knob 6) 1. In Performance mode, this knob adjusts the output level of the BP355. 2. When editing a preset, this knob modifies the parameter listed in the column directly above it for the selected Effect row.
- Page 9 6. Drums The Drums button is used to turn on and off the BP355’s built-in drum machine. When the Drums button is turned on, the Drums LED lights and the selected drum pattern plays continuously. Select the Drums row using the Edit buttons and use Knobs 1-4 to change the style, pattern, tempo, and level of the drum machine.
-
Page 10: Rear Panel
X-Edit™ Editor/Librarian software, and (2) for streaming audio to and from the computer. The BP355 will stream 2 channels up and 2 channels down from the computer at 44.1kHz, 16 and 24 bit. A utility panel in the Editor/Librarian controls the direct/playback mix and USB record level when used with recording software. -
Page 11: Section 2 - Getting Started
There are several different connection options available with the BP355. Before connecting the BP355, make sure that the power to your amplifier and the BP355 is turned off. There is no power switch on the BP355. To turn the BP355 on or off, connect or disconnect the included PS0913B power supply from the Power Input jack. -
Page 12: Stereo Mixer Setup
Stereo Mixer Setup Aux 1 Aux 1 Aux 1 Aux 1 Aux 1 Aux 1 Aux 1 Aux 1 Aux 2 Aux 2 Aux 2 Aux 2 Aux 2 Aux 2 Aux 2 Aux 2 0 +1 0 +1 0 +1 0 +1 0 +1 0 +1... -
Page 13: Applying Power
Turn the amp volume all the way down. Connect the plug of the PS0913B power supply to the power jack on the rear panel of the BP355. Connect the other end of the PS0913B power supply to an AC outlet. Turn the BP355’s Master Level knob (Knob 6) down to “0”. -
Page 14: Section 3 - Editing Functions
Section 3 - Editing Functions Editing/Creating Presets The BP355 is designed to make preset editing and creation easy and intuitive. When creating your own sound, you must first start with an existing preset. Note that the preset you begin with doesn’t have to be in the memory location you intend to have it reside, since you can store it to any User preset location during the store procedure. -
Page 15: Storing/Copying/Naming A Preset
Storing/Copying/Naming a Preset Once the preset has been modified to your liking, you may store your settings to any of the 70 User preset locations (presets 1-70). The following steps outline the procedure for storing changes to a preset or copying a preset to a different location: Press the Store button once. -
Page 16: Section 4 - Models And Parameters
With stompboxes, the order in which they are connected affects the overall sound. The BP355 has placed the Amp and Effect models in an order for optimum results. The following diagram shows the order in which they are connected. -
Page 17: Compressor
Distortion The BP355 models the tones of 18 popular distortion stompboxes, each of which can be tweaked and modified, just like the real thing. Distortion Model - Knob 1 selects one of 18 Distortion models. Press this knob to turn the selected Distortion model on and off. - Page 18 Knobs 2-6 have the following functions for the various Distortion models: Dist. Model Knob 2 Knob 3 Knob 4 Knob 5 Knob 6 (Gain) (Param. 1) (Param. 2) (Param. 3) (Distortion (X-Edit Level) only) Drive Tone Level Scream Overdrive Tone Level Gain Tone...
-
Page 19: Amplifier
(Amp A or Amp B). Amp Model - Knob 1 selects one of the classic, modern, and DigiTech custom Amp models. Press this knob to turn Amp and Cabinet modeling on and off. Note that when you select an Amp model, the default Cabinet model is automatically selected. -
Page 20: Noise Gate/Auto Swell
The BP355’s EQ helps further shape your tone with Bass, Midrange, and Treble controls. To help get you started, there are four preset EQ curves: Mid Boost (midbst), Scoop (ScooP), Bright (BRight), and Warm (WarM) that can be selected using Knob 1. Bass, Midrange, and Treble parameters range from -12dB to +12dB. -
Page 21: Chorus/Fx
Chorus/FX The Chorus/FX row in the BP355 is a multi-function module, allowing you to select Effect models such as Chorus, Flanger, Phaser, Vibrato, Rotary Speaker, Tremolo, Panner, Envelope Filter (auto wah), AutoYa™, YaYa™, SynthTalk™, Step Filter, Whammy™, Pitch Shift, Detune, Harmony, and Octaver effects. When the Chorus/FX row is selected, Knob 1 is used to choose the Effect model. - Page 22 As the phasing changes, different frequencies get canceled resulting in a warm sort of twisting sound. The BP355 includes the following Phaser models: phaser (the DigiTech Phaser), tphase (the DigiTech Triggered Phaser), mxphas (based on an MXR Phase 100), and ehphas (based on an Electro-Harmonix Small Stone).
- Page 23 VibroPan (vibpan) A vibrato is an effect that modulates the pitch of the incoming signal. This will take the whole signal slightly in and out of tune at a steady pace. The DigiTech VibroPan also incorporates an automatic panner with the ®...
- Page 24 Tremolo/Panner A Tremolo effect modulates the volume of the signal at an even rate. The BP355 includes the following Tremolo models: trmolo (the DigiTech Tremolo), optrem (based on the Fender Opto Tremolo), ® ® bitrem (based on the Vox Bias Tremolo), and panner (the DigiTech Panner),.
- Page 25 YaYa™ (yaya) The YaYa is another effect exclusive to DigiTech products. Like the AutoYa, it combines the characteristics of a wah and a flanger together providing a unique talk box type of effect when linked to and controlled by the Expression Pedal.
- Page 26 As the Pedal is moved, the note bends either up or down. When DigiTech Whammy is selected, it is automatically placed before the Amp modeling as shown in the block diagram on page 13.
- Page 27 Detune (DetUNe) A Detuner makes a copy of your incoming signal, takes the copied signal slightly out of tune from the original, then mixes the two signals together. The result is a doubling type of effect as if two basses were playing the same part together.
-
Page 28: Delay
Delay Model - Knob 1 selects one of the 7 different Delay models. Values include: algdly (DigiTech ® Analog Delay), dm dly (Based on the Boss DM-2 Analog Delay), digdly (DigiTech Digital Delay), moddly (DigiTech Modulated Delay), pngdly (DigiTech Pong Delay), tapdly (DigiTech Tape Delay), and ecoplx (Based on the Maestro EP-2 Echoplex ®... -
Page 29: Reverb
Using reverb in recorded program material gives the listener a sense that the material is being performed in an actual room or hall. It is this similarity to actual acoustic spaces that makes reverberation a useful tool in recorded music. The BP355 features genuine Lexicon reverbs, whose rich, lush effects have been heard ®... -
Page 30: Section 5 - Other Functions
Section 5 - Other Functions Phrase Looper The BP355 features a built-in 20 second Phrase Looper for creating on the fly performance loops of the music you play. The Phrase Looper can be accessed any time during performance and used with any of the BP355’s presets. -
Page 31: Aux Input
BP355. To use the Aux Input, connect the headphone output of your MP3 or CD player to the Aux Input on the rear panel of the BP355 using an 1/8" stereo cable, and press play on your MP3 or CD player. Use the playing device’s volume control and the BP355’s Master Level knob to balance the levels. -
Page 32: Lfos
5. Rotate Knob 6 to select the speed you want the parameter to be controlled at. Factory Reset This function resets the BP355 to its original factory settings. This procedure erases all custom User presets, and recalibrates the Expression Pedal. -
Page 33: Expression Pedal Calibration
Expression Pedal Calibration The Expression Pedal on the BP355 needs to be recalibrated for use after a factory reset has been performed. This calibration procedure is automatically entered after a factory reset procedure. (You can also initiate the calibration procedure by pressing and holding the Up and Down Footswitches for approximately 5 seconds.) In the event the Pedal’s calibration fails, or if the Pedal does not function... -
Page 34: Section 6 - Appendix
1/8˝ Stereo (TRS) – 13.6mW per channel @ 50 Ohms Digital Connections: Universal Serial Bus (USB): Type B, supports USB1.1 Full Speed (12 Mbps Bandwidth USB 2.0 compatible) BP355 USB Recording Specifications: Sample Rate: 44.1 kHz Bit depth: supports 16-bit or 24-bit (depends on setup in Recording Software) -
Page 35: Expression Pedal - Assignable Parameters
– – – CRYWAH Vox® Clyde McCoy Wah Wah Minimum Wah Maximum Wah Level – – – CLYDE DigiTech® Full Range Wah Wah Minimum Wah Maximum Wah Level – – – FULRNG Compressor Effects based on: Comp Model Sustain Tone... - Page 36 Speed Depth Waveform – – PANNER Envelope/Special Effects Effect Model Pre/Post Amp Speed Depth Regen FX Level X-Edit based on: DigiTech Envelope Filter Pre/Post Amp Sensitivity Range – – – ENVLOP DOD FX25 Pre/Post Amp Blend Sensitivity Range – –...
-
Page 37: Tone Library
Tone Library Rock 1 Sinister ROCK 1 SINSTR Rock 2 Punchy ROCK 2 PUNCHY Slap 1 Fingerstyle SLAP 1 FINGER Slap 2 Mid Boost SLAP 2 MIDBST Compressed Big Bottom CMPRSD BIGBTM Funk Pick Style FUNK PICK Clean Groove CLEAN GROOVE Drive Solo Bass... - Page 38 Other product names modeled in this product are trademarks of their respective companies that do not endorse and are not associated or affiliated with DigiTech or Harman International Industries, Inc. They are trademarks of other manufacturers and were used merely to identify products whose sounds were...
Need help?
Do you have a question about the BP355 and is the answer not in the manual?
Questions and answers