Fezz Audio Titania User Manual
Hide thumbs
Also See for Titania:
- User manual (14 pages) ,
- User manual (18 pages) ,
- User manual (8 pages)
Table of Contents
Advertisement
Quick Links
Advertisement
Table of Contents

Related Manuals for Fezz Audio Titania


Summary of Contents for Fezz Audio Titania
- Page 1 Titania USER’S MANUAL...
- Page 2 • Never place the Fezz Audio Titania amplifier near heat sources, such as radiators, heaters or direct sunlight. Ensure adequate ventilation and airflow.
-
Page 3: Table Of Contents
TABLE OF CONTENTS ________________________________________ SAFETY TIPS ___2___ INTRODUCTION ___4___ The Tube Amplifier INSTALLATION OF THE DEVICE ___5___ Unpacking Contents of the package Description of the elements of the amplifier Installation of the vacuum tubes Where to place your amplifier INTERCONNECTIONS ___9___ Hook-up of the power supply cord Hook-up of the signal sources... -
Page 4: Introduction
Thus, in praxis, they are exclusively destined for the audiophile circles. And it is at this very point where the unique offering of Fezz Audio comes into play. A unique vacuum tube sound, made available at a price point similar to a new,... -
Page 5: Installation Of The Device
INSTALATION OF THE DEVICE _______________________________ UNPACKING Please kindly check if the packaging of the Titania amplifier has not been damaged during transit. If you find any damages, please immediately contact your dealer. Remove the amplifier and accessories from the packaging. Make sure that the content is not damaged. -
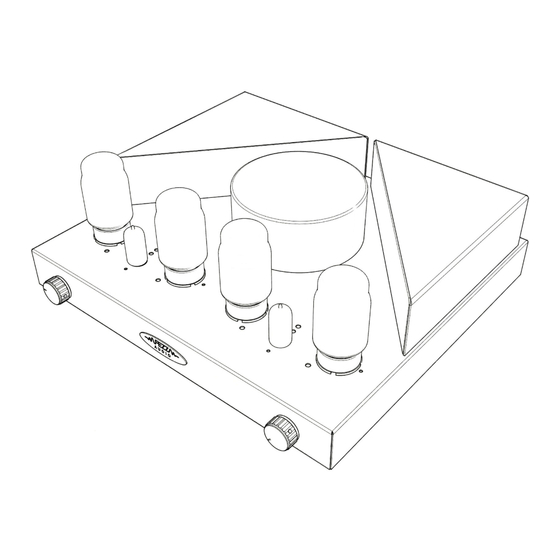
Page 6: Description Of The Elements Of The Amplifier
DESCRIPTION OF THE ELEMENTS OF THE AMPLIFIER 1) Volume control 2) Input Source Selector 3) Sockets for the right channel vacuum tubes 4) Sockets for the left channel vacuum tubes 5) The housing for the power supply transformer 6) The housing for the output transformers... -
Page 7: Installation Of The Vacuum Tubes
INSTALLATION OF THE VACUUM TUBES Place the Titania amplifier on a stable surface. Carefully remove the vacuum tubes from their packaging and install them in the appropriate sockets, as shown below, and adhering to the numbering scheme as identified on the packaging. Please pay attention to the diameter of the socket and to the appropriate orientation of the vacuum tube pins. -
Page 8: Where To Place Your Amplifier
The sound quality may be degraded as a result of vibrations. Therefore we recommended to place the amplifier on a flat and stable surface. ATTENTION - Never place the Fezz Audio Titania amplifier in the vicinity of sources that produce large amounts of heat. -
Page 9: Interconnections
5) The IEC power supply cord socket 6) Mains switch The figure above shows the rear panel view of the Fezz Audio Titania tube amplifier, together with a description of the inputs and outputs allowing for connection of the other elements of your audio system. -
Page 10: Hook-Up Of The Power Supply Cord
Any and all connections must be made whilst the device is disconnected from the mains power supply. Before making any such connections, make sure that the amplifier is switched off. HOOK-UP OF THE POWER SUPPLY CORD Make sure that the amplifier is switched off. Connect the power cord to the IEC socket on the rear panel of the amplifier. -
Page 11: First Power-Up And Getting Started
Select the source of signal using the rotary selector switch located on the front panel. Set the volume control to minimum. Turn on the mains power of the Titania amplifier – the vacuum tubes shall begin to glow. Make sure that the sound source is turned on, playing, and then gradually increase the volume level by turning the potentiometer. -
Page 12: Adjustment And Control Of The Bias Currents
ADJUSTMENT AND CONTROL OF THE BIAS CURRENTS _________ Setting and control of the bias is a procedure that is required after the first switch-on and after the initial burn-in period of the amplifier. Later on, we recommend to check these parameters once a month. Please make yourself acquainted with the locations of the measuring points: •... - Page 13 3) Measure the actual value of the BIAS between MR1 and MR2 or MR1 and MR3. 4) Adjust the voltage reading using the BIAS level potentiometer AR1 to a value as close as possible to 500 mV (+/- 20mV). THE PROCEDURE FOR ADJUSTMENT OF BIAS FOR THE LEFT CHANNEL Similarly as described in the procedure for the right channel, conduct the adjustments using potentiometers AL1 AL2 and the measurement points ML1, ML2 and ML3.
-
Page 14: Burning-In" The Amplifier
“BURNING-IN” OF THE AMPLIFIER _____________________________ Any tube amplifier requires an initial pre-heating (or "burn-in") period, in order so that it achieves its full sonic potential. This is due to the presence of residual polarization of dielectric elements and due to a necessary stabilization of working parameters of the vacuum tubes. -
Page 15: Technical Data
TECHNICAL DATA _____________________________________________ Type: Stereo integrated power amplifier Model: Titania Output power: 2x 45W Circuit architecture Push-Pull, class AB1 Output Impedance: 4Ω / 8Ω Input connectors: 3x RCA THD distortion: < 0,2% Frequency response: 18Hz – 103kHz (at -3dB) Power consumption:... -
Page 16: Limited Warranty Conditions
• Breach of guarantee seals, unauthorized use, adjustments or modifications Carelessness or damage resulting from improper transportation • The company Fezz Audio reserves the right to amend the designs of its products and their specifications without prior notice to the previous buyers. Fezz Audio ul.
Need help?
Do you have a question about the Titania and is the answer not in the manual?
Questions and answers