TC-Helicon Perform-V Reference Manual
Hide thumbs
Also See for Perform-V:
- Quick start manual (2 pages) ,
- Quick start manual ,
- Quick start manual (8 pages)
Table of Contents
Advertisement
Advertisement
Chapters
Table of Contents

Related Manuals for TC-Helicon Perform-V


Summary of Contents for TC-Helicon Perform-V
- Page 1 English Reference Manual...
-
Page 2: Table Of Contents
Appendix About Presets Factory Reset Importing (Beaming) a Preset Technical Specifications Editing a Beamed Preset HIT 24 Tone About Tone Anti-Feedback Product Perform-V Product (firmware) version Document Reference manual Document version / date 2015-11-17 Perform-V – Reference manual (updated 2015-11-17) -
Page 3: Safety Information
Safety information Safety information Perform-V – Reference manual (updated 2015-11-17) -
Page 4: Important Safety Instructions
12. Use only with a cart, stand, tripod, bracket, or table specified by the manufacturer, or sold with the ap- paratus. When a cart is used, use caution when moving the cart/apparatus combination to avoid injury from tip-over. Perform-V – Reference manual (updated 2015-11-17) - Page 5 Do not install this device in a confined space. ► For use at an altitude of 2000 m or lower. ► Do not open the unit – risk of electric shock ► inside. Perform-V – Reference manual (updated 2015-11-17)
-
Page 6: Emc / Emi
Connect the equipment into an outlet on a cir- ► cuit different from that to which the receiver is connected. Consult the dealer or an experienced ra- ► dio / TV technician for help. Perform-V – Reference manual (updated 2015-11-17) -
Page 7: Explanation Of Graphic Symbols
The exclamation point triangle is used to alert the user to presence of import- ant operating and service instructions in the literature accompanying the product. Perform-V – Reference manual (updated 2015-11-17) -
Page 8: Before You Begin
Before you begin Before you begin Perform-V – Reference manual (updated 2015-11-17) -
Page 9: About This Document
Professionally authored preset libraries ► Direct access to product manuals ► To get the most from your TC-Helicon pro duct, Drag & drop Preset management ► please start by reading the printed quick guide Customizable content about your products ►... -
Page 10: Please Register Your Perform-V
Before you begin Please register your Perform-V To register your Perform-V using the Voice- Support software, launch VoiceSupport and click on the ACCOUNT button. You can also go to account.tc-helicon.com Registration of your product is NOT required to use VoiceSupport, download Presets, update firmware or contact support. -
Page 11: Introduction
Introduction Introduction Perform-V – Reference manual (updated 2015-11-17) -
Page 12: Introduction
Quick Start Guide that came with your portunities. pitches are spot on. For more information, see Perform-V, got things hooked up and you’re able “Pitch Correction and Pitch Guide”. to sing through the product. Starting with our Adaptive Tone... -
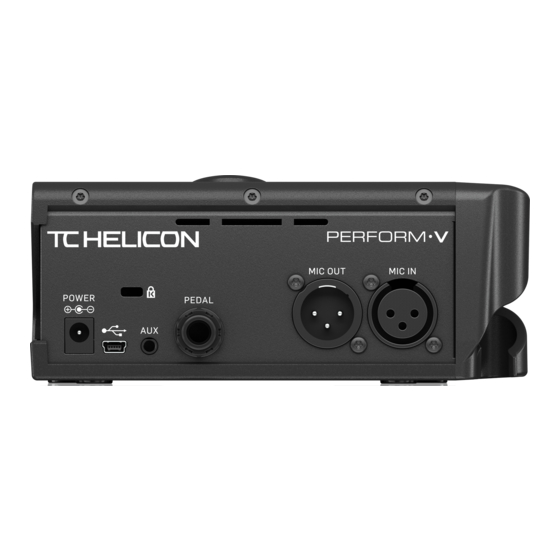
Page 13: Connection Diagram
Connection Diagram Connection Diagram Perform-V – Reference manual (updated 2015-11-17) - Page 14 Connection Diagram MIC OUT MIC IN PEDAL SWITCH-3 Perform-V – Reference manual (updated 2015-11-17)
-
Page 15: Effects
Effects Effects Perform-V – Reference manual (updated 2015-11-17) -
Page 16: About Effects
Effects About Effects Double (onboard) Reverb (onboard) There are three effects available to you in Perform-V, and up to four more effects can be accessed via beamed Presets. TONE ANTI- PITCH TONE ANTI- PITCH FEEDBACK FEEDBACK DOUBLE DOUBLE REVERB REVERB... - Page 17 Some Echoes can have effects applied to the “taps” or repeats of the Echo, like Megaphone or Radio. Perform-V – Reference manual (updated 2015-11-17)
- Page 18 “Natural”. The “Pop” style covers the other end of the spec- trum. HardTune requires Key information to work cor- rectly, so just like Harmony you’ll need a chorded instrument and/or AUX input. Perform-V – Reference manual (updated 2015-11-17)
-
Page 19: Turning Effects On And Off
Reverb, Double or Echo button. The button will illuminate GREEN when active and WHITE when inactive. TONE ANTI- PITCH FEEDBACK DOUBLE Double effect active REVERB TONE ANTI- PITCH FEEDBACK ECHO DOUBLE TALK Double effect inactive REVERB ECHO TALK Perform-V – Reference manual (updated 2015-11-17) -
Page 20: Editing Effects
E.g., if you lower the level for TALK Echo Style 3 by turning the control knob count- Changing the Echo level er-clockwise and you reach zero, Perform-V will jump to Echo Style 2 at full level, as indicated by the LEDs. TONE... - Page 21 Beamed Preset Style ► Double 1 Voice Tight ► 2 Voices Tight ► Octave Up and Down ► Beamed Preset Style ► Echo ¼ Note ► 1/8 Note ► Slap ► Beamed Preset Style ► Perform-V – Reference manual (updated 2015-11-17)
-
Page 22: Presets
Presets Presets Perform-V – Reference manual (updated 2015-11-17) -
Page 23: About Presets
Preset 1 and Preset 2 in the images above. Presets can be configured however you like. The state (on/off), style and level for each effect in a Preset can also be different from Pre- set to Preset. Perform-V – Reference manual (updated 2015-11-17) -
Page 24: Importing (Beaming) A Preset
Importing (Beaming) a Preset Using the Preset app Using VoiceSupport Your Perform-V also has the ability to “beam” or import a Preset sound to each of the 1, 2, 3 buttons. First, you can use your smartphone and our Pre- Second, you can use our VoiceSupport applica- set app to “beam”... -
Page 25: Editing A Beamed Preset
Here is a table showing you what you can con- trol, depending on which effects are contained in the Preset: Modifier Harmony Level HardTune Gender EQ Filter µMod Level Harmony Level HardTune Gender µMod Level µMod Level Perform-V – Reference manual (updated 2015-11-17) -
Page 26: Hit
Feel free to DOUBLE experiment! REVERB ECHO TALK HIT off TONE ANTI- PITCH FEEDBACK DOUBLE REVERB ECHO TALK HIT on When you have beamed a Preset to your Perform-V, HIT is turned on by default. Perform-V – Reference manual (updated 2015-11-17) - Page 27 ECHO TALK HIT off – Double and Reverb active Now, Double and Reverb will be active when HIT is off in Preset 1. You can configure the HIT on state in the same way. Perform-V – Reference manual (updated 2015-11-17)
-
Page 28: Tone
Tone Tone Perform-V – Reference manual (updated 2015-11-17) -
Page 29: About Tone
De-Ess and some of the low “mud” frequencies and boosts ► Gate At the mixer you plug Perform-V into, you’ll want the highs for “sparkle” or “air”. Every recording ► to make sure that… you hear these days has some manner of EQ on to your overall vocal sound. - Page 30 For vocals, we don’t want to go as far as shut- ting your mic completely off – but we do want to reduce the volume (gain) of the mic when you’re not singing so that feedback becomes less likely. Perform-V – Reference manual (updated 2015-11-17)
-
Page 31: Anti-Feedback
Anti-Feedback Anti-Feedback Perform-V – Reference manual (updated 2015-11-17) -
Page 32: Echo
TALK Here is a Craig’s Corner video about feedback: youtube.com/watch?v=VlN1RJ4gcAo Perform-V – Reference manual (updated 2015-11-17) -
Page 33: Pitch Correction And Pitch Guide
Pitch Correction and Pitch Guide Pitch Correction and Pitch Guide Perform-V – Reference manual (updated 2015-11-17) -
Page 34: About Pitch Correction
Pitch Correction and Pitch Guide About Pitch Correction About Pitch Correction- Nobody is perfect, so Perform-V gives you the related “Phasing” option to add a little bit of transparent pitch cor- rection to your voice. It gently guides you to the nearest semi-tone when you sing. -
Page 35: Pitch Guide
“on the note” (green LEDs), ► “flat” (yellow/red LEDs on the left hand side of ► DOUBLE the ring) or “sharp” (yellow/red LEDs on the right hand ► REVERB side of the ring). ECHO TALK Flat Pitch Perform-V – Reference manual (updated 2015-11-17) -
Page 36: Phantom Power, Mic Control And Talking To Your Audience
Phantom Power, Mic Control and talking to your audience Phantom Power, Mic Control and talking to your audience Perform-V – Reference manual (updated 2015-11-17) -
Page 37: Phantom Power)
ANTI- PITCH FEEDBACK Phantom Power on If you’re not sure what kind of mic you have, but you don’t hear any sound, it’s OK to try 48V. This won’t damage a dynamic microphone. TALK Perform-V – Reference manual (updated 2015-11-17) -
Page 38: Mic Control
The MP-75’s Mic Control button cycles Presets Perform-V buttons as you sing. on your Perform-V by default. You can change that behavior by holding the Mic Control button and then pressing the button on Perform-V that you’d like to control. -
Page 39: Tap Tempo
► Assigning a Preset (1-3) to a button allows you to control the HIT function if this Preset slot con- tains a Beamed Preset. For more information, see “Importing (Beaming) a Preset” and “HIT”. Perform-V – Reference manual (updated 2015-11-17) -
Page 40: Echo
Mute mode. button comes in. In Lock/Mute mode, all outputs (including XLR When active, Talk bypasses all Perform-V effects and Headphone) are muted and the Perform-V (except Tone) so that you can speak with the front panel is disabled. This prevents people... - Page 41 Tap (Tempo) Tap (Tempo) Perform-V – Reference manual (updated 2015-11-17)
- Page 42 If you have selected and activated an Echo ef- TALK fect, but the Tap button is dark, this means that the currently active Echo Style is a “slap” style Tap button that doesn’t use Tap Tempo. Perform-V – Reference manual (updated 2015-11-17)
-
Page 43: Roomsense And Aux
RoomSense and Aux RoomSense and Aux Perform-V – Reference manual (updated 2015-11-17) -
Page 44: Roomsense
This microphone is there for two reasons: termine key/scale for Perform-V’s Harmony or HardTune effects (in beamed Presets only – see If you beam in a Preset into your Perform-V “Importing (Beaming) a Preset”). ► that contains Harmony or HardTune effects and you’re not using an Aux In music source... -
Page 45: Switch-3 / Switch-6 Remote Control
Switch-3 / Switch-6 remote control Switch-3 / Switch-6 remote control Perform-V – Reference manual (updated 2015-11-17) -
Page 46: About The Switch-3/Switch-6 (Pedal) Input
About the Switch-3/Switch-6 (Pedal) Input Connecting a Switch-3 or Switch-6 When you have connected a Switch-3 or Switch-6 to your Perform-V’s pedal jack (using the TRS cable that came in the Switch-3/Switch-6 box) In order to correctly detect a Switch-3 or you can control various features remotely. -
Page 47: Using Switch-3
Using Switch-6 Reassigning footswitches The default behavior for Switch-3 is to change You can reassign any of the Perform-V buttons Switch-6 acts in the same manner as Switch-3 Presets according to the numbers on Switch-3. to be activated by a footswitch, with the follow- but adds buttons 4, 5, and 6. -
Page 48: Appendix
Appendix Appendix Perform-V – Reference manual (updated 2015-11-17) -
Page 49: Factory Reset
Appendix Factory Reset To reset the unit back to factory settings, press and hold the ECHO and DOUBLE buttons when powering up your Perform-V. Perform-V – Reference manual (updated 2015-11-17) -
Page 50: Technical Specifications
Technical Specifications Technical Specifications Perform-V – Reference manual (updated 2015-11-17) - Page 51 Output Impedance Balanced/ Unbalanced 66/33 Ohm Output 0 dBFS -1.5 dBu Dynamic Range > 109 dB, 20 Hz to 20 kHz Frequency Response +0.50/-0 dB, 20 Hz to 20 kHz Headphone Output Connector 1/8" mini stereo jack Perform-V – Reference manual (updated 2015-11-17)
- Page 52 Technical Specifications Perform-V – Reference manual (updated 2015-11-17)
Need help?
Do you have a question about the Perform-V and is the answer not in the manual?
Questions and answers