Table of Contents
Advertisement
Available languages
Available languages
Quick Links
SP6851-1 Workshop :SP6439-3_ES.qxd 9/20/13 11:58 AM Page 1
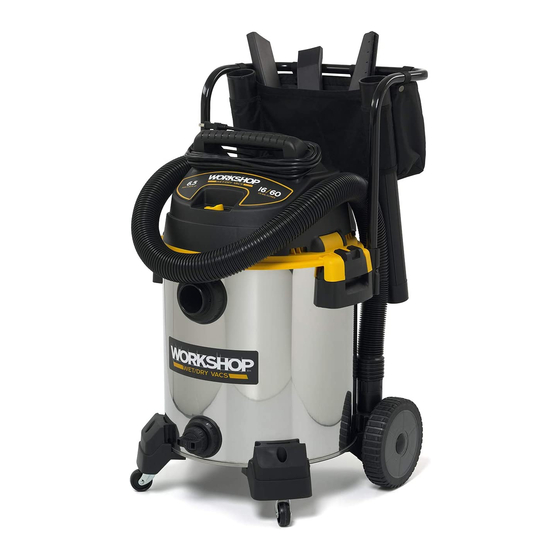
• Professional
Wet/Dry Vac
• 16 U.S. Gallon/
60 Liter
• WS1600SS0
FOR QUESTIONS OR INFORMATION CONTACT US AT:
1-888-455-8724 from the US and Canada
WARNING:
To reduce the risk of injury, the user must read and understand the
owner's manual before using this product.
• Español - página 19
• Français - page 37
SAVE THIS MANUAL FOR FUTURE REFERENCE
Part No. SP6851
www.WORKSHOPvacs.com
OWNER'S MANUAL
Printed in Mexico
MD
Advertisement
Chapters
Table of Contents

Related Manuals for Workshop WS1600SS0


Summary of Contents for Workshop WS1600SS0
- Page 1 SP6851-1 Workshop :SP6439-3_ES.qxd 9/20/13 11:58 AM Page 1 OWNER’S MANUAL • Professional Wet/Dry Vac • 16 U.S. Gallon/ 60 Liter • WS1600SS0 FOR QUESTIONS OR INFORMATION CONTACT US AT: 1-888-455-8724 from the US and Canada www.WORKSHOPvacs.com WARNING: To reduce the risk of injury, the user must read and understand the owner’s manual before using this product.
-
Page 2: Table Of Contents
SP6851-1 Workshop :SP6439-3_ES.qxd 9/20/13 11:58 AM Page 2 TABLE OF CONTENTS Section Page Section Page Important Safety Instructions....2 Operation ....... 11 Introduction . -
Page 3: Save This Manual
SP6851-1 Workshop :SP6439-3_ES.qxd 9/20/13 11:58 AM Page 3 • To reduce the risk of injury from • To reduce the risk of personal injury or accidental starting, unplug power cord damage to Vac, use only WORKSHOP before changing or cleaning filter. -
Page 4: Introduction
SP6851-1 Workshop :SP6439-3_ES.qxd 9/20/13 11:58 AM Page 4 INTRODUCTION This Professional Wet/Dry Vac is intended Read this owner’s manual to familiarize for household use. It may be used for yourself with the product features and to vacuuming wet or dry debris and may be understand the specific usage of your used as a blower. - Page 5 SP6851-1 Workshop :SP6439-3_ES.qxd 9/20/13 11:58 AM Page 5 UNPACKING & CHECKING CARTON CONTENTS (continued) Description Carton containing the following parts: Storage Bag .........1 Metal Handle........1 Shaft..........1 Caddy, Right.........1 Caddy, Left ........1 8” Wheel ........2 Description Bag of Loose Parts - Containing the following: 2”...
-
Page 6: Filter Removal & Installation
SP6851-1 Workshop :SP6439-3_ES.qxd 9/20/13 11:58 AM Page 6 FILTER REMOVAL & INSTALLATION Removal and Installation Integrated Filter of the Qwik Lock™ Filter PUSH Plate with Center DOWN Hole Filter Removal: 1. Hold the filter tabs of the Qwik Lock™ filter in each hand. -
Page 7: Drum/Caddy Assembly
SP6851-1 Workshop :SP6439-3_ES.qxd 9/20/13 11:58 AM Page 7 DRUM/CADDY ASSEMBLY Do not assemble until you have all the NOTE: Smooth side of parts. the wheel to the outside. Cap Nut 1. Invert drum to install caddies. Install Wheel cap nut on one side of shaft rod. Tap... -
Page 8: Wet/Dry Vac Assembly
SP6851-1 Workshop :SP6439-3_ES.qxd 9/20/13 11:58 AM Page 8 DRUM/CADDY ASSEMBLY (continued) 7. Insert the caster stem into the socket of 9. Rotate drum/caddy assembly upright, the caster foot as shown. (Front casters using a long phillips screwdriver, install only). (8) #10 x 3/4” screws into matching holes on both right and left side of 8. -
Page 9: Removing/Installing The Metal Handle
SP6851-1 Workshop :SP6439-3_ES.qxd 9/20/13 11:58 AM Page 9 REMOVING/INSTALLING THE METAL HANDLE Installing Handle Correct Press and hold release buttons while Position installing handle into handle receptacles in drum (See illustration). NOTE: An audible snap of release buttons indicates successful engagement of handle. -
Page 10: Accessory Storage & Assembly
SP6851-1 Workshop :SP6439-3_ES.qxd 9/20/13 11:58 AM Page 10 ACCESSORY STORAGE & ASSEMBLY Your accessories may be stored in the accessory bag, or in the two locations on Push/Pull Handle the caddy right/left. Either the hose or the Cord Wrap wands may be stored in the two areas marked Hose Storage. -
Page 11: Operation
SP6851-1 Workshop :SP6439-3_ES.qxd 9/20/13 11:58 AM Page 11 OPERATION WARNING: To reduce the risk of fire, explosion, or damage to Vac: • Do not leave Vac running while unattended - you may fail to notice important signs indicating abnormal operation such as loss of suction, debris/liquid exiting the exhaust, or abnormal motor noises. -
Page 12: Choosing The Correct Filter
SP6851-1 Workshop :SP6439-3_ES.qxd 9/20/13 11:58 AM Page 12 OPERATION (continued) Choosing the Correct Filter the Filter at more frequent intervals to maintain peak vacuum WARNING: To reduce the risk of performance. damage to the Vacuum, do not run d. See “Filter Removal and Installation”... -
Page 13: Emptying The Drum
SP6851-1 Workshop :SP6439-3_ES.qxd 9/20/13 11:58 AM Page 13 OPERATION (continued) Emptying the Drum 1. Locate blowing port of your Vac. 2. Insert the locking end of the Dual- 1. The Vac comes equipped with a drain Flex™ Locking Hose into the blowing for easy emptying of liquids. -
Page 14: Maintenance
SP6851-1 Workshop :SP6439-3_ES.qxd 9/20/13 11:58 AM Page 14 MAINTENANCE Cleaning A Dry Filter Filter NOTE: For best cleaning results due to WARNING: To reduce the risk of accumulated dust, clean the filter in an injury from accidental starting, open area. Cleaning SHOULD be done unplug power cord before changing outdoors and not in the living quarters. -
Page 15: Cleaning & Disinfecting The Wet/Dry Vac
SP6851-1 Workshop :SP6439-3_ES.qxd 9/20/13 11:58 AM Page 15 MAINTENANCE (continued) Cleaning and Disinfecting the Storage Wet/Dry Vac Before storing your Vac, the drum should To keep your Wet/Dry Vac looking its be emptied and cleaned. The cord should best, clean the outside with a cloth... -
Page 16: Warranty
LIMITED WARRANTY This limited warranty is offered by Emerson Tool Company, a division of Emerson Electric Co., located at the address below (“ETC” or “we” or “our” or “us”) and applies to our WORKSHOP- branded Wet/Dry Vacuums (collectively, the “WORKSHOP® Product”). - Page 17 WORKSHOP Product or provide you with a refund. The decision to repair or replace your WORKSHOP Product or to provide a refund is at our sole discretion. Repair or replacements provided to you by ETC are at no cost to you if covered under this limited warranty.
- Page 18 SP6851-1 Workshop :SP6439-3_ES.qxd 9/20/13 11:58 AM Page 18 THIS PAGE INTENTIONALLY LEFT BLANK...
- Page 19 SP6851-1 Workshop :SP6439-3_ES.qxd 9/20/13 11:58 AM Page 19 MANUAL DEL USUARIO • Aspiradora para mojado/seco profesional • 16 galones EE.UU. /60 litros • WS1600SS0 ¿PREGUNTAS O COMENTARIOS? COMUNÍQUESE CON NOSOTROS EN: 1-888-455-8724 desde los EE.UU. y Canadá www.WORKSHOPvacs.com ADVERTENCIA: Para reducir el riesgo de lesiones, el usuario debe leer y entender el manual del usuario antes de utilizar este producto.
-
Page 20: Instrucciones De Seguridad Importantes
SP6851-1 Workshop :SP6439-3_ES.qxd 9/20/13 11:58 AM Page 20 INDICE Sección Página Sección Página Instrucciones de seguridad importantes ..20 Vaciado del tambor ..... 31 Introducción . - Page 21 SP6851-1 Workshop :SP6439-3_ES.qxd 9/20/13 11:58 AM Page 21 • Para reducir el riesgo de lesiones debidas a un • Para reducir el riesgo de lesiones corporales o arranque accidental, desenchufe el cordón de daños a la aspiradora, utilice únicamente energía antes de cambiar o limpiar el filtro.
-
Page 22: Introducción
SP6851-1 Workshop :SP6439-3_ES.qxd 9/20/13 11:58 AM Page 22 INTRODUCCIÓN Esta aspiradora para mojado/seco profesional está Familiarícese con las siguientes características del diseñada para uso doméstico solamente. Se puede producto y lea todo el manual del usuario para utilizar para la recogida ligera de medios mojados o obtener instrucciones sobre la utilización específica... - Page 23 SP6851-1 Workshop :SP6439-3_ES.qxd 9/20/13 11:58 AM Page 23 DESEMPAQUETADO Y COMPROBACIÓN DEL CONTENIDO DE LA CAJA DE CARTÓN (continuación) Clave Descripción Cant. Caja de cartón que contiene las piezas siguientes: Bolsa de almacenamiento .....1 Asa metálica ...........1 Eje ............1 Base de soporte derecha .......1 Base de soporte izquierda .....1...
-
Page 24: Remoción E Instalación Del Filtro
SP6851-1 Workshop :SP6439-3_ES.qxd 9/20/13 11:58 AM Page 24 REMOCIÓN E INSTALACIÓN DEL FILTRO Remoción e instalación Placa de filtro del filtro Qwik Lock™ Integrated Filter EMPUJE PUSH integrada con agujero HACIA Plate with Center Remoción del filtro: DOWN ABAJO central Hole 1. -
Page 25: Ensamblaje Del Tambor/Base De Soporte
SP6851-1 Workshop :SP6439-3_ES.qxd 9/20/13 11:58 AM Page 25 ENSAMBLAJE DEL TAMBOR/BASE DE SOPORTE No realice el ensamblaje hasta que tenga todas NOTA: Lado liso de las piezas. NOTE: Smooth side of la rueda hacia el exterior. the wheel to the outside. -
Page 26: Ensamblaje De La Aspiradora Para Mojado/Seco
SP6851-1 Workshop :SP6439-3_ES.qxd 9/20/13 11:58 AM Page 26 ENSAMBLAJE DEL TAMBOR/BASE DE SOPORTE (cont.) 7. Introduzca el vástago de la ruedecilla en el 9. Voltee el ensamblaje del tambor/base de soporte receptáculo del pie de ruedecilla, de la manera hasta la posición vertical. Utilizando un destor- que se muestra en la ilustración (ruedecilla... -
Page 27: Remoción E Instalación Del Asa Metálica
SP6851-1 Workshop :SP6439-3_ES.qxd 9/20/13 11:58 AM Page 27 REMOCIÓN E INSTALACIÓN DEL ASA METÁLICA Instalación del asa Correct Posición Oprima y mantenga oprimidos los botones Position correcta de liberación mientras instala el asa en los receptáculos para el asa ubicados en el tambor (vea la ilustración). -
Page 28: Almacenamiento Y Ensamblaje De Accesorios
SP6851-1 Workshop :SP6439-3_ES.qxd 9/20/13 11:58 AM Page 28 ALMACENAMIENTO Y ENSAMBLAJE DE ACCESORIOS Los accesorios se pueden almacenar en la bolsa de accesorios o en las dos ubicaciones que están Asa de empuje/tracción Push/Pull Handle en la base de soporte de almacenamiento a la Enrollador del derecha y a la izquierda. -
Page 29: Funcionamiento
SP6851-1 Workshop :SP6439-3_ES.qxd 9/20/13 11:58 AM Page 29 FUNCIONAMIENTO ADVERTENCIA: Para reducir el riesgo de incendio, explosión o daños a la aspiradora: • No deje la aspiradora en marcha mientras esté desatendida. Usted podría no notar señales importantes que indiquen un funcionamiento anormal, tal como pérdida de succión, residuos o líquido que salen por el escape o ruidos anormales del motor. -
Page 30: Selección Del Filtro Correcto
SP6851-1 Workshop :SP6439-3_ES.qxd 9/20/13 11:58 AM Page 30 FUNCIONAMIENTO (continuación) Selección del filtro correcto d. Consulte la sección “Remoción e instalación del filtro” para obtener instrucciones sobre cómo cambiar el filtro ADVERTENCIA: Para reducir el riesgo de de cartucho de papel plisado. -
Page 31: Vaciado Del Tambor
SP6851-1 Workshop :SP6439-3_ES.qxd 9/20/13 11:58 AM Page 31 FUNCIONAMIENTO (continuación) Vaciado del tambor 1. Localice el orificio de soplado de la aspiradora para mojado/seco. 1. La aspiradora viene equipada con un drenaje 2. Inserte el extremo de fijación de la manguera de para vaciarla fácilmente de líquidos. -
Page 32: Mantenimiento
SP6851-1 Workshop :SP6439-3_ES.qxd 9/20/13 11:58 AM Page 32 MANTENIMIENTO Filtro Limpieza de un filtro seco NOTA: Para lograr una limpieza óptima con el fin ADVERTENCIA: Para reducir el riesgo de de eliminar el polvo acumulado en el filtro, limpie lesiones debidas a un arranque accidental, el filtro en un área abierta. -
Page 33: Limpieza Y Desinfección De La Aspiradora Para Mojado/Seco
SP6851-1 Workshop :SP6439-3_ES.qxd 9/20/13 11:58 AM Page 33 MANTENIMIENTO (continuación) Limpieza y desinfección de la Almacenamiento aspiradora para mojado/seco Antes de almacenar la aspiradora, se debe vaciar y limpiar el tambor. El cordón se debe enrollar Para mantener el mejor aspecto posible de la... -
Page 34: Garantía
Manual del Usuario que se le entregue a usted con el Producto WORKSHOP, durante un período de cinco (5) años a partir de la fecha de compra original (el “Período de Garantía”). Esta garantía limitada se termina si el comprador original transfiere el Producto WORKSHOP a cualquier otra persona o entidad. - Page 35 COMERCIABILIDAD O IDONEIDAD PARA UN PROPÓSITO ESPECÍFICO, TANTO SI EL PROPÓSITO HA SIDO REVELADO COMO SI NO LO HA SIDO Y SI EL PRODUCTO WORKSHOP HA SIDO O NO HA SIDO DISEÑADO O FABRICADO ESPECÍFICAMENTE PARA USO POR USTED O PARA EL PROPÓSITO QUE USTED TENGA.
- Page 36 SP6851-1 Workshop :SP6439-3_ES.qxd 9/20/13 11:58 AM Page 36 THIS PAGE INTENTIONALLY LEFT BLANK...
- Page 37 SP6851-1 Workshop :SP6439-3_ES.qxd 9/20/13 11:58 AM Page 37 MODE D’EMPLOI • Aspirateur de liquides et de poussières professionnel • 16 gallons É.-U/ 60 litres • WS1600SS0 EN CAS DE QUESTIONS OU POUR OBTENIR DES INFORMATIONS, VEUILLEZ NOUS CONTACTER AU : 1-888-455-8724 depuis les États-Unis et le Canada...
-
Page 38: Instructions Importantes Relatives À La Sécurité
SP6851-1 Workshop :SP6439-3_ES.qxd 9/20/13 11:58 AM Page 38 TABLE DES MATIÈRES Sujet Page Sujet Page Fonctionnement ......47 Instructions importantes relatives à... - Page 39 SP6851-1 Workshop :SP6439-3_ES.qxd 9/20/13 11:58 AM Page 39 • Éteignez l’aspirateur avant de le débrancher. • Pour réduire le risque de blessure ou le risque • Pour réduire le risque de blessure pouvant être d’endommagement de l’aspirateur, n’utilisez que causée par une mise en marche accidentelle, des accessoires recommandés par WORKSHOP.
-
Page 40: Introduction
SP6851-1 Workshop :SP6439-3_ES.qxd 9/20/13 11:58 AM Page 40 INTRODUCTION Cet aspirateur de liquides et de poussières Familiarisez-vous avec les fonctions suivantes de ce professionel est conçu pour un emploi domestique. produit, et lisez le mode d’emploi du début à la fin Il peut être utilisé... - Page 41 SP6851-1 Workshop :SP6439-3_ES.qxd 9/20/13 11:58 AM Page 41 DÉBALLAGE ET INSPECTION DU CONTENU DU CARTON (suite) Légende Description Qté Boîte en carton contenant les pièces suivantes : Sac de rangement ........1 Poignée en métal........1 Arbre ............1 Chariot, côté droit ........1 Chariot, côté...
-
Page 42: Retrait Et Installation Du Filtre
SP6851-1 Workshop :SP6439-3_ES.qxd 9/20/13 11:58 AM Page 42 RETRAIT ET INSTALLATION DU FILTRE Retrait et installation Plaque de filtre Integrated Filter du filtre Qwik Lock™ PUSH intégrée avec trou Plate with Center DOWN APPUYER central Retrait du filtre : Hole 1. -
Page 43: Assemblage Du Tambour/Chariot
SP6851-1 Workshop :SP6439-3_ES.qxd 9/20/13 11:58 AM Page 43 ASSEMBLAGE DU TAMBOUR/CHARIOT Ne commencez pas le montage si vous ne disposez REMARQUE : le côté lisse de la NOTE: Smooth side of roue est orienté vers l’extérieur. pas de toutes les pièces. -
Page 44: Assemblage De L'aspirateur De Liquides Et De Poussières
SP6851-1 Workshop :SP6439-3_ES.qxd 9/20/13 11:58 AM Page 44 ASSEMBLAGE DU TAMBOUR/CHARIOT (suite) 7. Insérez la tige de la roulette dans l’emboîtement 9. Faites tourner l’ensemble de tambour/chariot en du pied de la roulette tel que cela est illustré position verticale, et, en utilisant un tournevis (roulette avant seulement). -
Page 45: Retrait/Installation De La Poignée En Métal
SP6851-1 Workshop :SP6439-3_ES.qxd 9/20/13 11:58 AM Page 45 RETRAIT/INSTALLATION DE LA POIGNÉE EN MÉTAL Mise en place de la poignée Correct Position Appuyez sur les boutons de déclenchement, et Position correcte maintenez-les enfoncés, pendant que vous placez la poignée dans les logements de la poignée situés sur le tambour (veuillez vous reporter à... -
Page 46: Rangement Et Assemblage Des Accessoires
SP6851-1 Workshop :SP6439-3_ES.qxd 9/20/13 11:58 AM Page 46 RANGEMENT ET ASSEMBLAGE DES ACCESSOIRES Vos accessoires peuvent être placés dans le sac de rangement des accessoires ou dans les deux Poignée de poussée/tirage Push/Pull Handle emplacements à droite et à gauche du chariot. Il... -
Page 47: Fonctionnement
SP6851-1 Workshop :SP6439-3_ES.qxd 9/20/13 11:58 AM Page 47 FONCTIONNEMENT AVERTISSEMENT : pour réduire le risque d’incendie, d’explosion ou d’endommagement de l’aspirateur : • Ne laissez pas en marche pendant que vous êtes absent – vous vous risqueriez de manquer des signes importants indiquant un fonctionnement anormal, comme une perte de puissance d’aspiration, la sortie de... -
Page 48: Choix Du Filtre Correct
SP6851-1 Workshop :SP6439-3_ES.qxd 9/20/13 11:58 AM Page 48 FONCTIONNEMENT (suite) Choix du filtre correct d. Voir la rubrique intitulée « Retrait et installation du filtre » pour obtenir des instructions sur la façon de changer le filtre AVERTISSEMENT : pour réduire le risque à... -
Page 49: Vidage Du Tambour
SP6851-1 Workshop :SP6439-3_ES.qxd 9/20/13 11:59 AM Page 49 FONCTIONNEMENT (suite) Vidage du tambour 1. Localisez l’orifice de soufflante sur votre aspirateur. 1. L’aspirateur est équipé d’un drain pour 2. Insérez l’extrémité verrouillable du tuyau flexible l’évacuation facile des liquides. Il suffit de verrouillable Dual-Flex™... -
Page 50: Entretien
SP6851-1 Workshop :SP6439-3_ES.qxd 9/20/13 11:59 AM Page 50 ENTRETIEN Filtre Nettoyage d’un filtre sec REMARQUE : pour obtenir les meilleurs résultats AVERTISSEMENT : pour réduire le risque lors du nettoyage après l’accumulation de de blessure en raison d’une mise en marche poussière, nettoyer le filtre dans un endroit non... -
Page 51: Nettoyage Et Désinfection De L'aspirateur De Liquides Et De Poussières
SP6851-1 Workshop :SP6439-3_ES.qxd 9/20/13 11:59 AM Page 51 ENTRETIEN (suite) Nettoyage et désinfection Rangement de l’aspirateur de liquides Avant de ranger votre aspirateur, vous devez vider et de poussières et nettoyer le tambour. Vous devez ègalement enrouler le cordon d’alimentation autour de Pour conserver l’esthétique optimale de votre... -
Page 52: Garantie
Mode d’emploi qui vous a été fourni avec le Produit WORKSHOP pendant une période de cinq (5) ans à compter de la date d’achat d’origine (la « Période de garantie »). La présente garantie limitée cesse de produire des effets si l’acheteur original cède le Produit WORKSHOP à... - Page 53 La décision de réparer ou de remplacer votre Produit WORKSHOP ou de vous en rembourser le prix d’achat est à notre discrétion absolue. La réparation ou le remplacement d’un Produit par ETC pour votre bénéfice ne vous coûtera rien si vous bénéficiez de la couverture de la présente garantie limitée.
- Page 54 SP6851-1 Workshop :SP6439-3_ES.qxd 9/20/13 11:59 AM Page 54 THIS PAGE INTENTIONALLY LEFT BLANK...
-
Page 55: Repair Parts
SP6851-1 Workshop :SP6439-3_ES.qxd 9/20/13 11:59 AM Page 55 REPAIR PARTS (16 U.S. Gallon) WARNING SERVICING OF DOUBLE-INSULATED WET/DRY VAC In a double-insulated Wet/Dry Vac, two systems of insulation are provided instead of grounding. No grounding means is provided on a double-insulated appliance, nor should a means for grounding be added. - Page 56 SP6851-1 Workshop :SP6439-3_ES.qxd 9/20/13 11:59 AM Page 56 REPAIR PARTS (16 U.S. Gallon)
- Page 57 SP6851-1 Workshop :SP6439-3_ES.qxd 9/20/13 11:59 AM Page 57 REPAIR PARTS (16 U.S. Gallon)
- Page 58 SP6851-1 Workshop :SP6439-3_ES.qxd 9/20/13 11:59 AM Page 58 REPAIR PARTS (16 U.S. Gallon)
- Page 59 SP6851-1 Workshop :SP6439-3_ES.qxd 9/20/13 11:59 AM Page 59 REPAIR PARTS (16 U.S. Gallon)
- Page 60 SP6851-1 Workshop :SP6439-3_ES.qxd 9/20/13 11:59 AM Page 60 c 2013 Emerson Part No. SP6851 Form No. SP6851-1 Printed in Mexico 08/13...
Need help?
Do you have a question about the WS1600SS0 and is the answer not in the manual?
Questions and answers