Table of Contents
Advertisement
Advertisement
Table of Contents

Subscribe to Our Youtube Channel
Related Manuals for VTech VS150 TWIN


Summary of Contents for VTech VS150 TWIN
- Page 1 User guide For product support Model: VTech VS150 TWIN please call: 1 300 369 193...
- Page 2 IntroductIon To your VTECH VS150 CORDLESS TWIN WITH WIRE-FREE HOME MONITORING • Telephone system - Includes a telephone base and two cordless handsets. The base and handset screens show call information and sensor alerts. The sensor sends alerts to the phone system or sends remote alert calls to external numbers you have speciied.
- Page 3 Programmable alertS Customize when and how you receive alerts. When you receive alerts: • A monitored garage door or contact sensor opens, or there is motion in the monitored area; • The monitored object is open for more than 5, 10, or 20 minutes if you have set a reminder for alerts;...
- Page 4 PLEASE LOOK IN THE HELP SECTION AT THE END OF THE USER GUIDE IF YOU EXPERIENCE ANY OPERATIONAL DIFFICULTIES WITH YOUR VTECH PRODUCT, OR PLEASE CONTACT THE TECHELP INFORMATION LINE 1300 369 193 OR CONTACT US BY EMAIL AT: tcpsupport_au@vtech.com...
-
Page 5: Important Safety Instructions
ImPortant SafetY InStructIonS When using your telephone equipment, basic safety precautions should always be followed to reduce the risk of ire, electric shock and injury, including the following: Read and understand all instructions. Follow all warnings and instructions marked on the product. Unplug this product from the wall outlet before cleaning. - Page 6 or other risks. Incorrect reassembling can cause electric shock when the product is subsequently used. Do not overload wall outlets and extension cords. Unplug this product from the wall outlet and refer servicing to an authorized service facility under the following conditions: •...
-
Page 7: Save These Instructions
17. Use only the adapters included with this product. Incorrect adapter polarity or voltage can seriously damage the product. Telephone base adapter: Input 100-240V AC 200mA 60Hz; Output: 6V DC 600mA; Charger adapter: Input 100-240V AC 150mA 60Hz; Output: 6V DC 400mA. 18. -
Page 8: Table Of Contents
table of contentS Overview ......1 Rename the sensor ....42 Pet immunity ......43 Handset overview ......1 Sensor log ........ 44 Telephone base overview ..5 Contact Sensor overview ..9 Conigure your Sensor unit overview ....9 telephone ..... 45 Display icons overview ....10 Navigating the menus .....45 Lights overview ......12 Handset menu layout ....46... - Page 9 About the built-in answering Phonebook ...... 59 system and voicemail Add a phonebook entry ...59 service ......72 Review and dial from the phonebook ......60 Set your built-in Edit a phonebook entry ...60 answering system ..73 Delete a phonebook entry ..60 Turn the answering system Calling Number Display ...
- Page 10 Retrieve voicemail from telephone service ..86 Retrieve voicemail ....86 Turn off the new voicemail indicators......86 ECO mode ......87 General product care ..87 Storage ......87 How many telephone can you have? ....90 Customer service and product warranty ..91 Technical Speciications ...
-
Page 11: Overview
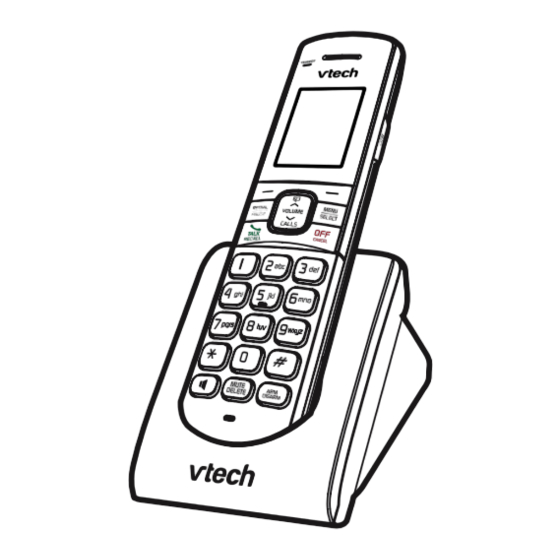
oVerVIew HandSet oVerVIew 1 – CHARGE light 2 – LCD display... - Page 12 3 – Right Soft key • Press to review the sensor status when the phone is not in use. • While in a menu, press to select a menu item; or save an entry or setting. Left Soft key • Press to enter the sensor mode menu when the phone is not in use.
- Page 13 8 – MUTE/DELETE • Mute the microphone during a call. • While editing names or numbers, press to delete a digit or character, or press and hold to delete all digits or characters. • Delete the playing message on the handset. •...
- Page 14 13 – OFF/CANCEL • Hang up a call. • Silence the ringer temporarily while the handset is ringing. • Press and hold to erase the missed call indicator while the phone is not in use. • Press to return to the previous menu, or press and hold to return to idle mode, without making changes.
-
Page 15: Telephone Base Overview
telePHone baSe oVerVIew 1 – Right Soft key • Press to review the sensor status when the phone is not in use. • While in a menu, press to select a menu item; or save an entry or setting. Left Soft key •... - Page 16 2 – Dialing keys • Press to enter numbers or characters. • Press and hold to set or dial your voicemail number. • Press to add a space when entering names. • Press and hold to enter quiet mode setting menu. 3 –...
- Page 17 9 – MIC (Microphone) 10 – SENSOR light • On when a sensor detects that one or more of the monitored garage door or contact sensors is opened, or when there is motion in the monitored area. 11 – IN USE light •...
- Page 18 • Move the cursor to the left when entering numbers or names. /ANS ON/OFF 17 – • Turn the answering system on or off. 18 – ARM/DISARM • Press to turn on or off the sensor alert system. 19 – X/DELETE •...
-
Page 19: Contact Sensor Overview
contact SenSor oVerVIew 1 – Magnet unit 2 – Sensor unit SenSor unIt oVerVIew 1 – Latch button • Press to open the battery compartment case. 2 – Back cover 3 – Pair button • When the sensor has been deregistered from the telephone base, press and hold to enter the registration mode. -
Page 20: Display Icons Overview
dISPlaY IconS oVerVIew HandSet IconS Battery status - battery is charging (animated display). Battery status - the battery icon lashes when the battery is low and needs charging. Speakerphone - the handset speakerphone is in use. Ringer off - the handset ringer is off. New voicemail - you have new voicemail from your telephone service provider. - Page 21 MUTE - the handset microphone is off. Sensor - the garage door or contact sensor is opened. Missed alerts in idle mode - displays in idle mode when there are new missed alerts from sensors. Armed local mode - displays when the sensor alert system is turned on, and is set to receive alerts locally.
-
Page 22: Lights Overview
Index - shows the entry number of the sensor status, or in the sensor log, phonebook, caller ID log, or call block list that is currently being viewed, out of the total number of entries. Sensor - the garage door or contact sensor is opened. - Page 23 telePHone baSe lIgHtS SENSOR On when the garage door or contact sensor is or contact sensor is is opened. IN USE On when: • the telephone line is in use; • the answering system is answering a call; or Flashes quickly when: •...
-
Page 24: Installation Setup
INSTallaTION SeTUP TelePHONe INSTallaTION You can choose to connect the telephone base for desktop usage or wall mounting. NOTES • Use only the adapters provided. • Make sure the electrical outlets are not controlled by wall switches. The adapters are intended to be correctly oriented in a vertical or loor •... -
Page 25: Connect The Charger
CONNeCT THe CHaRgeR INSTall THe HaNDSeT baTTeRY NOTES • Use only the supplied battery. • If the handset will not be used for a long time, disconnect and remove the battery to prevent possible leakage. -
Page 26: Charge The Battery
CHaRge THe baTTeRY Place the handset in the telephone base or a charger to charge. - Page 27 (at least 30 minutes). time. The screen shows The battery is To keep the battery VTECH X . charged. charged, place it in the telephone base or charger when not in use.
-
Page 28: Mount The Telephone Base
mOUNT THe TelePHONe baSe The telephone comes ready for tabletop use. If you have already installed the telephone for tabletop use, unplug the telephone line cord from the telephone wall jack, and unplug the telephone base power adapter from the wall outlet before mounting your telephone on a wall. - Page 29 Plug the telephone line cord (or DSL ilter) into the wall jack. Align the holes on the back of the telephone base with the standard wall plate. Slide the bracket down until it clicks securely in place. Connect the power adapter to the telephone base and an electrical outlet not controlled by a wall switch.
-
Page 30: Contact Sensor Installation
contact SenSor InStallatIon Power on the contact sensor The batteries are pre-installed in your contact sensor. To activate the batteries: Pull the battery tab off from the sensor to activate the batteries. The garage door sensor powers on. NOTE • The contact sensors in your package are already pre-registered to the telephone base. - Page 31 CHeCk THe CONTaCT SeNSOR befORe USe 1. Separate the sensor unit from the magnet unit. • You will hear an announcement alert - “Open/Closed X open”, from the handset and the telephone base. • The handset and the telephone base will display “Open/ Closed X is open”, and then .
- Page 32 TeST THe CONTaCT SeNSOR’S SIgNal STReNgTH You can mount the Contact sensor on a door, window, or medicine cabinet that opens or closes. 1. Take the sensor unit and magnet unit to the desired mounting location, and hold them at the object and the frame respectively. 2.
- Page 33 mount tHe contact SenSor We recommend you to mount the magnet unit on a door, window, or medicine cabinet, and mount the sensor unit on its respective frame. NOTES • Make sure the mounting surface is clean. A textured surface or any imperfections to a smooth surface can keep the mounting tape from making a strong bond.
- Page 34 mOUNT THe magNeT UNIT Without Spacer Mount with tape 1. Attach mounting tape C onto the rectangular area at the rear side of the magnet unit, 2. Stick the magnet unit onto the door. With Spacer Mount with tape You can choose one out of the four spacers with suitable height, and then add it to the magnet unit.
- Page 35 mOUNT THe SeNSOR UNIT Without Spacer Mount with tape 1. Attach the mounting tape B onto the rectangular area at the rear side of the back cover 2. Stick the sensor unit onto the frame. -OR- Mount with screws 1. Press the latch button on the sensor unit to open the battery compartment case.
- Page 36 With Spacer Mount spacer with tape 1. Attach mounting tape A onto the rectangular area at the rear side of the spacer. 2. Stick the spacer onto the frame. -OR- Mount spacer with screws 1. Use a pencil to mark two holes on the desired location on the frame, with the aid of the two holes on...
-
Page 37: Power-Fail Backup Mode
Power-faIl backuP mode Power-fail mode allows your telephone system to function in the event of a power outage. The telephone system uses stored power from the handset’s battery to operate. After the power goes out, if there is already a handset with enough charge placed in the telephone base, the telephone system enters battery backup mode automatically. - Page 38 Power-fail backup mode operation During power-fail backup mode, the telephone base, answering system and sensor alert system will be disabled. The operating time is subject to the battery level of the handset placed in the telephone base and the actual usage. For optimal performance, you are not recommended to use the handset placed in the telephone base when this mode is on.
-
Page 39: Before Use
befORe USe After you install your telephone, or power returns following a power outage, the telephone system will prompt you to set the date and time irst. Then, it will ask you to set the answering system through voice guide. SeT DaTe aND TIme NOTE •... -
Page 40: Check For Dial Tone
CHeCk fOR DIal TONe Press on the handset, or on the telephone base. If you hear a dial tone, the installation is successful. If you do not hear a dial tone: • Make sure the installation procedures described above are properly done. -
Page 41: Wire-Free Sensors
wIre-free SenSorS The sensors help you to monitor your garage door, in-house door, window, medicine cabinet, or an area around your house. This keeps you notiied if the monitored object is open or closed, or someone has accessed an area that is off-limits. When any of the monitored garage door or contact sensors open, or when there is motion in the monitored area, the sensor... -
Page 42: Arm/Disarm The Sensor Alert System
aRm/DISaRm THe SeNSOR aleRT SYSTem You can use the ARM/DISARM key on the handset or telephone base to turn on or off the sensor alerts immediately, by arming or disarming the sensor alert system. To disarm the sensor alert system: •... -
Page 43: Sensor Mode
SenSor mode You can choose Local mode to receive alerts at the telephone system, or Remote mode to receive calls at other numbers you have specified. This allows you to get notified even when you are away from home. The preset sensor mode is Local. In Remote mode, when you receive the remote alert call, you will hear the alert message and then you can choose to listen to the sound in your house;... - Page 44 Edit numbers for remote calls: You can add, edit, or delete a telephone number for remote calls. Press MODE on the handset or telephone base when idle. Press on the handset, or CALLS / or PHONEBOOK/ on the telephone base to scroll to choose Remote, and then press OPTIONS.
- Page 45 NOTES • For the last 10 seconds of exit delay time, there will be a beep every second. • When a delay time has been set, there will not be any local or remote call alerts when a monitored garage door or contact sensor is open, or when there is motion in the monitored area, during the delay time.
-
Page 46: Access An Individual Sensor Menu
aCCeSS aN INDIVIDUal SeNSOR meNU Press SENSORS on the handset or telephone base when idle, and then scroll to the desired sensor. -OR- i. Press MENU when the phone is not in use. on the handset, or CALLS / ii. Press PHONEBOOK/ on the telephone base to scroll to Sensors, and then press SELECT. -
Page 47: Set Alert Schedule As Always On
SeT aleRT SCHeDUle aS alwaYS ON The default setting of sensors’ alert schedule is Always on. You will receive an announcement alert - “Sensor X is open” Open/closed 1 or “Motion X sensor detected motion”, every time a monitored garage door Set schedule or contact sensor is opened, or there is motion in the monitored area. -
Page 48: Set A Time Range For Alerts
SeT a TIme RaNge fOR aleRTS You can choose to receive an announcement alert - “Sensor X is open” or “Motion X sensor detected motion”, when a monitored garage door or contact sensor is opened, or when there is motion in the monitored area, during a preset time period of the day. -
Page 49: Turn Off The Alert
TURN Off THe aleRTS You can choose not to receive an announcement alert when a monitored garage door or contact sensor is opened, or when there is motion in the monitored area. If it is a monitored garage door or contact sensor is opened, the icon will still display on the handset and telephone base. -
Page 50: Alert Notiications
aleRT NOTIfICaTIONS You can choose the type of notiication to receive when a sensor is triggered. The preset alert notiication type is All alerts on. Deinitions of notiication types: Msg - The LCD display messages, Sensor X is open or Motion X detected motion, on the handset and telephone base. -
Page 51: Test Sensor Signal Strength
TeST SeNSOR SIgNal STReNgTH Before you mount the sensor, follow the instructions below to check the signal strength between the sensor and the telephone base. Make sure you mount the sensor in a location where the signal strength is good. Using a handset: Press MENU on the handset when idle. -
Page 52: Reset Sensor Alerts
ReSeT SeNSOR aleRTS You can reset the alert schedule of all individual sensors’ to their default settings - Always on. The sensor notiication type will also be reset to its default setting - Msg, tone, voice. Press MENU on the handset or telephone base when idle. on the handset, or CALLS / or PHONEBOOK/ Press... -
Page 53: Pet Immunity
Pet ImmunItY Your VTech VS150 is capable of setting the motion sensor (VS002, purchased separately), so it ignores any small or medium size pets (less than 25 kilograms). SENSORS Press on the handset or telephone base when idle, and then scroll to the desired sensor. -
Page 54: Sensor Log
SeNSOR lOg The sensor log menu appears when there is at least one sensor registered to the telephone base. The sensor log stores a maximum of 50 entries for the sensor activities from all sensors. Press MENU on the handset or telephone base when idle. -
Page 55: Conigure Your Telephone
confIgure Your telePHone naVIgatIng tHe menuS Your VS150 has an easy to use menu system. Each menu has a list of options, as outlined on the following page. To enter the main menu of the handset or telephone base: 1. Press MENU on the handset or telephone base when idle. on the handset, or CALLS / or PHONEBOOK / to 2. -
Page 56: Handset Menu Layout
HandSet menu laYout Play messages Sensor log Phonebook Play new msgs Review Play old msgs Add contact Call log Answering sys Intercom Reiew Announcement Del all calls Delete all old Record memo Answer ON/OFF Voice guide Ans sys setup Call guard Ringers Set date/time Block list... -
Page 57: Base Menu Layout
telePHone baSe menu laYout Sensor log Call log Phonebook Review Reiew Add contact Del all calls Answering sys Intercom Call guard Announcement Block list Delete all old Calls w/o number Record memo Answer ON/OFF Voice guide Ans sys setup Ringers Set date/time CND annc. -
Page 58: Keystroke Table
keYStroke table... -
Page 59: Set Date And Time
Set date and tIme NOTE • Make sure you set the date and time including the year correctly; otherwise the answering system does not announce the correct day of the week for your recorded messages time stamp. 1. Press MENU on the handset or telephone base when idle. on the handset, or CALLS / or PHONEBOOK / to 2. -
Page 60: Time Format
TIme fORmaT You can change the time format of the time displayed in idle mode or during date and time setting. 1. Press MENU on the handset or telephone base when idle. on the handset, or CALLS / or PHONEBOOK / 2. -
Page 61: Quiet Mode
QUIeT mODe You can turn on the quiet mode for a period of time. During this period, all tones (except paging tone and alert tone) and call screening are muted. When you turn on the quiet mode, the answering system turns on automatically. 1. -
Page 62: Calling Number Display Announce
CallINg NUmbeR DISPlaY aNNOUNCe The Calling Number Display Announce feature lets you know who’s calling without having to look at the display. When you have an incoming call, the handset speaks “Call from...” and the name of the caller based on the phonebook or Calling Number Display information. -
Page 63: Telephone Operations
TelePHONe OPeRaTIONS make a Call 1. Press on the handset, or press on the base. 2. When you hear a dial tone, dial the number. -OR- • Enter the telephone number on the handset or base, and then press on the handset, or press on the base, to dial. -
Page 64: Volume Control
VOlUme CONTROl • During a call on the handset, press /VOLUME/ to adjust the • listening volume. During a call on the telephone base, press /VOL/ to adjust the listening volume. NOTE • The volume settings of handset earpiece, handset speakerphone, and telephone base speakerphone are independent. -
Page 65: Find Handset
fIND HaNDSeT Use this feature to ind all system handsets. To start paging: Press /HANDSET LOCATOR on the • base. All idle handsets ring and display ** Paging **. To mute paging: • Press MUTE, MUTE, or CANCEL on the handset. -
Page 66: Join A Call In Progress
JOIN a Call IN PROgReSS You can use up to two devices plus the base at a time on a call. You can buy additional expansion handsets for this telephone base. You can register up to 5 handsets to the telephone base. •... -
Page 67: Transfer A Call
TRaNSfeR a Call While on an outside call, you can use the intercom feature to transfer the call from one handset to another. 1. Press OPTIONS on the handset or telephone base during a call. 2. Press SELECT to choose Intercom. Use the dialing keys to enter a destination device number. -
Page 68: Reset Phone Settings
ReSeT PHONe SeTTINgS You can reset the phone settings to the default values. Once the phone settings are reset, all your customized settings, and entries of phonebook, call log, and call guard will be deleted. Press MENU on the handset or telephone base when idle. on the handset, or CALLS / or PHONEBOOK/ Press... -
Page 69: Phonebook
PHONebOOk The phonebook stores up to 50 entries with up to 30 digits for each phone number and 15 characters for each name. aDD a PHONebOOk eNTRY 1. Press MENU on the handset or telephone base when idle. 2. Press on the handset, or CALLS / or PHONEBOOK / on the telephone base to scroll to Phonebook,... -
Page 70: Review And Dial From The Phonebook
ReVIew aND DIal fROm THe PHONebOOk Entries are sorted alphabetically. 1. Press on the handset or PHONEBOOK/ on the telephone base when idle. 2. Press on the handset, or CALLS / or PHONEBOOK / on the telephone base to scroll to browse through the phonebook, or use the dialing keys to start a name search 3. -
Page 71: Calling Number Display
callIng number dISPlaY If you have subscribed to a Network Calling Number Display service, you will be able to see your caller’s number on your handset display (provided it is not blocked) prior to answering the call. If your caller’s name is stored in the phonebook and a number match is found, you will see the caller’s name on the display instead. -
Page 72: Memory Match
memorY matcH If the incoming telephone number matches the exact telephone number in your phonebook the name that appears on the screen matches the corresponding name in your phonebook. For example, if Christine Smith calls, her name appears as Chris if this is how you entered it into your phonebook. -
Page 73: Review And Dial A Number In The Call Log
ReVIew aND DIal a NUmbeR IN THe Call lOg 1. Press CALLS or CALLS/ when idle. on the handset, or CALLS / 2. Press or PHONEBOOK / on the telephone base to scroll to browse through the call log. When the desired entry appears: •... -
Page 74: Call Guard
Call gUaRD You can use the Call Guard feature to reject certain calls automatically by adding numbers into the Block list, and/or all calls without number. When there is a call from the number saved in the Block list, the call will be disconnected. -
Page 75: Review The Block List
ReVIew THe blOCk lIST Press MENU when the phone is not in use. on the handset, or CALLS / or PHONEBOOK / Press on the telephone base to scroll to Call guard, and then press SELECT. SELECT to select Block list. Press SELECT to choose Review. -
Page 76: Block Unknown Calls
blOCk UNkNOwN CallS MENU Press when the phone is not in use. Press on the handset, or CALLS / or PHONEBOOK / on the telephone base to scroll to Call guard, and then press SELECT. Press on the handset, or CALLS / or PHONEBOOK / on the telephone base to scroll to Calls w/o num, and then press SELECT. -
Page 77: Call Guard Announce
Call gUaRD aNNOUNCe You can turn on the call guard announce feature to screen incoming calls without number. Answering system must be On when the call guard announce is turned On. MENU Press when the phone is not in use. Press on the handset, or CALLS / or PHONEBOOK / on the telephone base to scroll to Call guard, and then press... -
Page 78: Outgoing Message For Calls Without Number
OUTgOINg meSSage fOR CallS wITHOUT NUmbeR You can set a speciic outgoing message for calls without numbers. The preset outgoing message for calls without numbers is a greeting that answers calls with “Hello, please leave your name after the tone” You can use this default outgoing message for calls without numbers, or replace it with your own. - Page 79 on the handset, or CALLS / or PHONEBOOK / Press on the telephone base to scroll to Call guard annc., and then press SELECT. Press on the handset, or CALLS / or PHONEBOOK / on the telephone base to scroll to Annoucement, and then press SELECT.
-
Page 80: Sound Settings
SOUND SeTTINgS keY TONe You can adjust the key tone volume, or turn the key tone off. Press MENU when the handset is not in use. Press on the handset, or CALLS / or PHONEBOOK / on the telephone base to scroll to Phone setup, and then press SELECT. -
Page 81: Ringer Volume
RINgeR VOlUme You can adjust the ringer volume level, or turn the ringer off. To adjust the handset ringer volume: Press MENU on the handset when idle. Press on the handset to scroll to Ringers, and then press SELECT. to select Ringer volume. SELECT Press Press... -
Page 82: About The Built-In Answering System And Voicemail Service
abOUT THe bUIlT-IN aNSweRINg SYSTem aND VOICemaIl SeRVICe For message recording, your telephone has a built-in answering system, and it also support voicemail service offered by your telephone service provider (subscription is required, and fee may apply). The main differences between them are as follows: Built-in answering Voicemail from Category... -
Page 83: Set Your Built-In Answering System
Set Your buIlt-In anSwerIng SYStem Your answering system has various features, read below for the basic settings. The answering system can record and store up to 99 messages. Each message can be up to three minutes in length. The total storage capacity for the announcement, messages and memos is approximately 22 minutes. -
Page 84: Default Announcement
Using the handset: Press MENU when the phone is not in use. to scroll to Answering sys, and then press Press SELECT. to scroll to Answer ON/OFF, and then press Press SELECT. to scroll to On or Off, and then press SELECT Press save. -
Page 85: Play The Announcement
PlaY THe aNNOUNCemeNT Press MENU on the handset or telephone base when idle. on the handset, or CALLS / or PHONEBOOK / Press on the telephone base to scroll to Answering sys, and then press SELECT. SELECT to select Announcement. Press on the handset, or CALLS / or PHONEBOOK / Press... -
Page 86: Set Number Of Rings
SeT NUmbeR Of RINgS You can set the answering system to answer an incoming call after 2, 3, 4, 5 or 6 rings; or toll saver. If you choose toll saver, the answering system answers after 2 rings when you have new messages, or after 4 rings when you have no new messages. -
Page 87: Message Alert Tone
meSSage aleRT TONe When the message alert tone is set to on, and there is at least one new message, the telephone base beeps every 10 seconds. The message alert tone is preset to off. Press MENU when the phone is not in use. on the handset, or CALLS / or PHONEBOOK / Press on the telephone base to scroll to Answering sys, and then press... -
Page 88: Recording Time
ReCORDINg TIme You can set the recording time limit for each incoming message. Press MENU when the phone is not in use. on the handset, or CALLS / or PHONEBOOK / Press on the telephone base to scroll to Answering sys, and then press SELECT. -
Page 89: Use Your Built-In Answering System
USe YOUR bUIlT-IN aNSweRINg SYSTem New meSSage INDICaTION When you received a message on your answering system, displays on both the handset and telephone base, XX New msgs displays on the handset, and XX New messages displays on the telephone base. To retrieve, press /PLAY when the phone is not in use. -
Page 90: Options During Playback
To play messages at the handset: 1. Press MENU when the handset is not in use. to scroll to Play messages, and then press 2. Press SELECT. • If there are new and old messages, press to select Play new msgs or Play old msgs, then press SELECT. •... -
Page 91: Delete All Old Messages
DeleTe all OlD meSSageS To delete all old messages at the telephone base: Press X/DELETE twice when the phone is not in use. To delete all old messages on a handset: Press MENU when the phone is not in use. On the handset, scroll to Answering sys and then press SELECT. -
Page 92: Remote Access
RemOTe aCCeSS A two-digit security code is required to access the messages, or change the sensor mode setting remotely, from any touch-tone telephone. The preset code is 19. You can use this preset code, or set your own. Dial your telephone number from any touch-tone telephone. When the system plays your announcement, enter the two-digit security code. -
Page 93: Listen To Messages From Remote Access
lISTeN TO meSSageS fROm RemOTe aCCeSS Follow steps 1 and 2 in Remote access section on page 82 to enter remote access mode. Press # on your remote touch-tone telephone to enter the answering system operations command session. You can enter one of the following remote commands to do the answering system operations. -
Page 94: Change Sensor Mode From Remote Access
CHaNge SeNSOR mODe fROm RemOTe aCCeSS Follow steps 1 and 2 in Remote access section on page 82 to enter remote access mode. Press * on your remote touch-tone telephone to enter the sensor mode command session. You can enter one of the following remote commands to change to the respective sensor mode. -
Page 95: Use The Built-In Answering System And Voicemail Service
USe THe bUIlT-IN aNSweRINg SYSTem aND VOICemaIl SeRVICe You can use your answering system and voicemail service together by setting your answering system to answer before voicemail service answers as described below. To learn how to program your voicemail settings, contact your telephone service provider. If you are on a call, or if the answering system is busy recording a message and you receive another call, the second caller can leave a voicemail message. -
Page 96: Retrieve Voicemail From Telephone Service
ReTRIeVe VOICemaIl fROm TelePHONe SeRVICe ReTRIeVe VOICemaIl When you received a voicemail, the handset displays New voicemail. To retrieve, you typically dial an access number provided by your telephone service provider, and then enter a security code. Contact your telephone service provider for instructions on how to conigure the voicemail settings and listen to messages. -
Page 97: Eco Mode
eCO mODe This power conserving technology reduces power consumption for optimal battery performance. The ECO mode activates automatically whenever the handset is synchronized with the telephone base. geNeRal PRODUCT CaRe Taking care of your telephone Your cordless telephone contains sophisticated electronic parts, so it must be treated with care. - Page 98 HelP Below are the questions most frequently asked about the cordless telephone. If you cannot ind the answer to your question, call 1300 369 193 for customer service. My telephone does Make sure the telephone base is installed not work at all. properly, and battery is installed and charged correctly.
- Page 99 To register HS, see base. Place the handset in the telephone base manual to register. to register it back. The handset shows VTECH X Registered and you hear a beep The handset does not work at all. when the registration process completes. This process takes about 60 seconds to complete.
-
Page 100: How Many Telephone Can You Have
(REN), which is used to calculate the number of items which may be connected to any other telephone line. Your VS150 TWIN has a REN of 0.1. A total REN of 3 is allowed, if the total REN of 3 is exceeded, the telephone may not ring. -
Page 101: Customer Service And Product Warranty
Voluntary Product Warranty In addition to your Statutory Rights and subject to the conditions below, VTech warrants that this product will be free from any defect in materials or workmanship under conditions of normal use for a period of 12 months from date of purchase. - Page 102 Statutory Rights. This Voluntary Product Warranty is given by: VTech Telecommunications (Australia) Pty Ltd ABN 70 136 672 627 Address: 24 Gilby Road, Mount Waverley 3149 IMPORTANT NOTE: THIS IS NOT A PRODUCT RETURN OR SERVICE ADDRESS –...
-
Page 103: Technical Speciications
TeCHNICal SPeCIfICaTIONS Frequency control Crystal controlled PLL synthesizer Transmit frequency 1881.792 - 1897.344 MHz Channels Nominal effective Actual operating range may vary according to range environment conditions at the time of use. Power Handset: 2.4V 400mAH Ni-MH battery pack requirements Telephone base: 6V DC @ 600mA Charger: 6V DC @ 400mA Sensor: 2xAAA alkaline batteries... -
Page 104: Disclaimer
VTech is not responsible for losses, injury, or damage resulting from the use of this product. - Page 105 VTech is the registered trademark of VTech Holdings Limited. Copyright © 2015 for VTech Telecommunications (Australia). All rights reserved. Printed in China. Version A FOR MORE INFORMATION CALL: TECHELP ON 1300 369 193 OR EMAIL: TCPSUPPORT_AU@VTECH.COM...
Need help?
Do you have a question about the VS150 TWIN and is the answer not in the manual?
Questions and answers