Table of Contents
Advertisement
Quick Links
Advertisement
Table of Contents

Related Manuals for Plum Ram Plus E300


Summary of Contents for Plum Ram Plus E300
- Page 1 E300 (Ram Plus) User Manual...
-
Page 2: Table Of Contents
Contents 1. Safety and Performance ........... 3 3. Preparing for use ............12 3.1 Install SIM Card ............12 3.2 Install Memory Card (T-FLASH Card) ........12 3.3 Charge the battery ............ 12 4. Basic Functions ............13 4.1 Dial Call .............. 13 4.2 Adjust Volume ............13 4.3 Answer the incoming call ..........13 4.4 Call Process ............14 5. Main Menu ..............14 5.1 Call Center ............14 5.1.1 Call history ............14 5.1.2 Call Settings ............ - Page 3 6. Appendix ..............26 Common problems and solutions ......... 27...
-
Page 4: Safety And Performance
1. Safety and Performance Personal Interference might cause by poor shielding performance of medical devices such as hearing aids ♦ and heart pacemakers. Consult to medical device manufacturer or your doctor before using mobile phone. Please turn off the phone in medical facilities. These places include hospitals and rest homes and ♦ other medical establishments because these facilities may be using equipments sensitive to external RF signal. If you are using personal medical devices, please consult to these manufacturers to confirm that ♦ they are adequately shielded from around the RF signal. You can also ask your doctor for the relevant information. Users suffering from heart disease should pay special attention to the setting of ring tone ♦... - Page 5 To avoid the misused of the phone, please take preventive measures such as: set up mobile ♦ phone SIM card PIN code or personal security code and modify in a timely manner when others know. ♦ Do not remove the battery in standby state mode, it will result in the loss of user data. When you leave your car, please do not put the mobile phone in a place easy to be seen. You shall take it with you or put it in the trunk. ♦ Do not let the children touch the mobile phone, charger or battery.
- Page 6 The headset may be hot during normal using and the mobile phone may be hot when charging. ♦ Do not leave the mobile phone without battery or with empty battery for a long time otherwise ♦ the data may be lost. Mobile phone contains some metallic substances which may cause allergies. ♦ If you turn on the vibration function, please keep the mobile phone away from the heat source ♦ (such as radiator) and to avoid the phone slipped from the desktop due to vibration. Please try to avoid scratching the touch screen. Do not use common pen or other sharp objects ♦ to write on the touch screen. Battery Please do not short circuit battery equipment, it will damage the battery and ♦ may cause fire or explosion. You must not put the battery into the fire lest it will cause an explosion. Used batteries should ♦ be returned to the supplier or put in the designated collection points. Do not put them in the household waste. Please do not use metal objects (such as coins or key ring) to contact the battery endpoint ♦...
- Page 7 wireless phone using, and pay attention in using. Please turn off your mobile phone when refueling, the same situation applies to ban the use of ♦ a two-way radio equipment. Please do not take any hazardous material which is inflammable, explosive with mobile phone together otherwise the internal spark may cause burns. On the plane ♦ Please turn off the phone while you are in the plane or near the plane. It is illegal to use mobile phone in the plane. It could be dangerous for aircraft operation and it may also disrupt mobile phone networks.
- Page 8 Radio Frequency Energy Your mobile phone is a low power radio transmitter and receiver. Once it is powered on, it will periodically receive and send radio signal. Network system will control the transmitted power of the mobile phone. FCC Warning This device complies with part 15 of the FCC Rules. Operation is subject to the following two conditions: (1) This device may not cause harmful interference, and (2) This device must accept any interference received, including interference that may cause undesired operation. Note: This equipment has been tested and found to comply with the limits for a Class B digital device, pursuant to part 15 of the FCC Rules. These limits are designed to provide reasonable protection against harmful interference in a residential installation. This equipment generates, uses and can radiate radio...
- Page 9 —Increase the separation between the equipment and receiver. —Connect the equipment into an outlet on a circuit different from that to which the receiver is connected. —Consult the dealer or an experienced radio/TV technician for help. SAR tests are conducted using standard operating positions accepted by the FCC with the phone transmitting at its highest certified power level in all tested frequency bands. Although the SAR is determined at the highest certified power level, the actual SAR level of the phone while operating can be well below the maximum value. In general, the closer you are to a wireless base station antenna, the lower the power output.
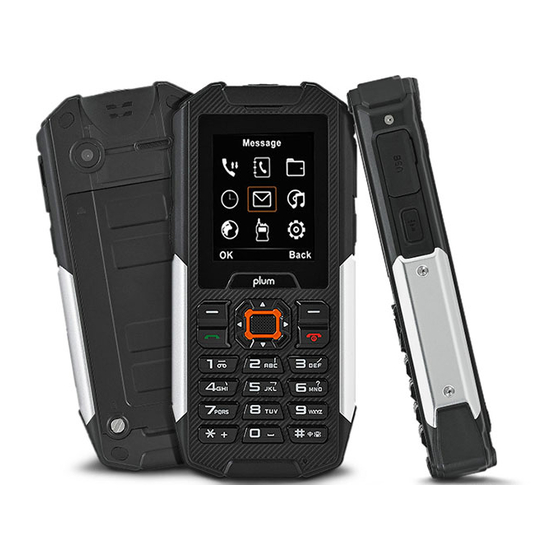
- Page 11 2. Your E300 E300 Phone Layout Keys Descriptions : No. Keys Function Descriptions Press to enter to main menu in standby mode to select Menu / Options / Edit / edit / confirm the operating functions. / OK Key Press to enter to phonebook in standby mode. Or, Phonebook / Back Key press to return to the previous page in the main menu. Press to enter the call records. Input the number Dial Key in standby mode, and press this key to dial. Press to end the phone call. Long press to turn off End, Power On/Off the phone. Key Input numbers or characters. Number Keys a) Press Up key to select shortcuts of Write Message, Messaging, Add New Contact to Phonebook, and, Navigation Keys Alarm.
- Page 12 c) Press Left key to Profiles to select ringing mode. d) Press Right key to Messaging functions. e) Press the up, down, left or right keys to select the functions you need in the main menu. f) Press the key in the middle to confirm. LED Flashlight LED Flashlight 8 / 9 Volume key To adjust the volume of your phone. Camera Key Press to camera function USB/Charger Pal port USB/Charger Pal port LED Flashlight key Press for LED Flashlight Loudspeaker Loudspeaker Viewfinder Viewfinder Icons : Vertical bars indicate the signal strength of the GSM network signal. Indicates your phone is locked. Indicates music playing Indicates the alarm clock is set ...
-
Page 13: Preparing For Use
3. Preparing for use 3.1 Install SIM Card The SIM card contains your private information such as your phone number and Phonebook. · The SIM card slot is located inside the phone, for the installation, open the back cover, take out the battery and find the SIM card slot. Put the SIM card metal face down, gently insert to the card slot, and fix it. You must turn the phone off before you replace the SIM card. · Please operate SIM card carefully, friction or bending may damage the SIM card. · Pay attention to save the mobile phone and its accessories such as the SIM card small parts, and place out of the reach of children. 3.2 Install Memory Card (T-FLASH Card) It is located inside the phone and it is a pluggable mobile memory card. When the phone is enable USB memory function and computer connected, transmission of the data files from the computer to mobile phone can be stored in this memory card. Install Method: Turn off the phone, open the back cover and take the battery out, then find the memory card slot. Put the memory card metal face down, gently insert to the card slot, and fix it. You must turn the phone off before you take the battery out. Note: Since the phone memory is less, in the need to use the storage function, please try to store files in the memory card so as not to affect the use of your phone. -
Page 14: Basic Functions
means charging is finished. Note: The actual standby time and call time are affected by the mobile phone usage, local network environment, SIM card and the actual settings. ● The charger can charge the battery through the phone. You must insert the battery before you start to charge. Connect the charger and the micro-USB port at the bottom of the phone by the USB cable as provided. -
Page 15: Call Process
■ Press the End key to end the call. ■ Directly press the End key or the Back key to refuse an incoming call. Note: If the caller identification is available, it displays caller number. (If the caller phone record is saved in the mobile phone, it displays the caller name). 4.4 Call Process During a call, you can press the Menu (Options) key to select hold, end single call, phonebook, call records, message, sound recording, mute, and other functions. Please see the next chapter "menu function". -
Page 16: Call Settings
● View: view the details of the phone number. ● Call: call the phone number. ● Send SMS: send SMS to the phone number. ● Send MMS: send MMS to the phone number. ● Save to phonebook: save the phone number to phonebook. ● Edit before calling: edit the phone number before calling it. ● Delete: delete the phone number. ■Dialed Calls ● You can view the last 20 dialed calls. You can view, call, send SMS, save to phonebook, edit before calling and delete. Same as “Missed Call”. ■Received Calls ● You can view the last 20 received calls. You can view, call, send SMS, save to phonebook, edit before calling and delete. Same as “Missed Calls”. - Page 17 menu, select “Call divert”, press the "OK" key to enter this function. ■ Call Barring: This function allows you to restrict your calls. To set this function, you need the network operator to provide network banning password first. 5.1.2.2 Advanced Settings ● Blacklist: You can open or close and set the numbers of the blacklist. ● Auto Redial: If this function is on, when the other party does not pick up your call, the phone will automatically redial over a period of time. Automatic redial is 10 times maximum. ● Call Time Reminder : This function gives prompts to you for the call time. You can set reminder time in the reminder type options of “Single” and “Periodic”. ● Answer mode: You can set any key to answer calls or automatic answer via headset mode.
-
Page 18: Phonebook
5.2 Phonebook 5.2.1 Searching Quick Search: You can enter the name or telephone number, and other related information to quickly find the contacts in the phonebook. Press the # key to switch "abc" or "123" in the phonebook interface to switch the input method. 5.2.2 Add New Contact In the phonebook menu, select "Add New Contact", then select "to SIM 1", “to SIM 2” or "to Phone” to add new contacts. 5.2.3 Options of the Contacts Press the Options key in the Phonebook menu, you can view, send SMS, call, edit, delete, copy, send name card and phonebook settings. ■Phonebook Settings ● Storage Position : You can select to save the contacts in SIM 1, SIM 2, mobile phone or all the above. If the phone only has SIM 1, this option will only display SIM 1. ● Speed Dial : When this function is on, a total of eight speed dial numbers can be set to the keys 2 ~ 9. In the standby state, long press the number key, the corresponding phone number will be dialed at once. -
Page 19: File Manager
● Delete All Contacts : You can delete all the contacts in the phonebooks of SIM 1 / SIM 2 and the phone. 5.3 File Manager ■ You can use this function to manage the directories and files which are stored in the phone or in the T-Flash card. Note: You can move the specified file or all the files and images of the T-Flash card. 5.4 Organizer 5.4.1 Charge Pal ■ The phone can charge another mobile phone via the USB port on the right side of the phone. ● After selecting “On” on the Charge Pal interface, connect another mobile phone or device with the USB port by a correct USB cable for charging. Note: Charging another mobile phone or device will be ceased when the phone is in low battery. 5.4.2 Calendar ■ On the Calendar interface, press the left or right key to switch the date. After selecting the date, press the Options key to select functions such as View / Add events, Jump to (specific) Date or Go to Weekly View. - Page 20 ● Send to: send the SMS. ● Input method: select which input method you want to edit. ● Advanced option: number insertion is available. ● Save: save the SMS to the draft box. ■ MMS: Edit the MMS in MMS interface. You can also add image, sound and video file in MMS to send. The contents of MMS file cannot be exceeded 100k. You can click “options” to operate the functions: 5.5.2 Inbox This message dialogue will save SMS, MMS in the dialogue groups. SMS icon is different from multimedia message. Unread message will show as unread message icon. Read message will show as read icon.
-
Page 21: Multimedia
5.5.7 Message Settings ■SMS ● SIM1/SIM2 Card: enter this menu, you can set Message Center number, SMS validity, sent format, send report, reply path, preferred connection, voice mail, etc. ● Save the sent SMS: open this function, the sent message will automatically save in Sent Message. ■MMS ● Data account: Choose the service provider that you need to connect. ● General Settings: ● Receive settings: you can select promptly or delay settings. ● Send and save: open this function, the MMS will be saved in sent message automatically every time. ● Storage State: check the MMS usage rate in memory card. ■ Service Message: ● Service Message Settings: you can select receive all and close all. ● Information loading: can choose to ask, automatic implementation and close. 5.6 Multimedia Camera 5.6.1 Use the camera application, you can take picture for around people or events any time. Photo will be stored in the JPG format in the “Image Viewer". - Page 22 5.6.2 Image Viewer ■ Press left soft key to enter the menu: ● View: view the images. ● Send: to send the images via MMS or BT. ● Use as: Images can be selected for wallpaper. ● Rename: modify the image’s name. ● Delete: delete the image. ● Image information: view the details of image. 5.6.3 Video Recorder ■ Enter to Video Recorder, in the camera preview state, press the OK key to start camera then press the right soft key to stop. Press left soft key after enter to the video recorder function, the operations as below: ■ Camcorder settings: set to avoid flicking value. ■...
- Page 23 ■ Video Play: ● Press the * and # key to adjust the volume. Press the left or right key to support fast forward and rewind. Press the up key to switch between full-screen and half-screen. Press OK key to pause and continue to play.
-
Page 24: Network Service
5.7 Network Service 5.7.1 Internet Service ■ You can surf the internet, browse the relevant Web by WAP browser. For more information, please contact your network service provider. Open this menu to enter the following operations: ● Homepage: Internet’s default website. ● Bookmark: store the commonly used website. ● Search or input the website: input the website which you want to visit, click OK to enter the website. ● Recent Pages: the preservation record after browsed the web. ■ Settings ● Data account: Select the network connection data account. If you select automatic, the phone will automatically according to the SIM card operators to select the data account. - Page 25 5.9.1.1 Time and Date ■ In this interface, you can change the following setting: 1. Set Time Zone: Set the device Time Zone. 2. Set Time/ Date: Change the Time and date manually. 3. Set format: To change the display method of the Time and date. 4. Auto Update Time: To calibrate the time and date by network. 5.9.1.2 Language ■ You can choose different language as your requirement in this interface. 5.9.1.3 Preferred Input Method ■ To choose your commonly used input method as the default input method. 5.9.1.4 Display ● Wallpaper: system provides 7 default images for wallpaper. You can also use your own image as the wallpaper by choosing the “User Defined”. ● Screen auto lock: you can set the keyboard lock time according to your own needs. ● Show date and time: click open or close to said whether display date and time in standby. 5.9.1.5 Dedicated Key ■ Dedicated key: used to set the shortcuts for specific keys. 5.9.1.6 Flight Mode ■ In this interface, you could choose the flight mode and normal mode, ●If you choose Flight mode, all the network function will disable. ●The network function will restore after you choose the normal mode. 5.9.1.7 Misc. Settings...
- Page 26 ● LCD Backlight: set LCD backlight brightness and backlight time. ● Image Quality: set to open or close. 5.9.2 Security Settings This interface contain some setting for improve the safety of your device. ■ SIM1/SIM2 Security: you can setup or change the PIN code in this interface. Once you enable the PIN lock, it will restrict some phone function unless you input the correct PIN code to unlock it. ■ Phone Security: Using this function will lock your phone. A password is required to turn this function on or off. You will be asked to enter the password when you power on the device with SIM card. ■ Privacy Project: Once you enable this function, you can choose to lock the Phone book, message, call log and file manager. You may not access those function unless you input the correct password. 5.9.3 Network Settings You can change the network selection for each SIM card in this interface. To obtain the above network services, please contact your network operator. 5.9.4 Dual SIM Setting ■ The user can refer to the SIM card usage to set the corresponding operation, this function in the double card insertion condition can choose: ● Dual SIM open: open two SIM cards at the same time.
- Page 27 5.9.5.1 BT ■ You can activate BT function in this menu, including start BT, search hands free device, my device, connectivity device, settings, my BT. Start BT, you can transfer the files to the matched BT and it can be paired with a BT headset to make a call. ● Power: You can choose “activate” or “close” BT as your demand. ● Visibility: Other BT devices cannot search your BT unless you enable this function. ● My device: Used to search for new device or display already pairing successful device list record. ● Search audio device: search audio device with BT function. ● My name: display this phone’s BT name, and you can also modify it. ● Advanced: ● Audio path: set audio path to save as your phone or BT hands free device. ● My Address: Display this phone’s BT address. 5.9.5.2 Data Account ■ Select the corresponding data account according to your needed connection network services. You can edit, add, delete and change default account.
- Page 28 Common problems and solutions Common problems The causes and solutions Check whether the battery power is exhausted, please charge the battery. Unable to boot Check whether the battery is bad contact. Please remove it first and reinstall, then retry boot. 1. SIM card metal surface have dirt, use clean cloth to brush the SIM card metal contact point SIM card error 2. Reinstall the SIM card.
Need help?
Do you have a question about the Ram Plus E300 and is the answer not in the manual?
Questions and answers