Table of Contents
Advertisement
Quick Links
Advertisement
Table of Contents

Related Manuals for NETGEAR supernet


Summary of Contents for NETGEAR supernet
- Page 1 SuperNet Installation Manual...
-
Page 2: Connect To The Gateway
1. Connect to the Gateway Getting to know your gateway This chapter describes how to configure the Internet connection of your gateway and includes these sections: • Gateway Front Panel • Gateway Rear Panel • Gateway Label • Log In to Your Gateway •... -
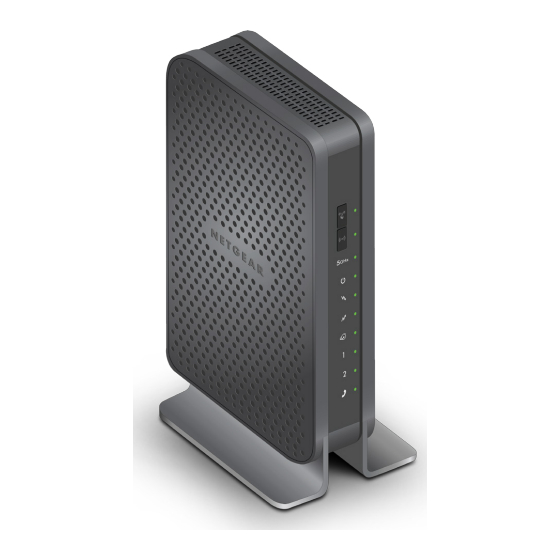
Page 3: Gateway Front Panel
Gateway Front Panel The gateway front panel has the buttons and status LEDs shown in the following figure. WPS button / LED Wireless button / 2.4 GHz LED 5 GHz LED Power LED Downstream LED Upstream LED Internet LED LAN (Ethernet) LEDs Phone LED Figure 1. - Page 4 Table 1. Gateway LED descriptions Description • Solid green. The gateway has 5 GHz connectivity. • Off. The gateway does not have 5 GHz connectivity or the power is off. • Solid green. The gateway has power. Power • Blinking green. Power-on self-test is in progress. •...
-
Page 5: Gateway Rear Panel
Gateway Rear Panel The rear panel has the connections and buttons shown in the following figure. Phone port USB port (optional) Ethernet LAN ports Figure 2. Rear panel connections and buttons Coaxial cable connector The rear panel includes the following connections, viewed from top to bottom: •... -
Page 6: Gateway Label
Gateway Label The label on the gateway shows the PIN, login information, MAC address, serial number, SSID, and WPA key. Figure 3. The label shows unique information about your gateway Position Your Gateway The range of your wireless connection can vary based on the physical placement of the gateway. The latency, data throughput performance, and notebook power consumption of wireless adapters also vary depending on your configuration choices. -
Page 7: Log In To Your Gateway
Log In to Your Gateway You can log in to the gateway to view or change its settings. Note: To connect to the gateway, use a computer that is configured for DHCP (most computers are). For help with configuring DHCP, see the instructions that came with your computer. -
Page 8: Basic Home Screen
Dashboard (Click to view details) Figure 4. NETGEAR genie BASIC home screen The BASIC Home screen has a dashboard that shows the status of your Internet connection and network. You can click the sections of the dashboard to view more detailed information. The left column has menus and an ADVANCED tab displays at the top that you can use to access more menus and screens. -
Page 9: Advanced Home Screen
ADVANCED Home Screen Note: Using the ADVANCED Home screen requires a solid understanding of networking concepts. To view the ADVANCE Home screen, click the ADVANCED tab. The gateway ADVANCED Home screen has a dashboard that lets you see the configuration of your gateway and network at a glance. You can click any of the sections of the dashboard to view more detailed information. -
Page 10: Join The Wireless Network
Join the Wireless Network To join the wireless network: 1. Open the software that manages your wireless connections on the wireless device (laptop computer, gaming device, iPhone) that you want to connect to your gateway. This software scans for all wireless networks in your area. 2. -
Page 11: Netgear Genie Basic Settings
2. NETGEAR genie Basic Settings Your Internet connection and network This chapter explains the features available from the genie BASIC Home screen. This chapter contains the following sections: • Cable Connection • View or Configure Your Wireless Network • Network Map •... -
Page 12: Cable Connection
From the BASIC tab, select Cable Connection. The starting frequency is automatically generated. Most of the time, you do not need to enter a value in this field. If you need to enter a starting frequency, contact your Internet service provider. NETGEAR genie Basic Settings... - Page 13 Does your wireless device or computer appear on the Network Map screen? If it does, it is connected to the network. • If you are not sure what the network name (SSID) or password is, look on the label on your gateway. NETGEAR genie Basic Settings...
-
Page 14: Wireless Setup Screen Fields
Mode. Up to 145 Mbps is the default and allows 802.11n and 802.11g wireless devices to join the network. g & b supports up to 54 Mbps. The 300 Mbps setting allows 802.11n devices to connect at this speed. NETGEAR genie Basic Settings... - Page 15 4. Security Keeping unwanted content out of your network This chapter explains how to prevent objectionable content from reaching the computers and other devices that are connected to your network. This chapter includes the following sections: • Keyword Blocking of HTTP Traffic •...
-
Page 16: Keyword Blocking Of Http Traffic
Keyword Blocking of HTTP Traffic Use keyword blocking to prevent certain types of HTTP traffic from accessing your network. 1. Select ADVANCED > Security > Block Sites. 2. Select one of the keyword blocking options: • Never. Turn off keyword blocking. •... -
Page 17: Schedule Blocking
2. In the Trusted IP Address field, enter the IP address. 3. Click the Apply button. Your changes are saved. Schedule Blocking You can specify the days and time that you want to block Internet access. To schedule blocking: 1. Select ADVANCED > Security > Schedule. The following screen displays. -
Page 18: Troubleshooting
5. Troubleshooting Finding and fixing common issues This chapter provides information about troubleshooting your gateway. This chapter contains the following sections: • Troubleshoot with LEDs • Cannot Log In to the Gateway • Troubleshoot the ISP Connection • Troubleshoot a TCP/IP Network Using the Ping Utility Troubleshooting... - Page 19 Check that you are using the 12 V-DC power adapter from NETGEAR for this product. If the error persists, you have a hardware problem. • Clear the configuration of the gateway to its factory defaults.
-
Page 20: Cannot Log In To The Gateway
Cannot Log In to the Gateway If you are unable to access the gateway from a computer on your local network, check the following: • Check the Ethernet connection between the computer and the gateway as described in the previous section. •... -
Page 21: Test The Lan Path To Your Gateway
Test the LAN Path to Your Gateway You can use ping to verify that the LAN path to your gateway is set up correctly. To ping the gateway from a computer running Windows 95 or later: 1. From the Windows toolbar, click the Start button and select Run. 2. -
Page 22: Test The Path From Your Computer To A Remote Device
Test the Path from Your Computer to a Remote Device After verifying that the LAN path works correctly, test the path from your computer to a remote device. After verifying that the LAN path works correctly, test the path from your computer to a remote device. To test the path from your computer to a remote device: 1. - Page 24 Connect with us, OoredooMaldives T:929 | E: 929@ooredoo.mv | ooredoo.mv...
Need help?
Do you have a question about the supernet and is the answer not in the manual?
Questions and answers