Advertisement
Advertisement
Table of Contents

Related Manuals for Yardworks 60-1750-4


Summary of Contents for Yardworks 60-1750-4
- Page 1 Compact Electric Lawn Mower 60-1750-4 Owner's Manual TOLL-FREE HELPLINE: 1 866 523-5218 IMPORTANT: Read all safety rules and instructions carefully before using this product.
-
Page 2: Table Of Contents
Operating the Lawn Mower Making Adjustments Maintenance Storage Troubleshooting Warranty Parts List 15/17 SPECIFICATIONS: Model Number 60-1750-4 Motor 120V, 60 Hz, 8 A No-load Speed 3,600 RPM Cutting Path 14”(35.6cm) Height Adjustment 1 3/8 to 3 3/4" (3.8 to 9.5 cm) Wheel size 6"... - Page 3 2. Become familiar with all controls and their proper operation. Know how to stop the mower and how to disengage the power in an emergency. 3. Do not allow children under the age of 14 to operate this mower. Children who are 14 years of age and older must read and understand the operating instructions and the safety rules in this manual, and must be trained and supervised by a parent.
-
Page 4: Operating On A Slope
17. Do not abuse the cord by pulling the mower by the cord or yanking on the cord in order to disconnect it from the outlet. Keep the cord away from heat, oil, and sharp edges. 18. Many injuries occur as a result of the mower being pulled over the operator's foot during a fall caused by slipping or tripping. -
Page 5: Save These Instructions
SERVICE 1. When servicing the mower, use only replacement parts that are listed in this manual. The use of parts that do not meet the original equipment specifications may lead to improper performance, and may compromise safety. 2. Before cleaning, repairing, or inspecting, verify that the blade and all moving parts have come to a complete stop. -
Page 6: Slope Gauge
WARNING: IT IS YOUR RESPONSIBILITY To restrict the use of this mower to people who have read and understand the warnings and instructions that appear in this manual and on the mower and who will follow them. DANGER AVERTISSEMENT AVOID SERIOUS INJURY OR DEATH •... -
Page 7: Assembling The Lawn Mower
ASSEMBLING THE LAWN MOWER Loose Parts in Carton Grass catcher Owner's Manual Assembling the Handle 1. Remove any packing material that may have been inserted between the upper and lower handles for shipping purposes. 2. Align the holes (4) on the upper handle (1) with those on the middle handle (2). Insert the bolts (5), and tighten them using the knobs (6) provided. -
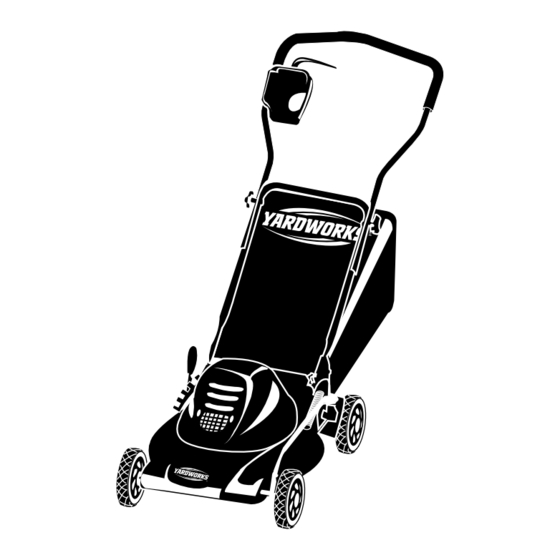
Page 8: Description Of Parts
DESCRIPTION OF PARTS Power switch assembly Upper handle Cord restraint Middle handle Lower handle Rear bag Motor housing Height adjustment lever Wheel Fig. 2 Read this Owner's Manual and safety rules before operating the lawn mower. Compare the illustration in Fig. 2 to the lawn mower in order to become familiar with the location of the various controls and adjustments. -
Page 9: Operating The Lawn Mower
Cord Restraint The cord restraint is located on the back of the upper handle, and when it is used properly, it helps to protect the switch assembly and the extension cord. Height Adjustment Lever A single height adjustment lever is used to adjust the cutting height. The lever is located beside the right rear wheel, and has six height positions. -
Page 10: Making Adjustments
Connecting to the Switch Assembly Connect the plug to the extension cord by fully inserting the plug from the mower into the receptacle on the extension cord. The lawn mower's plug will only fit into the polarized extension cord one way. If the plug does not fit into the extension cord properly, reverse the plug. If the plug still does not fit, obtain a proper polarized extension cord or call the toll-free helpline, at 1 866 523-5218. -
Page 11: Mulching Tips
Mowing The Lawn NOTE: A sharp blade will greatly enhance the performance of the mower, especially when cutting high grass. Be sure to check the blade and to sharpen it at least once per year, as described in the Maintenance section. Verify that the lawn is free of stones, sticks, wires, and other objects that could damage the blades, the lawn mower, or the motor. -
Page 12: Adjusting The Cutting Height
Adjusting the Cutting Height 1. Adjust the cutting height to the desired setting. 2. Simply move the lever (1) toward the wheel, and HIGH HIGH HIGH then place it in the desired position. This will set all of the wheels to the same height. 3. -
Page 13: Maintenance
Mower Deck WARNING: In order to reduce the risk of electric shock, do not expose the mower to water. The underside of the mower deck should be cleaned after each use, because grass clippings, leaves, dirt, and other debris will accumulate, which will causing rust and corrosion. -
Page 14: Troubleshooting
TROUBLE SHOOTING Problem Possible Cause(s) Corrective Action Adjust the height of the handle, and verify The handle is not in Carriage bolts. that the carriage bolts are properly seated position. in the handle insulators. Reconnect the cord, and use the cord The power cord is disconnected restraint to keep the cord close to the from the switch. -
Page 15: Warranty
WARRANTY For TWO YEARS from the date of purchase within Canada, YARDWORKS CANADA will, at its option, repair or replace for the original purchaser, free or charge, any part or parts found to be defective in material or workmanship. This warranty does not cover: 1. -
Page 16: Parts List
PARTS LIST... - Page 17 Part Num. Model N Description 3490335 Soft grip 3330645-2 Upper handle 925004 Switch assembly 3411135-1 Cord guide 3410835-1 Knob 3220235-1 Carriage bolt(M6x35) 925009 Grass catcher 3330745-2 Middle handle 3420435 Rubber flap 3330845-2 Lower handle 3320237 "O" ring 925010 Wheel 3331638 Washer 3290135 Cotter pin...
- Page 18 Part Num. Model N Description 3220101 Screw 3411535 Tension disc 3331335 Axle support (R) 3320335 Rotor shaft sleeve 3410235 3110345-2 Front wheel shaft 3410135 Deck 925011 Motor assembly 925012 Motor housing 3220313 Screw 3190135 Manual Printed in China...
Need help?
Do you have a question about the 60-1750-4 and is the answer not in the manual?
Questions and answers
there are no carbon brushes information, I need the parts number for replacement.