
Related Manuals for Black & Decker CAFÉ SELECT CM6000B


Summary of Contents for Black & Decker CAFÉ SELECT CM6000B
- Page 1 CA F É S E L E C T ™ DUA L B REW CA RA F E | K-CUP ® CO FF EE MA KER DO B LE CO LA DO JAR RA | K- CUP ® C A FE TE RA C M6 0 0 0 B C M6 0 0 0 BD C M6 0 0 0 BD M...
- Page 2 Thank you for your purchase! Gracias por su compra! Merci de votre achat! Should you have any questions or concerns with your new product, please call our Customer Service Line at 1-800-231-9786 (US and Canada). Please do not return to the store. Si usted tiene alguna inquietud o pregunta con su producto, por favor llame a nuestra línea de servicio al cliente una atención inmediata 1-800-231-9786 (EE.UU/Canadá) 01-800-714-2503...
-
Page 3: Important Safeguards
Please Read and Save this Use and Care Book. IMPORTANT SAFEGUARDS. When using electrical appliances, basic safety precautions should always be followed to reduce the risk of fire, electric shock, and/or injury, including the following: • Read all instructions prior to use. •... -
Page 4: Save These Instructions
SAVE THESE INSTRUCTIONS. This product is for household use only. POLARIZED PLUG (120V models only) ELECTRICAL CORD This appliance has a polarized plug (one 1. A short power-supply cord is provided blade is wider than the other). To reduce to reduce the risk resulting from becoming the risk of electric shock, this plug is entangled in or tripping over a longer cord. -
Page 5: Table Of Contents
WE LCO M E ! Congratulations on your purchase of the Black + Decker Café Select™ ! We have developed this guide to ensure optimal product performance for your complete satisfaction. Save this use and care manual and be sure to register your appliance online at www.prodprotect.com/applica. -
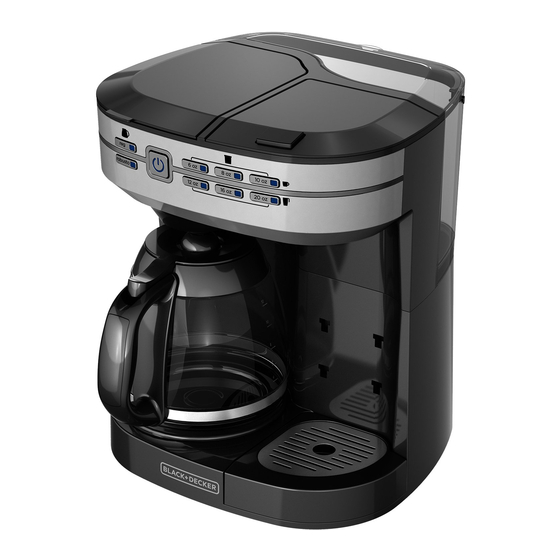
Page 6: Getting To Know Your Café Select
GE TTIN G TO K N OW YOUR Ca fé S elec t ™ * *Product image may vary slightly from actual product appearance. Carafe filter basket lid 10. Water reservoir lid (Part #CM6000-05) 2. Evenstream™ showerhead 11. 60 oz. Removable water reservoir 3. -
Page 7: Features And Benefits
F E ATUR ES AND B E NE F I TS Always On Ready Mode Auto Clean™ System To ensure a quick cup, press the To ensure a quality brew and long power button once and your lifespan of your Café Select™, the Café... -
Page 8: Café Select™ - Quick Tips
Caf é Se l e ct ™ —Q UIC K T IP S 1. Press the power button at any time to turn the unit on or off. 2. A self-check will run each time the unit is restarted from off mode. During this self-check the power button will blink. -
Page 9: Brewing A Carafe
BR EW I NG A C A R AF E 1. Make sure your Café Select™ is in ready mode and the power button LED is lit. (See the Before Brewing section for assistance.) 2. Fill water reservoir with desired amount of water. The MAX line represents a full carafe of coffee. -
Page 10: Brewing Single Ser Ve - Pods
BR EW I NG SI N G LE SE RVE —PO DS 1. One coffee POD generally brews 6 to 12 ounces. For stronger coffee or when filling higher capacity mugs, select the 6, 8, or 10 ounce setting and brew twice using two separate PODs. -
Page 11: Brewing Single Ser Ve - Ground Cof Fee
10. To turn off the coffeemaker at any time, press the power button CAUTION: The coffee POD will be hot. 11. When cooled, carefully remove and dispose of the used POD. BR E W I N G S I NGLE S E RV E—GR O U N D COF FEE 1. -
Page 12: Care And Cleaning
CA R E A N D CLEA N IN G Basic Cleaning Follow the directions below to clean your Café Select™ after each use. 1. Ensure your coffeemaker is unplugged and cool. 2. Open carafe filter basket lid. If remaining, throw away the used paper filter and coffee grounds. -
Page 13: De-Scaling With Auto Clean
De-scaling With Auto Clean™ Over time, calcium deposits or “scale” may build up in your brewer. Scale is non- toxic but if left unattended can hinder brewer performance. Regularly de-scaling your brewer helps to maintain quality coffee as well as the lifespan of the heating element, and other internal parts that come in contact with water throughout the brew process. -
Page 14: Troubleshooting
TR OU B L E SHOOTI N G—G EN ER A L PROBLEM POSSIBLE CAUSE SOLUTION Coffeemaker will Unit is unplugged Make sure appliance is not turn on. plugged into a working outlet. Unit is plugged in but Press the power button not turned on. - Page 15 TROU B LESHO OTIN G— CA R A FE PROBLEM POSSIBLE CAUSE SOLUTION Coffeemaker Carafe lid may not be Make sure carafe lid is is leaking. correctly placed on placed straight onto carafe. the carafe. Carafe may not be Place carafe securely and correctly placed on the squarely onto the carafe carafe plate...
- Page 16 TROU B LESHO OTIN G— SIN GL E S E RV E PROBLEM POSSIBLE CAUSE SOLUTION Coffeemaker is leaking. Travel mug lid may still Ensure lid is removed be on travel mug. from travel mug before brewing. The six single serve Less than 20 oz.
-
Page 17: Warranty And Customer Ser Vice Information
WA R R AN TY AN D C USTOM ER S ERV I CE I NFOR M ATIO N For service, repair or any questions regarding your appliance, call the appropriate 800 number listed within this section. Please DO NOT return the product to the place of purchase. -
Page 18: Instrucciones Importantes De Seguridad
Por favor lea este instructivo antes de usar el producto. INSTRUCCIONES IMPORTANTES DE SEGURIDAD Al utilizar cualquier aparato eléctrico siempre deben tomarse precauciones básicas de seguridad, incluyendo las siguientes: • Lea todas las instrucciones antes de utilizar. unidad durante el ciclo de colado puede ocasionar •... - Page 19 CONSERVE ESTAS INSTRUCCIONES. Este aparato eléctrico es para uso doméstico solamente. ENCHUFE POLARIZADO (Solamente CABLE ÉLECTRICO para los modelos de 120V) 1. El producto se debe de proporcionar con un cable eléctrico corto, a fin de reducir el riesgo de Este aparato cuenta con un enchufe polarizado (un tropezar o de enredarse en un cable más largo.
-
Page 20: Índice
¡BIEN VEN ID O! ¡Felicitaciones por su compra de la cafetera Café Select™ de Black & Decker! Hemos desarrollado este manual para asegurar rendimiento óptimo y su satisfacción total. Conser ve este manual de uso y cuidado y asegúrese de registrar su producto en línea visitando www.prodprotect.com/applica. -
Page 21: Conozca Su Cafetera Café Select
CON OZC A SU CA FE TE RA Café Se le c t™ * *La ilustración del producto puede variar ligeramente de la apariencia del producto original. Tapa del cesto del filtro de la jarra 10. Tapa del tanque de agua (pieza no. -
Page 22: Características Y Beneficios
CA R AC T E RÍ STI C AS Y B E N EFICI OS Siempre en modo de listo Sistema de limpieza automática Para asegurar una taza rápida, Para asegurar un colado de calidad presione el botón de funcionamiento y una vida larga de su cafetera Café... -
Page 23: Café Select™ - Consejos Rápidos
CAFETERA Café Select™ -- CONSEJOS RÁPIDOS 1. Presione el botón de funcionamiento en cualquier momento para encender o apagar la unidad. 2. La unidad realiza un proceso de auto verificación cada vez que es reactivada desde el modo de apagado. Durante esta auto verificación, el botón de funcionamiento parpadeará. -
Page 24: Antes De Colar
AN T E S D E COL AR 1. Para registrar su producto, visite www.prodprotect.com/applica. 2. Desempaque su cafetera cuidadosamente, retirando todo material de empaque, etiquetas adheridas a su cafetera y la tira plástica alrededor del enchufe. 3. Limpie bien su cafetera según las instrucciones de limpieza básica, descritas en la sección de Cuidado y Limpieza de este manual. -
Page 25: Preparación De Café Para Una Sola Taza Bolsitas Individuales
PREPARACIÓN DE CAFÉ PARA UNA SOLA TAZA BOLSITAS INDIVIDUALES 1. Una bolsita de café cuela generalmente 6 a 12 onzas. Para café más fuerte o cuando se llene tazas de mas capacida, seleccione el ajuste de 6, 8 ó 10 onzas y cuele dos veces utilizando dos bolsitas separadas. -
Page 26: Preparación De Café Para Una Sola Taza Café Molido
10. Para apagar su cafetera en cualquier momento, presione el botón de funcionamiento Precaución: La bolsita de café estará caliente. 11. Cuando su cafetera se haya enfriado, retire cuidadosamente la bolsita de café usada y deséchela. PREPARACIÓN DE CAFÉ PARA UNA SOLA TAZA CAFÉ... -
Page 27: Cuidado Y Limpieza
CU IDA D O Y L I M PI E ZA Limpieza básica Siga las instrucciones a continuación para limpiar su cafetera Café Select™ después de cada uso. 1. Asegúrese de que la cafetera esté desenchufada y fría. 2. Abra la tapa del cesto del filtro de la jarra. Si aún queda café molido, deseche el filtro de papel usado y el café... - Page 28 Descalcificación con el sistema de limpieza automática. Con el tiempo, depósitos de calcio o sarro pueden acumularse en su cafetera. El sarro no es tóxico, pero si se descuida puede entorpecer el desempeño de la cafetera. La descalcificación regular de su cafetera ayuda a mantener la calidad del café...
-
Page 29: Resolución De Problemas
RES O LU C IÓN DE P R O B LE MAS —G E NE RAL PROBLEMA CAUSA POSIBLE SOLUCIÓN La cafetera no se La unidad está Asegúrese de que el enciende. desenchufada. aparato esté enchufado a un tomacorriente que funcione. - Page 30 RES O LU C IÓN DE P R O B LE MAS —JARRA PROBLEMA CAUSA POSIBLE SOLUCIÓN La cafetera gotea. La tapa de la jarra Asegúrese de la puede no estar tapa de la jarra esté colocada correctamente colocada derecha en la jarra.
- Page 31 RESOLUCIÓN DE PROBLEMAS—PARA SOLO UNA TAZA PROBLEMA CAUSA POSIBLE SOLUCIÓN La cafetera está La tapa de la taza Asegúrese de que la goteando. portátil puede estar tapa esté removida de todavía colocada sobre la taza portátil antes de la taza. comenzar a colar.
-
Page 32: Información De Garantía Y Ser Vicio Al Cliente
INFO RM ACIÓ N DE G A R A N T ÍA Y SE RVI CI O AL C LIE NT E Para servicio, reparaciones o preguntas relacionadas al producto, por favor llame al número del centro de servicio que se indica para el país donde usted compró... - Page 33 PÓLIZ A DE G AR A N T ÍA (Válida sólo para México) DURACIÓN Rayovac de México SA de CV garantiza este producto por 2 años a partir de la fecha original de compra. ¿Qué cubre esta garantía? • Esta Garantía cubre cualquier defecto que presenten las piezas, componentes y la mano de obra contenidas en este producto.
- Page 34 Por favor llame al número correspondiente que aparece en la lista a continuación para solicitar que se haga efectiva la garantía y donde Ud. puede solicitar servicio, reparaciones o partes en el país donde el producto fué comprado. Argentina México Servicio Técnico Articulo 123 # 95 Local 109 y 112 Monroe 3351...
- Page 35 Sello del Distribuidor: Código de fecha / Date Code / Le code de date: Fecha de compra: Modelo: CM6000–950W 120 V ~ 60 Hz Comercializado por: Venta de Refacciones y Accesorios Rayovac de México S.A de C.V 01 800 714 2503 Autopista México Querétaro Importado por / Imported by: No 3069-C Oficina 004...
- Page 36 www.BlackAndDeckerAppliances.com © 2015 The Black + Decker Corporation and Spectrum Brands, Inc., Middleton, WI 53562 Made in People’s Republic of China Fabricado en la República Popular de China Fabriqué en République populaire de Chine K-Cup® pack is a registered trademark of Keurig Green Mountain, Inc. K-Cup®...
Need help?
Do you have a question about the CAFÉ SELECT CM6000B and is the answer not in the manual?
Questions and answers