NETGEAR Ultra 6 Hardware Manual
Hide thumbs
Also See for Ultra 6:
- Software manual (163 pages) ,
- Hardware manual (48 pages) ,
- Letter of volatility (2 pages)

Related Manuals for NETGEAR Ultra 6


Summary of Contents for NETGEAR Ultra 6
- Page 1 ReadyNAS Ultra ® H ardwa re M a nual Models: Ultra 6 Ultra 4 350 East Plumeria Drive San Jose, CA 95134 July 2010 202-10692-01 v1.0...
-
Page 2: Technical Support
NETGEAR, Inc. Technical Support Thank you for choosing NETGEAR. To register your product, get the latest product updates, or get support online, visit us at http://support.netgear.com. ... -
Page 3: Table Of Contents
ReadyNAS Ultra 6 ........ -
Page 4: Chapter 2 Readynas Ultra
ReadyNAS Ultra 6 ........ -
Page 5: Chapter 1 Getting Acquainted
N ETG E A R Rea dy NAS Ult ra Congratulations on your purchase of a NETGEAR ReadyNAS Ultra storage unit. The NETGEAR ReadyNAS Ultra family provides advanced home users with an easy-to-use, high-performance, gigabit multimedia desktop storage system with iSCSI support. -
Page 6: What Is The Netgear Readynas Ultra
ReadyNAS Ultra Hardware Manual What is the NETGEAR ReadyNAS Ultra? The NETGEAR ReadyNAS Ultra series deliver the power you need to run bleeding-edge applications, and the flexibility you want to store, share, and protect your prized multimedia collections. Two Gigabit Ethernet ports deliver ultra-fast connections, while three USB ports offer the flexibility to connect other devices using a USB connection, like printer servers, external USB storage devices, or digital cameras. -
Page 7: Readynas Community Website
• Wake-on-LAN ReadyNAS Community Website For more information about NETGEAR ReadyNAS products visit the dedicated ReadyNAS Community website at http://readynas.com, where you will find reviews, tutorials, a comparison chart, software updates, documentation, an active user forum, and much more. Chapter 1: Getting Acquainted... -
Page 8: Readynas For Home Storage Product Lineup
ReadyNAS Ultra Hardware Manual ReadyNAS for Home Storage Product Lineup NETGEAR offers a complete lineup of ReadyNAS home storage products, each with its own unique characteristics to fit your specific requirements. With all ReadyNAS products, the embedded operating system and easy-to-configure software makes installation, and upgrades a breeze. -
Page 9: Choosing A Setup Location
Microsoft® Windows® 7, Vista™, XP, 2000, Mac OS®, UNIX®, or Linux® • Microsoft® Internet Explorer® 7.0+, Apple® Safari®, 2.0+, Mozilla Firefox® 2.0+, Opera® 9.5+ • Hard Disk Drive(s) — NETGEAR recommends the HDD from the NETGEAR HDD Compatibility List only. See http://www.readynas.com/hcl. Chapter 1: Getting Acquainted... -
Page 10: Initial Setup And Default Login
Initial Setup and Default Login Installation To install your ReadyNAS Ultra, follow the instructions in the NETGEAR ReadyNAS for Home Installation Guide that came with your unit. An electronic copy of the installation guide is located on the product CD. -
Page 11: The Raidar Setup Utility
ReadyNAS Ultra Hardware Manual The RAIDar Setup Utility The RAIDar utility acts as a discovery tool for the ReadyNAS device or devices on your network, and enables easy setup and management of all your ReadyNAS units. RAIDar Installation To install RAIDar: If not already installed, install the RAIDar utility from your product Resource CD. -
Page 12: Raidar Commands
ReadyNAS Ultra Hardware Manual RAIDar Commands Use the following RAIDar commands to monitor your devices. Setup Clicking the Setup button launches the FrontView Management Console for the highlighted device. FrontView is a web-based utility used to set up, configure, and manage your devices. If this is a first-time installation, or the device has been reset to the factory default settings, the Setup Wizard launches so that you can configure the device. -
Page 13: Raidar Led Descriptions
ReadyNAS Ultra Hardware Manual RAIDar LED Descriptions The first column (LED) lists the status that informs you if the ReadyNAS device is in normal operating mode, or if it is in a warning or failure condition. The other columns display device-specific status, which tells you exactly what devices might need attention. -
Page 14: Log In To Your Readynas
ReadyNAS Ultra Hardware Manual Log in to Your ReadyNAS To use RAIDar to log in to the unit: Select a unit from the list on RAIDar, and click the Setup button. RAIDar opens your default browser and connects you to the selected ReadyNAS. You are prompted for the user name and password you will use to log in to FrontView. -
Page 15: Frontview Management Console
ReadyNAS unit into your network. Note: For the initial setup, NETGEAR strongly recommends using the Setup Wizard so that all of the necessary settings are configured. FrontView automatically switches to the Advanced Control mode once the Setup Wizard is complete. -
Page 16: Advanced Control Mode
ReadyNAS Ultra Hardware Manual Advanced Control Mode The FrontView Advanced Control mode provides access to all available settings. In this mode, the menus on the left allow you to quickly jump to the screen you want. The bar at the top provides options to return to the Home screen, refresh the browser window, display Help where available, or to log out of the session. -
Page 17: Status Bar
ReadyNAS Ultra Hardware Manual Status Bar The status bar at the bottom of the screen gives a quick glimpse of the system status and provides access to the following information: • Data and time. When clicked, the date button opens the Clock screen. •... - Page 18 ReadyNAS Ultra 4 This chapter provides an overview of the unit’s physical features and includes the following sections: • Front and Side Panel • Drive Bay • Rear Panel • LED and Status Information • System Shutdown Chapter 2: ReadyNAS Ultra 4 | 18...
-
Page 19: Readynas Ultra 4
ReadyNAS Ultra Hardware Manual ReadyNAS Ultra 4 This section introduces the physical attributes of the ReadyNAS Ultra 4. Front and Side Panel Air flow exhaust vents Front USB port Backup button/backup LED Disk LEDs Disk activity light Power button/power LED Drive bay door Status display screen Note:... -
Page 20: Drive Bay
ReadyNAS Ultra Hardware Manual Drive Bay Drive bay door Four disk bays Recessed disk tray locking mechanism; slide button to lock/unlock Disk release latch; press down to release disk tray Disk tray latch handle; pops open when disk release latch is pressed Disk tray... -
Page 21: Rear Panel
ReadyNAS Ultra Hardware Manual Rear Panel Disk and system exhaust fan Power cable socket Reset button. Recessed button provides access to the diagnostic startup menu: Normal, Factory Default (which erases all data), OS Reinstall, Tech Support remote diagnostics, Skip Volume Check, Memory Test, Disk Test. LAN1 and LAN2 Gigabit Ethernet ports Two USB ports Kensington lock to prevent unauthorized removal of the unit... -
Page 22: Led And Status Information
ReadyNAS Ultra Hardware Manual LED and Status Information The status information for the ReadyNAS Ultra 4 is shown on the bottom of the unit. Each function is described in the following table. Item Description Power button / LED Push the button to turn on the ReadyNAS. The Power LED blinks while the ReadyNAS is booting. -
Page 23: System Shutdown
ReadyNAS Ultra Hardware Manual System Shutdown You can shut down the unit using the power button, or from the FrontView browser user interface. Using the Power Button There are two ways to shut down the unit using the power button: •... - Page 24 This chapter provides an overview of the unit’s physical features and includes the following sections: • Front and Side Panel • Drive Bay • Rear Panel • LED and Status Information • System Shutdown Chapter 3: ReadyNAS Ultra 6 | 24...
-
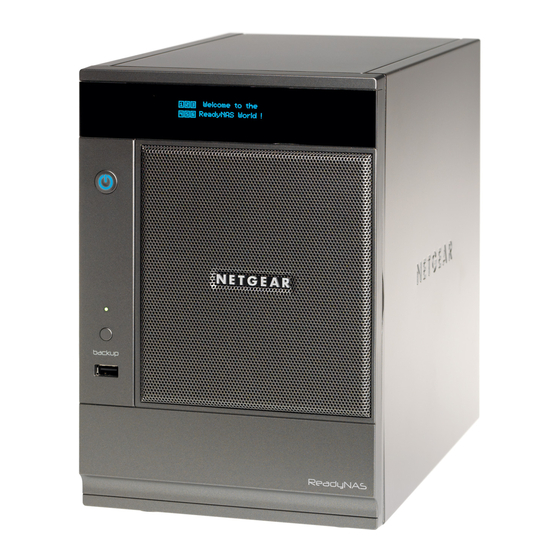
Page 25: Readynas Ultra 6
ReadyNAS Ultra Hardware Manual ReadyNAS Ultra 6 This section introduces the physical attributes of the ReadyNAS Ultra 6. Front and Side Panel System exhaust vent Power button/power status LED USB/Backup status LED Backup button Front USB port Drive bay door... -
Page 26: Drive Bay
Six disk bays; three upper and three lower Recessed disk tray locking mechanism; slide button to lock/unlock Disk release latch; press down to release disk tray Disk tray latch handle; pops open when disk release latch is pressed Disk tray 26 | Chapter 3: ReadyNAS Ultra 6... -
Page 27: Rear Panel
Factory Restore (which erases all data), OS Reinstall, Tech Support remote diagnostics, Skip Volume Check, Memory Test, Disk Test. LAN1 and LAN2 Gigabit Ethernet ports Kensington lock to prevent unauthorized removal of the unit Power switch Power cable socket Chapter 3: ReadyNAS Ultra 6 | 27... -
Page 28: Led And Status Information
ReadyNAS Ultra Hardware Manual LED and Status Information The status information for the ReadyNAS Ultra 6 is shown on the bottom of the unit. Each function is described in the following table. Item Description Power button / LED Push the button to turn on the ReadyNAS. The power LED blinks while the ReadyNAS is booting. -
Page 29: System Shutdown
From FrontView, the Shutdown Options screen offers the option to power off or reboot the ReadyNAS. You also have the option of performing a full file system check or a quota check on the next boot. Chapter 3: ReadyNAS Ultra 6 | 29... -
Page 30: Chapter 4 Disks And Disk Replacements
Disks and Disk Replacements This chapter includes the following topics: • Failed Disk Notification • Adding or Replacing Disks • Hardware Compatibility List Chapter 4: Disks and Disk Replacements | 30... -
Page 31: Failed Disk Notification
ReadyNAS Ultra Hardware Manual Failed Disk Notification When a disk fails in your ReadyNAS, you are notified of the failure by e-mail. The FrontView Health screen provides information about the failed disk. Note: Email alerts must be set up for notifications to be sent. See the ReadyNAS for Home Software Manual for information on setting up alerts. -
Page 32: Adding Or Replacing Disks
Adding or Replacing Disks Adding and replacing failed disks are similar processes. Note: Check the Hardware Compatibility List on the NETGEAR Support site for a list of disks qualified for use with the ReadyNAS to assure that you use a suitable disk. -
Page 33: Replacing A Failed Disk
Locate the amber LED on the disk tray to identify the failed disk. In the same way as when you add a disk, pull the disk tray pull release switch. The disk tray handle pops out. Ultra 4 Ultra 6 Disk tray Disk tray handle... -
Page 34: Appendix A Defaults And Technical Specifications
Defaults and Technical Specifications This appendix provides the factory default settings and system specifications. • Factory Default Settings • Technical Specifications • Safety Warning Appendix A: Defaults and Technical Specifications | 34... -
Page 35: Factory Default Settings
ReadyNAS Ultra Hardware Manual Factory Default Settings ReadyNAS Ultra 4 Feature Default Login User login URL when the ReadyNAS is https://192.168.168.168 not connected to a DHCP server Admin user name (case-sensitive) admin Admin login password (case-sensitive) netgear1 Management System configuration FrontView web-based configuration and status monitoring Discovery, multi-unit status monitoring,... -
Page 36: Readynas Ultra 6
ReadyNAS Ultra Hardware Manual ReadyNAS Ultra 6 Feature Default Login User login URL when the ReadyNAS is https://192.168.168.168 not connected to a DHCP server Admin user name (case-sensitive) admin Admin login password (case-sensitive) netgear1 Management System configuration FrontView web-based configuration and status... -
Page 37: Technical Specifications
ReadyNAS Ultra Hardware Manual Technical Specifications ReadyNAS Ultra 6 • 6-bay storage with RAID 0, 1, 5, 6 data protection • 1.66 GHz Intel® Atom™ dual-core processor • 1 GB DDR2 DIMM • Delivers over 90 MBps throughput • Includes two Gigabit Ethernet ports •... -
Page 38: Readynas Ultra 4
ReadyNAS Ultra Hardware Manual • Half-populated ReadyNAS Ultra 4 • 4-bay storage with RAID 0, 1, 5 data protection • 1.66 GHz Intel® Atom™ single-core processor • 1 GB DDR2 SODIMM • Delivers over 80 MBps throughput • Includes two Gigabit Ethernet ports •... -
Page 39: Safety Warning
ReadyNAS Ultra Hardware Manual Safety Warning The equipment contains no operator access areas and is certified for installation only by trained personnel, according to the installation instructions provided with each unit. The socket outlet shall be installed near the equipment and shall be easily accessible. Observe the on board battery precautions. -
Page 40: General Safety Precautions
ReadyNAS Ultra Hardware Manual General Safety Precautions Follow these rules to ensure general safety: • Keep the area around the ReadyNAS clean and free of clutter. • See the technical specifications in this manual for details about your specific ReadyNAS Ultra unit. -
Page 41: Appendix B Notification Of Compliance
This transmitter must not be co-located or operating in conjunction with any other antenna or transmitter. FCC Declaration Of Conformity We, NETGEAR, Inc., 350 East Plumeria Drive, San Jose, CA 95134, declare under our sole responsibility that the NETGEAR ReadyNAS Ultra complies with Part 15 of FCC Rules. Appendix B: Notification of Compliance... -
Page 42: European Union
Canadian Department of Communications Radio Interference Regulations This digital apparatus, NETGEAR ReadyNAS Ultra, does not exceed the Class B limits for radio-noise emissions from digital apparatus as set out in the Radio Interference Regulations of the Canadian Department of Communications. -
Page 43: Index
IP default login commands disk failure LED descriptions diskless unit RAIDar. log in disks, add ReadyNAS Ultra 4 disks, failure ReadyNAS Ultra 6 disks, replace replacement disk resynchronizing volume electrical safety electrostatic discharge safety setup setup location Setup Wizard...
Need help?
Do you have a question about the Ultra 6 and is the answer not in the manual?
Questions and answers