Table of Contents
Advertisement
Quick Links
Download this manual
See also:
User Manual
®
MANUAL de ARRANQUE
Antes de utilizar esta unidad, lea cuidadosamente las
secciones tituladas: "UTILIZAR LA UNIDAD CON SEGURI-
DAD" (p 2, 3) y "NOTAS IMPORTANTES" (página 4). Estas sec-
ciones le darán información importante acerca del modo cor-
recto de utilizar la unidad. Además, para poder estar seguro
de que ha conseguido un buen dominio de todas las presta-
ciones de su nueva unidad, debería leer este manual en su
totalidad, así como guardarlo y tenerlo a mano para cualquier
posible consulta.
Todos los derechos reservados. No se permite la reproducción de parte alguna de esta publi-
cación, de ninguna forma, sin el permiso por escrito de ROLAND CORPORATION.
PROCESADOR
DE AUDIO & MIDI
Lea Éste Primero!
Copyright © 1998 ROLAND CORPORATION
para
for
®
®
Microsoft Windows 98
.
Advertisement
Table of Contents

Related Manuals for Roland Audio Canvas UA-100


Summary of Contents for Roland Audio Canvas UA-100
- Page 1 ® ® Microsoft Windows 98 Copyright © 1998 ROLAND CORPORATION Todos los derechos reservados. No se permite la reproducción de parte alguna de esta publi- cación, de ninguna forma, sin el permiso por escrito de ROLAND CORPORATION.
- Page 2 Un técnico cualificado o el personal de servicio sido diseñados para otro voltaje y, por lo tanto, especializado de Roland debe efectuar todas las su uso puede dar lugar a daños, mal fun- demás reparaciones.
- Page 3 ...................... your retailer, the nearest Roland Service Center, • Siempre que no vaya a utilizar la unidad durante or an authorized Roland distributor, as listed on un periodo de tiempo largo, desconecte el adap- the “Information” page when: tador AC.
-
Page 4: Power Supply
Important Notes Additional Precautions In addition to the items listed under “USING THE UNIT SAFELY” on pages 2 and 3, please read and Use a reasonable amount of care when using the observe the following: unit’s buttons, sliders, or other controls; and Power Supply when using its jacks and connectors. - Page 5 Professional Effects Processor That Draws on Roland’s Experience in Musical Equipment The multi-effects processor provides carefully selected effects that meet the needs of the professional.
- Page 6 Features of This Product Here’s What Else You Need External Amp, Speakers, Headphones and Microphone Are Not Included The external amp, speakers, or headphones that you will need in order to hear the sound that is output through the UA-100 are not included. A microphone for con- nection to the UA-100 to input audio must also be purchased separately.
-
Page 7: Table Of Contents
Contents Check the Contents of the Troubleshooting ....49 Package ........ 8 Points to Check on the UA-100 ......49 Points to Check for the UA-100 Driver ....60 Front and Rear Panels ..10 Points to Check for the UA-100 Controller ..62 Front Panel .............. -
Page 8: Check The Contents Of The Package
“About the Included Software” (p. 28). Before opening the included CD-ROM, be sure to read the separate docu- NOTE ment Roland License Agreement . Do not touch the recorded surface of the disc or allow it to be scratched. NOTE Doing so may make it impossible to read the data correctly. - Page 9 6. TERMINATION OF THE LICENSE Roland reserves the right to terminate this license if you fail to comply with any of the terms and conditions contained herein. You hereby agree that upon such a termination, you will not use give away, loan, lease or re-sell the SOFTWARE.
-
Page 10: Front And Rear Panels
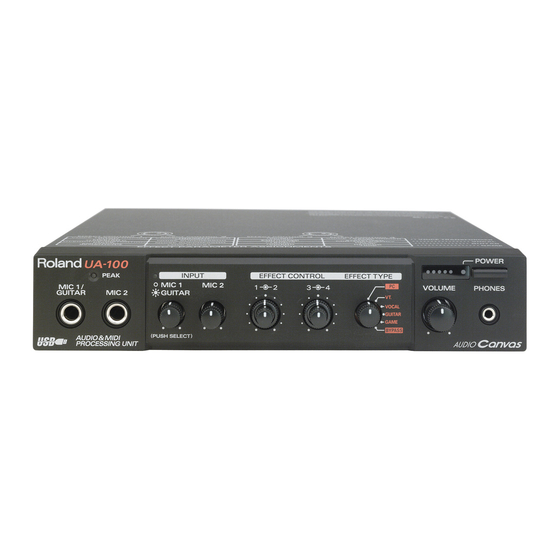
Front and Rear Panels Front Panel fig.02-01 1. MIC1/GUITAR Input Jack Connect a microphone or guitar to this jack. 2. MIC2 Input Jack Connect a microphone to this jack. Only dynamic microphones can be used with the MIC1/GUITAR Input Jack NOTE and MIC2 Input Jack. -
Page 11: Power Switch
Front and Rear Panels 6. MIC1/GUITAR Function Indicator This indicates whether the MIC1/GUITAR Input Jack is functioning as a micro- phone input, or as a guitar input. By pressing the MIC1/GUITAR Input Volume knob, you can switch between a microphone input and guitar input. Microphone input: extinguished Guitar input: When the power is turned on, this will be lit (Guitar input). - Page 12 Front and Rear Panels <About the Effect Type Selector> The Effect Type Selector lets you switch the following functions. There will be no sound for several seconds after the effect type has been changed. • When PC is selected You can use the UA-100 Controller to control mixing and the effects processor from the computer.
- Page 13 Front and Rear Panels <About the Effect Controllers> By rotating these knobs, you can control the UA-100’s onboard effects. The effect parameters assigned to each knob will depend on the effect type. At the factory settings, the knobs are assigned as follows. fig.02-02.e Effect Parameter Effect Type...
-
Page 14: Rear Panel
Front and Rear Panels Rear Panel fig.02-03 1. AC Adaptor Jack Connect the included AC adaptor to this jack. 2. Line Input Volume Adjusts the input level of the audio from the Line Input Jacks. If the input level is excessive, exceeding the peak, the Input Level Peak Indicator located on the front panel will light in red. -
Page 15: Getting Ready To Use The Ua-100
Before You Install the UA-100 Driver If you will be connecting your computer to both the UA-100 and another Roland USB-compatible device such as the Super MPU64 and using them at the same time, you must disconnect the other device (S-MPU64 etc.) from the USB connector before installing the UA-100 Driver. - Page 16 Getting Ready to Use the UA-100 Use the following procedure to first set the Voice Modem Wave #00 Line and/or Voice Modem Wave #00 Handset devices to the Disabled state, or check some other preferred device. Click the Windows Start button, point to Settings and select Control Panel.
- Page 17 Getting Ready to Use the UA-100 Double-click Wave Device for Voice Modem. The Wave Device for Voice Modem Properties dialog box will appear. fig.05-06.e The name “Wave Device for Voice Modem” may differ depending on your MEMO computer system. If so, select a device named Voice Modem. Click the General tab to open the window, and in the Device usage area, click the check box for Disable in this hardware profile, and then click OK.
-
Page 18: Making The Connections
Getting Ready to Use the UA-100 Making the Connections To prevent malfunction and/or damage to speakers or other devices, always NOTE turn down the volume, and turn off the power on all devices before making any connections. fig.03-01.e Stereo set, etc. to the USB connector LINE IN, AUX IN of your computer... -
Page 19: Installing The Ua-100 Driver
Getting Ready to Use the UA-100 Installing the UA-100 Driver If other Windows programs are already running, exit all of them before you per- form the following procedure. If the UA-100 driver is installed in the computer that you are using, delete NOTE the previously installed UA-100 driver before performing the installation. - Page 20 Getting Ready to Use the UA-100 Select Search for the best driver for your device (Recommended), and click Next. fig.04-11a.e Check Specify a location, input D:\Drivers\Win98 in the text box, and click Next. fig.04-12.e Alternatively, you can click Browse, open the Drivers folder on the CD-ROM drive, select the Win98 folder, and click Open.
- Page 21 If The updated driver (Recommended) field displays USB compati- NOTE ble device instead of Roland UA-100 Driver & WDM for Windows98 , the wrong search location has been specified. Click Back , and check the Specify a location field in step 4.
- Page 22 Getting Ready to Use the UA-100 When installation is completed, the following dialog box will appear, so click Finish. fig.04-15.e If installation does not proceed as it should, consult “Can’t install” (p. 64) in MEMO the “Troubleshooting” section. Once the UA-100 driver is installed, the icon will appear in the Windows taskbar.
-
Page 23: Ua-100 Driver Settings
Panel. Then in Control Panel, double-click Multimedia. The Multimedia Properties dialog box will appear. Click the MIDI tab. In MIDI output, click to select 1:Roland UA-100 MIDI 1 from the Single instrument list. fig.04-17.e Next, make settings for Audio input/output destination. With the Multimedia Properties box still displayed, proceed to “Specifying the... -
Page 24: Specifying The Audio Data Input/Output Destination
The Multimedia Properties dialog box will appear. Click the Audio tab. In Playback, click the for Preferred device, and in the list that appears, click 1:Roland UA-100 Wave 1. In Recording, click the for Preferred device, and in the list that appears, click 1:Roland UA-100 Wave. -
Page 25: Listening To The Demo Song
Listening to the Demo Song Now that the UA-100 driver has been installed, let’s listen to the demo song. All rights reserved. Unauthorized use of this material for purposes other than NOTE private, personal enjoyment is a violation of applicable laws. No data for the music that is played will be output from MIDI OUT 1/2 con- nectors. -
Page 26: Playing The Demo Song
Listening to the Demo Song Playing the Demo Song To play back the demo song, we will use Media Player, which is included with Windows. The demo song is contained on the included CD-ROM. Insert the included CD-ROM into the CD-ROM drive of your computer, and start up Media Player as follows. - Page 27 Listening to the Demo Song Drag the demo song Alright.wav to the desktop to copy it. fig.05-10a.e Select the demo song Alright.wav that you copied to the desktop, and click Open. fig.05-11.e Click the Play button. The demo song will begin playing back. Does the Demo Song Play? If it plays correctly, the computer and the UA-100 are connected correctly, and the UA-100 Driver has also been installed correctly.
-
Page 28: About The Included Software
About the Included Software The CD-ROM contains the following software. UA-100 Controller. This application controls the effects and mixer of the UA-100. Please refer to “Using the UA-100 Controller” (p. 29). For details on operation, refer to the Help for UA-100 Controller. Reference Manual. -
Page 29: Using The Ua-100 Controller
Using the UA-100 Controller What is the UA-100 Controller? UA-100 Controller is an application which allows you to control all of the UA- 100’s functionality from your computer. It mainly controls the 1. Mixer, 2. Effects, and 3. VT Mixer. In addition, you can modify the effect parameters which are pre- set in the UA-100, and change the effect parameters that are assigned to the Effect Type Selector. - Page 30 Using the UA-100 Controller In the Open text box, input D:\Ua100ctl\DISK1\Setup.exe and then click OK. fig.01-01.e* Alternatively, you can click Browse, then open the Ua100ctl folder on the CD- ROM drive, select the setup.exe file located in the Disk1 folder, and click Open. Then click OK.
- Page 31 Using the UA-100 Controller The program icon will be added to the group shown in Program Group. If this is acceptable, click Continue. fig.01-04.e* If you wish to change the group or create a new group, input the desired MEMO group name in Program Group .
-
Page 32: Starting Up The Ua-100 Controller
Roland UA-100 Controller group, and click UA-100 Controller. When you start this up for the first time, the following Setting window will appear. In the MIDI Device tab, make sure that MIDI Device is set to 1:Roland UA-100 MIDI Control, and click OK. fig.01-06a.e* The UA-100 Controller will start up. -
Page 33: Using The Ua-100 Controller To Apply Effects To The Demo Song
Using the UA-100 Controller Using the UA-100 Controller to Apply Effects to the Demo Song As an example, we will explain how to use the UA-100 Controller’s Mixer func- tion to playback the demo song. Controls of the Mixer fig. 05-01a.e* System Effect Indicator Panpot Controller Return Controller... - Page 34 Set UA-100’s Effect Type Selector to the PC position. fig.03-01a* Set the audio playback device to Roland UA-100 Wave 1. For the pro- cedure, refer to “UA-100 Driver Settings” (p. 23). Start up the UA-100 Controller (p. 32), and click the Mixer button.
- Page 35 Using the UA-100 Controller In the EASY SETTING section, click the Listen button. The following settings will be made automatically. 1. In the Effect section, click the to select Full Effects Mode. fig.05-02a.e* SYS1 Button 2. In the Effect section, click the SYS1 button to open the Full Effects window. For Effect Type, click to select High Quality Reverb.
- Page 36 Using the UA-100 Controller Use Media Player to playback the demo song Alright.wav. While listening to the playback, adjust the volume and the amount of reverb. Volume control: In the Mixer window, move the channel 3 (Wave 1) Main fader to adjust the vol- ume.
-
Page 37: Examples Of Actual Applications
Examples of Actual Applications Applying Effects to a Vocal Here’s how you can connect a microphone to the UA-100, and adjust the input level of the voice and apply effects to it. We will explain how to use the Effect Controller. -
Page 38: Adjusting The Input Level
Examples of Actual Applications Howling could be produced depending on the location of microphones rela- NOTE tive to speakers. This can be remedied by: 1. Changing the orientation of the microphone(s). 2. Relocating microphone(s) at a greater distance from speakers. 3. -
Page 39: Modifying Your Voice
Examples of Actual Applications Modifying Your Voice. Once you have adjusted the input level, you can try applying the effect to your own voice to modify it. While speaking or singing into the microphone, rotate the Effect Controller knobs 1/2 and 3/4 to modify the effect that is applied to the sound. fig.02-07.e* Effect Controller 1 Effect Controller 3... - Page 40 Examples of Actual Applications Set the audio input/output device to UA-100 Driver. For the proce- dure, refer to “UA-100 Driver Settings” (p. 23). In Sound Recorder, select the File menu and choose Properties. The Properties for Sound dialog box will appear. fig.02-07b.e* In Format Conversion, click Convert Now.
- Page 41 Examples of Actual Applications Click the Record button to begin recording. Sing into the micro- phone. Click the Play button , and listen to the sound file that you recorded. The sound file (.wav) that you recorded here can be saved. MEMO For details on using the Sound Recorder , refer to the Windows owner’s manual or Help.
-
Page 42: Applying Effects To A Guitar
Examples of Actual Applications Applying Effects to a Guitar The sound from a guitar can be input to the UA-100 in the same way as the sound from a microphone. Connecting a Guitar. Before you connect a guitar to the UA-100, turn down the levels of the following volume controls. -
Page 43: Adjusting The Input Level
Examples of Actual Applications Adjusting the Input Level. Adjust the sound being input from the guitar to an appropriate level. Set the UA-100’s Effect Type Selector to GUITAR. fig.02-03a* Gradually rotate MIC1/GUITAR Input Volume and Line Output Volume toward the right as you play your guitar. Make sure that the Input Level Peak Indicator lights green. -
Page 44: Recording
Examples of Actual Applications Recording. Click the Windows Start button, and choose Programs – Accessories – Entertainment – Sound Recorder. The Sound Recorder will start up. fig.02-07a.e* If Sound Recorder has not been installed in your computer, use NOTE Add/Remove Programs in the Control Panel to install it. For details on the installation procedure, refer to the Windows owner’s manual or Help. - Page 45 Examples of Actual Applications In Format Conversion, click Convert Now. The Sound Selection dialog box will appear. fig.02-07c.e* In Name, click the , choose CD Quality, and click OK. The Sound Selection dialog box will close. In the Properties for Sound dialog box, click OK. The Properties for Sound dialog box will close, and settings have now been com- pleted.
-
Page 46: Applying Effects To The Game Sound (3D Reverb)
Examples of Actual Applications Applying Effects to the Game Sound (3D Reverb) DirectSound is one of the elements which make up Microsoft DirectX. It minimizes delay of the sound, and allows it to playback with the best possible audio quality. By using DirectX compatible software on a computer in which DirectX has been installed, you can enjoy high-performance games with excellent expressiveness. -
Page 47: Digitally Recording To An Md
Examples of Actual Applications Digitally Recording to an MD Here’s how to digitally record via the UA-100 to a digital recorder such as an MD or DAT The UA-100 is able to mix two audio devices from the computer with two micro- phone inputs or one line input, and sent the result from the digital output. -
Page 48: Mixdown
Mixdown. Use the Media Player to open the demo song Alright.wav. For the operating procedure, refer to “Playing the Demo Song” (p. 26). Make preparations for recording on your digital recorder, and play- back the demo song Alright.wav and record it. The volume that is output from the digital output connector is controlled MEMO (adjusted) from the computer. -
Page 49: Troubleshooting
Have Settings Been Made in Windows to Specify the Output Destination of the Audio Data? You must specify Roland UA-100 Wave 1 as the output destination. For details on making this setting, refer to “UA-100 Driver Settings” (p. 23). Is the UA-100 Driver Installed Correctly? In order to use the UA-100 to play back a data, the UA-100 Driver must be installed correctly. - Page 50 Troubleshooting Are the Outputs of Your MIDI Sound Module Connected to the Line Input Jacks of the UA-100? If the outputs of the external MIDI sound module are connected to the Line Input Jacks of the UA-100, check the Line Input Volume knob on the rear panel of the UA-100, and adjust the line input level.
- Page 51 There is sound! Use the user support service. Check the audio output destination Has the 1:Roland UA-100 Wave 1 been specified as the audio output (playback) device? Refer to “UA-100 Driver Settings” (p. 23) Install the UA-100 driver. Refer to “Getting Ready to Use the Use the user support UA-100”...
- Page 52 Troubleshooting Sound Is Distorted. Is an Effect Being Applied? Use the following procedure to check. 1. Either set the UA-100’s Effect Type selector to BYPASS, or open the mixer window in the UA-100 Controller, and turn off all effects (Compact Effects/Full Effects/System Effect) so that no effects are being applied.
- Page 53 Troubleshooting Noise Occurs During Audio Playback. Has a Microphone Been Left Connected? If a microphone is connected to the UA-100, rotate the Mic 1/Guitar Input volume or Mic 2 Input volume all the way to the left to turn down the input level. In Some Cases, the Graphics Accelerator May Cause Noise to Be Present in the Audio Playback.
- Page 54 Troubleshooting 3. In the Graphics section, set the Hardware acceleration slider to None, and then click OK. fig.06-02.e 4. In the Display Properties dialog box, click OK to close the dialog box. Then restart your computer. Noise May Appear in the Line Input or the Microphone Input Depending on your computer system, noise generated by the computer or display may be heard in the line input.
- Page 55 Troubleshooting 4. From the list, select GENERIC IDE DISK TYPE40, and click Properties to access the GENERIC IDE DISK TYPE40 Properties dialog box. fig.06-04a.e In GENERIC IDE DISK TYPE40 , the number 40 may differ depending on MEMO your computer system. 5.
- Page 56 1. In the Windows taskbar, click the icon, and select 1:Set Properties of Roland UA-100 from the menu that appears. The 1:Roland UA-100 Properties dialog box will appear. 2. Click the Wave OUTPUT tab. 3. In the Buffer Size item, check 5 Max, and click OK.
- Page 57 Troubleshooting Audio Playback Stops. On some models of computer, the Power Management settings in the Control Panel may cause the audio playback to stop. The content of Power Supply Properties that appears when you double-click Power Management will differ depending on your computer system. One example is given below, but you will need to refer to the owner’s manual for your computer to verify the situation for your computer.
- Page 58 1. In the Windows taskbar, click the icon, and select 1:Set Properties of Roland UA-100 from the menu that appears. The 1:Roland UA-100 Properties dialog box will appear. 2. Click the Wave OUTPUT tab. 3. In the Buffer Size item, check 1 Min and click OK.
- Page 59 1. In the Windows taskbar, click the icon, and select 1:Set Properties of Roland UA-100 from the menu that appears. The 1:Roland UA-100 Properties dialog box will appear. 2. Click the Wave OUTPUT tab. 3. In Buffer Size, check 1 Min and click OK.
-
Page 60: Points To Check For The Ua-100 Driver
Troubleshooting Points to Check for the UA-100 Driver Search for Unknown Device Is Not Performed Automatically. Search for Unknown Device Ends Before Completion. Is the USB Cable Connected Correctly? Make sure that the UA-100 and your computer are connected correctly via the USB cable. - Page 61 Troubleshooting 4. If there are Unsopported Device, Unknown Device and USB Composite Device in the list, select them and click Remove. 5. In the Delete Device? dialog box, click OK. 6. Make sure that Other Device and Unsupported Device are not displayed in the list, and click Close to close the dialog box.
-
Page 62: Points To Check For The Ua-100 Controller
1. Click the Taskbar icon , and from the menu that appears select 1:Set Properties of Roland UA-100. 2. Click the MIDI PLAY tab, and make sure that the Cont. Cont. check box is checked. If not, click to check it. - Page 63 Troubleshooting 3. Click the MIDI REC tab, and make sure that the Cont. Cont. check box is checked. If it is not checked, click to check it. fig.06-06.e Cont. Cont. check box 4. Click OK. Can’t Record Audio. Has the Input Mode Appropriate for the Input Source Been Selected? If you are recording from Line Input, set the Mic/Guitar Select Button of the mixer or VT mixer window of the UA-100 controller to the Line position to select...
-
Page 64: Points To Check That Are Common To All Software
Troubleshooting Points to Check That Are Common to All Software If you find that the instructions are difficult to understand (e.g., if you are MEMO using Windows for the first time), please refer first to the owner’s manuals for your computer and for Windows. Can’t Install. - Page 65 Troubleshooting Computer Operation Is Unstable. If Microsoft Internet Explorer 4.0 is installed on your computer, and the Windows Start menu item Settings – Active Desktop – Display as Web page is checked, the operation of your computer may seem slow and unstable. When using the UA-100, we recommend that you un-check the View as Web Page item.
-
Page 66: Information That You Will Find Useful
Information That You Will Find Useful UA-100 Driver Settings When you finish installing the UA-100 Driver, the icon will appear in the Windows taskbar. If you click this icon, a dialog box will appear in which you can modify the settings for the UA-100’s internal mixer and for MIDI. For details on these settings, refer to “Detailed settings for the driver”... -
Page 67: Deleting The Ua-100 Driver
5. Double-click Sound, video and game controllers to access the list of devices. fig.07-01a.e 6. From the list, select Roland UA-100 Driver & WDM for Windows98, and click Remove. In the Confirm Delete device? dialog box, click OK. 7. Double-click Sound, video and game controllers, make sure that Roland UA-100 Driver &... - Page 68 Information That You Will Find Useful 9. Click the View tab, and in the Advanced settings item Hidden files, click Show all files and click OK. fig.07-01c.e 10. In the hard disk which contains the system, select Windows\Inf\Other\RolandRDUSBAUD.INF, right-click it, and select Delete in the menu that appears.
-
Page 69: Using The Reference Manual
Information That You Will Find Useful Using the Reference Manual The Reference Manual on the included CD-ROM contains the details of more advanced ways to use the UA-100. In order to take full advantage of the UA-100’s functionality, read this material as desired. In order to read the Reference Manual you will need an Web browser such MEMO as Netscape Navigator 3.01 or later or Microsoft Internet Explorer... -
Page 70: About The Included Song Data
Information That You Will Find Useful About the Included Song Data All rights reserved. Unauthorized use of this material for purposes other than NOTE private, personal enjoyment is a violation of applicable laws. It’s gonna be alright Composed & Programmed by Mitsuru Sakaue Vocal: Tahirih Walker, Humiyo Kawazoe Guitar: Katsuhisa Fujimoto, Idecs Inc. -
Page 71: Operating Requirements
Pentium II processor recommended 2x or faster CD-ROM drive * Although Roland has tested numerous configurations, and has determined that on aver- age, a computer system similar to that described above will permit normal operation of this product, Roland cannot guarantee that a given computer can be used satisfactorily with this product based solely on the fact that it meets the above requirements. -
Page 72: Specifications
Specifications Interface UA-100: USB Audio & MIDI Processing Unit Audio Record/Play Digital Out: Optical type (conforms to S/P DIF) Record Track: 1 ch, Stereo Play track: 2 ch, Stereo Full Duplex Connectors Front Panel: Effects MIC1/GUITAR Input Jack (1/4 inch phone type) Original effects: MIC2 Input Jack (1/4 inch phone type) Voice Effect equivalent to VT-1... -
Page 73: Index
Index (Numeric) 3D Reverb ..............46 GAME ..............12, 46 GUITAR ............... 12, 43 Guitar Multi ............... 12 AC Adaptor ..............8 AC Adaptor Jack ............14 Audio Data Input/Output ........24 Headphones Jack ............11 Audio data output ............ 12 High Quality Reverb .......... - Page 74 REVERB TIME ............46 Reverb ................ 36 Roland License Agreement ........9 Wave 1 ................ 36 Roland UA-100 Driver & WDM for Windows98 . 67 Wave out .............. 41, 45 Roland UA-100 MIDI Control ........ 32 Wave Output Fader ..........33 Roland UA-100 Wave 1 ...........
- Page 75 Paises de la Comunidad Europea For EU Countries This product complies with the requirements of European Directive 89/336/EEC. Este producto cumple con los requerimientos de los Directivos Eurpeos EMC 89/336/EEC y LVD 73/23/EEC...
- Page 76 Información Information Cuando necesita servivio técnico, pongase en contacto con el Servicio Postventa de Roland o con el distribuidor autori- When you need repair service, call your nearest Roland/EDIROL Service Center or authorized Roland/EDIROL distributor zado de Roland de su país.
Need help?
Do you have a question about the Audio Canvas UA-100 and is the answer not in the manual?
Questions and answers