
Related Manuals for Roland TRI-Capture


Summary of Contents for Roland TRI-Capture
- Page 1 For the following languages, a PDF version of the Owner’s Manual can be found on the CD-ROM. Deutsch, Français, Italiano, Español, Português, Nederlands...
- Page 2 Register SONAR LE. Set the input/output audio device on the DAW (p. 21). For details, refer Connect a guitar or microphone to the TRI-CAPTURE (p. 24). to the installation guide of the Set the REC MODE function to “GUITAR/MIC” (p. 24).
-
Page 3: Using The Unit Safety
Refer all servicing to your retailer, the nearest Roland Service Center, or an • Exposed to steam or smoke; or are authorized Roland distributor, as listed on the • Subject to salt exposure; or are “Information”... - Page 4 Be sure and request servicing by your retailer, to check the specifications of any microphone the nearest Roland Service Center, or an you intend to use by referring to the manual authorized Roland distributor, as listed on the that came with it.
-
Page 5: Important Notes
IMPORTANT NOTES Power Supply Maintenance • Before connecting this unit to other devices, turn off the • For everyday cleaning wipe the unit with a soft, dry power to all units. This will help prevent malfunctions cloth or one that has been slightly dampened with and/or damage to speakers or other devices. - Page 6 Copyright © 2011 ROLAND CORPORATION All rights reserved. No part of this publication may be reproduced in any form without the written permission of ROLAND CORPORATION. Roland is a registered trademark of Roland Corporation in the United States and/or other countries.
-
Page 7: Table Of Contents
Record Microphone or Guitar Sound While Mixing it with Audio Data Played on a Computer (LOOP BACK) ................................. Troubleshooting ........................... 30 Problems When Installing the Driver ..........................Problems When Using the TRI-CAPTURE .......................... Changing Computer Settings to Avoid Problems ......................Driver Signing Options Setting (Windows XP) ....................Power Management Settings .......................... -
Page 8: Contents Of The Package
* You need DAW software for Mac OS X. USB cable Use this cable to connect the TRI-CAPTURE to the USB connector of your computer. * Please use only the included USB cable. If you require a replacement due to loss or damage, please contact the nearest Roland Service center, or an authorized Roland distributor, as listed on the “Information”... - Page 9 Contents of the Package You’ll need to provide the following items • External amplifier, speakers, headphones, etc., for listening to the sound that is output via the TRI-CAPTURE • Microphone, guitar, etc., for inputting audio to the TRI-CAPTURE...
-
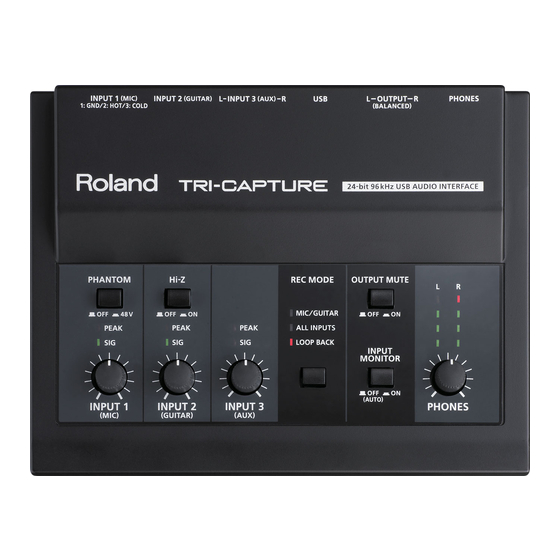
Page 10: Panel Descriptions
Panel Descriptions Note Do not connect the TRI-CAPTURE to the computer until the driver has been installed (p. 14). Top Panel 1. [PHANTOM] button Switches on or off the supply of phantom power to the XLR type jacks of the INPUT 1 (MIC) jack. - Page 11 The input volume is set to zero if the [INPUT 2 (GUITAR)] or [INPUT 3 (AUX)] knob is turned fully to the left. 6. [REC MODE] button The TRI-CAPTURE has three recording modes. You can change the recording mode by pressing this button (p. 23). 7. [INPUT MONITOR] button...
-
Page 12: Rear Panel
Panel Descriptions 10. [PHONES] knob Adjusts the volume of the audio signal that is output from the PHONES jack. * The volume of the signals output from the OUTPUT jacks cannot be adjusted on the TRI- CAPTURE itself. Rear Panel 11. PHONES jack Used to connect headphones. -
Page 13: Bottom Panel
Selects recording mode or playback mode when the [SAMPLE RATE] switch is set to “96k. ” When the [SAMPLE RATE] switch is set to “96k, ” the TRI-CAPTURE cannot record and play audio data simultaneously. For recording, set the [MODE] switch to “REC, ” and for playback, set the [MODE]... -
Page 14: Driver Installation
Mac OS X Note Do not connect the TRI-CAPTURE to the computer until you are directed to do so. A “driver” is software that transfers data between the TRI-CAPTURE and application software running on your computer when your computer and the TRI-CAPTURE are connected. - Page 15 Driver Installation Windows 5. When a confirmation screen regarding user account control appears, click [Yes] or [Continue]. 6. When “The TRI-CAPTURE Driver will be installed on your computer.” appears, click [Next]. 7. Click [Next] again. Windows 8/Windows 7/Windows Vista If a dialog box regarding Windows security appears, click [Install].
- Page 16 If you cannot select the TRI-CAPTURE, refer to “Problems When Using the TRI-CAPTURE” (p. 31). If the TRI-CAPTURE is selected as the output device, the computer’s audio alerts will be played using the TRI-CAPTURE; they will not be heard from the computer’s speakers.
- Page 17 16. Click [OK]. Proceed to p. 19 If you cannot select the TRI-CAPTURE, refer to “Problems When Using the TRI-CAPTURE” (p. 31). If the TRI-CAPTURE is selected as the output device, the computer’s audio alerts will be played using the TRI-CAPTURE; they will not be heard from the computer’s speakers.
- Page 18 13. When you have finished making these settings, quit “System Preferences.” Proceed to p. 19 If you cannot select the TRI-CAPTURE, refer to “Problems When Using the TRI-CAPTURE” (p. 31). If the TRI-CAPTURE is selected as the output device, the computer’s audio alerts will be...
-
Page 19: Confirm That Sound Can Be Heard
* The copyright of content in this product (the sound waveform data, style data, accompaniment patterns, phrase data, audio loops and image data) is reserved by Roland Corporation and/or Atelier Vision Corporation. - Page 20 * The volume of the signals output from the OUTPUT jacks cannot be adjusted on the TRI-CAPTURE itself. If the sample file can be heard, the computer and TRI-CAPTURE are connected properly and the driver has been successfully installed. If you cannot hear the sample file, refer to “Problems When Using the TRI-CAPTURE” (p. 31).
-
Page 21: How To Use
• Match the sampling rate of the software to the setting of the [SAMPLE RATE] switch on the bottom panel. • The TRI-CAPTURE will not operate in the Mac OS X Classic environment. Use the TRI-CAPTURE when the Classic environment is not running. -
Page 22: Playing Back
How to Use Playing Back Connect the TRI-CAPTURE to a computer using the USB cable. Audio data is transferred in both directions between the TRI-CAPTURE and computer via the USB cable. By connecting headphones or amplified speakers as shown in the illustration, you can monitor playback from your DAW software or the sound from an instrument or audio device connected to the TRI-CAPTURE. -
Page 23: Recording
Using your software, you can record sound input via the INPUT 1–3 jacks. You can also record sound input to the TRI-CAPTURE while combining it with audio data played on the computer. The TRI-CAPTURE has three recording modes. Select the mode that is appropriate for the purpose you have in mind. -
Page 24: Recording Microphone Or Guitar Sound (Mic/Guitar)
Set the input port for the track in the software. When using SONAR, set as follows: When recording the microphone sound: Left IN (TRI-CAPTURE) Headphones Amplified speakers When recording the guitar sound: Right IN (TRI- CAPTURE) - Page 25 How to Use Features of the “MIC/GUITAR” Mode • You can separately edit audio data recorded from a microphone and guitar. By setting the input port of the track to monaural in the software, the microphone sound will be recorded on the left channel (L), and the guitar sound will be recorded on the right channel (R). • You cannot record or monitor sound input via the INPUT 3 (AUX) jacks.
-
Page 26: Recording Microphone Or Guitar Sound Along With Audio Device Sound (All Inputs)
Select the “ALL INPUT” mode when recording microphone or guitar sound with the stereo playback of the audio device. Headphones Amplified speakers Set the input port for the track in the software. When using SONAR, set to “Stereo IN (TRI-CAPTURE). ” Computer Rear panel When connecting a condenser... - Page 27 How to Use Use the corresponding knob ([INPUT 1 (MIC)], [INPUT 2 (GUITAR)], or [INPUT 3 (AUX)]) to adjust the volume of the microphone, guitar, or audio device so its PEAK indicator does not light. Features of the “ALL INPUT” Mode • Microphone or guitar sound is localized at the center.
-
Page 28: Record Microphone Or Guitar Sound While Mixing It With Audio Data Played On A Computer (Loop Back)
Headphones Amplified speakers Set the input port in the software. When using SONAR, set to “Stereo IN (TRI-CAPTURE), ” and set “Driver mode” to [MME] or [ASIO]. Computer Rear panel... - Page 29 How to Use Use the corresponding knob ([INPUT 1 (MIC)], [INPUT 2 (GUITAR)], or [INPUT 3 (AUX)]) to adjust the volume of the microphone, guitar, or audio device so its PEAK indicator does not light. Features of the “LOOP BACK” Mode • Microphone or guitar sound is localized at the center.
-
Page 30: Troubleshooting
Follow step 9 of the driver installation procedure (p. (Windows XP) 17) and install the driver. If you connect the TRI-CAPTURE to a different USB connector than the one you used when installing Numeral such as the driver, a numeral may appear with the device “2-”... -
Page 31: Problems When Using The Tri-Capture
Problem Confirmation Resolution Is the driver installed? Install the driver (p. 14). Make sure that the TRI-CAPTURE is connected to the computer correctly. Is the REC MODE indicator off? If the problem is not resolved, reinstall the driver (p. 41). - Page 32 If the sound in your headphones is inaudible or too soft, check the other troubleshooting items. Sound played by Is the [PHONES] knob of the TRI- Use the TRI-CAPTURE’s [PHONES] knob to adjust your computer is CAPTURE turned down? the volume.
- Page 33 Is the system’s “Performance” setting Change the system’s “Performance” settings (p. 38). correct? (Windows) Is the TRI-CAPTURE connected to a USB Connect the TRI-CAPTURE directly to one of the hub? computer’s USB connectors. You must use the included USB cable.
- Page 34 Connect the MIDI sound module and the the playback from computer with the USB cables, and have TRI-CAPTURE to a self-powered USB hub (a USB hub your computer the output of the MIDI sound module that uses an AC plug).
- Page 35 “PLAY, ” and for recording, set the [MODE] switch to “REC. ” Or, set the [SAMPLE RATE] switch to “44.1k” or “48k. ” Exit all programs that are using the TRI-CAPTURE, disconnect the TRI-CAPTURE’s USB cable, and then Is there another program using the reconnect it.
-
Page 36: Changing Computer Settings To Avoid Problems
Changing Computer Settings to Avoid Problems Changing these computer settings can help you avoid the problems described in “Problems When Installing the Driver” (p. 30) and “Problems When Using the TRI-CAPTURE” (p. 31). Driver Signing Options Setting (Windows XP) If the “Driver Signing Options” setting is set to [Block], you cannot install the driver. Configure as follows. -
Page 37: Power Management Settings
Troubleshooting Power Management Settings If the sound is interrupted during a performance or if sounds are missing, you may be able to resolve the problem by changing the computer’s power management settings. Windows 8/Windows 7/Windows Vista 1. Open the “Control Panel,” click [System and Security] or [System and Maintenance], and then click [Power Options]. -
Page 38: System "Performance" Settings (Windows)
Troubleshooting System “Performance” Settings (Windows) If the sound is interrupted during a performance or if sounds are missing, you may be able to solve the problem by changing the “Performance” setting of the system as described below. Windows 8/Windows 7/Windows Vista 1. Open the “Control Panel,” click [System and Security] or [System and Maintenance], and then click [System]. -
Page 39: Setting The System Volume
If you have selected Classic view, double-click [Sounds and Audio Devices]. 2. Click the [Audio] tab. 3. In the “Sound playback” area, make sure that [OUT (TRI-CAPTURE)] is selected as the “Default device,” and click [Volume]. 4. When the volume control appears, adjust the “Wave” volume. -
Page 40: Voice Communication Software Settings (Windows 8/Windows 7)
1. Open the “Control Panel,” click [Hardware and Sound], and then click [Sound]. If you have selected Icon view, click [Sound]. 2. In the “Recording” area, click the TRI-CAPTURE’s [IN], and then click [Properties]. 3. Click the “Listen” tab and clear the [Listen to this device] check box. -
Page 41: Reinstalling The Driver
2. Install the driver again as described in “Driver Installation” (p. 14). Deleting the Driver If the computer does not detect the TRI-CAPTURE correctly, use the following procedure to delete the driver, and then install the driver again as described in “Driver Installation” (p. 14). - Page 42 2. Insert the included CD-ROM into the computer’s DVD-ROM drive. 3. Double-click [Uninstaller] in the [MacDriver] folder on the included CD-ROM. 4. When “This uninstalls TRI-CAPTURE driver from this Macintosh.” appears, click [Uninstall]. If other messages appear, follow the instructions on the screen.
-
Page 43: Advanced Driver Settings
Decrease the buffer size to decrease latency. Increase the buffer size if audio drops out. Audio Buffer Size * After adjusting the buffer size, make sure to restart all programs that are using the TRI-CAPTURE. If using software that has an “audio device test” function, run the test function. [Use ASIO Direct... - Page 44 Audio Buffer Size * After adjusting the buffer size, make sure to restart all programs that are using the TRI-CAPTURE. If using software that has an “audio device test” function, run the test function. If audio drops out or if noise is heard, even if you have adjusted the buffer size setting Recording Margin in the software and adjusted the “Audio Buffer Size”...
-
Page 45: Main Specifications
Main Specifications USB Audio Interface: Roland TRI-CAPTURE UA-33 1 pair of stereo Record * All inputs are mixed to 1 pair stereo on ALL Number of Audio Record/ INPUTS and LOOP BACK mode. Playback Channels 1 pair of stereo Playback... - Page 46 Main Specifications 171 (W) x 134 (D) x 40 (H) mm Dimensions 6-3/4 (W) x 5-5/16 (D) x 1-5/8 (H) inches Weight 320 g / 12 oz. (TRI-CAPTURE unit only) Owner’s Manual CD-ROM Accessories USB cable Cakewalk SONAR LE DVD-ROM (for Windows) (0 dBu = 0.775 Vrms)
-
Page 47: Index
Index ALL INPUTS ........26, 48 REC MODE . -
Page 48: Block Diagrams For Rec Mode
Block Diagrams for REC MODE For details about the REC MODE function, refer to “Recording” (p. 23). MIC/GUITAR +48V PEAK/SIG INPUT 1 (MIC) STEREO MONO INPUT 2 OUTPUT (GUITAR) OUTPUT Hi-Z MUTE INPUT 3 (AUX) PEAK/SIG PHONES AUDIO PEAK/SIG INPUT MONITOR ALL INPUTS +48V... -
Page 49: Loop Back
Block Diagrams for REC MODE LOOP BACK +48V PEAK/SIG INPUT 1 (MIC) STEREO MONO INPUT 2 OUTPUT (GUITAR) OUTPUT Hi-Z MUTE INPUT 3 (AUX) PEAK/SIG PHONES AUDIO PEAK/SIG INPUT MONITOR... - Page 50 For EU Countries For China...
-
Page 51: Declaration Of Conformity
Compliance Information Statement Model Name : UA-33 Type of Equipment : USB Audio Interface Responsible Party : Roland Corporation U.S. Address : 5100 S. Eastern Avenue, Los Angeles, CA 90040-2938 Telephone : (323) 890-3700 For EU Countries This product complies with the requirements of EMC Directive 2004/108/EC. - Page 52 www.maxlight.ru...
Need help?
Do you have a question about the TRI-Capture and is the answer not in the manual?
Questions and answers