Table of Contents
Advertisement
Available languages
Available languages
Advertisement
Chapters
Table of Contents

Related Manuals for BRONDI PMR FX-100 TWIN


Summary of Contents for BRONDI PMR FX-100 TWIN
- Page 1 PMR FX-100 TWIN PMR 446 2-way radio Radio transmisor-receptor mod. PMR 446 Radio émetteur-récepteur PMR 446 Funksender - und Empfänger PMR 446 Instruction manual Manual de instrucciones Manuel d’instructions Gebrauchsanleitung...
- Page 2 Brondi would like to congratu- late you on your purchase of the brand new FX-100 private 2-way radio. recommend that carefully read the User manual for correct use of the handset. p. 3-26 Brondi se congratula con Uds. para la compra del innovador transmisor-receptor particular mod.
-
Page 3: Table Of Contents
NDEX ENGLISH 1. INFORMATION, PRECAUTIONS CARE AND MAINTENANCE ..4 2. PERFORMANCE, TECHNICAL DATA, SUGGESTIONS FOR USE ... 7 3. PACK CONTENTS ................. 10 4. HANDSET DESCRIPTION .............. 11 5. INSTALLATION ................13 Fitting the batteries ............13 5.2 Using the accessories ............15 6. -
Page 4: Information, Precautions Care And Maintenance
1. I NFORMATION PRECAUTIONS CARE AND MAINTENANCE USING THE HANDSET On the basis of the current “Code of Electronic Communications” (Legislative decree 259/03) all PMR 446 handsets are subject to a declaration of use and an annual contribution: contact the Area Inspector of reference (Ministry of Communications) to request the forms and information on how to gain general authorisation to use the PMR 446 handsets. - Page 5 Batteries • Do not replace or charge batteries in environments where there is a risk of explosion. • Only use 3 rechargeable AA batteries or 3 alkaline AA batteries. • Ensure that the batteries are properly fi tted, observing the polarity indicated inside the compartment.
- Page 6 unit on aircraft when its use is expressly forbidden. Any use of the unit must respect the regulations of the airline or the instructions given by the crew. CARE AND MAINTENANCE • If the handset is dirty, clean using a soft cloth and water. Never use detergents or solvents, which could ruin the outer casing and penetrate inside the handset, causing damage.
-
Page 7: Performance, Technical Data, Suggestions For Use
2. P ERFORMANCE TECHNICAL DATA SUGGESTIONS FOR USE SPECIAL PERFORMANCE • Professional handset, sporty look. • Built-in stopwatch. • Illuminated display. • VOX function: detects the voice and activates transmission. • Monitoring 2 channels at once. RANGE & COMMUNICATION • Up to 5 Km range in a wide open space •... - Page 8 • Selected channel lock: to avoid accidentally changing channel. • Channel monitoring: to listen to all the communications on the channel (even when very weak). • Large backlit display. • Call function: button to call all handsets synchronised on the same channel.
- Page 9 SUGGESTIONS FOR USE • Sport: - bicycle - skiing - running - trekking - sailing - fi shing - golf • Walking/trips outdoors: - mountains - lake - city • Outdoor team games • Holidays with the family or friends: - camping - holiday resort - on the beach...
-
Page 10: Pack Contents
3. P ACK CONTENTS HANDSETS ACCESSORIES 2 battery chargers 3+3 batteries two two-way radios 2 earpieces CARRYING ACCESSORIES 2 neck straps 2 belt clips DOCUMENTATION Instruction manual. Warranty. List of service centres. -
Page 11: Handset Description
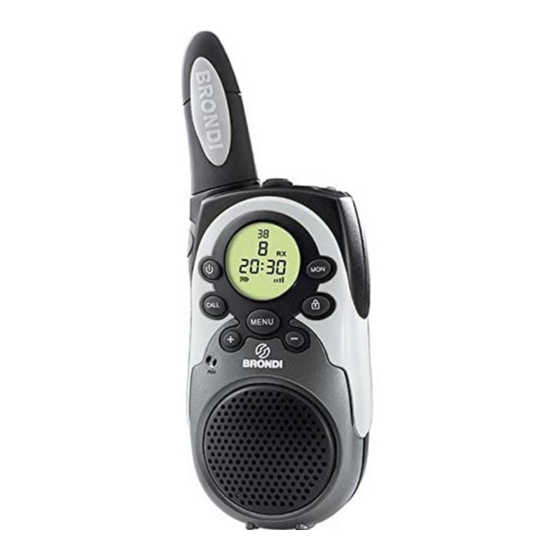
4. H ANDSET DESCRIPTION HANDSET: Jack for earpiece Aerial Torch PTT button Torch on/off button Radio on/off Channel lock button CALL button: to send tones on the channel to which MENU button: the radio is tuned - Access to functions menu - Button lock + and –... - Page 12 DISPLAY: Channel (from 1 to 8) Code (from 0 to 38) Battery charge level Transmission activated Receiving activated Dual channel monitoring activated VOX function activated SCAN function activated Buttons locked Speaker volume level...
-
Page 13: Installation
5. I NSTALLATION 5.1 FITTING THE BATTERIES To use the handsets it is necessary to fi t 3 rechargeable AA batteries (like those supplied) or 3 Alkaline batteries in each handset. Ensure that the batteries are properly fi tted, observing the polarity indicated inside the compartment. - Page 14 BATTERY METER When the handset is on, the meter is located in the left corner of the display. It shows the battery charge level using bars ( When the battery power is insuffi cient, the battery meter fl ashes. Recharge the batteries immediately, otherwise you will be unable to use the radio.
-
Page 15: Using The Accessories
5.2 USING THE ACCESSORIES BELT CLIP To hook on the clip To unhook the clip NECK STRAP • Press the two fl aps on the neck strap and release the two ends of the accessory. • Slot the fi ner strap into the hole on the belt clip (on the upper part) and make a knot. -
Page 16: Using The Handset
6.2 COMMUNICATING With your BRONDI FX-100 you can communicate with another BRONDI FX-100 handset or with any other 2-way radio that uses the PMR 446 standard. You may communicate with an unlimited number of PMR 446 handsets in conference. - Page 17 Your handset can communicate on one of the 8 channels available. For every channel it is possible to set even just one of the 38 CTCSS codes: you will hear only the conversations of the PMR 446 handsets tuned to the same channel and CTCSS code. All other conversations will be fi...
-
Page 18: Communicating: Receiving And Transmitting
NOTE: If no button is pressed for 6 seconds during programming, the handset will automatically return to stand-by and the changes will be confi rmed. 6.3 COMMUNICATE: RECEIVING AND TRANSMITTING To transmit or receive, all the handsets must be tuned into the same channel and the same CTCSS code. -
Page 19: Call Function (Call)
4. At the end of the transmission, release the PTT communication button the handset will issue a “roger beep”. 6.4 CALL FUNCTION The CALL button allows you to call all the handsets synchronised on your channel and CTCSS code and they will ring for two seconds; others can call your handset in the same way. -
Page 20: Locking The Chosen Channel
Press the - and MENU buttons at the same time to activate the monitoring function; to deactivate it, press and immediately release the MENU button. When the monitoring function is active, the display remains illuminated for 5 seconds and the receiving symbol appears. -
Page 21: Low Battery Consumption Mode
2. When the handset detects any kind of signal (vocal or call) on one of the 8 channels, the scan pauses and the signal detected can be heard in the speaker. 3. The scan will automatically restart a few seconds after the end of the receipt of the signal. -
Page 22: Transmission Over Tone ("Roger Beep")
Function activated with low sensitivity Function activated with medium sensitivity Function activated with high sensitivity 3. To return to stand-by mode, press and immediately release the PTT communication button. The parameters set up to now will be saved. If the VOX function is activated, the word “ ”... -
Page 23: Monitoring 2 Channels At Once
2. Press the + or – buttons to deactivate (“ ” on the display) or activate (“ ” on the display) the tone. 3. To exit this programming procedure, press and immediately release the PTT communication button; the parameters set up to now will be saved. -
Page 24: Using The Stopwatch
1. Press the MENU button 7 times. The second channel and the CTCSS code will fl ash on the display. 2. Press the + or – buttons until “ ” appears on the display. 3. Press the MENU button to confi rm and exit the mode. ATTENTION: The secondary channel must be different from the primary. -
Page 25: Warranty
(FX-100 TWIN) and the serial number (SN) printed under the base (if this is not already printed on the warranty card). It is necessary to collect electric and electronic devices separately Brondi reserves the right to change the product specifi cations and performance without prior notice. -
Page 26: Ce Conformity Declaration
8. CE C ONFORMITY ECLARATION Brondi Telefonia S.p.A., with registered offi ce in Str. Caffadio 14 - 10036 Settimo Torinese (TO) and operating premises in Via Guido Rossa 3 - 10024 Moncalieri (TO), declares that the FX-100 TWIN handset conforms to the following standards: EN300296-2 v.1.1.1 (2001-03), EN301489-5 v1.3.1 (2002-08), EN60065 :2002. - Page 27 Í NDICE ESPAGÑOL 1. INFORMACIÓN, PRECAUCIONES CUIDADO Y MANTENIMIENTO ..28 2. PRESTACIONES, DATOS TÉCNICOS, SUGERENCIAS DE EMPLEO .. 31 3. CONTENIDO DEL EMBALAJE ............34 4. DESCRIPCIÓN DEL APARATO ............35 5. INSTALACIÓN ................37 Instalación baterías ............37 Empleo de los accesorios ..........39 6.
- Page 28 1. I NFORMACIÓN PRECAUCIONES CUIDADO Y MANTENIMENTO EMPLEO DE LOS APARATOS EMPLEO DE LOS EQUIPOS Según el vigente “Código de las Comunicaciones Electrónicas” (D.Lgs. 259/03) todos los equipos de tipo PMR 446 quedan sometidos a una declaración de empleo y a una contribución anual;...
- Page 29 Daño de la antena No utilicen receptores-transmisores con antena dañada. Si una antena dañada entrara en contacto con la piel, podrían causarse quemaduras de escasa entidad. Baterías • No sustituyan o carguen las baterías en ambientes a riesgo de explosión. •...
- Page 30 o químicas; ambientes que contienen productos químicos o partículas en suspensión en el aire, como residuos o polvos metálicos. Compatibilidad/interferencia electromagnética Apaguen la unidad en cualquier edifi cio en el que se han colgado carteles que prohíban su uso. Los hospitales o los institutos sanitarios pueden utilizar equipos sensibles a las emisiones electromagnéticas del aparato.
-
Page 31: Prestaciones, Datos Técnicos, Sugerencias De Empleo
2. P RESTACIONES DATOS TÉCNICOS SUGERENCIAS DE EMPLEO PRESTACIONES ESPECIALES • Aparato profesional, imagen deportiva. • cronómetro integrado. • Pantalla iluminada. • Función VOX: detecta la voz y activa la transmisión • Monitorización contemporánea de dos canales. ALCANCE & COMUNICACIÓN •... - Page 32 • Bloqueo del canal seleccionado: para no modifi car desaperci- bidamente el canal. • Monitorización canal: para escuchar todas comunicaciones en el canal (incluso si muy débiles). • Grande pantalla retroiluminada. • Función llamada: pulsador para hacer sonar todos los aparatos sintonizados en el mismo canal.
- Page 33 SUGERENCIAS DE EMPLEO • Deporte: - bicicleta - esquí - carrera - trekking - náutica - pesca - golf • Paseos/excursiones al aire libre: - montaña - lago - ciudad • Juegos de equipo al aire libre • Vacaciones con familia o amigos: - campismo - en urbanización turística - en la playa...
-
Page 34: Contenido Del Embalaje
3. C ONTENIDO DEL EMBALAJE APARATOS ACCESORIOS 3+3 baterías 2 cargabaterías 2 receptores-transmisores 2 auriculares ACCESORIOS PARA EL TRANSPORTE 2 cordones para el cuello 2 clipes de cinturón DOCUMENTACIÓN Manual de instrucciones. Garantía. Lista de los centros de asistencia. -
Page 35: Descripción Del Aparato
4. D ESCRIPCIÓN DEL APARATO APARATO: Toma para auricular Antena Antorcha Pulsador de comunicación Pulsador encendido/ apagamiento antorcha Encendido/ apagamiento receptor-transmisor Bloqueo del canal programado Pulsador de LLAMADA: para enviar unos tonos al canal en que se Pulsador MENÚ: ha sintonizado el - acceso al menú... - Page 36 PANTALLA: Canal (de 1 a 8) Código (de 0 a 38) Nivel de carga de las baterías Transmisión activada Recepción activada Función monitorización contemporánea 2 canales activada Función VOX activada Función SCAN activada Pulsadores bloqueados Nivel volumen altavoz...
-
Page 37: Instalación
5. I NSTALACIÓN 5.1 INSTALCIÓN BATERÍAS Para utilizar los aparatos, es necesario instalar en cada aparato 3 baterías AA recargables (como las en dotación) o bien 3 baterías estilo alcalinas. Pongan cuidado en la correcta instalación de las baterías respetando la polaridad indicada en el interior del alojamiento. COMO INSTALAR LAS BATERÍAS 1. - Page 38 INDINDICADOR NIVEL BATERÍA Cuando el aparato está encendido, el indicador se sitúa a la izquierda de la pantalla. El mismo, indica gráfi camente el nivel de carga de las baterías por medio de las barras ( Cuando el nivel de carga de las batería resulta insufi ciente, el indicador de nivel de carga se pone intermitente.
-
Page 39: Empleo De Los Accesorios
5.2 EMPLEO DE LOS ACCESORIOS CLIPE DE CINTURÓN Para enganchar el clipe Para desenganchar el clipe CORDÓN PARA EL CUELLO • Del cordón para el cuello, apreten las dos partes y desenganchen las dos extremidades del accesorio. • Introduzcan el cordón más fi no en el agujero posicionado sobre el clipe de cinturón (en la parte arriba) y anuden. -
Page 40: Empleo Del Aparato
6.2 COMUNICAR Con Su BRONDI FX-100 es posible comunicar con otro aparato BRONDI FX-100, o bien con cualquier receptor-transmisor que utilice el estándar PMR 446. La comunicación puede tener lugar incluso entre un número ilimitado de aparatos PMR 446 en conferencia. - Page 41 Seleccionar el canal y el código CTCSS (Continuous Tone Coded Squelch System). Su aparto puede comunicar en uno de los 8 canales disponibles. Por cada canal es posible programar también uno de los 38 códigos CTCSS: escucharán sólo las conversaciones de los demás aparatos PMR 446 programados en Su mismo canal y con el mismo código CTCSS, todas las demás conversaciones vendrán fi...
-
Page 42: Comunicar: Recibir Y Transmitir
5. Para volver a la modalidad de stand-by, apreten y suelten enseguida el pulsador de comunicación PTT; las programaciones efectuadas hasta este momente se guardarán. NOTA: Si, durante la programación, no se apreta ningún pulsador durante 6 segundos, el aparato vuelve de forma automática a la condición de espera y las modifi... -
Page 43: Función Llamada (Call)
1. Antes de empezar la comunicación es oportuno verifi car que el canal resulte libre, es decir, en la pantalla no tendrá que aparecer el símbolo de recepción 2. Apreten y mantengan apretado el pulsador de comunicación PTT, el símbolo de transmisión aparece en la pantalla. -
Page 44: Monitorización Del Canal (Desactivación Del Squelch Automático)
demás aparatos, éstos sonarán con el timbre estándar. 2. La programación anterior no modifi ca la melodía. 6.6 MONITORIZACIÓN DEL CANAL (desactivación del Squelch Automático) Por medio de esta función Uds. podrán escuchar todas las señales (aunque muy débiles) del canal en que están sintonizados, independientemente código CTCSS... -
Page 45: Función Scan: Barrido De Los Canales
6.8 FUNCIÓN SCAN: BARRIDO DE LOS CANALES Esta función es muy útil en el caso en que el canal se haya modifi cado de forma desapercibida por Uds. o por Sus interlocutores. Esta función Les permite controlar las comunicaciones en todos los 8 canales para individuar el canal que utilizan sus interlocutores. -
Page 46: Función Vox: Activación Vocal
6.10 FUNCIÓN VOX: ACTIVACIÓN VOCAL Esta función permite comunicar con las manos libres; con la función activada, su aparato detecta su propia voz y activa de forma automática la transmisión. Es posible programar 3 niveles de sensibilidad. Procedimiento: 1. De la modalidad de stand-by apreten 3 veces el pulsador MENÚ, en la pantalla aparece el mensaje y la indicación de la actual programación de la función... -
Page 47: Tonos Del Teclado
3. Para salir de dicha programación apreten y suelten enseguida el pulsador de comunicación PTT; las programaciones efectuadas hasta este momento se guardarán. 6.12 TONOS DEL TECLADO: ACTIVACIÓN/DESACTIVACIÓN Cada vez que Uds. apretan un pulsador, Su aparato emite un tono; pueden activar o desactivar esta señalización cumpliendo con la sencilla programación indicada a continuación. -
Page 48: Empleo Del Cronómetro
Activación de la función: Para activar la función es necesario programar el canal segundario y el código CTCSS: 1. Apreten 7 veces el pulsador MENÚ, en la pantalla el símbolo “ ” se pone intermitente y aparece, pequeño, el mensaje 2. -
Page 49: Garantía
(SN) reproducido debajo de la base (si ya no impreso en el formulario de garantía). Es necesario recoger de forma separada los equipos eléctricos y electrónicos. Brondi se reserva el derecho de modifi car sin aviso previo las especifi aciones y las prestaciones del producto. -
Page 50: Declaración De Conformidad Ce
8. D ECLARACIÓN DE CONFORMIDAD La sociedad Brondi Telefonia S.p.A., con sede legal en Str. Caffadio 14 - 10036 Settimo Torinese (TO) y unidad operativa en Via Guido Rossa 3 - 10024 Moncalieri (TO), declara que el aparato FX-100 TWIN es conforme a las siguientes normas: EN300296-2 v.1.1.1 (2001-03), EN301489-5 v1.3.1 (2002-08), EN60065 :2002. - Page 51 NDEX FRANÇAISE 1. INFORMATIONS, PRECAUTIONS, PREVENTION ET ENTRETIEN ..52 2. PRESTATIONS, DONNEES TECHNIQUES, CONSEILS D’UTILISATION ... 55 3. CONTENU DE L’EMBALLAGE ............58 4. DESCRIPTION DE L’APPAREIL ............59 5. INSTALLATION ................61 Installation piles ..............61 5.2 Utilisation des accessoires ..........63 6.
- Page 52 1. I NFORMATIONS PRECAUTIONS PREVENTION ET ENTRETIEN UTILISATION DES APPAREILLAGES UTILIZZO DELLE APPARECCHIATURE Sur la base du «Code des Communications Électroniques» (D.Lgs. 259/03) en vigueur tous les appareillages PMR 446 sont sujets à une déclaration d’utilisation et à une contribution annuelle; contactez, par conséquent, l’Inspectorat Territorial de référence (Ministère des Communications) pour demander les formulaires et les modalités d’obtention de l’autorisation générale pour...
- Page 53 Endommagement de l’antenne Ne pas utiliser d’émetteurs-récepteurs avec une antenne endommagée. Si une antenne endommagée entre en contact avec la peau, elle peut provoquer de légères brûlures. Piles • Ne pas remplacer ou charger les piles dans un environnement à risque d’explosion.
- Page 54 des produits chimiques ou particules en suspension dans l’air, tels que des résidus ou des poussières métalliques. Compatibilité/interférence électromagnétique Éteindre l’unité dans tout édifi ce dans lequel sont présents des panneaux qui indiquent que leur utilisation est interdite. Les hôpitaux ou les instituts sanitaires peuvent utiliser des instruments sensibles aux émissions électromagnétiques de l’appareil.
- Page 55 2. P RESTATIONS DONNEES TECHNIQUES ’ CONSEILS D UTILISATION PRESTATIONS SPECIALES • Appareil professionnel, look sportif. • Chronomètre intégré. • Affi cheur éclairé. • Fonction VOX: détecte la voix et active la transmission. • Monitorage simultané de deux canaux. PORTÉE & COMMUNICATION •...
- Page 56 • Bloc du canal sélectionné : pour ne pas modifi er par inadvertance le canal. • Monitorage du canal: pour écouter toutes les communications sur le canal (même si très faibles ). • Grand affi cheur rétro-éclairé. • Fonction appel: touche pour faire sonner tous les appareils qui utilisent le même canal.
- Page 57 CONSEILS D’EMPLOI • Sport: - bicyclette - ski - course - trekking - sports nautiques - pêche - golf • Promenades/excursions en plein-air: - montagne - lac - ville • Jeux collectifs en plein-air • Vacances en famille ou avec des amis - en camping - dans un village - sur une plage...
- Page 58 3. C ’ ONTENU DE L EMBALLAGE APPAREILS ACCESSOIRE 3+3 piles 2 chargeur de piles 2 émetteurs-récepteurs 2 ecouteurs ACCESSOIRES POUR LE TRANSPORT 2 lacets pour le cou 2 clips pour port a la ceinture DOCUMENTATION Manuel d’instructions. Garantie. Liste des centres d’assistance.
- Page 59 4. D ’ ESCRIPTION DE L APPAREIL APPAREIL: Prise pour écouteur Antenne Torche Touche de communication Touche d’allumage/ extinction torche Allumage/extinction émetteur-récepteur Bloc du canal imposé Touche d’APPEL: pour envoyer des tons sur le Touche MENU: canal sur le quel - accès au menu est syntonisé...
- Page 60 AFFICHEUR: Canal (de 1 à 8) Code (de 0 à 38) Niveau de charge des piles Transmission activée Réception activée Fonction monitorage simultané 2 canaux activée Fonction VOX activée Fonction SCAN activée Touches bloquées Niveau volume haut-parleur...
- Page 61 5. I NSTALLATION 5.1 INSTALLATION DES PILES Pour utiliser les appareils, il est nécessaire d’installer dans chaque appareil 3 piles AA rechargeables (comme celles fournies) ou bien 3 piles 1,5 V alcaline. Prêtez attention à l’installation correcte des piles en suivant la polarité...
- Page 62 INDICATEUR NIVEAU PILES Quand l’appareil est allumé, l’indicateur est placé à gauche de l’affi cheur. Il montre graphiquement le niveau de charge des piles au moyen des barres ( Quand le niveau de charge des piles est insuffi sant, l’indicateur du niveau de charge clignote.
- Page 63 5.2 UTILISATION DES ACCESSOIRES CLIP POUR PORT A LA CEINTURE Pour accrocher le clip Pour décrocher le clip LLACET POUR LE COU • Du lacet pour le cou, appuyer les deux pointes et décrochez les deux extrémités de l’accessoire. • Introduire le lacet plus fi n dans le trou situé...
- Page 64 6.2 COMMUNIQUER Avec votre BRONDI FX-100 il est possible de communiquer avec un autre appareil BRONDI FX-100, ou bien avec tout autre émetteur- récepteur qui utilise le standard PMR 446. La communication peut s’effectuer également entre un nombre illimité d’appareils PMR 446 en conférence.
- Page 65 Sélectionner le canal et le code CTCSS (Continuous Tone Coded Squelch System). Votre appareil peut communiquer sur un des 8 canaux disponibles. Pour chaque canal il est possible d’imposer également un des 38 codes CTCSS: vous entendrez uniquement les conversations des appareils PMR 446 imposés sur votre canal et code CTCSS, toutes les autres conversations seront fi...
- Page 66 5. Pour retourner en modalité stand-by, appuyez et relâchez immédiatement la touche de communication PTT; les réglages effectués jusqu’à cet instant précis seront sauvegardés. NOTE: Si, pendant la programmation, on n’appuie sur aucune touche pendant 6 secondes, l’appareil retournera automatiquement dans l’état d’attente et les modifi cations seront confi...
- Page 67 1. Avant de commencer la communication il est opportun de vérifi er que le canal soit libre, c’est-à-dire le symbole de réception ne devra pas apparaître sur l’affi cheur. 2. Appuyez et maintenez appuyé la touche de communication PTT, le symbole de transmission apparaîtra sur l’affi...
- Page 68 appareil: quand vous appellerez les autres appareils, ceux-ci sonneront avec la sonnerie standard. 2. La programmation précédente ne modifi e pas la mélodie. 6.6 MONITORAGE DU CANAL (désactivation du Squelch Automatique) Avec cette fonction vous pourrez écouter tous les signaux (même si très faibles) du canal que vous utilisez, indépendamment du code CTCSS éventuellement imposé.
- Page 69 6.8 FONCTION SCAN: BALAYAGE DES CANAUX Cette fonction est particulièrement utile si le canal a été par inadvertance modifi é par vous ou vos interlocuteurs. Cette fonction vous permet de contrôler les communications sur les 8 canaux pour identifi er le canal utilisé par les vôtres. Si vos interlocuteurs ont imposé...
- Page 70 6.10 FONCTION VOX: ACTIVATION VOCALE Cette fonction vous permet de communiquer, les mains libres; avec la fonction activée, votre appareil détecte votre voix et active automatiquement la transmission. Vous pouvez imposer 3 niveaux de sensibilité. Procédure: 1. De la modalité de stand-by appuyez 3 fois la touche MENU, sur l’affi...
- Page 71 2. Appuyez les touches + ou - pour désactiver (sur l’affi cheur: “ ”) ou bien activer (sur l’affi cheur: “ ”) le ton. 3. Pour sortir de cette programmation appuyez et relâchez immédiatement la touche de communication PTT; les impositions effectuées jusqu’à...
- Page 72 secondaire est celui qui est imposé à travers la procédure d’activation de la fonction ci-après décrite. Activation de la fonction: Pour activer la fonction il est nécessaire d’imposer le canal secondaire et code CTCSS: 1. Appuyez 7 fois la touche MENU, sur l’affi cheur le symbole “ ”...
- Page 73 (si non imprimé sur le coupon de garantie). Le ramassage séparé des appareillages électriques et électroniques est nécessaire. Brondi se réserve le droit de modifi er sans préavis les spécifi cations et les prestations du produit.
- Page 74 8. D ECLARATION DE CONFORMITÉ La société Brondi Telefonia S.p.A., dont le siège légal se trouve Str. Caffadio 14 - 10036 Settimo Torinese (TO) et l’unité de production Via Guido Rossa 3 - 10024 Moncalieri (TO), déclare que l’appareil FX-100 TWIN est conforme aux normes suivantes: EN300296-2 v.1.1.1 (2001-03), EN301489-5 v1.3.1 (2002-08), EN60065 :2002.
- Page 75 NHALTSVERZEICHNIS DEUTSCHE 1. INFORMATIONEN, VORSICHTSMASSNAHMEN, PFLEGE UND WARTUNG ............... 76 2. LEISTUNGEN, TECHNISCHE DATEN, EMPFEHLUNGEN ZUR ANWENDUNG ............... 79 3. INHALT DER VERPACKUNG ............82 4. GERÄTEBESCHREIBUNG ..............83 5. INSTALLATION ................85 Batterien einlegen ............. 85 5.2 Verwendung des Zubehörs ..........87 6.
-
Page 76: Informationen, Vorsichtsmassnahmen, Pflege Und Wartung
1. I NFORMATIONEN ORSICHTSMASSNAHMEN FLEGE UND ARTUNG VERWENDUNG DER GERÄTE Alle Geräte PMR 446 unterliegen einer Nutzererklärung einer Jahresgebühr entsprechend „Code Elektronische Kommunikation“ (Rechtsverordnung 259/03 (D.L.gs. 259/03)). Nehmen Sie daher bitte Kontakt mit der Landesaufsichtsbehörde auf (Fernsprechministerium), um die Formulare und Modalitäten zur allgemeinen Genehmigung der Geräteanwendung PMR 446 zu erhalten. - Page 77 Antenne beschädigt Bei beschädigter Antenne dürfen die Funksender/-empfänger nicht verwendet werden. Eine beschädigte Antenne kann, bei Hautkontakt, leichte Verbrennungen verursachen. Batterien • In explosionsgefährdeten Räumen die Batterien weder aus- wechseln noch aufl aden. • Nur 3 aufl adbare Stiftbatterien AA verwenden, oder 3 Alkali- batterien AA.
- Page 78 Substanzen; Räume, in denen chemische Produkte gelagert werden, Luftpartikel wie Metallreste oder Metallstaub. Elektromagnetische Kompatibilität/Interferenz jeglichem Gebäude, Verbotsschilder ange- bracht sind, ist das Gerät auszuschalten. Krankenhäuser und Gesundheitsinstitute verwenden Einrichtungen, die empfi ndlich auf elektromagnetische Ausstrahlungen des Funkgerätes rea- gieren. Auch in Flugzeugen, wo die Verwendung ausdrücklich verboten ist, ist das Gerät auszuschalten.
-
Page 79: Leistungen, Technische Daten, Empfehlungen Zur Anwendung
2. L EISTUNGEN ECHNISCHE ATEN MPFEHLUNGEN NWENDUNG SPEZIELLE LEISTUNGEN • Profi -gerät, sportiver look. • Integrierter Chronometer. • Leucht-Display. • Funktion VOX: ermittelt die Stimme und aktiviert die Übertra- gung. • Gleichzeitige Überwachung von zwei Kanälen. REICHWEITE & KOMMUNIKATION • Bis 5 km Reichweite im Freien •... - Page 80 • Sperre des selektierten Kanals: um nicht versehentlich den Ka- nal zu ändern. • Kanalüberwachung: um alle Kommunikationen auf dem Kanal abzuhören (auch wenn sehr schwach). • Rückbeleuchteter Großdisplay. • Ruffunktion: Taste, um alle auf denselben Kanal eingestellten Geräte läuten zu lassen. •...
- Page 81 EMPFEHLUNGEN ZUR ANWENDUNG • Sport: - Fahrrad - Ski - Laufen - Trekking - Schiffahrt - Angeln - Golf • Spaziergänge/Wanderungen: - Gebirge - See - Stadt • Gruppenspiele im Freien • Urlaub mit der Familie oder Freunden: - Zeltplatz - Feriendorf - Strand - Boot...
-
Page 82: Inhalt Der Verpackung
3. I NHALT DER ERPACKUNG GERÄTE ZUBEHÖR 3+3 batterien 2 Ladegeräte 2 Funksender/-empfänger 2 Kopfhörer TRANSPORTZUBEHÖR 2 Halsbänder 2 Gürtelhaken DOKUMENTATION Gebrauchsanweisung. Garantie. Liste der Kundenassistenz. -
Page 83: Gerätebeschreibung
4. G ERÄTEBESCHREIBUNG GERÄT: Steckbuchse f. Kopfhörer Antenne Lampe Sprechtaste Ein-Ausschalttaste f. Lampe Funksender/ -empfänger EIN/AUS Sperre des selek- tierten Kanals RUFTASTE: Um Töne an den Kanal zu senden, mit dem der Funksender/- Taste MENU: empfänger abgestimmt ist - Zugang zum Menu der Funktionen - Tastensperre (au- Tasten + und -... - Page 84 DISPLAY: Kanal (von 1 bis 8) Code (von 0 bis 38) Batterieladezustand Übertragung aktiviert Empfang aktiviert Funktion: gleichzeitige Überwachung von 2 Kanälen aktiviert Funktion VOX aktiviert Funktion SCAN aktiviert Tasten gesperrt Lautstärke Lautsprecher...
-
Page 85: Installation
5. I NSTALLATION 5.1 BATTERIEN EINBAUEN Um die Geräte einsetzen zu können, müssen in jedes Gerät 3 auf- ladbare Batterien AA eingelegt werden (wie die beigestellten), oder 3 Alkalistiftbatterien. Bitte darauf achten, dass die Batterien korrekt eingelegt werden und mit der im Batterieraum angegebenen Polarität überein- stimmen. - Page 86 BATTERIELADESTATUS Bei eingeschaltetem Gerät befi ndet sich der Ladeanzeiger links am Display. Dieser zeigt graphisch den Batterieladestatus durch Balken an ( Bei ungenügender Batterieladung blinkt der Ladeanzeiger. In diesem Fall bitte dringend die Batterien aufl aden, da sonst der Funksender/-empfänger nicht verwendet werden kann. HINWEIS: Sollten Sie das Gerät längere Zeit nicht verwenden, sind die Batterien herauszunehmen, um Korrosion und Beschädigungen an den Bauteilen im Gerät zu vermeiden.
-
Page 87: Verwendung Des Zubehörs
5.2 VERWENDUNG DES ZUBEHÖRS GÜRTELHAKEN So den Haken befestigen So den Haken auslösen HALSBAND • Am Halsband beidseitig drücken und die beiden Zubehörendteile ausklinken. • Die dünnere Schlinge in das am Clip vorhandene Loch fügen (im oberen Bereich) und einen Kno- ten binden. -
Page 88: Anwendung Des Gerätes
Gerät durch anhaltendes Drücken der Taste , bis ein Akustiksignal ertönt. 6.2 KOMMUNIZIEREN Mit Ihrem BRONDI FX-100 können Sie auch mit einem anderen Gerät BRONDI FX-100 kommunizieren, oder mit jedem anderen beliebigen Funksender/-empfänger, der mit dem Standard PMR 446 arbeitet. Die Kommunikation kann, in Konferenzschaltung, auch zwischen einer unbegrenzten Menge Geräte PMR 446 er-... - Page 89 Kanal und Code CTCSS (Continuous Tone Coded Squelch System) wählen. Ihr Gerät kann über einen der 8 verfügbaren Kanäle kommuni- zieren. Für jeden Kanal besteht zudem die Möglichkeit einen der 38 CTCSS-Code einzustellen: Sie hören nur die Gespräche der Geräte PMR 446, die auf Ihren gleichen Kanal und CTCSS-Code eingestellt sind.
-
Page 90: Kommunizieren: Empfangen Und Senden
5. Die bis zu diesem Moment durchgeführten Einstellungen wer- den gerettet. HINWEIS: Wenn während der Programmierung keine Taste 6 Sekunden lang gedrückt wird, geht das Gerät automatisch in den Wartezustand über und die vorge- nommenen Änderungen werden bestätigt. 6.3 KOMMUNIZIEREN: EMPFANG UND SENDEN Für den Empfang oder das Senden müssen alle Geräte auf den- selben Kanal und denselben CTCSS-Code eingestellt sein. -
Page 91: Ruffunktion (Call)
1. Bevor Sie mit der Nachricht beginnen, ist zu kontrollieren, dass der Kanal frei ist, d.h. am Display darf das Empfangsymbol nicht angezeigt werden. 2. Ruftaste PTT betätigen und gedrückt halten; am Display er- scheint das Sendesymbol 3. Aus 15 cm Entfernung ins Mikrophon sprechen. 4. -
Page 92: Kanalüberwachung (Ausschaltung Squelch-Automatik)
dann die anderen Geräte anrufen, läuten diese mit dem Standardläutwerk. 2. Die vorher erfolgte Programmierung verändert den Klingelton nicht. 6.6 ÜBERWACHUNG DES KANALS (Ausschaltung der Squelch Automatik) Diese Funktion gestattet das Abhören aller Signale (auch wenn diese sehr schwach sind) des Kanals, auf den Sie eingestellt sind, unabhängig vom eventuell eingestellten CTCSS-Code. -
Page 93: Funktion Scan: Scanning Der Kanäle
6.8 SCAN-FUNKTION: SCANNING DER KANÄLE Diese Funktion ist besonders nützlich, wenn der Kanal versehent- lich von Ihnen oder Ihren Gesprächspartner ge ändert wurde. Anhand dieser Funktion können Sie die Kommunikationen auf al- len 8 Kanälen kontrollieren, um den von Ihren Gesprächspartnern verwendeten Kanal zu identifi... -
Page 94: Funktion Vox: Vokale Aktivierung
6.10 FUNKTION VOX: VOKALE AKTIVIERUNG Hände frei bei dieser Sprechfunktion; bei Aktivierung dieser Funktion ermittelt das Gerät Ihre Stimme und aktiviert automatisch die Sendung. Drei diverse Sensibilitätspegel sind einstellbar: Vorgehensweise: 1. In Modalität Standby 3x die MENU-Taste drücken; am Display erscheint die Anzeige , und es blinkt die Anzeige der aktu- ellen Einstellung der Funktion... -
Page 95: Tastaturtöne
3. Zum Verlassen des Programms Ruftaste PTT drücken und sofort loslassen. Die bisher vorgenommenen Einstellungen werden gerettet. 6.12 TASTATURTÖNE: AKTIVIERUNG / AUSSCHALTUNG Bei jeder Tastenbetätigung erfolgt ein Signalton; diesen Signalton können Sie, wie hier beschrieben, einfach programmieren. 1. MENU-Tasten 6x drücken; das Gerät befi ndet sich jetzt im Programm der Tastaturtöne und am Display erscheint in Kleinschrift die Anzeige “... -
Page 96: Chronometer-Verwendung
Aktivierung der Funktion: Diesbezüglich sind der sekundäre Kanal und der CTCSS-Code einzustellen: 1. MENU-Taste 7x drücken; am Display blinkt das Symbol “ ” und in Kleinschrift erscheint 2. Mit den Tasten + oder - den gewünschten Kanal auswählen. 3. Dann MENU-Taste drücken, um den CTCSS-Code zu ändern; am Display blinkt kleingeschrieben “... -
Page 97: Garantie
7. G ARANTIE Wie für alle von Fa. Brondi hergestellten Produkte, beträgt die Garantiezeit für das Gerät FX-100 TWIN 12 Monate. In der Verpackung von FX-100 TWIN befi ndet sich der Garantieschein. Um die Garantie in Anspruch nehmen zu kön- nen, muss der Garantieschein: - vollständig ausgefüllt werden;... -
Page 98: Übereinstimmungserklärung Ce-Richtlinien
8. CE-Ü BEREINSTIMMUNGSERKLÄRUNG LDie Fa. Brondi Telefonia S.p.A. (AG), mit Standort in I-10036 Settimo Torinese (TO/Turin), Str. Caffadio 14, und Produktionseinheit in I- 10024 Moncalieri (TO/Turin), Via Guido Rossa 3, deklariert, dass das Gerät FX-100 TWIN nachstehenden Normvorschriften ent- spricht: EN300296-2 v.1.1.1 (2001-03), EN301489-5 v1.3.1 (2002-08), EN60065 :2002. - Page 99 BRONDI TELEFONIA SPA Factory with certifi ed quality system BRONDI TELEFONIA SPA Empresa con sistema de calidad certifi cado BRONDI TELEFONIA SPA Usine avec système qualitè certifi é BRONDI TELEFONIA SPA Hersteller mit zertifi ertem Qualitätssystem...
- Page 100 Produktionformationen (Leistungen, Gebrauchsanweisungen im Digitalformat, usw.), aktualisierte Kundendienstliste, und um Initiativen und die neuesten Neuigkeiten zu erfahren, besuchen Sie uns im Internet unter www.brondi.it Via Guido Rossa, 3 - 10024 Moncalieri (TO) Tel. 011.647.44.07 - Fax 011.647.44.33 info@brondi.it...
Need help?
Do you have a question about the PMR FX-100 TWIN and is the answer not in the manual?
Questions and answers