Advertisement
Quick Links
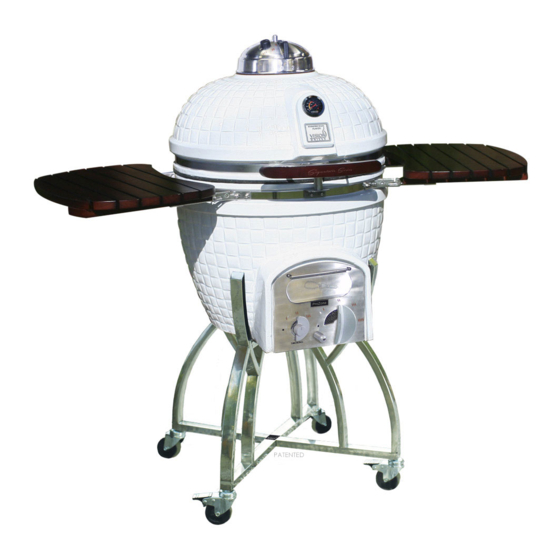
Parts for Assembly:
A
1 pc. - Kamado Grill
B
4 pcs. - Cart Legs
C
3 pcs. - "X" Leg Connectors
D
1 pc. - Electric Starter
Holster
E
1 pc. - Fire Bowl
F
G
1 pc. -
1 pc. -
Top Flip Grate
Cast Iron Grate
H
1 pc. - Wood Handle
I
1 pc. - Top Vent
J
1 pc. - Charcoal Grate
K
2 pcs. - Side Shelves
L
Grate Lifting Tool
N
Cooking Stone &
Bracket
Tools Included:
Box Wrench:
T-Handle Wrench
For shelf assembly
G
*
1 pc. -
Bottom Flip Grate
*Laguna Only
M
Grill Light
Flat Wrench
ENGLISH
SIGNATURE SERIES GOURMET
Model #s RL-K17F1M4 / RL-W20D1L5-1 / Laguna
Step 1: Cart Assembly
• Remove bolts, washers and
locking washers from the three "X"
connectors.
• Remove paper washers and begin
assembling the "X" connectors and
legs.
• Please Note: Top, Middle & Bottom
"X" connectors must be assembled
simultaneously.
• Assemble cart by inserting the three "X" connectors into leg
ends and install bolts and washers in the same order they were
removed from "X" connectors.
• While assembling, only finger-tighten bolts to allow for
adjustment in cart. Otherwise it can be difficult to get all the
bolts inserted.
• Screw in Standard Rubber Wheels to rear Cart Legs and the
Locking Rubber Wheels to the front Cart Legs.
• Once Cart is assembled, flip cart over so that bolts are exposed.
Step 1a:
Loosen the (4) outer bolts slightly so
as to allow for the Holster body to
slide into the gap between the bolt
heads and the leg bars.
Step 1c:
Slide Holster back into place.
• Once Holster is secure, flip cart back over to proper position
so that it is resting on Wheels. Continue Grill Assembly.
SET UP
STEP 1
STEP 1
Shown here is
the bottom of the
cart, flipped upside down
Step 1b:
With opening of Holster facing the
front of the cart (the Locking Wheels)
slide.
Step 1d:
Using provided T-Handle Wrench,
tighten bolts again through hole
openings in bottom of Holster.
Advertisement

Subscribe to Our Youtube Channel
Related Manuals for Vision grills RL-K17F1M4


Summary of Contents for Vision grills RL-K17F1M4
- Page 1 Parts for Assembly: ENGLISH SET UP 1 pc. - Kamado Grill SIGNATURE SERIES GOURMET Model #s RL-K17F1M4 / RL-W20D1L5-1 / Laguna Step 1: Cart Assembly STEP 1 STEP 1 4 pcs. - Cart Legs • Remove bolts, washers and locking washers from the three “X”...
- Page 2 Step 2: Shelf Brackets STEP 2 • Remove nuts and washers from bolts welded on the bottom banding and remove paper washers. • Mount shelf brackets over studs with bracket slots facing up. Brackets are stamped on the back with letters indicating their position (e.g., LF=Left Front and RB=Right Back).
- Page 3 • Use provided Grate Removal Tool to lift out Cast Iron Grate by centering the prongs of the tool in between the center grate bars closest to the Vision Grills logo. • When prongs are pushed all the way forward, lean Tool back against grate and lift up.
- Page 4 SS Stone Bracket Electric Starter VGK-ELEC 24** 25** VGK-FGL-W Flexible Grill Light, White Flexible Grill Light, Black VGK-FGL-K ** Not included in all Grill packages Vision Grills, LLC • 1531 Fairview Avenue, Suite B, St. Louis, MO 63132 • 877.917.4273 • www.visiongrills.com...
Need help?
Do you have a question about the RL-K17F1M4 and is the answer not in the manual?
Questions and answers