Table of Contents
Advertisement
Quick Links
24
Assembly Manual
1/8
P-51D MUSTANG
Specifications:
Wing Span: 56 1/4(1430mm)
Length: 50" (1269mm)
2
Wing Area: 38.15dm
Weight: 5 lbs. (2450-2650g)
No.4580
This kit is guaranteed to be free from defects in material and workmanship at the date of purchase.
It does not cover any damage caused by use or modification. The warranty does not extend beyond
the product itself and is limited only to the original cost of the kit. By the act of building this user-
assembled kit, the user accepts all resulting in liability for damage caused by the final product. If the
buyer is not prepared to accept this liability, it can be returned new and unused to the place of
purchase for a refund. Neither your dealer nor Thunder Tiger Distributors, can accept kits for return if
construction has begun.
Notice: Adult Super Vision Required
This is not a toy. Assembly and flying of this product requires adult supervision.
Read through this book completely and become familiar with the assembly and flight of this airplane.
Inspect all parts for completeness and damage. Browse www. thundertiger. com for customer service
if you encounter any problems.
Warranty
1
JE6809
Advertisement
Table of Contents

Related Manuals for THUNDER TIGER P-51D MUSTANG


Summary of Contents for THUNDER TIGER P-51D MUSTANG
- Page 1 If the buyer is not prepared to accept this liability, it can be returned new and unused to the place of purchase for a refund. Neither your dealer nor Thunder Tiger Distributors, can accept kits for return if construction has begun.
-
Page 2: Table Of Contents
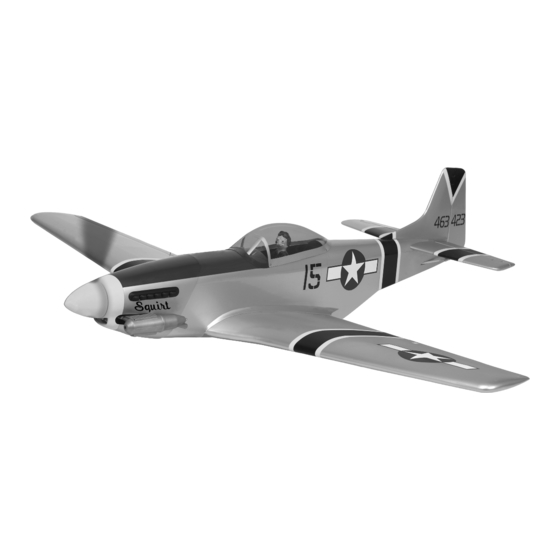
Nitro power Congratulations on the purchase of our finest scale ARF. As the most successful fighters in WW2, a truly incredible aircraft changed the war for allied air forces, the P-51D Mustang has enjoyed a reputation as No.9041 America' s favorite fighter. It is an aircraft not only combined speed with agility, but also had a long range and powerful punch. -
Page 3: Parts Drawing
PARTS DRAWINGS PARTS DRAWINGS PE0009 EZ Connector AS6471 Fuselage AS6007 Scale Tail Gear AS6479 Control Horn Radiator Vent (1) 1/4" Blind EZ Connector(1) Nut(2) Control Horn(4) Back Fuselage(1) Plate(4) 3X3mm 1.5mm Tail Gear(1) Tail Wheel(1) Collar(1) Fillet ( / , / ) 1 L 1 R Set Screw(1) Hex Wrench... -
Page 4: Wing
PARTS CHECK LIST WING Remove aileron from the wing, CA three hinges on the Use a sealing iron to tack down the covering inside aileron. the servo well. Kit Contents: Fuselage(1) Canopy(1) Captain Eddy(1) 1/4" Blind Nut(2) Cockpit(1) Main Gear Wire(1) Fillet(1/L,1/R) Landing Gear Strap(4) Radiator Vent (1) - Page 5 WING WING 7. Locate the servo wire exit hole and remove covering 10. Thread the clevis on the aileron pushrod then insert 13. Mix up an ample amount of 30-min. Epoxy and apply 16. Enlarge wing mount holes to 5/16"(8mm) then install on the top wing near wing root.
-
Page 6: Tail
TAIL TAIL 19. Trim the fairing and CA the fairing in place. 22. Epoxy the vertical fin in place. Next cut away the 25. Epoxy the horizontal tail in place with the joiner 28. Locate two holes at the bottom tail, install tail gear attached. -
Page 7: Landing Gear
32. Locate the fixed gear mount and landing gear wire. 35. Secure the wheel on landing gear with 3x5mm screw 38. Install the Outrunner (Thunder Tiger OBL36/07-46A 41.Install the propeller the spinner as shown then leave Insert the wire in place. -
Page 8: Radio
RADIO CANOPY 43. Cut away the covering of elevator and rudder 46. Do the same procedure on elevator make sure the Cut away the covering on the rear radiator. If user 52. Firstly apply instrument panel decal in place. Next pushrod exit holes on two side of rear fuselage. -
Page 9: Nitro Power Unit
NITRO POWER UNIT NITRO POWER UNIT 55. Refer to page 21 and apply all decal in place. Next 58. Measure from the firewall to the front of thrust 61. Install the throttle pushrod. You might need to screw 64. Secure the EZ connector on the servo horn with M2 glue on the machine guns. -
Page 10: R E T R A C
NITRO POWER UNIT RETRACT 67. Next attach the cowl in place, make sure drive 70. Drill Glow Plug ignition hole, needle valve hole and 73. Cut away the covering at landing gear area. 76. Use hobby knife and remove the planking along the washer is exposed about 2~3mm from the cowl. -
Page 11: D E C A
RETRACT DECAL Refer to the photos and apply all decals. 79. Install the retract servo as shown. Note the 82.Trim and glue the wheel well in place orientation of the servo. Bottom 80. Connect the retract gear pushrod then thread the 83. -
Page 12: Balance
1/2" sure the batteries are fully charged, especial the first time Bear 1/6 scale replica, the most popular unlimited pylon-racing machine from Thunder Tiger. Fly it low and fast to the radio is used. We would recommend you use larger capacity(1000mAh NiMH battery for Nitro version, 4000mAh experience the thrill and excitement of pylon racing.
Need help?
Do you have a question about the P-51D MUSTANG and is the answer not in the manual?
Questions and answers