
Related Manuals for ROSIERES TRIPLE 10 G

Summary of Contents for ROSIERES TRIPLE 10 G
- Page 1 NOTICE D'EMPLOI ET D'INSTALLATION INSTRUCTIONS FOR USE AND INSTALLATION USINES DE ROSIÈRES - 30, rue Y. LACELLE - Rosières - 18400 - Lunery - France...
-
Page 2: Consignes De Securite
à l'article R 132-2 du Code de la Consommation. Produit compatible avec les Directives Européennes 73/23/EEC and et 89/336/EEC, remplacées par 2006/95/EC et 2004/108/EC, et les modifications successives. TRIPLE 10 G TRIPLE 10 M TRIPLE 10 V Puissance 2100 W... -
Page 3: Installation
INSTALLATION La mise en place fonctionnelle des appareils ménagers dans leur environnement est une opération délicate qui, si elle n'est pas correctement effectuée, peut avoir de graves conséquences sur la sécurité des consommateurs. Dans ces conditions, il est impératif de confier cette tâche à un professionnel qui la réalisera conformément aux normes techniques en vigueur. -
Page 4: Changement De Gaz
INSTALLATION CHANGEMENT DE GAZ: le pouvoir calorifique et la pression du gaz varient selon la nature du gaz. Lors du changement, l'installateur doit successivement : * changer l'injecteur de chaque brûleur de table, voir chapitre ci-dessous. * remplacer le raccord gaz, si nécessaire, voir page 2, * et régler le ralenti du robinet de chaque brûleur de table, voir ci-dessous. - Page 5 à la présence d'un filtre antiparasite radio. Monophase Triphase Triphase 220-230V~ 220-230V3~ 380-415V3N~ TRIPLE 10 G - TRIPLE 10 M FUSIBLE 25 A 25 A 16 A Le Triple est livré avec un câble d'alimentation permettant le raccordement exclusivement sous des tensions de 220-230V Câble...
- Page 6 UTILISATION INSTALLATION LES BRÛLEURS GAZ ALIMENTATION HYDRAULIQUE RACCORDEMENT POUR LA VIDANGE Chaque brûleur est contrôlé par un robinet à réglage progressif qui vous permet : ALIMENTATION HYDRAULIQUE : * une plage de réglage progressive et plus longue de la les tuyaux d'alimentation et de vidange peuvent être orientés position maximum jusqu'au ralenti le plus fin, en souplesse, indifféremment vers la gauche ou vers la droite.
- Page 7 UTILISATION LA PLAQUE ELECTRIQUE EN FONTE La plaque standard est commandée par un commutateur 7 positions. Chaque position correspond à une température permanente et progressive suivant le repère 1,2,3,4,5 et 6. La plaque auto-protégée, repérable par un point rouge au centre, est commandée également par un commutateur 7 positions.
- Page 8 UTILISATION LE FOYER VITROCERAMIQUE Positions Qelques conseils CONSEILS D'UTILISATION Très doux Maintien d’un plat chaud, beurre fondu, chocolat • Utiliser des récipients épais pour une parfaite répartition de la Mijotage, béchamel, ragoût, riz au lait, oeufs chaleur, et à fond plat pour éviter les points de surchauffe sur Doux sur le plat lesquels les aliments attachent.
-
Page 9: Conseils De Cuisson
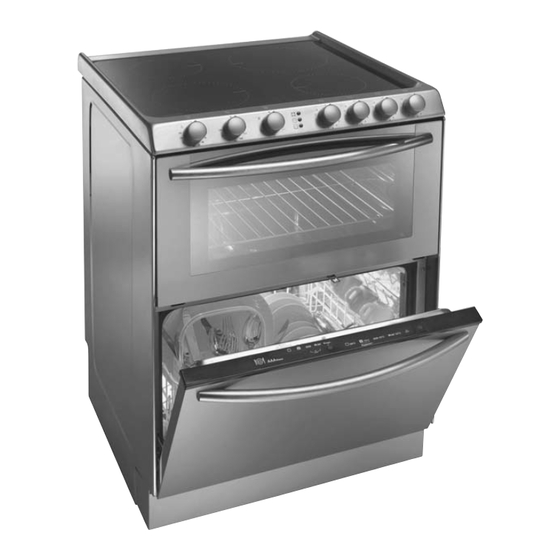
UTILISATION LE FOUR CONSEILS DE CUISSON VIANDES : TRES IMPORTANT : le four et le lave-vaisselle ne peuvent Ne saler les viandes qu'en fin de cuisson, car le sel favorise les pas fonctionner simultanément. Penser à arrêter le lave- projections de graisse, donc un encrassage rapide du four et des vaisselle avant de faire fonctionner le four. - Page 10 UTILISATION LE LAVE-VAISSELLE COMMANDES DU LAVE-VAISSELLE A Voyants de sélection des programmes B Touche de sélection des programmes C Description des programmes D Touche Marche/arrêt SELECTION DES PROGRAMMES ET DES FONCTIONS SPÉCIFIQUES Le lave-vaisselle et le four ne peuvent pas fonctionner simultanément. Choix des programmes Ouvrir la porte et appuyer sur la touche "Marche/Arrêt"...
- Page 11 UTILISATION CHARGEMENT DE LA VAISSELLE REMPLISSAGE DU PRODUIT DE RINÇAGE Le panier du lave-vaisselle a été étudié pour permettre une grande Le bac de produit de rinçage "B" se trouve à droite du bac possibilité de chargement afin de satisfaire toutes les exigences. lessiviel et a une contenance d'environ 130 ml.
- Page 12 UTILISATION Réglage de l'adoucisseur d'eau avec le programmateur électronique L'adoucisseur d'eau peut traiter l'eau dont la dureté s'élève jusqu'à 60 Fh (Graduation française) ou 33 Dh (Graduation germanique) et ce à partir de 5 niveaux de réglage. Les positions de réglage de l'adoucisseur d'eau sont indiquées dans le tableau suivant: Dureté...
-
Page 13: Apres L'utilisation
UTILISATION QUELQUES CONSEILS PRATIQUES ..Pour effectuer un programme de lavage complet avec un chargement plein, mettre après chaque repas la vaisselle en la disposant correctement, et réaliser entre chaque chargement un prélavage froid de façon à ramollir les salissures et pour éliminer les résidus les plus gros. - Page 14 ENTRETIEN • ECLAIRAGE DU FOUR L'ampoule située dans le four est d'un type spécial, résistant aux très hautes températures: 230 V~ - Culot E 14 - 15 W - Température 300 C mini. Remplacement de l'ampoule de four : avant toute opération de remplacement, déconnecter l'appareil de l'alimentation électrique et attendre le refroidissement des parties chaudes.
- Page 15 IDENTIFICATION D'ANOMALIES MINEURES RAPPEL : Le four et le lave-vaisselle ne peuvent pas fonctionner simultanément. Si votre lave-vaisselle ne fonctionne pas, avant d'appeler votre revendeur faire les contrôles suivants: ANOMALIES CAUSES REMEDES Prise de courant mal branchée Brancher la prise Touche M/A non appuyée Appuyer sur la touche 1 - La machine ne fonctionne sur aucun...
-
Page 16: Unpacking The Appliance
In order to improve the quality of the products, the manufacturer may carry out modifications linked to technical improvements. Appliance complies with European Directives 73/23/EEC and 89/336/EEC, replaced by 2006/95/EC and 2004/108/EC, and subsequent amendments. TRIPLE 10 G TRIPLE 10 M TRIPLE 10 V Power 2100 W 3540 W... -
Page 17: Gas Model
INSTALLATION Installing a domestic appliance can be a complicated operation which if not carried out correctly, can seriously affect consumer safety. It is for this reason that a professionally qualified person should undertake the task who will carry it out in accordance with the technical regulations in force. -
Page 18: Changing The Gas Type
INSTALLATION CHANGING THE GAS TYPE : the calorific capacity and pressure of the gas vary according to the type of gas. When changing the gas, the technician should successively : change the jets, make the gas connection to the installation and set the minimum flow of all the gas burner tap. -
Page 19: Electrical Connection
When the connection operation to the appliance terminals is • TRIPLE 10 G - TRIPLE 10 M finished, tighten the cable clamp and close the cover. A power cord is supplied with the Triple which allows it to be connected only to a power supply of 220-230 V between phases, or between phase and neutral. -
Page 20: Gas Burners
INSTALLATION GAS BURNERS WATER CONNECTION - WATER DRAINAGE Each burner is contolled by a tap with progressive settings allowing: * a wider choice of settings from the maximum position to the WATER CONNECTION : lowest and most precise one, The inlet and drain hoses can be directed to left or right. * easier flame regulation according to the pan diameter, The dishwasher can be connected to either cold or hot water, as * no risk of cutting off the flame or switching off when the... - Page 21 THE HOT PLATE A 7 positions commutator controls the standard hot plate. Each position corresponds to a permanent and progressive temperature according to the marks 1,2,3,4,5 and 6. The self-protecting hot plate, with a red dot in the centre, is also controlled by a 7 positions commutator.
-
Page 22: Choosing Utensils
THE VITROCERAMIC ZONE Positions Some Tips Very Low To keep a dish hot, melt butter and chocolate... ADVICES Slow cooking, sauces, stews, rice pudding The use of high quality utensils is important to obtain good cooking poached eggs... results : •... -
Page 23: Cooking Advices
THE OVEN USE COOKING ADVICES MEAT : It is better not to salt meats until after cooking as salt encourages VERY IMPORTANT : the oven and the dishwaher cannot be the meat to splatter fat. used at the same time. This will dirty the oven and make a lot of smoke. - Page 24 THE DISHWASHER DISHWASHER CONTROLS A Programme selection indicator lights B Programme selection button C Programme description D On/off button SELECTING THE PROGRAMMES AND SPECIAL FUNCTIONS The dishwasher and the oven cannot be used simultaneously. Setting a programme Open the door and press the On/off button ; the 4 Program selection LEDs start flashing. - Set the required programme by pressing Programme selection button, LED of the chosen programme will turn on (2 LEDs for COLD RINSE programme).
- Page 25 LOADING DISHES FILLING THE RINSE AID DISPENSER The basket has been carefully designed to make loading easy. The rinse aid dispenser "B" is to the right of the detergent dispenser For good wash performance, remove any debris from the dishes and has a capacity of about 130 ml.
-
Page 26: Washing Programme
Regulating the water softener with electronic programmer The water softener can treat water with a hardness level of up to 60 Fh (French grading) or 33 Dh (German grading) through 5 settings. The settings are listed in the panel below: Water hardness Water hardness Use of regenerating... - Page 27 SOME PRACTICAL HINTS ..- To carry out a wash programme with a full load of dishes load the machine correctly after each meal and do a cold pre-wash between each load to get rid of stains and remove the larger residues of food. HOW TO GET GOOD WASH RESULTS 1) Place the dishes face downwards.
- Page 28 CLEANING • OVEN LIGHTING The bulb and its cover are made of material resistant to high temperatures: 230 V~ - E 14 base - 15 W - Temperature 300 C mini. Replacing the bulb : disconnect the power supply from the oven before attempting to replace the lamp. Wait for the oven to cool down before doing any operation.
-
Page 29: Troubleshooting
TROUBLESHOOTING REMEMBER! the oven and the dishwasher cannot be used in the same time. Should the dishwasher fail to operate, before contacting the Service Centre, make the following checks: FAULT CAUSE REMEDY Plug is not connected correctly Connect electric plug O/I button has not been pressed Press button 1 - Machine completely dead... - Page 30 Le constructeur décline toute responsabilité concernant d’éventuelles inexacitudes imputables à des erreurs d’impression ou de transcription contenue dans cette notice. Le constructeur se réserve le droit de modifier les produits en cas de nécessité, même dans l’intérêt de l’utilisation, sans causer de préjudices aux caractéristiques de fonctionnement de sécurité...
Need help?
Do you have a question about the TRIPLE 10 G and is the answer not in the manual?
Questions and answers
My machine leaks from the bottom of the door can I change the bottom seal?