Atlantis Land I-Storm USB ADSL modem A01-AU2 Manual
Usb adsl modem
Hide thumbs
Also See for I-Storm USB ADSL modem A01-AU2:
- Caractéristiques (2 pages) ,
- Multilanguage manual (76 pages)
Table of Contents
Advertisement
Available languages
Available languages
Quick Links
Advertisement
Table of Contents

Related Manuals for Atlantis Land I-Storm USB ADSL modem A01-AU2


Summary of Contents for Atlantis Land I-Storm USB ADSL modem A01-AU2
-
Page 1: Adsl Modem
I-Storm USB ADSL modem A01-AU2 MULTILANGUAGE MANUAL A01-AU2_MX01... - Page 2 Italiano fare riferimento al sito www.atlantis-land.com. ENGLISH This product is covered by Atlantis Land 3 years On-Site warranty. For more detailed informations please refer to the web site www.atlantis-land.com. For more detailed instructions on configuring and using the Switch , please refer to the online manual.
- Page 3 The award of the information is facultative, but its lack will prevent ATLANTIS LAND® process requested. Registration www.atlantis-land.com within 15 days from the purchase of the product dismiss the customer from showing a valid proof of purchase (Sale Receipt or Invoice) in case of the request of intervention.
-
Page 4: Table Of Contents
ITALIANO 1.1 Caratteristiche tecniche dell’I-Storm USB ADSL Modem ... 7 1.2 Contenuto della confezione... 7 1.3 LED frontali ... 8 1.4 Informazioni da chiedere all’ISP ... 8 1.5 Installazione dell’I-Storm USB ADSL Modem... 9 1.6 Installazione Drivers ... 10 1.6.1 Windows 98/98SE/ME ... 10 1.6.2 Windows 2000 ... -
Page 5: Multilanguage Manual
1.7 Configuration ... 51 1.8 LAN DRIVER (RFC1483, RFC1577)... 53 1.8.1 For Windows 98/Me ... 53 1.8.2 For Windows 2000 / XP... 56 1.9 WAN DRIVER(PPPoA, PPPoE)... 59 1.10 Product Support... 61 FRANCAIS 1.1 Principales caractéristiques ... 64 1.2 Dans la boîte... 65 1.3 Les voyants (Face avant)... - Page 6 ITALIANO Copyright Copyright . 2002 è di proprietà di questa società. Tutti i diritti riservati. È vietata la riproduzione, la trasmissione, la trascrizione, la memorizzazione in un sistema di recupero o la traduzione in una qualsivoglia lingua o linguaggio informatico della presente pubblicazione, in qualsiasi forma o con qualsiasi mezzo, elettronico, meccanico, magnetico, ottico, chimico, manuale o di altro genere, senza previo consenso da parte della nostra azienda.
-
Page 7: Caratteristiche Tecniche Dell'i-Storm Usb Adsl Modem
1.1 Caratteristiche tecniche dell’I-Storm USB ADSL Modem L’I-Storm USB ADSL Modem offre le seguenti caratteristiche: ♦ Modem per connessione ADSL. ♦ Downstream data rate sino a 8 Mbps e upstream sino ad 1 Mbps. ♦ Alimentato dal bus USB, non richiede alimentatore esterno. -
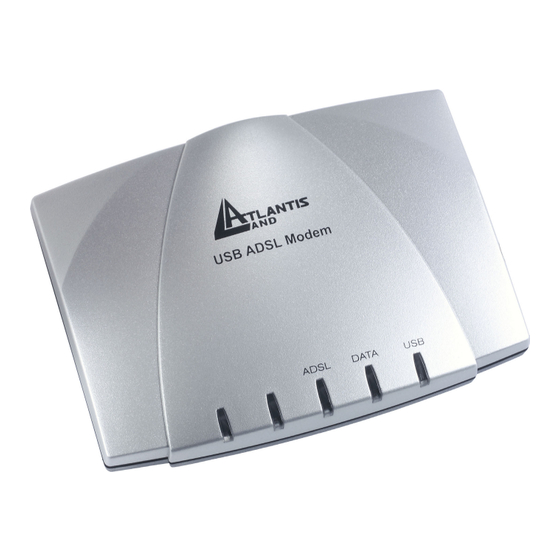
Page 8: Led Frontali
1.3 LED frontali Quando questo Led è acceso indica che la porta USB è connessa al PC e che il dispositivo funziona propriamente. DATA Lampeggia durante il trasferimento di dati. ADSL Quando questo Led è acceso indica l’avvenuto allineamento con il DSLAM del fornitore di servizio, se lampeggia sta allineandosi col DSLAM. -
Page 9: Installazione Dell'i-Storm Usb Adsl Modem
PPPoE VPI/VCI, Username, Password, Service Name e indirizzi IP del Domain Name System (DNS) (possono essere assegnati automaticamente oppure settati come fissi). PPPoA VPI/VCI, VC-based/LLC-based multiplexing, Username, Password e indirizzi IP del Domain Name System (DNS) (possono essere assegnati automaticamente oppure settati come fissi). RFC1483 VPI/VCI, VC-based/LLC-based multiplexing Bridged... -
Page 10: Installazione Drivers
ADSL. Tale filtro non è incluso nella confezione e va acquistato separatamente. Atlantis Land raccomanda di utilizzare apparati certificati per il tipo di linee e consiglia la scelta del codice A01-AF1 (filtro ADSL tripolare costruito rispettando le specifiche Telecom Italia) o A01-AF2. - Page 11 2. Nelle finestre successive selezionare Cerca il miglior driver Specificare il percorso dei driver per ME) e premere 3. Inserire a questo punto nel lettore CDRom il CD contenuto nella confezione. Nella finestra scegliere ITALIANO periferica bottone (scegliere Avanti.
- Page 12 Specificare un percorso e premere poi su Sfoglia ed indicare il percorso in cui sono contenuti i driver (CDRom:\Driver\WAN o LAN) e premere poi su OK. Cliccare poi su Avanti per proseguire. 4. Continuare premendo Avanti nelle successive richieste sino a che non termina l’installazione dei driver.
-
Page 13: Windows 2000
7. Una nuova icona sarà anche presente nel Pannello di controllo e sul Desktop (oltre all’icona per il Dial Up in caso di driver WAN). 8. Andando in Pannello di controllo, poi in Sistema, Gestione periferiche è possibile vedere sotto Schede di rete e Controller USB due nuove istanze relative all’I-Storm USB. - Page 14 2. Inserire a questo punto nel lettore CDRom il CD contenuto nella confezione. Nella finestra scegliere Specificare un percorso e premere su Avanti e poi tramite il tasto Sfoglia indicare il percorso in cui sono contenuti i driver (CDRom:\Driver\WAN o LAN) e premere poi su OK.
- Page 15 4. Per finire, cliccare su Fine. Potrebbe essere necessario riavviare il PC. 5. A questo punto i driver dell’I-Storm USB ADSL Modem sono stati installati con successo, nella barra di stato dovrebbe apparire una nuova icona. Potrebbe apparire anche un’icona di Rimozione sicura che va utilizzata (per scegliere) prima di staccare la periferica USB 6.
-
Page 16: Windows Xp
1.6.3 Windows XP 1. Avviare WindowsXP. volta collegato l’I-Storm al PC tramite il cavo USB, rileverà una nuova periferica. Nella finestra di Installazione guidata del nuovo hardware spuntare Installa da un elenco o percorso specifico e premere poi su Avanti. 2. - Page 17 ITALIANO 3. Durante l’installazione verranno mostrate in successione le finestre (sotto riportate), premere su Continua (entrambe le volte).
- Page 18 ITALIANO Per finire, cliccare su Fine.
- Page 19 Dopo qualche istante, il Sistema Operativo mostrerà una nuova finestra. Premere semplicemente su Avanti. 6. All’apparire della finestra (sotto riportata) premere su Continua. 7. Premere poi su Fine per terminare l’installazione. 8. A questo punto i driver dell’I-Storm USB ADSL Modem sono stati installati con successo, è...
- Page 20 9. Una nuova icona sarà anche presente nel Pannello di controllo e sul Desktop (oltre all’icona per il Dial Up in caso di driver WAN). 10. Andando in pannello di controllo (passa alla visualizzazione classica), poi in sistema, hardware ed infine gestione periferiche, è possibile trovare sia sotto schede di rete che controller USB due nuove istanze relative all’I-Storm USB.
-
Page 21: Configurazione Generale
1.7 Configurazione Generale Seguire le seguenti istruzioni per configurare l’I-Storm USB ADSL modem. 1. Cliccare sull’icona I-Storm USB ADSL Modem presente nel pannello di controllo o sul desktop. Apparirà la finestra sotto riportata. ITALIANO... - Page 22 2. Premendo [Alt]+[P] sulla tastiera è possibile accedere alla configurazione avanzata. 3. Selezionare il tag Protocol Setup, inserire i valori di VPI=8 VCI=35 Encapsulation Mode il tipo di incapsulamento ed il relativo framing. Solitamente per il PPPoA scegliere PPP over ATM VCMUC (RFC 2364) mentre per il PPPoE scegliere PPP over Ethernet LLCSNAP (RFC 2516).
-
Page 23: Configurazione Driver Lan(Rfc1577, 1483)
1.8 Configurazione Driver LAN(RFC1577, 1483) 1.8.1 Windows 98 / Me 1. Andare in Panello di controllo, cliccare sull’icona Rete e scegliere il tab Configurazione. 2. Selezionare TCP/IP → I-Storm USB-ADSL LAN Adapter. Cliccare poi su Proprietà.. ITALIANO... - Page 24 3. Selezionare il tab Indirizzo IP ed introdurre nel campo Indirizzo IP e Subnet Mask I valori forniti dall’ISP. 4. Selezionare il tab Gateway, introdure nel campo Nuovo gateway l’indirizzo IP del Gateway e cliccare su Aggiungi. ITALIANO...
- Page 25 ITALIANO 5. Selezionare il tab Configurazione DNS, selezionare il bottone Attiva DNS ed introdurre nel campo Host un qualsiasi nome. Introdurre poi gli indirizzi IP dei DNS e premere su Aggiungi.
-
Page 26: Windows 2000 / Xp
1.8.2 Windows 2000 / XP Andare nel Pannello di Controllo e qui cliccare due volte sull’icona Connessioni di rete. Andare sull’icona relativa all’I-Storm USB, premere il tasto destro ed andare su Proprietà. Selezionare (nel tab Generale) Protocollo Internet (TCP/IP). Cliccare poi su Proprietà. ITALIANO... - Page 27 Selezionare Utilizza il seguente indirizzo IP ed introdurre l’IP assegnato dall’ISP, la subnet mask ed il Gateway predefinito. Selezionare poi Utilizza i seguenti indirizzi server DNS ed introducete poi gli indirizzi dei server DNS dati dall’ISP. ITALIANO...
- Page 28 ITALIANO...
-
Page 29: Configurazione Driver Wan(Pppoa, Pppoe)
ITALIANO 1.9 Configurazione Driver WAN(PPPoA, PPPoE) 1. Cliccare sull’icona di Dial-Up creata sul desktop o nel gruppo apposito. Inserire Nome utente e Password e cliccare su Componi per accedere ad Internet. -
Page 30: Supporto Offerto
Protocollo, Incapsulamento, VPI/VCI ed eventuali indirizzi IP) è possibile contattare l’help desk telefonico (02/93907634) gratuito di Atlantis Land che fornirà assistenza da lunedì al giovedì dalle 9:00 alle 13:00 e dalle 14:00 alle 18:00. Il venerdì dalle 9:00 alle 13:00. E’ possibile anche utilizzare il fax (02/93906161) o la posta elettronica (info@atlantis-land.com... -
Page 31: English
1.1 I-Storm USB ADSL Modem Features I-Storm USB ADSL Modem provides the following features: ♦ Bus-powered USB modem for broadband ADSL. ♦ Downstream data rate up to 8 Mbps and upstream up to 1 Mbps. ♦ No external power supply is required. ♦... -
Page 32: The Front Leds
1.3 The Front LEDs When this LED is lit, it indicates that the USB port is connected to the PC and working properly. DATA Flashes when transferring data. ADSL When lit, it indicates that the ADSL (Line) port is connected to the DSLAM and working properly. 1.4 Information from ISP Before you start installing this device, you have to check with your ISP what kind of service (connection method) is provided such as... -
Page 33: Installing I-Storm Usb Adsl Modem
PPPoE VPI/VCI, Username, Password, Service Name, and Domain Name System (DNS) IP address (it can be automatically assigned from ISP or be set fixed). PPPoA VPI/VCI, VC-based/LLC-based multiplexing, Username, Password, and Domain Name System (DNS) IP address (it can be automatically assigned from ISP or be set fixed). -
Page 34: Installing I-Storm Usb Adsl Modem Drivers
1.6 Installing I-Storm USB ADSL Modem Drivers 1.6.1 For Windows 98 1. Start Windows. After the opening banner, Windows will tell you that the new device has been detected. You will then see the following screen. Click “Next >”. 2. In the next window, select “Search for the best driver for your device”... - Page 35 ENGLISH 3. Insert the installation CD into the CD-ROM drive and check “Specify a location”. Click “Browse…” specify driver directory such CDRom:\DriverEng\LAN CDRom:\Driver\LAN) for installing I-Storm USB ADSL LAN Adapter or CDRom:\DriverEng\WAN (or CDRom:\Driver\WAN) for installing I-Storm ADSL Adapter. (Please refer Information from ISP section for more details.) Click “OK”...
- Page 36 ENGLISH...
- Page 37 4. Continuing through the Wizard, click the “Next >” button. Windows will start copying files to your system. Then, click “Finish”. 5. You will see the following screen prompting for the path of the Windows source files. Please specify a location.
-
Page 38: For Windows Me
Go to the Device Manager, the “I-Storm USB ADSL WAN Adapter” is under the Network Adapters, and “I-Storm USB ADSL Modem” is under the Universal Serial Bus Controllers for I- Storm USBADSL WAN driver installation. 1.6.2 For Windows Me 1. Start Windows. After the opening banner, Windows will tell you that the new device has been detected. - Page 39 ENGLISH Information from ISP section for more details.) Click “OK” and then “Next>” to continue.
- Page 40 3. Continuing through the Wizard, Windows will start copying files to your system. Then, click “Finish”. 4. I-Storm USB ADSL Modem driver is successfully installed and the Status Task Bar will appear in the System Tray. 5. I-Storm USB ADSL Modem icon is installed in the Control Panel.
-
Page 41: For Windows 2000
6. Go to the Device Manager, the “I-Storm USB ADSL LAN Adapter” is under the Network Adapters, and “I-Storm USB ADSL Modem” is under the Universal Serial Bus Controllers for I- Storm USBADSL LAN driver installation. Go to the Device Manager, the “I-Storm USBADSL WAN Adapter”... - Page 42 the CD-ROM drive. In next window, check “Specify a location” and click “Next>”. 3. Click “Browse…”. In the Locate File window, specify CDRom:\DriverEng\LAN\ CDRom:\Driver\LAN) USBADSL CDRom:\DriverEng\WAN\ CDRom:\Driver\WAN) for installing I-Storm USB ADSL WAN Adapter. (Please refer Information from ISP section for more details.) Click “Open” and then “Next>“...
- Page 43 4. When windows titled “Digital Signature Not Found” appear, press “Yes” to continue the installation. 5. Press “Finish”. 6. I-Storm USB ADSL Modem driver is successfully installed and the Status Task Bar will appear in the System Tray. ENGLISH...
-
Page 44: For Windows Xp
7. I-Storm USB ADSL Modem icon is installed in the Control Panel. 8. Go to the Device Manager, the “I-Storm USB ADSL LAN Adapter” is under the Network Adapters, and “I-Storm USB ADSL Modem” is under the Universal Serial Bus Controllers for I- Storm USBADSL LAN driver installation. - Page 45 ENGLISH 2. Insert the installation CD into the CD-ROM drive and select “Include this location in the search”. Click “Browse” to specify the driver directory such as CDRom:\DriverEng\LAN CDRom:\Driver\LAN) for installing I-Storm USB ADSL LAN Adapter or CDRom:\DriverEng\WAN (or CDRom:\Driver\WAN) for installing I-Storm ADSL Adapter.
- Page 46 ENGLISH...
- Page 47 ENGLISH 3. When windows titled “Hardware Installation” or “Software Installation” appear, press “Continue Anyway” to go on.
- Page 48 Then, click “Finish”. 5. Wait a few moments. Windows will show that the new device, I-Storm USBADSL LAN (or WAN) Adapter, has been detected. Select “Install from a list or specific location”. Click “Next >” 6. Click “Next >” when the following figure appears. 7.
- Page 49 8. Then, click “Finish” to end the installation. 9. I-Storm USBADSL Modem driver is successfully installed and the Status Task Bar will appear in the System Tray. 10. I-Storm USB ADSL Modem icon is installed in the Control Panel. 11. Go to the Device Manager, the “I-Storm USB ADSL LAN Adapter”...
- Page 50 ENGLISH Go to the Device Manager, the “I-Storm USB ADSL WAN Adapter” is under the Network Adapters, and “I-Storm USB ADSL Modem” is under the Universal Serial Bus Controllers for I- Storm USB ADSL WAN driver installation.
-
Page 51: Configuration
1.7 Configuration Follow the instructions below to configure your I-Storm USB ADSL Modem. 1. Click I-Storm USB ADSL Modem icon in the Control Panel or ADSL Configuration icon on the desktop. The status of ADSL connection will be displayed. ENGLISH... - Page 52 2. Press [Alt]+[P] on keyboard, the following figure appears. 3. Select the Protocol Setup tag, please set the value of “VPI”, “VCI” and “Encapsulation Mode”. Then, click “OK”. For BT (VPI=0, VCI=38), for KC(VPI=1, VCI=50). ENGLISH...
-
Page 53: Lan Driver (Rfc1483, Rfc1577)
1.8 LAN DRIVER (RFC1483, RFC1577) 1.8.1 For Windows 98/Me 1. Go to Start / Settings / Control Panel. In the Control Panel, double-click on Network and choose the Configuration tab. 2. Select TCP/IP → I-Storm USB ADSL LAN Adapter. Then, click Properties. 3. - Page 54 ENGLISH 4. Select the Gateway tab. Enter the “gateway” provided by your ISP and click Add.
- Page 55 ENGLISH 5. In the DNS Configuration page. Click the Enable DNS radio button. Enter the “Host” name and “DNS Server IP address” provided by your ISP. Then, press the Add button.
-
Page 56: For Windows 2000 / Xp
1.8.2 For Windows 2000 / XP 1. Go to Start / Settings / Control Panel. In the Control Panel, double-click on Network and Dial- up Connections. 2. Right–click on Local Area Connection that is using the I-Storm USB ADSL LAN Adapter and then click “Properties”. - Page 57 ENGLISH 3. Select Internet Protocol (TCP/IP). Then, click “Properties”.
- Page 58 4. Select Use the following IP address, and then enter the “IP address”, “Subnet mask”, and “Default gateway” provided by your ISP. Select Use the following DNS server addresses and then enter the provided DNS server IP address. ENGLISH...
-
Page 59: Wan Driver(Pppoa, Pppoe)
ENGLISH 1.9 WAN DRIVER(PPPoA, PPPoE) 1. Click ADSL Easy Dialup icon on the desktop. Then, the following window appears. Enter the “Username” and “Password” provided by your ISP. Let the Phone number field be blank. - Page 60 ENGLISH 2. Click Connect and get ready to surf the Internet!
-
Page 61: Product Support
WWW: www.atlantis-land.com Copyright The Atlantis Land logo is a registered trademark of Atlantis Land SpA. All other names mentioned mat be trademarks or registered trademarks of their respective owners. Subject to change without notice. No liability for technical errors and/or omissions. -
Page 62: Francais
FRANCAIS Copyright Copyright . 2002 est la propriété de cette société. Tous droits réservés. Sont interdites, la reproduction, la transmission, la transcription, la mémorisation dans un système de sauvegarde où la traduction dans une autre langue ou en langage informatique quels qu’ils soient, de la présente publication, sous quelque forme que ce soit ou quel qu’en soit le moyen, électronique, mécanique, magnétique, optique, chimique, manuel ou de tout autre genre,... - Page 63 FRANCAIS Toutes les marques ou noms de produits mentionnés dans le présent manuel sont des marques commerciales et/ou brevetées par leurs propriétaires respectifs.
-
Page 64: Principales Caractéristiques
1.1 Principales caractéristiques L’I-Storm USB ADSL offre les caractéristiques suivantes: ♦ Controllerless external USB ADSL Modem ♦ Chipset Conexant AccessRunner™ (Falcon 2P) ♦ Full-rate avec une vitesse descendante jusqu’à 8 Mbps et une vitesse montante jusqu’à 1,5Mbps ♦ G.lite avec une vitesse descendante jusqu’à 1,5 Mbps et une vitesse montante jusq’à... -
Page 65: Dans La Boîte
1.2 Dans la boîte Au moment d'ouvrir la boîte, vérifiez son contenu : ♦ Atlantis I-Storm USB ADSL Modem ♦ CD avec pilotes et manuels ♦ Câble téléphonique (RJ11) ♦ Câble USB ♦ Guide d'installation 1.3 Les voyants (Face avant) Allumé... - Page 66 suivant récapitule les informations dont vous aurez besoin en fonction des pilotes à installer : PPPoE PPPoA RFC1483 Bridged RFC1483 Routed IPoA Vous trouverez dans le tableau ci-dessous les valeurs possibles de VPI/VCI. Données à configurer Virtual Path Identifier Virtual Circuit Identifier Framing VPI/VCI, VC-based/LLC-based, Username, Password, Service Name...
-
Page 67: Installation De L'i-Storm Usb Adsl Modem
Attention si ces valeurs sont erronées le modem fonctionnera pas correctement (de toute façon l'alignement correct peut se vérifier). confirmation à votre fournisseur d’accès. 1.5 Installation de l’I-Storm USB ADSL Modem Faire référence aux instructions suivantes: ♦ Raccordez le câble téléphonique fourni au filtre (non livré... - Page 68 Win98 choisir Spécifier un emplacement). Cliquez sur Parcourir pour atteindre l’emplacement des pilotes. CDRom:\Driver\Wan] (pour PPPoA or PPPoE) ou choisir CDRom:\Driver\Lan] RFC1483). Cliquez enfin sur Suivant. 4. Cliquez sur Suivant dans les fenêtres suivantes jusqu’au dernier écran, cliquez sur Terminer. 5.
-
Page 69: Windows 2000
1.6.2 Windows 2000 1. Insérez le CD fourni et allumez l’ordinateur. Dès que vous connectez l’I-Storm ADSL modem au port USB de l’ordinateur, une nouvelle fenêtre apparaîtra. Cliquez sur Suivant . 2. Dans la fenêtre suivante sélectionner Rechercher un pilote (recommandé) et cliquez sur Suivant . -
Page 70: Windows Xp
8. Cliquez sur Démarrer, après sur Configuration, Maintenance et après sur Système puis sur l’onglet Matériél périphériques. Dans le type Cartes réseau a été ajouté I-Storm USB ADSL Wan Adapter et dans le type Controller USB(Universal Serial Bus) a été ajouté... - Page 71 5. À ce stade les pilotes ont été installés avec succès, vous devriez pouvoir maintenant voir dans la barre des tâches, une nouvelle icône (dans l'illustration dessous). 6. Cliquez sur Démarrer, après sur Configuration. Vous trouverez ici I-Storm ADSL Wan adapter. Sur le bureau il y a : ADSL Configuration et ADSL Easy Dial-up(si vous avez installé...
-
Page 72: Configuration Générale
1.7 Configuration Générale Faire référence aux instructions suivantes: 1. Cliquez sur Démarrer, après sur Configuration et enfin sur I-Storm ADSL Wan adapter. Sinon, sur le bureau, vous pouvez aussi cliquer sur ADSL Configuration. La fenêtre suivante apparaîtra. FRANCAIS Panneau de... - Page 73 FRANCAIS 2. Tapez [Alt]+[P] pour accéder à la configuration. La fenêtre suivante s’affiche. 3. Cliquez sur l’onglet Configuration du Protocol (or Protocol Setup). Pour le choix des VPI/VCI les combinaisons possibles sont : [VPI=8,VCI=35], [VPI=8,VCI=67], [VPI=2,VCI=32]. Cependant, ils peuvent être amenés à changer sur l’initiative de votre FAI.
-
Page 74: Windows 98 / Me
4. Cliquez enfin sur OK pour terminer la configuration. NB : Attention si ces valeurs sont fausses le modem ne fonctionnera pas correctement (de toute façon vérifier). confirmation à votre fournisseur d’accès. 1.8 Configuration DRIVER LAN (RFC1577, 1483) 1.8.1 Windows 98 / Me 1. - Page 75 FRANCAIS 3. Dans l’onglet Adresse IP configurez les paramètres (en utilisant les informations fournies par votre FAI). Introduisez l’adresse IP et le masque de sous- réseau.
- Page 76 FRANCAIS 4. Dans l’onglet Passerelle, remplissez les champs suivant les caractéristiques de votre abonnement ADSL.
- Page 77 FRANCAIS 5. Dans l’onglet DNS, renseignez les champs (en introduisant les adresses IP des serveurs DNS). Pour terminer cliquez sur OK. Il faut redémarrer l’ordinateur pour que les changements prennent...
-
Page 78: Windows 2000 / Xp
effet. 1.8.2 Windows 2000 / XP Panneau de Configuration, double-cliquez sur l’ icône Accès Réseau. Faites un clic droit sur la connexion au réseau local et cliquez sur propriétés. Sélectionnez le protocole TCP/IP, et cliquez sur propriétés. FRANCAIS... - Page 79 FRANCAIS Sous l’onglet Général, sélectionnez Utiliser l’adresse IP suivante et après configurez l’adresse IP suivant les informations données par votre FAI (avant). Dans l’onglet DNS sélectionnez Utiliser l’adresse de Serveur DNS suivante et après renseignez les champs (en introduisant les adresses IP des serveurs DNS).
- Page 80 FRANCAIS...
-
Page 81: Configuration Driver Wan (Pppoa, Pppoe)
1.9 Configuration DRIVER WAN (PPPoA, PPPoE) 1. Effectuez un double-clic sur ADSL Easy Dial-up, introduisez le Nom d’utilisateur et le Mot de passe (les paramètres d’identification indiqués par votre FAI.) 2. Cliquez enfin sur Numéroter. Si les paramètres sont exacts, la connexion s’établit en quelques secondes. La fenêtre de connexion disparaît automatiquement. - Page 82 FRANCAIS...
-
Page 83: Support
1.10 Support Pour tout problème vous pouvez contacter le service gratuit: l'help desk téléphonique d'Atlantis Land qui vous fournira une assistance du lundi au vendredi de 9.00 à 13.00 et de 14.00 à 18.00. Vous pouvez aussi nous contacter par fax ou par messagerie électronique (info@atlantis-land.com...
Need help?
Do you have a question about the I-Storm USB ADSL modem A01-AU2 and is the answer not in the manual?
Questions and answers