Table of Contents
Advertisement
Advertisement
Table of Contents

Subscribe to Our Youtube Channel
Related Manuals for Java wsd18


Summary of Contents for Java wsd18
-
Page 3: Control Elements
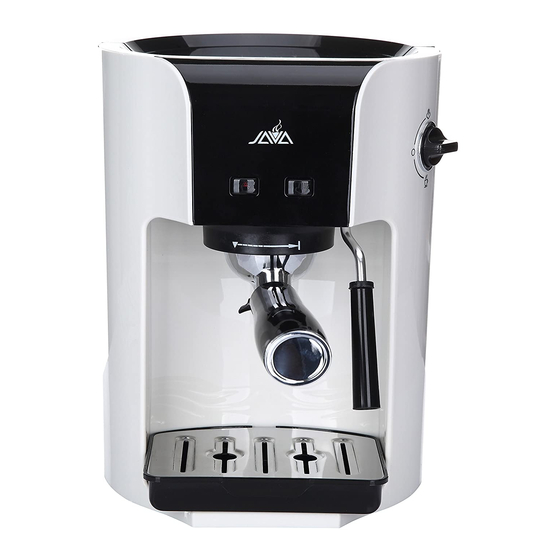
Control elements 1. Power Switch 2. Water Reservoir 3. Control Knob 4. On/Off key(Red) 5. Steam Key(Green) 6. Brew Head 7. Brew Basket / Filter Holder 8. Frothing Tube 9. Drip Tray 10. Pod Filter 11. Powder Filter 12. Hard Capsule Filter (optional) 13. Powder Scoop ... -
Page 4: Table Of Contents
WSD18 Instructions for use Contents 1. Safety Instruction…………………………………………………………………3 1.1 Warnings…………………………………………………………………………3 1.2 Precautions…………………………………………………………………………3 2. Before operating the appliance……………………………………………………4 2.1 Check supply voltage…………………………………………………………4 2.2 Check electrical fuse……………………………………………………………5 2.3 Fill water……………………………………………………………………………5 3. Using the appliance……………………………………………………………………5 4. Brewing a cup of coffee………………………………………………………………6 4.1 Turn on the appliance and warm up……………………………………………7 4.2 How to use coffee powder to make coffee……………………………………7... - Page 5 9. Technical Data………………………………………………………………………15 Introduction Thank you for purchasing the WSD18. To ensure perfect functioning of your WSD18, carefully read this operating manual and keep it for future reference. Should you need more information or if you encounter particular problems not specified in these operating instructions in sufficient detail, either contact us directly or contact your local authorized dealer.
-
Page 6: Safety Instruction
1. Safety Instruction 1.1 Warnings (1) Close supervision is required when any appliance is used by or near Children. (2) Read all instructions before using the appliance. (3) Do not operate any appliance with a damaged cord or plug or after the appliance malfunctions or has been damaged in any manner. -
Page 7: Before Operating The Appliance
(2) Use on a hard, flat level surface only, do not place this appliance on or near a hot burner(e.g. stove) or any place that children or pets can easily touch. (3) If long time no use of appliance (e.g. out for holiday), make sure to turn off the power. -
Page 8: Check Electrical Fuse
The coffee maker is preset in the factory to the correct mains voltage, check if your local mains supply voltage complies with the information given on the type plate on the underside of the coffee machine. 2.2 Check electrical fuse The electric current required of safe working is marked under the appliance, to check if the electrical fuse has sufficient capacity. -
Page 9: Brewing A Cup Of Coffee
(1) Before removing any of the parts and accessories, make sure the Control Knob③ on the side of unit is turned to the off position(“O” position), Steam Key⑤ (green) is off, the coffee maker is ready. (2) Do not remove the Filter Holder⑦ at any time during the brewing process. (3) Do not touch the metal part of Filter Holder⑦... -
Page 10: Turn On The Appliance And Warm Up
4.1 Turn on the appliance and warm up Plug the appliance to the electrical outlet, switch the Power Switch① to on position, press the On/Off key④ to turn on the appliance, the red light on the On/Off key twinkles. When the red light becomes solid red, the appliance is ready for making coffee. 4.2 How to use coffee powder to make coffee ○... -
Page 11: How To Use Coffee Pod To Make Coffee
to right until the filter is located at locked position and could not move, make sure 3 extended tongue plate on the Filter Holder⑦ are locked to the groove of Brew Head ⑥. (5) Place the cup under the Filter holder ⑦ , turn the Control Knob ③ to the coffee position ,coffee will begin to follow. -
Page 12: How To Use Hard Capsule To Make Coffee (Optional)
(2) Put the coffee pod into Pod Filter⑩ (make sure coffee pod is completely in the filter, not let the corner of pod out of filter). (3) Place the Filter Holder⑦ into the Brew Head⑥, then slowly turn the handle to right until the filter holder is located at locked position, make sure 3 extended tongue plate on the Filter Holder⑦... -
Page 13: Hot Water
○ the filter with the Hard Capsule Filter 5. Hot water Place the cup under the Frothing Tube⑧ when the coffee maker is in ready status. And turn the Control Knob③ to steam position . Hot water will begin to flow. When the cup is filled to the desired level, turn the side Control Knob③... - Page 14 (1) Follow any procedures in step 4 “Brewing Coffee” to make one cup of coffee. (2) Fill a small stainless steel or ceramic pitcher with proper cold milk. Skim the aerosol on the milk will be the easiest to froth. (3) Follow step 6, wait until the ready green light becomes solid green.
-
Page 15: Problems And Causes
8. Problems and causes PROBLEMS CAUSES SOLUTIONS No water or No water or full water inside Operate “6.Make Steam”procedure coffee at the the system is ok first use Coffee does not • No water in reservoir. • Add water. come out •... - Page 16 Coffee comes • Filter holder not rotated to • Rotate filter holder to full out around the full lock position. lock position. edge of the • Coffee grounds around the • Wipe off rim. filter holder filter basket rim. • Too much coffee in the filter •...
- Page 17 Milk is not • Ran out of steam. • Ensure there is enough water in foamy after the reservoir. frothing • Milk is not cold enough. • Chill milk and frothing pitcher prior to making cappuccino. Coffee comes • Ground coffee is too coarse. •...
-
Page 18: Technical Data
9. Technical Data Technical Data Voltage 230VAC / 120VAC Power 1400 W Fuse 10 A / 15 A Certification CE、GS / UL、cUL Pump pressure static, max. 20 bar Water tank 1.4 Litres Length of cable approx. 1.3 m Weight approx. 3.5Kg Size (HxWxD) 280×220×260 mm ...
Need help?
Do you have a question about the wsd18 and is the answer not in the manual?
Questions and answers