Table of Contents
Advertisement
Advertisement
Table of Contents

Subscribe to Our Youtube Channel
Related Manuals for Wasp wdt60


Summary of Contents for Wasp wdt60
- Page 1 WDT60™ Personal Digital Assistant (PDA) User’s Manual...
- Page 2 Electronic versions may either be downloadable from the Wasp Barcode Technologies website (www.waspbarcode.com) or provided on appropriate media. If you visit our website and would like to make comments or suggestions about this or other Wasp publications, please let us know via the "Contact " page.
-
Page 3: Table Of Contents
Laser Data Capture ..................29 Description of the Keys ................30 4.4.1 Alphanumeric Keyboard ................30 4.4.2 Numeric Keyboard ..................31 4.4.3 Resetting the WDT60 .................. 33 Status Indicators ..................35 4.5.1 LED Status ....................35 4.5.2 Taskbar ....................... 36 Settings ....................... 37 4.6.1... - Page 4 Connecting to Other Computers ..............61 4.7.1 Windows Mobile® Device Center ..............61 4.7.2 Bluetooth® Manager Device Setup ............. 62 WASP Desktop Utility.................. 70 4.8.1 Administrative Options (Admin tab) ............. 71 4.8.2 Locked Web Browser Options (LockedWeb tab) ........74 4.8.3...
-
Page 5: References
“PDA” and "WDT60" refer to WDT60 PDA. “You” refers to the System Administrator or Technical Support person using this manual to install, configure, operate, maintain or troubleshoot an WDT60 PDA. “Single Dock” refers to the WDT60 Single Slot Dock. The label artworks may be only a draft. Refer to the product labels for more precise information. -
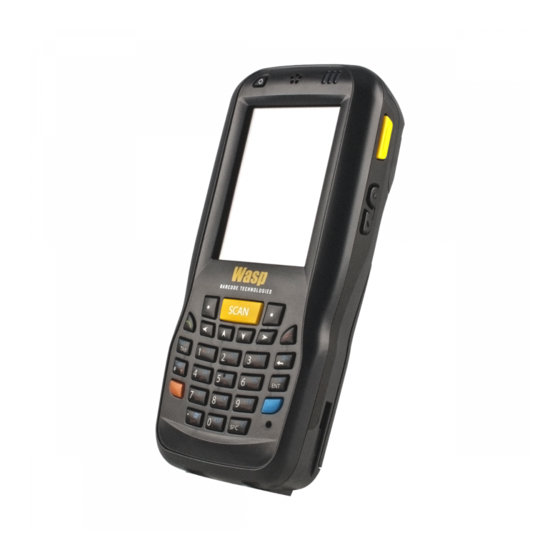
Page 6: General View
GENERAL VIEW A) Color Display H) Telescope Stylus (not included in the box, please order it separately) B) ON/OFF Power Key Laser Safety Label C) Receiver Loudspeaker D) LEDs K) Product Label E) Front Scan Key MicroSD Card Slot (under battery) Keyboard M) Reset Key (under battery) G) Microphone... - Page 7 O) Side Scan Key (left) R) Side Scan Key (right) P) Headset Connector S) Up/down Volume Keys Q) Micro-USB Port for supplying power and data transfer (host/slave) Data Capture Window U) Handylink™ Connector (host/slave)
- Page 8 This page intentionally left blank...
-
Page 9: Introduction
3 LEDs help to not waste time in the configuration and usage of the product. Working with the WDT60 becomes an easy pleasure. Great aesthetics do not put the robustness on a second level. The WDT60 has been designed for survival in the industrial environmental, outside or inside the four walls. -
Page 10: Inserting A Microsd Card
WDT60™ INSERTING A MICROSD CARD WDT60 supports microSD memory cards. To access the microSD card slot and insert the card, proceed as follows: Turn off the WDT60. Shift the battery latch to the left and remove the battery pack: Open the card slot and insert the microSD card with the written part downward:... - Page 11 INTRODUCTION Shift the card to the right to lock it into the cardholder; close the card slot: First insert the bottom (contacts) and then the upper side of the battery pack into the slot. Press until the battery latch clicks.
-
Page 12: Removing The Microsd Card
WDT60 or the microSD card itself. Proper ESD precautions include, but are not limited to, working on CAUTION an ESD mat and ensuring that the operator is properly grounded. Do not force the card. If you feel resistance, remove the card, check the orientation, and reinsert it. -
Page 13: Batteries And Maintenance
The battery icon on the Taskbar indicates when the battery pack is low. It is possible to recharge the battery pack by connecting the power supply directly to the WDT60. Alternatively, it is also possible to recharge the battery pack by using a Single Cradle. - Page 14 Insert the micro-USB cable output plug into the micro-USB connector of the WDT60, making sure that the arrow on the plug faces upwards: NOTE During the charging process the LED positioned at the right side of the display glows red constantly.
- Page 15 WDT60 is disconnected from power supply before the charging cycle is completed. NOTE The WDT60 may get warm during charging; this is normal and does not mean a malfunction. NOTE Use only a USB-IF compliant USB port as a charging source.
-
Page 16: Replacing The Battery Pack
REPLACING THE BATTERY PACK To correctly replace the battery pack, proceed as follows. Turn off the WDT60. Shift the battery latch to the left and remove the battery pack: Install the new battery pack, first insert the bottom (contacts) and then the upper... - Page 17 Using the battery pack in this manner may also result in a loss of performance and a shortened life expectancy. Use only a Wasp approved power supply. The use of an alternative power supply will void the product warranty, may cause product damage and may cause heat, an explosion, or fire.
- Page 18 In order to guarantee an adequate operating autonomy, when replacing the battery pack the PDA checks the battery energy level. If the battery is not sufficiently charged, the WDT60 does not turn on (when pressing the ON/OFF key). In this case, either substitute the battery pack with a charged one...
-
Page 19: Cleaning The Pda
BATTERIES AND MAINTENANCE CLEANING THE PDA Periodically clean the WDT60 with a slightly dampened cloth. Do not use alcohol, corrosive products or solvents. -
Page 20: Connections
WDT60™ CONNECTIONS USB CONNECTION You can use a standard micro USB cable or a HandyLink™ cable to directly connect the WDT60 to a host computer to transfer data through the USB interface. Key: Host computer WDT60 Standard Micro USB cable/ HandyLink™... - Page 21 CONNECTIONS The Single Dock can be connected to the Host by means of a Micro-B USB cord. Once the host computer has been turned on, insert the WDT60 PDA into the cradle. Key: Host computer WDT60 Single Slot Dock Micro USB Client Cable Power Adapter Connection through the cradle complies to USB 1.1 standard.
-
Page 22: Connection To Usb Peripherals
WDT60™ CONNECTION TO USB PERIPHERALS To connect the WDT60 to a USB keyboard or a memory device, connect the terminal to a micro USB host cable or to a HandyLink™ micro USB host cable (together with a standard A to micro A USB cable). - Page 23 CONNECTIONS Insert the micro-USB cable output plug into the micro-USB connector of the WDT60, making sure that the arrow on the plug faces upwards: NOTE...
- Page 24 Standard A to Micro A USB Cable WDT60 Single Slot Dock Power Adapter Micro USB Host Cable WDT60 works with most of the mentioned USB peripherals. Wasp cannot guarantee the interoperability of WDT60 with all devices on the market. NOTE Connection is compliant to USB 1.1 standard.
-
Page 25: Rs232 Connection
CONNECTIONS RS232 CONNECTION You can use a HandyLink™ micro RS232 client cable to directly connect the WDT60 to a host computer to transfer data through the RS232 interface Key: Host computer WDT60 HandyLink™ Micro RS232 Client Cable Insert the HandyLink™ cable output plug into the HandyLink™... - Page 26 WDT60™ The Single Slot Dock can be connected to the Host by means of a standard null modem cable. Once the Host computer has been turned on, insert the WDT60 PDA into the cradle. Key: Host Computer WDT60 Single Slot Dock...
-
Page 27: Wlan Connection
CONNECTIONS WLAN CONNECTION WDT60 802.11 b/g/n radio models can communicate with the host using the on- board Wi-Fi radio and an Access Point connected to the host computer network. For models using the 802.11 b/g/n radio, you can find information about the applet for radio configuration: http://www.summitdata.com/SCU.htm. - Page 28 (microwave ovens, radio transmitters, etc.). NOTE In case of heavy usage the WDT60 may get warm; this is normal and does not mean a malfunction. NOTE...
-
Page 29: Wpan Connections
CONNECTIONS WPAN CONNECTIONS WDT60 Bluetooth® models can communicate with a Bluetooth® device, such as a printer, within a range of 10 m, using the on-board Bluetooth® module. Key: A) WDT60 B) Bluetooth® printer In order to extend battery life, the Bluetooth® module is off by default. - Page 30 During a call, you can set the speaker volume by pressing the volume keys on the side of the WDT60. NOTE In case of heavy usage the WDT60 may get warm; this is normal and does not mean a malfunction. NOTE...
-
Page 31: Wireless And Radio Frequencies Warnings
Use only the supplied or an approved replacement antenna. Unauthorized antennas, modifications or attachments could damage the product and may violate laws and regulations. The antennas inside the WDT60 are not user-accessible and cannot be replaced by end users. Send any faulty equipment to Wasp WARNING Barcode Technologies for repair. - Page 32 WDT60™ RF signals may affect improperly installed or inadequately shielded electronic systems in motor vehicles. Check with the manufacturer or its representative regarding your vehicle. You should also consult the manufacturer of any equipment that has been added to your vehicle.
-
Page 33: Use And Functioning
STARTUP The WDT60 turns on when the battery pack or the external supply is inserted and the ON/OFF Power button is pressed. After the battery pack is installed, use the [ON/OFF] key to turn the PDA on and off. -
Page 34: Using The Stylus
To recalibrate the touch screen use the Screen applet (see par. 4.6.7). Use only original Wasp styluses supplied with the product itself. In harsh applications, use of screen protectors should be taken into consideration, in order to extend the touch screen operating life. -
Page 35: Windows Embedded Handheld Welcome Wizard
USE AND FUNCTIONING WINDOWS EMBEDDED HANDHELD WELCOME WIZARD In Windows Embedded Handheld, at the very first WDT60 startup, following a clean boot or following a Registry restore to default values, the PDA startup (see par. 4.1) is preceded by the Welcome Wizard. -
Page 36: Data Capture
WDT60™ DATA CAPTURE To capture data first of all tap Start > Settings > System > Decoding: To configure and enable data capture parameters refer to par. 4.6.1. -
Page 37: Laser Data Capture
4.3.1 Laser Data Capture To scan barcodes, point the WDT60 laser model onto the code from a distance within the reading range while pressing the SCAN key. The lighted band emitted by the laser must completely cross the barcode as shown in the figure below. -
Page 38: Description Of The Keys
WDT60™ DESCRIPTION OF THE KEYS The WDT60 comes with two different keyboards, an alphanumeric keyboard (QWERTY), having 46 keys, and a numeric keyboard, having a total of 27 keys. 4.4.1 Alphanumeric Keyboard... -
Page 39: Numeric Keyboard
USE AND FUNCTIONING 4.4.2 Numeric Keyboard... - Page 40 It powers the WDT60 ON or OFF. It is placed on the upper left side of the terminal. In blue mode, the Telephone End key generates a VK_ESCAPE virtual key code for applications that use the Esc key to cancel (e.g.
-
Page 41: Resetting The Wdt60
RAM, but the file system is preserved. Registry is restored from persistent memory. A clean boot restores the WDT60 to a clean configuration: both the Registry and the file system return to a clean status that conforms to factory default. - Page 42 WDT60™ Clean Boot To perform a clean boot, do the following steps: Perform a Warm Boot (see Warm Boot) Before the splash screen appears, press and hold down the 0 and Telephone End keys simultaneously: A dialog box will appear asking for confirmation. Press the Enter Key to confirm. If you wish to cancel the clean boot, press Esc by pressing Blue + Telephone End.
-
Page 43: Status Indicators
USE AND FUNCTIONING STATUS INDICATORS 4.5.1 LED Status The WDT60 provides three different LEDs signaling the PDA status. STATUS Scanning LED is ON from the time the Good Read user hits the scan button or side trigger (right side) buttons until the bar code is decoded. -
Page 44: Taskbar
WDT60™ 4.5.2 Taskbar The Taskbar provides information about the time, the battery level, the keyboard function, and the decoding status. Windows Embedded Handheld Taskbar ICONS DESCRIPTION Zooms the screen. Opens the Connections balloon, which includes hypertext links to the Wireless Manager and the Connections applet. (see par. -
Page 45: Settings
USE AND FUNCTIONING SETTINGS From the Start menu, tap Settings. The settings are organized hierarchically. Control panel applets are displayed as icons; each icon corresponds to one applet: Windows Embedded Handheld Control Panel... -
Page 46: Data Capture Configuration
WDT60™ 4.6.1 Data Capture Configuration You can configure the WDT60’s decoding options by tapping Start -> Settings -> System -> Decoding: There are two sections in the Decoding control panel, each containing additional pages. There are seven General Configuration pages and multiple Barcode symbology pages. - Page 47 USE AND FUNCTIONING Notification From the Decoding menu, tap Configure > General > Notification. Use it to set volume, tone, duration, and number of various types of beeps. Good Read From the Decoding Properties applet, tap Configure > General > Good Read. Use it to enable Good Read indications, the use of a vibrator feedback and to set the decoding timeout for decoding labels.
- Page 48 WDT60™ Formatting From the Decoding Properties page, tap Configure > General > Formatting. Use it to configure prefix, suffix and data separator character strings. General Options From the Decoding menu, tap Configure > General > General Options. Select from Label Programming Enable, Symbology IDs, Group Separator Replacement,...
- Page 49 USE AND FUNCTIONING Decoding Options From the Decoding Properties applet, tap Configure > General > Decoding Options. Use it to configure the User ID for symbologies, Redundancy and Aggressive Decoding (if supported by the decoding module). Select a symbology to view or change the available properties settings.
- Page 50 WDT60™ Spot Beam From the Decoding Properties applet, tap Configure > General > Spot Beam. It allows enabling and configuration of Spot Beam and triggering modes. It is only available on devices equipped with laser and advanced long range laser...
- Page 51 When the Clipboard checkbox is checked, the Windows clipboard is used to pass label data, which can be much faster than the keyboard wedge at typing label data from a large label one character at a time. The disadvantage is that label data will replace any data already in the WDT60's clipboard.
- Page 52 WDT60™ 1D Barcode Symbology Pages Use the drop-down menus from Configure > 1D Barcode, or tap the left and right arrow keys to navigate the different pages of the barcode symbology pages. Each barcode symbology opens to its own page, as shown in the figure below. Refer to the sample symbology control panels for examples of the types of fields and options you can modify.
- Page 53 USE AND FUNCTIONING Decoding Settings Select from the Decoding Properties Settings menu to restore previous configurations and/or other available default settings. Choose from: • Factory Defaults • Minimum Settings • Maximum Settings • Save (New Settings) • Revert to Saved Settings The settings are saved when you tap OK.
-
Page 54: Buttons
WDT60™ 4.6.2 Buttons From the Start menu, tap Settings > Personal > Buttons. On the Program Buttons tab, customize the program hardware buttons to launch your most used applications. Under ‘Select a button’, tap the button you want to assign a program to, and then select a program from ‘Assign a program’. -
Page 55: Quick Buttons
USE AND FUNCTIONING 4.6.3 Quick Buttons In Windows Embedded Handheld devices, <F1>-<F10> buttons (excluding F5) are assigned by Windows to default applications. F5 is commonly used by applications to refresh the few, but is not explicitly controlled by default. To disable an assigned function, tap Start > Settings > System > Quick Buttons to display the Quick Buttons window: Select the button you want to disable. - Page 56 WDT60™ To add the button, tap ‘New’ and then press the button you wish to add: To assign a new function to the button, select the desired function and then tap ‘OK’: To restore the old settings, do a clean boot.
-
Page 57: Triggers
USE AND FUNCTIONING 4.6.4 Triggers Triggers are special customizable buttons that are mapped by default by DL Buttons. Also, they can be set as wakeup buttons: DEFAULT CONFIGURATION TRIGGERS Assigned Function Wake-up Scan Bar Code Disabled Bar Code Disabled Right Side Scan Bar Code Disabled Left Side Scan... -
Page 58: Application Switcher
WDT60™ 4.6.5 Application Switcher The application switcher provides the same functionality as the standard Windows® Alt+Tab function. This allows the user to switch between the various open applications. The application switcher can be activated via an assigned shortcut key specified in the “DL Buttons”... -
Page 59: Wireless Communications
USE AND FUNCTIONING 4.6.6 Wireless Communications The Wireless Manager application is a sort of 'Control Panel' for wireless connections. From here it is possible to turn on or off Bluetooth® and radio modules. Open the Wireless Manager by tapping Start > Settings > Connections > Wireless Manager, or by tapping the connectivity icon on the taskbar and then tapping the "Wireless Manager"... - Page 60 WDT60™ Summit Client Utility (SCU) Wireless networking has a customized control, Summit Client Utility (SCU). From the Start menu, tap: Summit > SCU: The SCU will open to the “Main” tab: Summit Client Utility...
- Page 61 USE AND FUNCTIONING To create a new profile, tap the "Profile" tab: Information about the wireless network can be entered directly in the profile tab or by pressing “Scan” when the desired network SSID is in range. At the "Scan" screen, select the desired SSID:...
- Page 62 WDT60™ Tap the "Configure" button Follow the on-screen instructions to configure security parameters for your network. For more detailed settings specific to your installation please contact your wireless network administrator. When finished, tap “Commit” to save your settings. Return to the “Main” tab, if you have not previously selected “Commit” you will be...
- Page 63 USE AND FUNCTIONING At the “Main” tab select the profile you just created. If you used the “scan” button the desired profile will have the same name as the SSID. Use the “Status” tab to check connectivity to the network. More detailed information about the applet for radio configuration can be found at http://www.summitdata.com/Documents/summit_users_guide_3_03.html.
-
Page 64: Stylus Calibration
WDT60™ 4.6.7 Stylus Calibration You might need to recalibrate the touch screen (i.e. when you attempt to select one item with the stylus, another item is erroneously selected). To recalibrate the touch screen, complete the following steps: Select Start > Settings > System > Screen to open the Screen Settings. - Page 65 USE AND FUNCTIONING Startup Stylus Calibration When clean booting the terminal, a Welcome Wizard (with Stylus Calibration) comes up if valid calibration settings are not available.
-
Page 66: Audio Settings
WDT60™ 4.6.8 Audio Settings There are two applets that control volume: Audio and Volume & Sounds. Audio From the Start Menu, tap Settings > System > Audio: The audio control panel can be used to independently set the playback or recording volume for different types of audio inputs and outputs, such as a headset, powered mobile dock, or the internal speakers and microphone. - Page 67 USE AND FUNCTIONING Sounds & Notifications From the Start Menu, tap Settings > Sounds & Notifications: The Sounds & Notifications applet configures audio features of all speakers and headphones: Sounds Tab Notifications Tab...
- Page 68 WDT60™ You can also set the volume of a paired Bluetooth®headset. Tap: Start > Settings > System > Bluetooth Manager, select the Connections tab and then select the headset pairing in the Paired Devices list. The following window will appear:...
-
Page 69: Connecting To Other Computers
USE AND FUNCTIONING CONNECTING TO OTHER COMPUTERS To connect the WDT60 to another device (i.e. Host PC) which run Windows, several programs are available. These programs require specific electrical connections in order to function properly. 4.7.1 Windows Mobile® Device Center The desktop application Windows Mobile®... -
Page 70: Bluetooth® Manager Device Setup
Search for available Bluetooth® devices by tapping the button for the type of device you want (Printer, Serial or All) or tap the Discovery tab and then tap the Discover button to skip this step. The WDT60 will search for Bluetooth® devices within range. - Page 71 USE AND FUNCTIONING Once searching is complete, Bluetooth® devices will be displayed in the Discovery tab. You can set up a connection to a device in the list by selecting the device and then tapping the 'Connect' button: To create a pairing: Select a service: Configure any encryption, authentication, or virtual port options required by the service selected.
- Page 72 WDT60™ Icon Service Dialup Networking Printer Object Push (OPP) or Object Exchange (OBEX) ActiveSync Human Interface Device (HID) - Keyboard Serial Personal Area Network (PAN) Modem Headset Handsfree Virtual Port allows you to specify the incoming port, which is used to communicate serially with an incoming device just as if it were a physical COM port.
- Page 73 USE AND FUNCTIONING You can also select Encrypt or Authenticate from the Bluetooth® control panel to apply or modify those settings. To require Authentication, check the checkbox, then tap OK. If required, the Authentication Request dialog will then open, requesting that you enter a PIN.
- Page 74 WDT60™ The dialog will also appear when an Authentication request is received from another device. Once you have set up a Pairing, you can view the settings by double-tapping its name in the Connections tab. Tap the arrow to change the Virtual Port, or Delete to remove the device pairing.
- Page 75 USE AND FUNCTIONING Using your device to connect to the WDT60 Before turning on Bluetooth® ensure that the two devices are within close range and that both Bluetooth-enabled devices are discoverable. Tap Start > Settings > System > Bluetooth Manager to open the Bluetooth®...
- Page 76 (i.e. a scanner) to the WDT60, use Port control to select a virtual COM port to use for the connection. Tap ‘Find Me’ if you want to make the WDT60 visible to other Bluetooth® devices for 60 seconds, allowing them to set up a connection.
- Page 77 USE AND FUNCTIONING By default, Bluetooth® is turned off. If you turn it on, and then turn off your device, Bluetooth® also turns off. When you turn on your device again, Bluetooth® turns on automatically. NOTE...
-
Page 78: Wasp Desktop Utility
WDT60™ WASP DESKTOP UTILITY ® Wasp Desktop Utility (WDU) allows administrators to configure Windows CE and Embedded Handheld devices to control individual user access. This includes the ability to: • Prevent users from changing your device OS settings. • Use the Application Selector to replace the desktop with a selection of authorized applications. -
Page 79: Administrative Options (Admin Tab)
4.8.1 Administrative Options (Admin tab) When you open the WDU control panel, the “Admin” tab appears. COMMAND DESCRIPTION Enable Wasp Desktop Select/tap this checkbox to activate the WDU functions such as Windows Access Restrictions and Application Selector. Enter Password Enter a password in the text box. This allows the user to specify a password when this utility is launched. -
Page 80: Setting A Password
You must select/tap “Set Password” prior to exiting WDU in order to store and activate your new password. It is not necessary to select “Enable Wasp Desktop”. NOTE If you select/tap “Set Defaults” it will remove all custom settings and restore all the factory default settings, except a previously set password. - Page 81 Delete the contents of in both “Password” fields. Select/tap “Set Password”. Password Request Dialog Box Once the password is set, the next time you open the “Wasp Desktop Utility”, the WDU Password dialog box opens. This dialog box will only open if a password was defined.
-
Page 82: Locked Web Browser Options (Lockedweb Tab)
WDT60™ 4.8.2 Locked Web Browser Options (LockedWeb tab) Tap the LockedWeb tab to access the Locked Web Browser Configuration. Locked Web Browser is disabled by default. To enable, go to “Advanced settings” on the next page for more information. NOTE For additional information about Locked Web Browser commands and metatags, see section 4.10, “Locked Web Browser”. - Page 83 USE AND FUNCTIONING Error Redirection options Error Type The “Error Type” pull-down list displays available Error Types: (400) Invalid Syntax, (403) Request Forbidden, (404) Object Not Found, (406) No Response Format, (410) Page Doesn't Exist, (500) Internal Server Error, (501) Server Can't Do That, Generic Error, Network Disconnected Error Page Edit this textbox to associate a website or html file with the specified...
-
Page 84: Advanced Settings
WDT60™ Advanced settings General Tab Context Menu... - Page 85 USE AND FUNCTIONING Advanced Locked Web Browser options General Enable Locked When checked, enables the Locked Web Browser when Internet Web Browser Explorer is launched. Disable Cache Prevents the browser from loading the local intranet page from cache instead of navigating to the “Network Disconnected” error redirection page.
- Page 86 WDT60™ Context Menu Enable Context Enables the context menu accessed by a touch screen press in Menu the Locked Web Browser. Refresh Adds a “Refresh” item to the Locked Web Browser context menu. Selecting the “Refresh” item refreshes the web page.
-
Page 87: Status Icons Options (Status Tab)
USE AND FUNCTIONING 4.8.3 Status Icons Options (Status Tab) Tap the “Status” tab to access the Status Icons option. You can configure the view of some status icons that are used in “WebAppLock” and in “Application Selector” to display the status of: wi-fi radio and battery. Status Icons Options Set Status Icon Defaults Restores the status icons’... -
Page 88: Windows Controls
WDT60™ Windows Controls 4.8.4 Select/tap the “Win” (Windows Controls) tab to access the Windows Controls option. Use Windows controls to allow or restrict access to Windows system functions. You can disable normal Windows functions such as the taskbar, leaving nothing but a blank workspace. - Page 89 USE AND FUNCTIONING Windows Controls Select/tap “Taskbar Enabled” to specify whether the Taskbar Enabled taskbar is accessible. Enables the AutoSIP Windows feature. AutoSIP Enabled This control only take effects in WebAppLock. Scroll Bars Enabled When checked, displays horizontal and vertical scroll bars to help view large web pages which do not fit the screen.
-
Page 90: Appselector Options (Appselect Tab)
WDT60™ 4.8.5 AppSelector Options (AppSelect tab) Tap the Application Selector (“AppSelect” Tab) to edit, add, or delete applications for the application selector. Application Selector Options Enable Application Selector Select/tap “Enable Application Selector” enable/disable application selector. When enabled, the Application Selector replaces the... - Page 91 USE AND FUNCTIONING Application Selector Commands Select/tap “New” to create a new application entry. Edit Select/tap “Edit” to edit the selected entry. Select/tap “Del” to delete the selected entry. Select/tap “Up/Down” to move an entry up or down in Up/Down the Authorized Applications list.
- Page 92 WDT60™ Add Applications The “Add Application” dialog opens when you tap either “New” or “Edit”. From the “Add Application” dialog the administrator can configure and/or add/change a new application entry in the list. Applications with the “Run Application at Startup” option enabled will start automatically when the Application Selector starts up.
- Page 93 USE AND FUNCTIONING COMMAND DESCRIPTION Displays the path/link to the desired icon file. Icon File Select/tap to browse for the desired icon file. The Browse results of this search are placed in the “Icon File” textbox. Select/tap this box to force this application to auto start when the Application Selector starts up.
-
Page 94: Appselector (Application Selector)
Additionally, the page template can be modified to display a different background. Contact your Wasp representative for more information on this feature. To exit from Application Selector, press ALT + 6, uncheck the ‘Enable Application... -
Page 95: 4.10 Locked Web Browser
USE AND FUNCTIONING 4.10 LOCKED WEB BROWSER The Locked Web Browser is a web browser helper object for Internet Explorer. It allows an administrator to define a restricted internet usage environment. Once in the restricted environment, a password is required to exit. This means users can only access web applications and websites set by the administrator. - Page 96 WDT60™ For firmware versions 1.60 and newer, the following command line arguments are supported: /E optional parameter which allows for Exit without entering a password @URL optional parameter which specifies a URL to use as a home page. /C optional parameter which disables the ctrl keys (including the one to exit).
-
Page 97: Locked Web Browser Special Meta-Tags
</head> tag set. Also, the head tag set must be complete within the first 15K of the web page. The Wasp Locked Web Browser defines some special metatags that allow the web application to interact with the device: In particular, the special metatags allow it to:... - Page 98 WDT60™ GetSerialNumber Metatag DL_GetSerialNumber – Obtains the device serial number and sends it as an argument to a customer’s javascript function. Content – name of function to pass serial number to. Example: <meta http-equiv="DL_GetSerialNumber" content="Javascript:CustomerFunction"> When a page with this metatag is loaded, the content should be a javascript function that receives one parameter, the serial number.
- Page 99 USE AND FUNCTIONING Decoding Metatags: Each decoding metatag has a possible content of “Enable” or “Disable”. The settings are valid for the entire page (enables/disables each symbology). DL_Code_39 DL_Code_128 DL_Code_I25 DL_Code_S25 DL_Code_M25 DL_Code_CODABAR DL_Code_93 DL_Code_UPCA DL_Code_UPCE DL_Code_EAN13 DL_Code_EAN8 DL_Code_MSI DL_Code_MSR DL_Code_GS1_14 DL_Code_GS1_LIMIT DL_Code_GS1_EXP...
- Page 100 WDT60™ Key press Metatags The key press metatags can be used to call JavaScript functions. They have the name structure: “DL_Key_xxx” where xxx is the VKey code. Example: <meta http-equiv="DL_Key_13" content="Javascript:CheckEnter();"> Assigning a key press via a DL_Key metatag overrides its use on the page. For instance, when entering data in a text box a character assigned as a DL_Key would not be entered in the text box.
-
Page 101: 4.11 Autostart
Allows you to create a list of applications (with optional command line arguments) to run automatically after loading CAB files. AutoStart launches each time the WDT60 is rebooted executing each line with the specified command line arguments. It will take into account any AutoStart options at the beginning of the line. -
Page 102: How Autostart Uses Wceload
WDT60™ 4.11.2 How AutoStart Uses Wceload If you intend to create highly interactive installers, you should either install the CABs manually or review the section on “Interactive CAB Install” in this chapter.. NOTE In certain environments, CAB files will be deleted after execution. -
Page 103: Interactive Cab Install
NOTE identical to that of Autostart.ini..” Autostart.ini is a text file that AutoStart will run upon startup of the WDT60, and after any CAB files are installed. This file should be placed in the \root folder. AutoStart will run the Autostart.ini file on each reboot of the device. - Page 104 WDT60™ The following table breaks down the sample Autostart.ini line: Autostart option(s) Full path to executable Command line arguments \windows\pword.exe \file.doc Spaces must be placed between each component of the line in the Autostart.ini. If the executable path is in a folder that contains spaces in the name, quotes are required to distinguish what the actual executable name is.
- Page 105 USE AND FUNCTIONING AutoStart Options The table below shows options you can use when writing a line in the Autostart.ini file. Description Character Comments This may only be used as the first character of the line. If the Comment: This line will not be ‘#’...
- Page 106 WDT60™ Combining Options Autostart options can be combined together as shown in the following sample: ?- \Windows\Pword.exe This line would: − Request confirmation before executing the line. The next line would not be processed before the confirmation is answered. −...
- Page 107 USE AND FUNCTIONING The fields may be broken up into multiple lines (as shown in the example) due to limited space in the dialog. NOTE AutoStart Query Options Parentheses are used to surround the given field and make it very clear what the value of the field is.
- Page 108 WDT60™ Autostart.ini Samples The next table is a collection of sample Autostart.ini lines: Line Description This will confirm execution ? \windows\wceload.exe “\My \Windows\wceload.exe with specified argument Documents\Sample.cab” “\My Documents\Sample.cab” (invalid) This will execute \Program with the \Program Files\App.exe argument Files\App.exe.
-
Page 109: Technical Features
ESD PROTECTION 4 KV contact discharge, 8 KV air discharge In order to achieve the maximum charging rate the WDT60 should be charged between 0-40 °C. Never charge the main device or spare batteries in a closed space where excessive heat can build up. - Page 110 Micro-USB power adapter requirements: IDCP min=1,8A POWER SUPPLY* VCHG min=4,75V VCHG max=5,25V RDCP_DAT max=200 ohm LPS source according to EN 60950:2006+A1+A11+A12 IEC 60950:2005+A1:2009 Wasp Barcode Technologies recommends the use of approved adapters to keep all regulatory requirements and to guarantee the best performances...
- Page 111 TECHNICAL FEATURES COMMUNICATIONS Micro-USB connector: USB 1.1 Client and USB 1.1 Host HandyLink™ connector: integrated RS-232 up to INTERFACES 115.2 Kbps, USB 1.1 Client, USB 1.1 Host Ethernet: via single dock (external module) or multiple cradle Summit IEEE 802.11 b/g/n Cisco CCX v4 certified LOCAL AREA NETWORK (LAN) Frequency range: Country dependent, typically...
- Page 112 WDT60™ READING OPTIONS LASER CHARACTERISTICS SCANNING RATE 104 ± 12 scan/sec OPTICAL RESOLUTION 0.10 mm / 4 mils DEPTH OF FIELD See reading diagram (par. 5.2) SKEW ANGLE ± 50° PITCH ANGLE ± 65° AIMING LASER VLD, wavelength 630~670 nm...
-
Page 113: Reading Diagrams
TECHNICAL FEATURES READING DIAGRAMS WDT60 SE950-DL Symbol Density/ Far 47° Guaranted Bar Code Type/ Working Ranges W-N Ratio 4.0 mil 2,6 in Code 39; 6,63 cm 2.5:1 5.0 mil 4,9 in Code 39; 12,47 cm 2.5:1 7.5 mil 8,9 in Code 39;... -
Page 114: Test Codes
WDT60™ TEST CODES High Density Codes 0.25 mm (10 mils) !17162H! Code 39 17162 Ë"8NduÌ 2/5 Interleaved 0123456784 ÌtestwÎ Code 128 test x(0B2DE5*KKKKLM( EAN 13 (6450*TRMN( EAN 8... - Page 115 TEST CODES Medium Density Codes 0.38 mm (15 mils) !17162H! Code 39 17162 Ë"8NduÌ Interleaved 2/5 0123456784 ÌtestwÎ Code 128 test 100% x(0B2DE5*KKKKLM( EAN 13 100% (6450*TRMN( EAN 8...
- Page 116 WDT60™ Low Density Codes 0.50 mm (20 mils) !17162H! Code 39 17162 Ë"8NduÌ Interleaved 2/5 0123456784 ÌtestwÎ Code 128 test 120% x(0B2DE5*KKKKLM( EAN 13 120% (6450*TRMN( EAN 8...
- Page 117 TEST CODES 2D Codes Datamatrix ECC200 Example Inverse Datamatrix ECC200 Example...
-
Page 118: Safety Regulations
Use only the components supplied by the manufacturer for the specific WDT60 being used. − Do not attempt to disassemble the WDT60 PDA, as it does not contain parts that can be repaired by the user. Any tampering will invalidate the warranty. −... -
Page 119: Laser Safety
LASER SAFETY The laser light is visible to the human eye and is emitted from the window indicated in the figure. This information applies to both laser models and the WDT60 Imager Aiming System. Laser output window... - Page 120 Die Laserstrahlung ist für Le rayon laser est visible La luce laser è visibile La luz láser es visible al das menschliche Auge à l'oeil nu et il est émis all'occhio umano e viene ojo humano y es emitida sichtbar und wird am par la fenêtre désignée emessa dalla finestra por la ventana indicada...
- Page 121 ENGLISH The following information is provided to comply with the rules imposed by international authorities and refers to the correct use of your PDA. STANDARD LASER SAFETY REGULATIONS This product conforms to the applicable requirements of both CDRH 21 CFR 1040 Subchapter J and IEC 60825-1:2007 at the date of manufacture.
- Page 122 Non tentare di accedere allo scomparto contenete i componenti ottici o di farne la manutenzione. L’apertura dello scomparto, o la manutenzione di qualsiasi parte ATTENZIONE ottica da parte di personale non autorizzato, potrebbe violare le norme della sicurezza. Il sistema ottico può essere riparato solamente alla fabbrica.
- Page 123 Unter keinen Umständen darf versucht werden, die Komponenten im Optikhohlraum zu öffnen oder auf irgendwelche andere Weise zu warten. Öffnen bzw. Warten Komponenten Optikhohlraum durch unbefugtes Personal verstößt gegen die ACHTUNG Laser-Sicherheitsbestimmungen. Optiksystem darf werkseitig repariert werden. Jegliche Änderungen am Gerät sowie Vorgehensweisen, die nicht in dieser Betriebsanleitung beschrieben...
- Page 124 L'utilisation de procédures ou réglages différents de ceux donnés ici peut entraîner une dangereuse exposition à lumière laser visible. ATTENTION Le produit utilise une diode laser. Aucun dommage aux yeux humains n’a été constaté à la suite d’une exposition au rayon laser. Eviter de regarder fixement le rayon, comme toute autre source lumineuse intense telle que le soleil.
-
Page 125: Led Class
LED illuminators integrated in the WDT60 models with SE-4500 imager engine are compliant with exempt risk group requirements according to IEC62471:2006 and EN62471:2008. Flash LED integrated in the WDT60 models with camera is blue light hazard risk group 1 according to IEC62471:2006 and EN62471:2008. -
Page 126: Radio Compliance
The Radio modules used in this product automatically adapt to the frequencies set by the system and do not require any parameter settings. The TYPE field shows the correspondence between WDT60 types and radio modules: TYPE: 0BCDEE-FGH-IJJK-LMMMM C: “0”... - Page 127 Information for the User ENGLISH Contact the competent authority responsible for the management of radio frequency devices of your country to verify any possible restrictions or licenses required. Refer site http://ec.europa.eu/enterprise/sectors/rtte/documents/contacts- points/spectr/ for further information. ITALIANO Contatta l'autorità competente per la gestione degli apparati a radio frequenza del tuo paese, per verificare eventuali restrizioni o licenze.
-
Page 128: Fcc Compliance
FCC COMPLIANCE FCC Regulations • This device complies with part 15 of the FCC Rules. Operation is subject to the following two conditions: (1) This device may not cause harmful interference, and (2) this device must accept any interference received, including interference that may cause undesired operation. -
Page 129: Rf Exposure Information (Sar)
RF EXPOSURE INFORMATION (SAR) This model device meets the government’s requirements for exposure to radio waves. This device is designed and manufactured not to exceed the emission limits for exposure to radio frequency (RF) energy set by the Federal Communications Commission of the U.S. -
Page 130: Industry Canada Compliance
INDUSTRY CANADA COMPLIANCE Operation is subject to the following two conditions: (1) this device may not cause interference, and (2) this device must accept any interference, including interference that may cause undesired operation of the device. This Class B digital apparatus complies with Canadian ICES-003. Cet appareil numérique de la classe B est conforme à... -
Page 131: Sar Compliance
SAR COMPLIANCE For the used worst case positions, the portable device WDT60 from Wasp Barcode Technologies (FCC ID: C530060WDT60) is in compliance with the IC RSS 102 Issue 4 [RSS 102] and Federal Communications Commission (FCC) Guidelines [OET 65] for uncontrolled exposure. SAR assessment in body worn was conducted with a distance of 15 mm between the housing of the handheld and the flat phantom. -
Page 132: Weee Compliance
WEEE COMPLIANCE Informazione degli utenti ai sensi della Direttiva Europea 2002/96/EC L’apparecchiatura che riporta il simbolo del bidone barrato deve essere smaltita, alla fine della sua vita utile, separatamente dai rifiuti urbani. Smaltire l’apparecchiatura in conformità alla presente Direttiva consente di: ... - Page 133 Information aux utilisateurs concernant la Directive Européenne 2002/96/EC Au terme de sa vie utile, le produit qui porte le symbole d'un caisson à ordures barré ne doit pas être éliminé avec les déchets urbains. Éliminer ce produit selon cette Directive permet de: ...
-
Page 134: Glossary
GLOSSARY Access Point A device that provides transparent access between Ethernet wired networks and IEEE 802.11 interoperable radio-equipped mobile units. Hand-held mobile computers, PDAs or other devices equipped with radio cards, communicate with wired networks using Access Points (AP). The mobile unit (PDA) may roam among the APs in the same subnet while maintaining a continuous, seamless connection to the wired network. - Page 135 Decode To recognize a bar code symbology (e.g., Codabar, Code 128, Code 3 of 9, UPC/EAN, etc.) and convert the content of the bar code scanned from a visual pattern into electronic data. Depth of Field (DOF) The portion of a scene that appears acceptably sharp in the image. Although a lens can precisely focus at only one distance, the decrease in sharpness is gradual on each side of the focused distance, so that within the DOF, the unsharpness is imperceptible under normal viewing conditions.
- Page 136 Liquid Crystal Display (LCD) A display that uses liquid crystal sealed between two glass plates. The crystals are excited by precise electrical charges, causing them to reflect light outside according to their bias. They use little electricity and react relatively quickly. They require external light to reflect their information to the user.
- Page 137 Universal Serial Bus. Type of serial bus that allows peripheral devices (disks, modems, printers, digitizers, data gloves, etc.) to be easily connected to a computer. A “plug-and-play” interface, it allows a device to be added without an adapter card and without rebooting the computer (the latter is known as hot-plugging). The USB standard, developed by several major computer and telecommunications companies, supports data-transfer speeds up to 12 megabits per second, multiple data streams, and up to 127 peripherals.
-
Page 138: Index
USB Connection; 12 Reading Diagrams; 105 WLAN Connection; 19 References; v WPAN Connections; 21 Replacing the Batteries; 8 Resetting the WDT60; 33 RF Exposure Information (SAR); 121 Data Capture; 28 Laser Data Capture; 29 Data Capture Configuration; 38 Safety Regulations; 110 Wasp Desktop Utility;... - Page 139 WEEE Compliance; 124 Windows Embedded Handheld Using the Stylus; 26 Welcome Wizard; 27 Windows Mobile® Device Center; 61 Wireless and Radio Frequencies Warnings; 23 WDT60 Description; 1 Wireless Communication; 51...
-
Page 140: Declaration Of Conformity
DECLARATION OF CONFORMITY Wasp Barcode Technologies 1400 10th street, Plano TX, 75074 •USA dichiara che declares that the déclare que le bescheinigt ,daß das Gerät declare que el WDT60 modelli con funzionalità radio 802.11a/b/g+BT models with 802.11a/b/g+BT radio feature modèles avec 802.11a/b/g+BT radio intégrés modelle mit 802.11a/b/g+BT radio-funktionalität... - Page 141 ETSI EN 300 328 1.7.1 : 2006 LECTROMAGNETIC COMPATIBILITY AND ADIO SPECTRUM ATTERS (ERM); W IDEBAND TRANSMISSION SYSTEMS ATA TRANSMISSION 2,4GH EQUIPMENT OPERATING IN THE BAND AND USING WIDE BAND MODULATION TECHNIQUES ARMONIZED COVERING R&TTE ESSENTIAL REQUIREMENTS UNDER ARTICLE OF THE IRECTIVE EN 60950-1:2006 INFORMATION TECHNOLOGY EQUIPMENT...
- Page 142 © 2014 Wasp Barcode Technologies. All rights reserved. Logo of Wasp and Wasp ‘bug’ are registered trademarks. Wasp Barcode Technologies S.r.l. 1400 10th Street Plano, TX 75074 Telephone: 866-547-9277 Fax: 214-547-4101 06/14...
Need help?
Do you have a question about the wdt60 and is the answer not in the manual?
Questions and answers