Table of Contents
Advertisement
®
KOBALT
and the K Design
trademarks of LF, LLC. All Rights Reserved.
ATTACH YOUR RECEIPT HERE
Serial Number
Questions, problems, missing parts? Before returning to your retailer,
please call our customer service department at 1-888-3KOBALT,
8:00 a.m. – 8:00 p.m. EST, Monday – Friday.
AB14953
are registered
®
6 IN. PALM SANDER
Purchase Date
1
ITEM #0078914
VAC/NON-VAC
MODEL #SGY-AIR142TZ
Français p. 17
Español p. 33
Advertisement
Table of Contents

Related Manuals for Kobalt SGY-AIR142TZ


Summary of Contents for Kobalt SGY-AIR142TZ
-
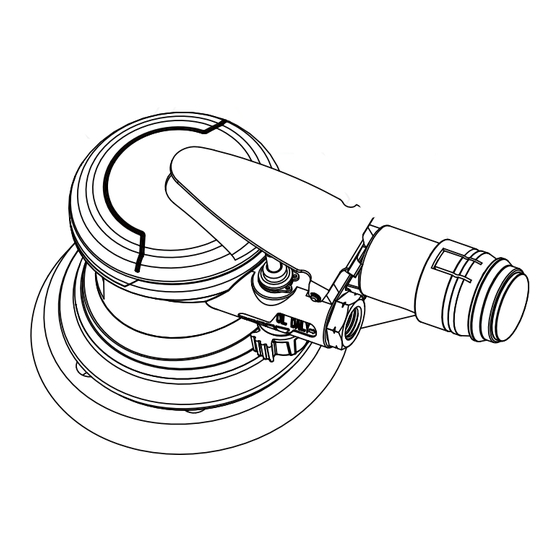
Page 1: E X P O L D E D V E I . W
ITEM #0078914 6 IN. PALM SANDER VAC/NON-VAC MODEL #SGY-AIR142TZ Français p. 17 Español p. 33 ® KOBALT and the K Design are registered ® trademarks of LF, LLC. All Rights Reserved. ATTACH YOUR RECEIPT HERE Serial Number Purchase Date Questions, problems, missing parts? Before returning to your retailer, please call our customer service department at 1-888-3KOBALT, 8:00 a.m. -
Page 2: Table Of Contents
TABLE OF CONTENTS Compressor Requirements .................. 2 Product Specifications ..................3 Safety Information ....................3 ...... -
Page 3: Product Specifications
PRODUCT SPECIFICATIONS COMPONENT SPECIFICATIONS SANDING PAD 6 IN. FREE SPEED 10,000 RPM +/- 10% AVERAGE AIR CONSUMPTION 6.4 CFM AIR INLET 1/4 IN. NPT AIR HOSE 3/8 IN. WORKING PRESSURE 90 PSI SAFETY INFORMATION Please read and understand this entire manual before attempting to assemble, operate or maintain this product. - Page 4 SAFETY INFORMATION WA R N I N G RISK OF EYE OR HEAD INJURY WHAT COULD HAPPEN HOW TO PREVENT IT This air-powered tool is capable of Always wear ANSI approved Z87.1 propelling materials such as fasteners, safety glasses with side shields. Never leave a pressurized tool metal chips, sawdust and other debris unattended.
- Page 5 SA FETY INFORMATION WA R N I N G RISK OF FIRE OR EXPLOSION WHAT COULD HAPPEN HOW TO PREVENT IT Continued from previous page. Never use oxygen, carbon dioxide or other bottled gasses as a power source for air tools. Use only clean, dry air at the specified pressure.
- Page 6 SAFETY INFORMATION WA R N I N G RISK OF ELECTRIC SHOCK WHAT COULD HAPPEN HOW TO PREVENT IT Never use air tools where they may This tool is NOT electrically insulated. come in contact with energized electrical Contact with a “live” wire will also make wiring.
- Page 7 SAFETY INFORMATION WA R N I N G RISK OF PERSONAL INJURY WHAT COULD HAPPEN HOW TO PREVENT IT Wrenches and adjusting keys that are Always remove and secure adjusting left attached to a rotating part of the tool keys and wrenches before operating may fly off and increase the risk of the tool.
- Page 8 SA FETY INFORMATION WA R N I N G RISK OF PERSONAL INJURY WHAT COULD HAPPEN HOW TO PREVENT IT Continued from previous page. Keep proper footing at all times when handling tools. Slipping, tripping and/or falling are major causes of serious injury and or death.
- Page 9 SA FETY INFORMATION WA R N I N G RISK OF PERSONAL INJURY WHAT COULD HAPPEN HOW TO PREVENT IT Continued from previous page. Always follow assembly, operation, maintenance and repair instructions. Maintain the tool and accessories with Improperly maintained tools and care.
-
Page 10: A E M B N S
PACKAGE CONTENTS PART DESCRIPTION QUANTITY 6 in. Palm Sander Sanding Pad Crank Shaft Air Regulator Knob Trigger Air Inlet Vacuum Adapter Revolving Tube Attachment Protective Cap HARDWARE CONTENTS Wrench PREPARATION Before assembling this tool, make sure all parts are present. Compare parts with package contents list and hardware contents list. -
Page 11: Assembly Instructions
ASSEMBLY INSTRUCTIONS To remove palm sander from packaging, slip the large end of the wrench (AA) between the sander and sanding pad and secure the crank shaft as shown in Fig. 3. Using the wrench to hold the crank shaft so it can’t spin, turn the sanding pad counterclockwise. - Page 12 ASSEMBLY INSTRUCTIONS 4. Mount sandpaper (not provided) onto the sanding pad following the appropriate instructions. WA R N I N G Use only sandpaper with an RPM rating equal to or greater than the tool itself. Always make sure all attachments are properly mounted and secure before using the tool.
-
Page 13: Operating Instructions
OPERATING INSTRUCTIONS 1. The palm sander includes a regulator to adjust the tool speed. Tool speed is adjusted by the air regulator knob (D) rolling the knob backwards (faster) or forwards (slower) as shown in Fig. 2. Minimum tool speed is indicated when the knob indicator is fully forward. -
Page 14: Care And Maintenance
CARE AND MAINTENANCE ALWAYS DISCONNECT TOOL FROM THE AIR SUPPLY BEFORE PERFORMING ANY MAINTENANCE ON THE TOOL. Always make sure the tool is properly lubricated during operation. Proper lubrication is shown in this instruction manual. An in-line oiler (not included) is recommended to help increase tool life and keep the tool properly lubricated. -
Page 15: Troubleshooting
TROUBLESHOOTING If the tool runs slowly or will not operate, check these possible problems and take the required corrective action: POSSIBLE PROBLEM SOLUTION Grit or gum in tool. Flush the tool with air-tool oil or gum solvent. No oil in tool. Lubricate the tool. - Page 16 Rotor blade Trigger lever Rotor Rear plate Vacuum adapter Bearin Outlet bushing Washer Revolving Tube Attachment Screw Cover Set Ring Wrench Printed in China ® ® KOBALT and the K Design are registered trademarks of LF, LLC. All Rights Reserved.
Need help?
Do you have a question about the SGY-AIR142TZ and is the answer not in the manual?
Questions and answers