Table of Contents
Advertisement
Electric
Fireplace
Model
DEF36S2
Installation Instructions & Homeowner's Manual
WARNING! IF THE INFORMATION IN THIS MANUAL IS NOT FOLLOWED EXACTLY, AN
ELECTRICAL SHOCK OR FIRE MAY RESULT CAUSING PROPERTY DAMAGE,
PERSONAL INJURY OR LOSS OF LIFE.
FOR YOUR SAFETY
DO NOT STORE OR USE GASOLINE OR OTHER
FLAMMABLE VAPOURS OR LIQUIDS IN THE VICINITY
C
US
OF THIS OR ANY OTHER APPLIANCE.
™
The Vermont Castings
Majestic Products Company
410 Admiral Blvd. • Mississauga, Ontario • Canada L5T 2N6 • 905-670-7777
www.vermontcastings.com • www.majesticproducts.com
INSTALLER: DO NOT DISCARD THIS MANUAL - LEAVE FOR HOMEOWNER
10003581
07/01 Rev. 0
- 1 -
Advertisement
Table of Contents

Related Manuals for Vermont Castings DEF36S2


Summary of Contents for Vermont Castings DEF36S2
-
Page 1: For Your Safety
DO NOT STORE OR USE GASOLINE OR OTHER FLAMMABLE VAPOURS OR LIQUIDS IN THE VICINITY OF THIS OR ANY OTHER APPLIANCE. ™ The Vermont Castings Majestic Products Company 410 Admiral Blvd. • Mississauga, Ontario • Canada L5T 2N6 • 905-670-7777 www.vermontcastings.com • www.majesticproducts.com... -
Page 2: Table Of Contents
Please read the Installation & Operating Instructions before using this appliance. Thank you and congratulations on your purchase of a Vermont Castings Majestic Products Company fireplace. IMPORTANT: Read all instructions and warnings carefully before starting installation. Failure to follow these instructions may result in a possible electric shock, fire hazard and/or injury and will void the warranty. -
Page 3: Installation Instructions
INSTALLATION INSTRUCTIONS GENERAL 1 . Read all instructions before using this appliance. 15. To prevent a possible fire, do not block air intakes or exhaust in any manner. Do not use on soft surfaces, 2. This appliance is hot when in use. To avoid burns, do like a bed, where openings may become blocked. -
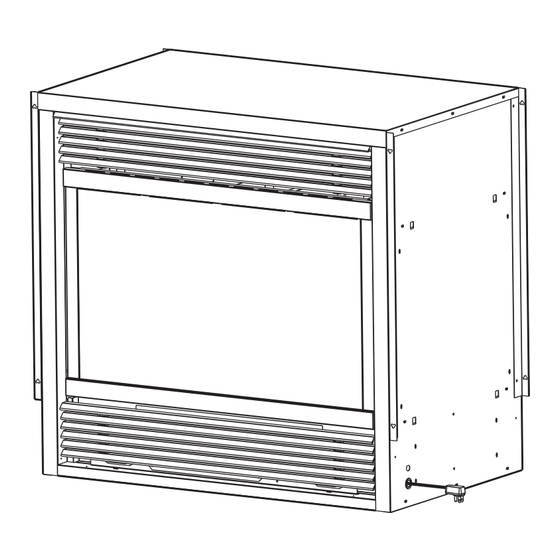
Page 4: Fireplace Dimensions
FIREPLACE DIMENSIONS FRAMING & FINISHING MODEL DEF 36S2 36" 914mm 1/4" 870mm 22" 559mm 33" 838mm 21" 533mm 3" 76mm FRAMING & FINISHING 1/2" 876mm 1/2" 927mm ELECTRICAL SPECIFICATIONS Voltage: 120VAC, 60Hz Total Amps: 14 Amps Total Watts: 1680 Watts Heater Rating: 1300 Watts Fig. -
Page 5: Mantels
CLEARANCE TO COMBUSTIBLES MANTELS Sides ..0 mm/0 inches Depending on the width of the mantel it may be installed Sides ..0mm/0 inches higher or lower from the top of the louvre opening. See Floor ..0 mm/0 inches drawing and chart below for proper installation height of Top .. -
Page 6: Final Finishing
If an extension cord must be used, B102 it must be a minimum 16AWG, three wire with grounding DEF36S2 type plug and connector and rated not less than 2025 Watts. A new electrical outlet can be installed inside the frame construction, if permitted by local codes. -
Page 7: Service Instructions
SERVICE INSTRUCTIONS GLASS INFORMATION Disconnect power before attempting any maintenance or cleaning to reduce the risk of fire, electrical shock or personal injury. 1. Under no circumstances should this product be operated with missing or broken glass. 2. Do not strike or slam the glass. LOUVRE REMOVAL 3. -
Page 8: Maintenance Of Motors
MAINTENANCE OF MOTORS CLEANING BRASS TRIM The motors used on the fan and the drum assembly are Clean the brass trim using a soft cloth, slightly dampened prelubricated for extended bearing life and require no with lemon oil and buff with a clean soft cloth. Do NOT use brass polish or household cleaners as these products will further lubrication. -
Page 9: Operating Instructions
OPERATING INSTRUCTIONS The control compartment is located behind the lower louvre HEATER CONTROL panel, or access panel radiant. To access the controls, simply flip down the lower louvre panel, or remove access panel radiant by lifting up and pulling out. To locate the The Heater Control acts to turn the heater on and off as well position of each control described below, refer to Fig. -
Page 10: Replacement Parts Pictorial
REPLACEMENT PARTS - ELECTRIC FIREPLACE 4 / 5 216mm [8 1/2"] (DISTANCE BETWEEN TWO SOCKETS) 305mm [12"] 216mm [8 1/2"] (DISTANCE BETWEEN TWO SOCKETS} COMPLETE LOG SET DEF36S2 - 10 -... -
Page 11: Replacement Parts List
REPLACEMENT PARTS LIST - ELECTRIC FIREPLACE ESCRIPTION DEF36S2 Log Set Complete 10003647 Log Top Left B103 Log Top Right B104 Log Bottom B102 Fan/Heater Assembly w/bracket 10001815 Motor 12VDC - Flame genertor 10001978 Switch Rocker 53606 On/Off Switch (Illuminated) 10001393... -
Page 12: Options
Wide Trim Kit - Polished Brass DV36TKWP (Fittng instructions included in kit) Bay Window Trim Kit - Polished Brass DV36BTKP (Fitting instructions included in kit) Ceramic Refractory Kit DEF36S2 (see below for fitting instructions) CERAMIC REFRACTORY INSTALLATION Side Side CR OPTIONAL FOR DEF36S2 1. -
Page 13: Bay Window Installation
BAY WINDOW INSTALLATION REMOVE ALL PLASTIC FROM BRASS TRIMS. DO NOT REMOVE EXISTING FRAME WINDOW ASSEMBLY. 1. Remove existing bottom louvre and hinges from fireplace. (Set aside the four (4) screws). If the fireplace has been installed with louvres. 2. Remove existing top louvre from fireplace by lifting up and pulling out. (If the fireplace has been installes with louvres). 3. -
Page 14: Fan Heater Installation
FAN HEATER INSTALLATION INSTALLATION WARNING: UNPLUG OR TURN THE POWER TO THE APPLIANCE OFF PRIOR TO BEGINNING THE INSTALLATION. IT IS NOT ACCEPTABLE TO USE THE “ON/OFF” SWITCH TO MEET THIS REQUIREMENT. 1. Turn the power to the appliance off, or unplug it from the power supply. 2.
Need help?
Do you have a question about the DEF36S2 and is the answer not in the manual?
Questions and answers
Can I buy a replacement remote for my fireplace?