Table of Contents
Advertisement
Available languages
Available languages
Quick Links
BEDIENUNGSANLEITUNG
USER MANUAL
MODE D'EMPLOI
MANUAL DEL USUARIO
PAR-56 Pro Short Spot
With Cable / with Cable & Plug
©
Für weiteren Gebrauch aufbewahren!
Copyright
Keep this manual for future needs!
Nachdruck verboten!
Gardez ce mode d'emploi pour des
Reproduction prohibited!
utilisations ultérieures!
Réproduction interdit!
Guarde este manual para posteriores usos.
Prohibida toda reproducción.
Advertisement
Table of Contents

Related Manuals for EuroLite PAR-56 Pro Short Spot


Summary of Contents for EuroLite PAR-56 Pro Short Spot
- Page 1 BEDIENUNGSANLEITUNG USER MANUAL MODE D'EMPLOI MANUAL DEL USUARIO PAR-56 Pro Short Spot With Cable / with Cable & Plug © Für weiteren Gebrauch aufbewahren! Copyright Keep this manual for future needs! Nachdruck verboten! Gardez ce mode d’emploi pour des Reproduction prohibited! utilisations ultérieures!
-
Page 2: Table Of Contents
You can find the latest update of this user manual in the Internet under: Vous pouvez trouvez la dernière version de ce mode d'emploi dans l'Internet sous: Vd. puede encontrar la versión más reciente de este manual en el Internet bajo: www.eurolite.de 2/36 00026544.DOC, Version 2.0... -
Page 3: Einführung
- sich die letzte Version der Anleitung im Internet herunter laden EINFÜHRUNG Wir freuen uns, dass Sie sich für einen EUROLITE PAR-56 Pro Short Spot entschieden haben. Wenn Sie nachfolgende Hinweise beachten, sind wir sicher, dass Sie lange Zeit Freude an Ihrem Kauf haben werden. - Page 4 Bitte überprüfen Sie vor der ersten Inbetriebnahme, ob kein offensichtlicher Transportschaden vorliegt. Sollten Sie Schäden an der Netzleitung oder am Gehäuse entdecken, nehmen Sie das Gerät nicht in Betrieb und setzen sich bitte mit Ihrem Fachhändler in Verbindung. Der Aufbau entspricht der Schutzklasse I. Der Netzstecker darf nur an eine Schutzkontakt-Steckdose angeschlossen werden, deren Spannung und Frequenz mit dem Typenschild des Gerätes genau übereinstimmt.
-
Page 5: Bestimmungsgemäße Verwendung
GESUNDHEITSRISIKO! Blicken Sie niemals direkt in die Lichtquelle, da bei empfindlichen Menschen u. U. epileptische Anfälle ausgelöst werden können (gilt besonders für Epileptiker)! Kinder und Laien vom Gerät fern halten! Das Gerät darf niemals unbeaufsichtigt betrieben werden! BESTIMMUNGSGEMÄßE VERWENDUNG Bei diesem Gerät handelt es sich um ein Strahlergehäuse, das ausschließlich für den professionellen Einsatz auf Bühnen, in Diskotheken, Theatern etc. -
Page 6: Geräteübersicht
Nehmen Sie das Gerät erst in Betrieb, nachdem Sie sich mit seinen Funktionen vertraut gemacht haben. Lassen Sie das Gerät nicht von Personen bedienen, die sich nicht mit dem Gerät auskennen. Wenn Geräte nicht mehr korrekt funktionieren, ist das meist das Ergebnis von unfachmännischer Bedienung! Reinigen Sie das Gerät niemals mit Lösungsmitteln oder scharfen Reinigungsmitteln, sondern verwenden Sie ein weiches und angefeuchtetes Tuch. - Page 7 Vermeiden Sie es, den Glaskörper mit bloßen Händen zu berühren. Beachten Sie auch unbedingt die Hin- weise des Lampenherstellers. Setzen Sie keine Lampen mit einer höheren Leistungsangabe ein. Lampen mit einer höheren Leistung ent- wickeln höhere Temperaturen, für die das Gerät nicht ausgelegt ist. Bei Zuwiderhandlungen erlischt die Ga- rantie.
- Page 8 Der Unternehmer hat dafür zu sorgen, dass sicherheitstechnische und maschinentechnische Einrichtungen mindestens einmal jährlich durch einen Sachkundigen geprüft werden. Vorgehensweise: Der Projektor sollte idealerweise außerhalb des Aufenthaltsbereiches von Personen installiert werden. WICHTIG! ÜBERKOPFMONTAGE ERFORDERT EIN HOHES MAß AN ERFAHRUNG. Dies beinhaltet (aber beschränkt sich nicht allein auf) Berechnungen zur Definition der Tragfähigkeit, verwendetes Installations- material und regelmäßige Sicherheitsinspektionen des verwendeten Materials und des Projektors.
- Page 9 Stellen Sie den Neigungswinkel über den Hängebügel ein und ziehen Sie die Feststellschrauben gut fest. LEBENSGEFAHR! Vor der ersten Inbetriebnahme muss die Einrichtung durch einen Sachverständigen geprüft werden! Anschluss ans Netz LEBENSGEFAHR! Lassen Sie den elektrischen Anschluss nur vom autorisierten Fachhandel ausführen! Schließen Sie die Geräte 42000802 und 42000812 über den Netzstecker ans Netz an.
-
Page 10: Bedienung
BEDIENUNG Wenn Sie das Gerät an die Spannungsversorgung angeschlossen haben, steuern Sie die Spots über Ihr Lichtsteuergerät. REINIGUNG UND WARTUNG Der Unternehmer hat dafür zu sorgen, dass sicherheitstechnische und maschinentechnische Einrichtungen mindestens alle vier Jahre durch einen Sachverständigen im Umfang der Abnahmeprüfung geprüft werden. Der Unternehmer hat dafür zu sorgen, dass sicherheitstechnische und maschinentechnische Einrichtungen mindestens einmal jährlich durch einen Sachkundigen geprüft werden. - Page 11 Optionales Zubehör: Best.-Nr. EUROLITE TH-90 Theaterhaken für 50mm Rohr 58000720 Sicherheits-Fangseil 40cm x 3mm bis 10kg 58010120 Sicherheits-Fangseil 90cm x 3mm bis 10kg 58010130 Sicherheits-Fangseil 140cm x 3mm bis 10kg 58010135 Schutzkontaktstecker Kunststoff, schwarz 3023610A Ersatzlampen: Best.-Nr. OMNILUX PAR-56 230V/300W NSP 2000h...
-
Page 12: Introduction
- download the latest version of the user manual from the Internet INTRODUCTION Thank you for having chosen a EUROLITE PAR-56 Pro Short Spot. If you follow the instructions given in this manual, we are sure that you will enjoy this device for a long period of time. - Page 13 Please make sure that there are no obvious transport damages. Should you notice any damages on the A/C connection cable or on the casing, do not take the device into operation and immediately consult your local dealer. This device falls under protection-class I. The power plug must only be plugged into a protection class I outlet.
-
Page 14: Operating Determinations
Never leave this device running unattended. OPERATING DETERMINATIONS This device is a spot designed for professional use on stages, in discotheques, theatres etc. This fixture is only allowed to be operated with an alternating current of max. 230 V, 50-60 Hz and was designed for indoor use only. -
Page 15: Overview
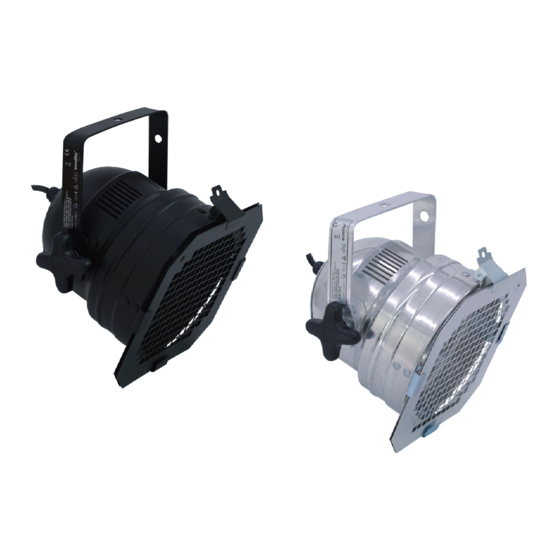
OVERVIEW (1) Mounting-bracket (2) Hole for safety rope (3) Tube (4) Filter frame (5) Silicone cable (6) Mounting bracket screws (7) Clip-to-hold clamps INSTALLATION Installing/Replacing the lamp DANGER TO LIFE! Only install the lamp with the device switched off! Unplug from mains before! CAUTION! The lamp has to be replaced when it is damaged or deformed due to the heat! - Page 16 Remove the wrapping material at the tube rear before operating this device! Always install the filter frame bevor operating this device! Overhead rigging DANGER TO LIFE! Please consider the EN 60598-2-17and the respective national standards during the installation! The installation must only be carried out by an authorized dealer! The installation of the projector has to be built and constructed in a way that it can hold 10 times the weight for 1 hour without any harming deformation.
- Page 17 DANGER OF FIRE! When installing the device, make sure there is no highly-inflammable material (decoration articles, etc.) within a distance of min. 0.5 m. Mount the projector with the mounting-bracket to your trussing system using an appropriate clamp. For overhead use, always install an appropriate safety bond. You must only use safety bonds complying with DIN 56927, quick links complying with DIN 56926, shackles complying with DIN EN 1677-1 and BGV C1 carbines.
-
Page 18: Operation
The occupation of the connection-cables is as follows: Cable International Brown Live Blue Neutral Yellow/Green Earth The earth has to be connected! Connect the device to the mains with the power-plug. If the device will be directly connected with the local power supply network, a disconnection switch with a minimum opening of 3 mm at every pole has to be included in the permanent electrical installation. -
Page 19: Technical Specifications
Min. distance to lighted object: Dimensions (LxWxH): 260 x 235 x 220 mm Weight: 1 kg Optional accessories: EUROLITE TH-90 theatre-hook for 50mm pipe 58000720 Safety-rope 40cm x 3mm up to 10kg 58010120 Safety-rope 90cm x 3mm up to 10kg 58010130... -
Page 20: Introduction
- télécharger la version ultérieure du mode d'emploi d'Internet INTRODUCTION Nous vous remercions d'avoir choisi un EUROLITE PAR-56 Pro Short Spot. Si vous respectez les instructions de service suivantes, vous allez profiter longtemps de votre achat. Sortez le PAR-56 Pro Short Spot de son emballage. - Page 21 L'appareil ne doit pas être mis en service lorsqu'il à été transporté d'un endroit froid à un endroit chaud. Il se forme de la condensation qui pourrait endommager l'appareil. Laissez celui-ci atteindre la température ambiante avant de le mettre en service. La construction de l'appareil correspond à...
-
Page 22: Emploi Selon Les Prescriptions
Evitez de faire des effets "flash" avec cet appareil en l'allumant et l'éteignant continuellement. Cela réduit considérablement la durée de vie des ampoules. RISQUE DE MAL! Ne jamais regarder directement à la source de lumière, parce que des personnes sen- sibles peuvent subir une attaque épileptique (surtout valable pour des épileptiques)! Tenir les enfants et les novices éloignés de l'appareil. -
Page 23: Aperçue Des Parties
N'utilisez l'appareil qu'après avoir pris connaissance de ses fonctions et possibilités. Ne laissez pas des personnes incompétentes utiliser cet appareil. La plupart des pannes survenant sur cet appareil sont dues à une utilisation inappropriée par des personnes incompétentes. Si vous deviez transporter l'appareil, utilisez l'emballage d'origine pour éviter tout dommage. Assurez-vous que vous enviez l’appareil dans l’etat original. - Page 24 Pour l'installation, vous avez besoin d'une lampe PAR-56 avec une puissance max. de 500 W. Procédure: Pas 1: Rémovez le porte-filtre. Pas 2: Rémovez l'anneau de fixation en le pressant. Pas 3: Quand vous remplacez une lampe, retirez la lampe deféctueuse avant et retirez la douille. Pas 4: Connectez la douille de lampe avec la lampe et mettez la lampe dans le boitier.
- Page 25 N’essayez jamais de procéder à une installation vous-même, si vous ne disposez pas d’une telle qualification, mais demandez à un installateur professionnel. Des installations incorrectes peuvent causer des blessures et/ou l’endommagement de propriété. Il faut installer le projecteur hors de portée du public. Si le projecteur doit être décroché...
-
Page 26: Maniement
DANGER DE MORT! Avant la première mise en marche, l’installation doit être contrôlé par un organisme agrée! Alimentation DANGER DE MORT! Les connexions électriques sont à faire effectuer par un installateur agrée! Branchez les appareils 42000802 et 42000812 avec la fiche au secteur. Pour brancher les appareils 42000800 et 42000810, vous deviez installer une fiche au secteur. -
Page 27: Caractéristiques Techniques
Dimensions (LxlxH): 260 x 235 x 220 mm Poids: 1 kg Accessoires optionals: N° d'art. EUROLITE TH-90 crochet p.tube dia. 50mm 58000720 Elingue 40cm x 3mm jusqu'à 10kg 58010120 Elingue 90cm x 3mm jusqu'à 10kg 58010130 Elingue 140cm x 3mm jusqu'à 10kg 58010135 Fiche européenne, PVC noire... - Page 28 Lampes de rechange: N° d'art. OMNILUX PAR-56 230V/300W NSP 2000h H 88125005 OMNILUX PAR-56 230V/300W NSP 2000h T 88125006 GE PAR-56 230V/300W NSP 2000h 88125000 GE PAR-56 230V/300W MFL 2000h 88125100 OMNILUX PAR-56 230V/300W MFL 2000h H 88125105 OMNILUX PAR-56 230V/300W MFL 2000h T 88125106 GE PAR-56 230V/300W WFL 2000h 88125200...
-
Page 29: Introducción
-descargar la última versión del manual del Internet INTRODUCCIÓN Gracias por haber elegido un EUROLITE PAR-56 Pro Short Spot. Si Vd. respecte las instrucciones sucesivas, aseguremos que vaya a gozarse mucho de su compra. Desembale su PAR-56 Pro Short Spot. - Page 30 Si el aparato ha estado expuesto a grandes cambios de temperatura (p.e. tras el transporte), no lo enchufe inmediatamente. La condensación de agua producida podría dañar su aparato. Deje el aparato desconec- tado hasta que llegue a la temperatura ambiente. Este aparato pertenece a la clase de protección I.
-
Page 31: Instrucciones De Manejo
INSTRUCCIONES DE MANEJO Este aparato es un efecto luminoso sólo diseñado para usos profesionales, por ejemplo en escenas, discotecas, teatros etc. El aparato sólo es permitido para una conexion hasta una tensión alternativa máxima de 230 V, 50-60 Hz y ha sido diseñado para ser usado en interiores. Efectos de luz no son diseñados para un uso permanente. -
Page 32: Descripción De Las Partes
DESCRIPCIÓN DE LAS PARTES (1) Lira de fijación (2) Orificio para cable de anclaje (3) Tubo (4) Portafiltros (5) Cable de silicona (6) Tornillo de fijación (7) Grapa de fijación INSTALACIÓN Instalar/Reemplazar la lámpara ¡PELIGRO DE MUERTE! ¡Instale la lámpara únicamente con el aparato desenchufado! ¡Desenchufe-lo de la corriente! ¡PRECAUCION! ¡La lámpara debe ser reemplazada cuando esté... - Page 33 Para el vedado de la lámpara, recomendamos precalentar la lámpara. Reglar su calentador de una manera que el filamento incandescente de la lámpara está calentado al rojo. ¡Quite el material de embalaje antes de manejar este aparato! ¡No maneje este aparato sin portafiltros instalado! Montaje por encima de la cabeza ¡PELIGRO DE MUERTE! Cuando instalar el aparato, Vd.
- Page 34 Asegúrese antes de la montaje, que el área de montaje puede llevar una carga de punto de un mínimo de 10 veces del peso del proyector. ¡PELIGRO DE INCENDIO! Al instalar el aparato asegúrese de que no hay ningún material altamente inflamable (artículos de decoración, etc.) a una distancia mínima de 0,5 m.
-
Page 35: Operación
Conectar los aparatos 42000802 y 42000812 a la red mediante la clavija de alimentación. Para conectar los aparatos 42000800 y 42000810 a la red, Vd. debe que instalar una clavija de alimentación. La ocupación de los cables de conexión es: Cable Internacional Marrón... -
Page 36: Especificaciones Técnicas
Dimensiónes: 260 x 235 x 220 mm Pesos: 1 kg Accesorios opcionales: Referencia EUROLITE TH-90 gancho p.tubo diá. 50mm 58000720 Cable de anclaje 40cm x 3mm hasta 10kg 58010120 Cable de anclaje 90cm x 3mm hasta 10kg 58010130 Cable de anclaje 140cm x 3mm hasta 10kg...
Need help?
Do you have a question about the PAR-56 Pro Short Spot and is the answer not in the manual?
Questions and answers