Table of Contents
Advertisement
Quick Links
Advertisement
Table of Contents

Related Manuals for Labgear HDSR 260


Summary of Contents for Labgear HDSR 260
- Page 1 HDSR 260 HD Satellite Receiver SET-UP GUIDE Please read carefully before use Customer Careline: 08457 573 479 Local rate - UK Only Technical Support: www.labgear.co.uk Customer Careline: 08457 573 479 (Local rate - UK Only) Technical Support: www.philex.com/support...
-
Page 2: Table Of Contents
Table Of Contents ..................Page 1 Introduction ..........................2 1.1 Safety Instructions ......................2 1.2 Features & Accessories ....................3 1.3 Features & Accessories ....................3 2 Your Receiver ..........................4 2.1 Front Panel ........................4 2.2 Rear Panel ......................... 4 2.3 Remote Control Unit ....................5-6 3 Connections .......................... -
Page 3: The Satellite Dish
Main Features • • DVB-S2 Satellite Receiver, allowing 7-day EPG function for supporting satellites access to DVB-S2/S channels • Multi-language menu, subtitles and audio • USB 2.0 socket for PVR, TIMESHIFT, software output supported upgrade and media file playback • Aspect ratios 16:9, 4:3, Pan &... -
Page 4: Front Panel
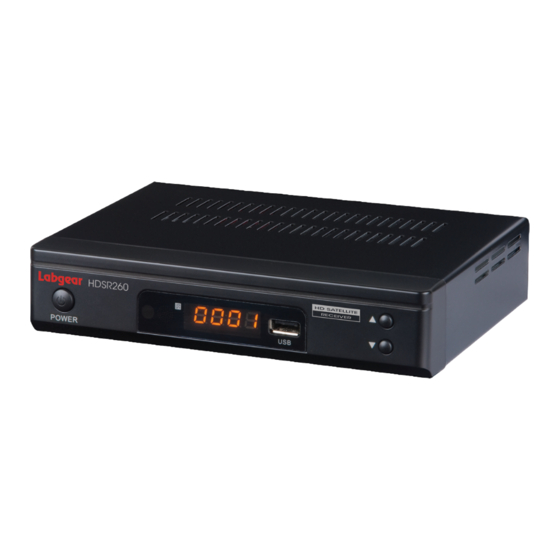
2.1 Front Panel Layout and 2.2 Rear Panel Layout Front Panel HDSR 260 Name Function Power Button - Press to switch your HDSR260 on and off 2. LED RED = Standby 3. SENSOR Infrared remote sensor 4. LED Display Displays channel number 5. - Page 5 2.3 Remote Control Functions No. Key Function Standby ON/OFF Show EPG (Electronic Programme Guide) INFO To display current programme information AUDIO Enter audio settings menu Record a TV program MENU To enter the main menu To increase / reduce volume (when Menu is not displayed), or move cursor left / right FAVORITE To display the Favorites list To increase / reduce volume (when Menu is...
-
Page 6: Installing The Batteries
2 .3 Installing the Remote Control Batteries Installing the Batteries Remove the battery cover from the remote control and put 2 x AAA size batteries inside the compartment. The diagram inside the battery compartment shows the correct way to install the batteries. Using the Remote Control To use the remote control, point it towards the front of your. -
Page 7: Connections
3 Connections This section explains the installation of your HDSR260 it is also recommended that you consult the manuals supplied with equipment you are connecting your HDSR260 to. 3.1 Connect to the TV using an HDMI or SCART lead (not supplied). 1. -
Page 8: First Time Installation
4 First Time Installation After all connections have been made properly, switch on your TV and make sure the receiver is connected to the mains via the power adaptor. Press the Power key to switch on the receiver. Satellite channels should be pre-loaded and the screen below should appear (go to 5.1 below). -
Page 9: Epg
5 Basic Operation - continued To Move a TV or Radio Channel: Enter Program Edit. 1. Select the preferred channel then press the RED key. A move symbol will appear. 2. Press the / keys to select the position you want to move the channel to. 3. -
Page 10: Channel Search
5 Basic Operation - 6 Dish Setup 5.5 Channel Search Press the MENU key and select [Channel Search]. This Menu gives you the option of Dish Setup or Data Base Management. Use the / keys to select an option and press the keys to adjust the setting. -
Page 11: Dish Setup
7 Dish Setup If you have a fixed satellite dish with a single LNB there is no need to alter any settings you can scan for channels straight away (Section 6). Choose satellites by using the / keys, you can choose one or more, press the OK key to confirm. -
Page 12: Motorised Dish Setup
8 Motorised Dish Setup If you have a USALS motorised system, you can set the dish position in the USALS menu of your satellite receiver. Ignore this section if you do not have a motorised dish. DiSEqC Type: Select DiSEqC1.2 or DiSEqC1.3 in Motor, press and OK key, the screen opposite appears, you can set the dish position in this menu. -
Page 13: Setting Time
7 Motorised Dish Setup 7.2.5 Disable Limit: Cancels the limit that has been set. Select DiSEqC1.3 in Motor, press the green key, the screen to the right will appear. 8.3 Set Location 8.3.1 Preset Locations Use this option if you live in one of the cities listed. Choose the the city, the menu will show the longitude and latitude information for the selected satellite, you can move the dish to this position by... -
Page 14: System Settings
11 System Settings Press the MENU key and select [System]. The menu provides options to change system settings. Press the / keys to select an option and press the / keys to change the setting. Press the EXIT key to exit the Menu. Set Password: To set or change the password, enter your old password or the default password ‘000000’... -
Page 15: Multimedia
12.1 Multimedia Select [Multimedia]. If no USB device is plugged in, a warning message “No USB Device is Found” will be displayed. After the USB device is recognized, if you want to playback a music file, enter “Music” and select a music file on your USB device then press OK . -
Page 16: Pvr Function
13 PVR Function 13.1 Start recording Insert a USB device into the set top box, the message “USB device is inserted” will appear on your screen. Press the PVR key on the remote control your TV will display “Enter Record Waiting... ” In recording mode, while recording a recording icon and recording time elapsed is shown in the top left of the screen. - Page 17 13 Scheduling PVR Recordings 13.4 Scheduling a PVR recording Follow the steps below if you want to program your receiver to record a program onto your USB device. Press the RED key on the remote control, the screen to the right will appear: Alternatively you can schedule a recording from the EPG screen use the / keys to highlight a program and press OK.
-
Page 18: Timeshift
13 Timeshift 13.5 Timeshift Connect a USB device to the receiver, press the PVR key on the remote control, when the receiver enters recording, press the PLAY key on the remote control, a bar will appear at the bottom of the screen, time shift is now on. -
Page 19: Troubleshooting
14 Troubleshooting There are a variety of reasons why the receiver may not function as expected. The table below lists symptoms that might occur and the causes and appropriate remedies. If you are still unable to get your receiver operating properly, please contact our customer careline - details shown in the footer. - Page 20 Waste electrical and electronic products should not be disposed of with household waste. Please recycle where facilities exist. Check with your Local Authority for recycling advice. © Philex Electronic Ltd. 2012. V1.1...
Need help?
Do you have a question about the HDSR 260 and is the answer not in the manual?
Questions and answers