Table of Contents
Advertisement
MSM466-R Outdoor 802.1 1n
Access Point Quick Start
Guide
Abstract
The MSM466-R 802.1 1n dual-radio Access Point [J9715A
(Americas), J9716A (Worldwide), J9717A (Japan), J9718A
(Israel)] brings 450 Mbps per radio technology to outdoor
environments for outdoor coverage, point to point and point
to multipoint applications either autonomously or centrally
controlled by MSM Controllers. This document describes
how to install and initially configure the MSM466-R,
hereafter referred to as the AP. The latest documentation is
available at www.hp.com/support/manuals.
© Copyright 2015 Hewlett-Packard Development Company, L.P.
HP Part Number: 5998-6833
Published: January 2015
Edition: 1
*5998-6833*
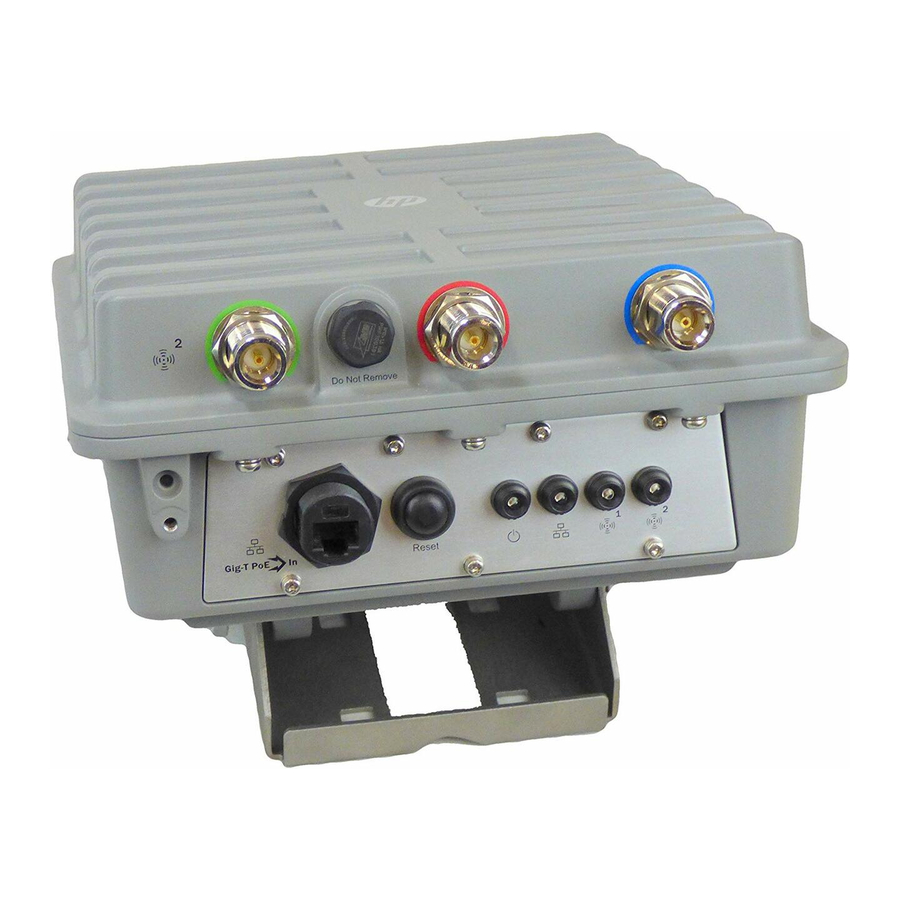
Hardware overview
Figure 1 AP key components (bottom view)
1. Radio 2 antenna connectors (x3)
2. Vent nut (do not remove)
3. Grounding lug with screw
NOTE: Three Radio 1 antenna connectors are on the
top of the AP.
Package contents
The AP, weatherproof RJ-45 Ethernet connector,
mounting bracket, 2 bracket bolts, 2 lock washers, 2
flat washers, 4 wall anchors and screws, 2 pole
clamps, and documentation.
Ethernet port
The Ethernet port is an auto-sensing 10/100/1000
Base-T (auto MDI/MDX) port with RJ-45 connector.
This port supports Power over Ethernet (PoE) 802.3af
and 802.3at (PoE+).
Antenna connectors
The AP includes no integrated antennas. It provides
three antenna connectors for each radio, color-coded
red, green, and blue. When connecting the antenna
cables, be sure to connect all three cables and to
respect the color-coding to ensure proper functionality.
See
"Available antennas" (page
Reset button
The reset button is on the bottom of the AP, labeled as
5 on
Figure 1 (page
power cycling), press and release the reset button. To
reset the AP to factory defaults, press and hold the
reset button until the status LEDs flash three times, and
then release the button.
Page 1
1
2
1
1
3
4
5
6
4. Ethernet connector
5. Reset button
6. Status LEDs (Power,
nl
Ethernet, Radio 1, Radio 2)
10).
1). To reset the AP (same as
Advertisement
Table of Contents

Related Manuals for HP MSM466-R


Summary of Contents for HP MSM466-R
- Page 1 Guide Figure 1 AP key components (bottom view) Abstract The MSM466-R 802.1 1n dual-radio Access Point [J9715A (Americas), J9716A (Worldwide), J9717A (Japan), J9718A (Israel)] brings 450 Mbps per radio technology to outdoor environments for outdoor coverage, point to point and point to multipoint applications either autonomously or centrally controlled by MSM Controllers.
-
Page 2: Safety And Regulatory Information
HP 1-Port 802.3at Gig PoE Power Injector strike. Lightening Arresters (J8996A) are available (JD054A). from HP. One arrester is required for each antenna connector (total of 6). CAUTION: If the AP will be powered by a user-supplied PoE power injector, use only a gigabit-compatible Cabling: You must use Cat 5e (or better) cables, and power injector. - Page 3 Figure 3 Weatherproof connector assembly items from the plastic bag, identifying all parts as illustrated. If any parts are missing, do not proceed. Contact HP support to request a replacement parts kit. If your Ethernet cable already has an RJ-45...
-
Page 4: Installing Cabling
14. Hand tighten the threads between sealing nut (1) Locate the AP mounting bracket. See and clamp ring (3), until the cable is firmly Figure 4 (page 4). Note that the four screw holes anchored. (1) are not used for pole mounting, only wall mounting. - Page 5 Locate the two bracket bolts (1), the two lock Figure 6 AP mounted on pole washers (2), and the four flat washers (3, 5). Onto each bracket bolt (1), thread a lock washer (2) followed by a flat washer (3). Push both washers against the bracket bolt (1) head.
-
Page 6: Attaching The Grounding Wire And Antennas
Install antennas including antenna connector lightning arresters as described in the respective antenna guide available online (search by antenna part number). An HP Lightning Arrester (J8996A) Guide is also 1. Bracket post 2. Bracket 3. Wall available online. -
Page 7: Using Controllers
For more information about using the AP with MSM7xx Controllers, see “Working with controlled APs” in the MSM7xx Controllers Configuration Guide. For more information about using the AP with HP 10500/7500, HP 830 or WX5002/WX5004 Controllers, see the HP 830 Switch and HP 10500/7500 20G Module 1. -
Page 8: Configuring Your Computer
HP recommends that after the initial On the Login page, specify admin for both configuration, you enable a wireless security option Username and Password, and then select Login. -
Page 9: Configuring Basic Wireless Protection
HP recommends that you configure basic wireless Select Save. protection as follows: Connection to the management tool is lost. Select VSC > HP, enable Wireless protection and You can reconnect to the management tool set it to WPA. by specifying the new IP address. -
Page 10: Performing Additional Configuration
By default, the AP creates a wireless network ensure that a lightning arrester is used on each named HP in the 5 GHz band for 802.1 1n and antenna connector (total of six). Lightening Arresters 802.1 1a users. Connect your computer to this (not supplied) are available from HP (J8996A). -
Page 11: Other Regulatory Information
35 50, +7 (727) 355 35 51 Manufacturing Date – The manufacturing date is included in the product serial number, CCYMPPPZZZ (HP serial number format for this product). The manufacturing date is indicated by YM in the serial Page 1 1...
Need help?
Do you have a question about the MSM466-R and is the answer not in the manual?
Questions and answers