
Related Manuals for Navman iCN 500 series


Summary of Contents for Navman iCN 500 series
-
Page 1: User Manual
iCN 500 series with Smart 2005 User Manual iCN 510 iCN 520 English - Europe / Australia / New Zealand... -
Page 3: Table Of Contents
20. Installing a Language on Your iCN 510 ... 84 21. Continuous Continental Navigation ... 86 22. Smart Desktop Advanced Features ... 88 23. Accessories ... 93 Appendix: Street Types ... 94 Support Information ... 97 Compliance ... 97 Copyright ... 97 iCN 500 series | User Manual... - Page 4 500 series | User Manual...
-
Page 5: Box Contents
Thank you for purchasing this Navman iCN. We hope you enjoy your new GPS transferable navigation system. This user manual will help you Drive-Away™ with your iCN, straight out of the box. Navman welcomes your feedback. To contact us or visit our website, see Support Information on page 97. - Page 6 500 series | User Manual...
-
Page 7: Introduction
• Do not use or handle the iCN when it is hot; leave it to cool, out of direct sunlight. Failure to adhere to these instructions may lead to serious personal injury, including death, or property damage. Navman disclaims all liability for use of the iCN that contributes to injuries, death, property damage or violates law. -
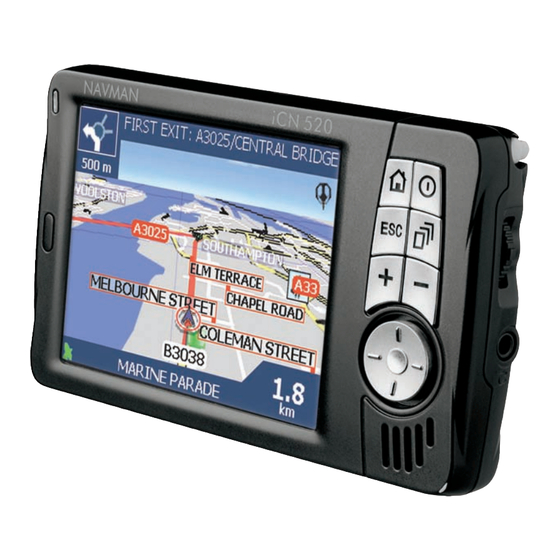
Page 8: Icn Features
500 series | User Manual 2. iCN Features We recommend that you familiarize yourself with the iCN’s basic operations, such as using the stylus, 4-way toggle and Volume control. Front Components Component Charge Indicator Touch Screen ... -
Page 9: Back Components
GPS Receiver External Antenna Socket iCN 500 series | User Manual Description Selects Main Menu options, keyboard characters and Preferences, moves around the 2D Map screen to select a destination, and scrolls through lists, such as lists of search results;... -
Page 10: Side Components
500 series | User Manual Side Components Component SD/MMC Slot Stylus Volume Control Headphone Socket End Components Component Reset USB Socket Power Socket Description Slot for memory card. Memory card must be inserted with label facing forward. -
Page 11: Internal Battery
• To charge the iCN using an electrical wall outlet, plug the AC power-pack into the Power Socket on the bottom of the iCN and the other end into the wall outlet. iCN 500 series | User Manual... -
Page 14: Starting Your Icn
Battery Switch to ON. 2. Gently pull the bottom of the GPS receiver away from the iCN. The receiver will lift out to a horizontal position to allow it to obtain a GPS fix. - Page 15 1. Read the Tutorial screen. • To prevent the Tutorial from displaying on startup, select the Do not show Tutorial on startup check box. 2. Tap to move through each Tutorial screen. The Main Menu screen will display. iCN 500 series | User Manual...
-
Page 16: Main Menu Screen
500 series | User Manual Main Menu Screen • Use the stylus to select a Main Menu option. • Return to the Main Menu screen at any time by pressing • The Route Information option is only available when a route has been calculated. - Page 17 To reset your iCN, either: a. Press and hold The message Reset Device? will display. Tap Yes. b. Use the stylus to press the Reset button on the top of the iCN. iCN 500 series | User Manual...
-
Page 18: Memory Card
500 series | User Manual 5. Memory Card Your iCN came with a memory card containing a preactivated map of the region in which it was purchased. To navigate to your destination you will first need to insert the memory card in your iCN. - Page 19 3. Select the Do not show on startup check box. 4. Tap The selected language is installed to your iCN. The Warning screen will display. 5. Continue to Step Three of Starting Your iCN on page 15. iCN 500 series | User Manual...
-
Page 20: Gps Status
500 series | User Manual 7. GPS Status Signals are transmitted by Global Positioning System (GPS) satellites orbiting the Earth. You can view your GPS status at any time from the 2D Map, 3D Map, Next Turn and Next 4 Turns screens. -
Page 21: Setting Your Destination
Search results will be listed in matching order, with the closest matches appearing at the top of the list. The Keyboard screen can display in three modes: alphabet, alternate and number/symbol. Figure 1. Alphabet Keyboard iCN 500 series | User Manual Figure 2. Alternate Keyboard to see more... -
Page 22: Preview Screen
500 series | User Manual Figure 3. Number/Symbol Keyboard As you select each character, the first two results will display. Tap • To select a character or a search result, tap the character or search result. • To delete a character, press ESC or tap <<; hold ESC to delete the line. -
Page 23: Address Search Rules
Example 1: If searching for “RH6 9ST”, search by “RH6 9”. Example 2: If searching for “3514 BN”, search by “3514”. For exact European street type abbreviations, see Appendix: Street Types on page 94. iCN 500 series | User Manual... -
Page 24: By Address - Europe And New Zealand
500 series | User Manual Setting Your Destination by Address - Case Study One: Europe and New Zealand This case study will show you how to set your destination by selecting your country, then area, then street, then house number. - Page 25 For information on using the Keyboard screen, see pages 21-22. The Destination screen will display. Step Four: Find the Street of Destination a. From the Destination screen, tap Find street. The Keyboard screen will display. iCN 500 series | User Manual...
- Page 26 500 series | User Manual b. Use the Keyboard screen to find the street of your destination. For information on using the Keyboard screen, see pages 21-22. The Destination screen will display. Step Five: Find the House Number of Destination a.
- Page 27 • To save the destination as a Favourite, tap Save. The New Favourite screen will display. See Favourites and My Home on page 59. • To change your destination, tap ESC. The Destination screen will display. To return to the Main Menu, press iCN 500 series | User Manual...
-
Page 28: By Address - Australia, Canada And Usa
500 series | User Manual Setting Your Destination by Address - Case Study Two: Australia, Canada and USA This case study will show you how to set your destination by selecting your country, then state, then town or city, then street, then house number. - Page 29 The Keyboard screen will display. b. Use the Keyboard screen to find the town or city of your destination. For information on using the Keyboard screen, see pages 21-22. The Destination screen will display. iCN 500 series | User Manual...
- Page 30 500 series | User Manual Step Five: Find the Street of Destination a. From the Destination screen, tap Find street. The Keyboard screen will display. b. Use the Keyboard screen to find the street of your destination. For information on using the Keyboard screen, see pages 21-22.
- Page 31 • To save the destination as a Favourite, tap Save. The New Favourite screen will display. See Favourites and My Home on page 59. • To change your destination, tap ESC. The Destination screen will display. To return to the Main Menu, press iCN 500 series | User Manual...
-
Page 32: By Poi - Europe And New Zealand
500 series | User Manual Setting Your Destination by POI - Case Study One: Europe and New Zealand This case study will show you how to set your destination by selecting a Point of Interest (POI). A POI is a named site, feature, landmark or public venue which can be displayed as an icon on the map. - Page 33 Select a POI type from the list. The Keyboard screen will display. c. Use the Keyboard screen to find the POI. For information on using the Keyboard screen, see pages 21-22. The Preview screen will display. iCN 500 series | User Manual...
- Page 34 500 series | User Manual d. Complete one of the following: • To calculate the route and open the 3D Map screen, tap Go. The 3D Map screen will display. • To display the destination on the 2D Map screen, tap the preview map.
-
Page 35: By Poi - Australia, Canada And Usa
The Select state screen will display. • If you only have the map of one state installed and selected, that state is selected for your destination by default. Go to Step Four: Select the Type of POI. iCN 500 series | User Manual... - Page 36 500 series | User Manual Step Three: Select the State of Destination If you only have the map of one state installed and selected, that state is selected for your destination by default and cannot be changed. Go to Step Four: Select the Type of POI.
- Page 37 • To change your destination, tap ESC. The Destination screen will display. • To view Point of Interest (POI) details when your destination is a POI, tap The POI Detail screen will display. To return to the Main Menu, press iCN 500 series | User Manual...
-
Page 38: Using The 2D Map Screen To Plan A Route
500 series | User Manual 9. Using the 2D Map screen to Plan a Route You can plan a route directly from the 2D Map screen using the Pop-up menu. 1. From the Main Menu, tap Map. The 2D Map screen will display. -
Page 39: Multi-Stop Trips
From the Main Menu, tap Multi-stop Trip. The Multi-stop Trip screen will display. b. Tap Add. The Add to Trip screen will display. c. Tap Address or POI. The Destination screen will open. iCN 500 series | User Manual... - Page 40 500 series | User Manual Note: You can also add destination points using Favourites, recent destinations and nearest Point of Interest. Step Two: Select the Country of Your Destination Point If you only have the map of one country installed and selected, that country is selected for your destination point by default and cannot be changed.
- Page 41 Keyboard screen, see pages 21-22. The Destination screen will display. Step Four: Find the Street of Your Destination Point a. From the Destination screen, tap Find street. The Keyboard screen will display. iCN 500 series | User Manual...
- Page 42 500 series | User Manual b. Use the Keyboard screen to find the street of your destination point. For information on using the Keyboard screen, see pages 21-22. The Destination screen will display. Step Five: Find the House Number of Your Destination Point a.
- Page 43 Favourite To return to the Main Menu screen, press iCN 500 series | User Manual Then ... • tap Add. The Add to Trip screen will display.
-
Page 44: Australia, Canada And Usa
500 series | User Manual Case Study Two: Australia, Canada and USA This case study will show you how to set a multi-stop trip by selecting your country, then area, then street, then house number for each destination point. - Page 45 If you only have the map of one state installed and selected, that state is selected for your destination by default and cannot be changed. Go to Step Four: Find the Town or City of Destination. a. Select a state from the list. The Destination screen will display. iCN 500 series | User Manual...
- Page 46 500 series | User Manual Step Four: Find the Town or City of Your a. From the Destination screen, tap Find town/city. The Keyboard screen will display. b. Use the Keyboard screen to find the town or city of your destination. For information on using the Keyboard screen, see pages 21-22.
- Page 47 Select Go to centre of street to display the Preview screen. Go to step c. b. Use the Keyboard screen to find the house number of your destination point. For information on using the Keyboard screen, see pages 21-22. The Preview screen will display. iCN 500 series | User Manual...
- Page 48 500 series | User Manual c. Select Add to Trip. The Multi-stop Trip screen will display, listing your destination point. d. Complete one of the following: Note: Destination points added, updated or deleted after a multi-stop trip has commenced will not affect the current route.
-
Page 49: Skipping A Destination Point
The Main Menu screen will display. 2. Tap Route Information. The Route Information screen will display. 3. Tap Skip Next Dest. The next destination point will be skipped and the route recalculated to the following destination point. iCN 500 series | User Manual... -
Page 50: Viewing Your Route
500 series | User Manual 11. Viewing your Route Once a route has been calculated, you can view it in several ways. Press 2D Map Screen The 2D Map screen is always oriented North and shows your current position (if a GPS fix is active) and surrounding street names. -
Page 51: D Map Screen
Tap to display the Satellite Signal Strengths screen. Your current location. Tap to display the Main Menu screen. iCN 500 series | User Manual to cycle through the screens. North-oriented compass Additional information can display here. Tap to scroll the options. -
Page 52: Next Turn Screen
500 series | User Manual Next Turn Screen The Next Turn screen displays information that you need for the next turn, the direction of the turn and the distance to the turn. A route must have been calculated for this screen to be able to display. -
Page 53: Route Information Screen
Tap Instruction list to display the Instruction List screen. The Instruction List screen is similar to the Next 4 Turns screen except that it displays your entire route. • Use to cycle through the instruction list. iCN 500 series | User Manual... -
Page 54: Cancel Route
500 series | User Manual Summary Tap Summary to display the Route Summary screen containing your From and To addresses, Estimated Time to arrival and the Distance remaining to your destination. If you are navigating a multi-stop trip, the information displayed will relate to your next destination point. -
Page 55: The 2D Map Screen Pop-Up Menu
• Save the point as a Favourite. Adds an Avoid Area for you to size. Deletes the selected Avoid Area. Displays the Select POI screen. Select the POI type, then the POI to navigate to. iCN 500 series | User Manual... -
Page 56: Avoiding An Area
500 series | User Manual 13. Avoiding an Area You can calculate a route that avoids a specified area on the map. Up to ten Avoid Areas can be added. Avoid Areas are displayed as shaded areas. If no alternative route around an Avoid Area exists, you will be routed through an Avoid Area. -
Page 57: Route Demonstrator
The Pop-up menu will close. The 3D Map screen will display the calculated route in Route Demonstrator mode. • If you have selected the Repeat check box on the Routing preferences screen, the Route Demonstrator will continue to repeat the route. iCN 500 series | User Manual... - Page 58 500 series | User Manual To Disable Route Demonstrator 1. Press to display the Main Menu screen. 2. From the Main Menu screen, tap Preferences. 3. From the Preferences screen, tap Routing. The Routing screen will display. 4. Press twice.
-
Page 59: Favourites And My Home
• To display the alternate Enter text screen, press +, or tap Alt. • To display the alphabet Enter text screen, press -, or tap ABC • After you have entered a name for the Favourite, tap Enter. The New Favourite screen will display. iCN 500 series | User Manual... -
Page 60: Saving A Favourite From The 2D Map Screen
500 series | User Manual 4. Complete one of the following: • To save as a favourite, tap Save as Favourite. The Favourite is saved. The Go To screen will display. • To save as My Home, tap Save as My Home. -
Page 61: Editing The Name Of The Favourite
Editing the Name of the Favourite 1. From the Main Menu, tap Go To. 2. From the Go To screen, tap Favourites. The Favourite screen will display. 3. Select a Favourite to edit. The Preview Favourite screen will display. iCN 500 series | User Manual... -
Page 62: Deleting A Favourite
500 series | User Manual 4. Tap the Name box. The Enter text screen will display. • To select a character, tap the character. • To delete a character, press ESC or tap <<; hold ESC to delete the line. -
Page 63: Navigating To A Favourite
The route is calculated and displayed on the 3D Map screen. Navigating to My Home 1. From the Main Menu, tap Go To. 2. From the Go To screen, tap My Home. The route is calculated and displayed on the 3D Map screen. iCN 500 series | User Manual... -
Page 64: Preferences
500 series | User Manual 16. Preferences You can modify the following preferences to suit your needs. Screen Brightness 1. Press and hold either the + or - button to display the Brightness scale. 2. To increase screen brightness, press + ; To decrease screen brightness, press -. - Page 65 Route Demonstrator enable the Route Demonstrator to play repeatedly enable Smart Demonstration to be played iCN 500 series | User Manual Then... move the Preference for motorways slider towards Less often to use roads other than motorways where possible when calculating a route.
- Page 66 500 series | User Manual If you want to... enable Track Recording (only to be used if required by Navman Customer Support) 4. Tap Save. The Main Menu screen will display. Language Preferences 1. From the Main Menu, tap Preferences.
- Page 67 Note: This option is only available when Map colours is set to Night. display topographical information on the 2D Map and 3D Map screens iCN 500 series | User Manual to move through the Display screens. Figure 2: iCN 520 Then...
- Page 68 500 series | User Manual If you want to... display grid lines on the 2D Map and 3D Map screens display a north-pointing compass on the 2D Map and 3D Map screens display “no entry” icons on “no entry” roads on the 2D Map and 3D Map screens 5.
- Page 69 Note: There may be more than one page of POI types, depending on the installed maps. To view additional pages of POI types, scroll down using the 4-way toggle, or press 5. Tap Save. The Main Menu screen will display. iCN 500 series | User Manual...
- Page 70 500 series | User Manual Alerts Preferences — Active POIs The Active POI settings allow you to set warning chimes and visual warnings for custom POIs that will activate within a chosen distance-radius of your location. For example, a warning chime will sound or a visual warning will display when an active POI is within 150 ft of, but not necessarily on, your route.
- Page 71 4. Tap Save. The Main Menu screen will display. iCN 500 series | User Manual Then... select the speed in the Speed box by tapping the left or right arrows or using the left and right sides of the 4-way toggle.
- Page 72 500 series | User Manual My Data Preferences - My Points of Interest (My POI) Custom Points of Interest (POIs) are installed from the Smart Desktop POI Editor (see pages 86- 85), and listed on the My POIs screen.
- Page 73 The satellites available from your current position are shown as grey, red and green coloured bars: Bar Colour Grey Green iCN 500 series | User Manual Description No signal at all A valid signal, but not being used to fix your position...
- Page 74 500 series | User Manual Measurement Preferences 1. From the Main Menu screen, tap Preferences. The Preferences screen will display. 2. From the Preferences screen, tap More Preferences. The second Preferences screen will display. 3. On the second Preferences screen, select Measurements.
- Page 75 The Preferences screen will display. 2. From the Preferences screen, tap More Preferences. The second Preferences screen will display. iCN 500 series | User Manual Then... tap Align and follow the prompts. Note: The prompts are available in English only.
- Page 76 500 series | User Manual 3. On the second Preferences screen, tap Hardware. The Hardware screen will display 4. From the Hardware screen, tap Power Status. The Power Status screen will display. 5. Press to return to the Main Menu screen.
- Page 77 Tutorial 5. Tap Save. The Main Menu screen will display. iCN 500 series | User Manual Then... select the Go to Power Saving Mode if not used for check box under Internal Backup Battery. select the time to elapse when connected to an external...
-
Page 78: Smart Desktop
500 series | User Manual 17. Smart Desktop Smart Desktop is used to manage maps to and from your iCN, obtain software updates, manage Custom Points of Interest (POIs) and install Basemaps. XP, ensure that Windows XP Service Pack 1 has been applied before you install Note: For Windows ®... - Page 79 You are now ready to install maps to your iCN. To Open Smart Desktop Once Smart Desktop has been installed, you can access it from the Start menu: Start Programs Navman Smart Desktop 2005 for iCN500 series Uninstalling Smart Desktop from your Computer We recommend that you use the Add or Remove Programs feature in your Windows Control Panel: 1.
-
Page 80: Updating Your Icn
18. Updating your iCN Updating your Version of Smart We recommended that you regularly use Smart Desktop to check the Navman website for Smart software updates: 1. If you connect to the Internet via a dial-up connection, connect to the Internet now. -
Page 81: Installing Maps Using Smart Desktop
Installing and Activating Maps on your iCN 1. Open Smart Desktop, if it is not already open: Start Programs Navman Smart Desktop 2. Insert a Smart Map CD into your computer CD drive, the available maps will display (the default colour for available maps is cross-hatch blue). - Page 82 500 series | User Manual • When activation has completed, the map will change colour (the default colour for activated maps is light green). Proceed to step 7. 7. Click the map to install to your iCN. The map will change colour to indicate it has been selected (the default colour for selected maps is dark green).
- Page 83 Removing Maps from your iCN 1. Open Smart Desktop: Start Programs Navman Smart Desktop 2005 for iCN500 series 2. Open the Maps on iCN section: iCN tab Maps on iCN. 3. Click the map to be removed and select Remove from iCN from the pop-up menu.
-
Page 84: Installing A Language On Your Icn 510
500 series | User Manual 20. Installing a Language on Your iCN 510 The iCN 510 stores English language files in the iCN internal memory by default and other languages on the memory card that came with your iCN. - Page 85 3. You will be prompted to register your iCN. Click No, as your iCN has been preregistered. 4. On the Tools menu, select Recover registration information from Navman. 5. Follow the prompts to recover your iCN registration information: •...
-
Page 86: Continuous Continental Navigation
You can add and remove Basemaps using the Basemap Installer (see below). Install Basemap 1. Open Smart Desktop if it is not already open: Start Programs Navman Smart Desktop 2005 for iCN500 series. 2. On the Map menu, click Basemaps. The Navman Basemap Installer window will open. - Page 87 The Main Menu screen will display. Remove Basemap 1. Open Smart Desktop if it is not already open: Start Programs Navman Smart Desktop 2005 for iCN500 series. 2. On the Map menu, click Basemaps. The Navman Basemap Installer window will open.
-
Page 88: Smart Desktop Advanced Features
500 series | User Manual 22. Smart Desktop Advanced Features This section details advanced features of Smart Desktop. If you have not installed Smart Desktop, see page 75. To Find a City or Town 1. From the Map menu, click Find City. - Page 89 The POI File Name window will open. • Type a name for the file in the File Name box, then click OK. The file name can be up to eight characters with no spaces. iCN 500 series | User Manual...
- Page 90 500 series | User Manual 2. Add a POI to the POI File. • On the POI Editor window Edit menu, click New. The POI Details window will open. • Type a description for the POI in the Description box.
- Page 91 5. To select another file to delete, go back to step 2; otherwise, proceed to step 6. 6. Click OK and accept the changes. The selected file or files are deleted. iCN 500 series | User Manual Then... select the Active check box.
- Page 92 500 series | User Manual Backups You can save backups of all iCN Preferences and Favourites to your computer. To Back up your Preferences, Favourites and My Home 1. On the Smart Desktop File menu, click Backup. The Backup window will display.
-
Page 93: Accessories
Button functions are the same as the iCN control buttons except that the iCN cannot be turned on using the Remote Control. The Remote Control is supplied with the iCN 510 or 520 Premium edition. iCN 500 series | User Manual... -
Page 94: Appendix: Street Types
500 series | User Manual Appendix: Street Types Note: Belgium and Switzerland each list street types and their abbreviations in three languages. Country Austria Belgium (Dutch) Belgium (French) Belgium (German) Finland France Street Type BOULEVARD CHAUSSEE PLATZ STRASSE BAAN... - Page 95 QUARTIER ROND-POINT ROUTE ROUTE NATIONALE SQUARE TRAVERSE BOULEVARD DIJK DWARSSTRAAT DWARSWEG GRACHT KADE KANAAL LAAN LEANE LOANE PARK PLANTSOEN PLEIN SINGEL STRAAT STRJITTE STRAATWEG iCN 500 series | User Manual Abbreviation C.DA C.SO P.ZA P.LE DWSTR DWWG PLNTS SNGL STRWG...
- Page 96 500 series | User Manual Country Norway Portugal Spain Switzerland (German) Switzerland (French) Switzerland (Italian) United Kingdom Street Type GATA GATE PLASSEN VEGEN AVENIDA BAIRRO CALÇADA CAMINHO ESTRADA LARGO LARGUINHO PRAÇA QUARTO QUARTA QUINTA SÃO SANTA SANTO AVENIDA CALLE CALLEJÓN...
-
Page 97: Support Information
New Zealand pcnsupport.nz@navman.com www.navman.com NAVMAN DISCLAIM ALL LIABILITY FOR ANY USE OF THIS PRODUCT IN A WAY THAT MAY CAUSE ACCIDENTS, DAMAGE OR VIOLATE THE LAW. Compliance This device complies with part 15 of the FCC Rules. Operation is subject to the following two conditions: (1) This device may not cause harmful interference, and (2) this device must accept any interference received, including interference that may cause undesired operation. - Page 98 500 series | User Manual Notes...
- Page 100 MN000406B...