
Related Manuals for Hyundai HYW2500P


Summary of Contents for Hyundai HYW2500P
- Page 1 HYW2500P_HYW3000P_HYW3100P_HYW3100P2_HYW4000P Combined user manual Rev 7.pdf 1 16/12/2015 11:43:50...
- Page 2 Page 2 Rev 7 HYW2500P_HYW3000P_HYW3100P_HYW3100P2_HYW4000P Combined user manual Rev 7.pdf 2 16/12/2015 11:43:50...
-
Page 3: Table Of Contents
1. INTRODUCTION 2. PRODUCT IDENTIFICATION 3. SAFETY 7 – 11 4. PETROL WASHER COMPONENTS 5. ASSEMBLY 6. PRE-OPERATION CHECK LIST 7. STARTING YOUR WASHER 14 – 17 8. SHUTTING DOWN YOU WASHER 17 – 18 9. QUICK RELEASE NOZZLES 18 - 19 10. -
Page 4: Introduction
1. INTRODUCTION Attention: Read through the complete manual prior to the initial use of your pressure washer. 1.1. Carbon monoxide warning. 1.1.1. Carbon monoxide is a colourless and odourless gas. Inhaling this gas can cause death as well as serious long term health problems such as brain damage. The symptoms of carbon monoxide poisoning can include but not limited to the following;... -
Page 5: Product Identification
2. PRODUCT IDENTIFICATION 2.1. Pressure Washer 2.1.1. If you need to contact an authorised dealer or customer service for information on servicing, always provide the product model and identification numbers. 2.1.2. You will need to locate the model and serial number for the machine and record the information in the places provided below. - Page 6 3. SAFETY 3.1. Important safety instructions save these instructions. 3.1.1. WARNING – When using this product basic precautions should always be followed, including the following:- 3.1.1.1. Read all the instructions before using the product. 3.1.1.2. To reduce the risk of injury, close supervision is necessary when a product is used near children.
-
Page 7: Safety
3.3. Safety rules. This is the safety alert symbol. It is used to alert you to potential personal injury hazards. Obey all safety messages that follow this symbol to avoid possible injury or death. The safety alert symbol ( ) is used with a signal word (DANGER, CAUTION, WARNING), a pictorial and/or a safety message to alert you to hazards. - Page 8 3.3.7.1.1. Turn pressure washer OFF and let it cool at least 2 minutes before removing fuel cap. Loosen cap slowly to release pressure in tank. 3.3.7.1.2. Fill or drain fuel tank outdoors. 3.3.7.1.3. DO NOT overfill tank. Allow space for fuel expansion (25mm from top).
- Page 9 3.3.9. WARNING Starter cord kickback (rapid retraction) can result in bodily injury. Kickback will pull hand and arm toward engine faster than you can let go. Broken bones, fractures, bruises, or sprains could result. 3.3.9.1. NEVER pull starter cord without first releasing spray gun pressure. 3.3.9.2.
- Page 10 3.3.13.3. Keep at least 5 feet (1.5 m) of clearance on all sides of pressure washer including overhead. 3.3.14. WARNING Risk of eye injury. Spray can splash back or propel objects. 3.3.14.1. Always wear safety goggles when using this equipment or in vicinity of where equipment is in use.
-
Page 11: Safety
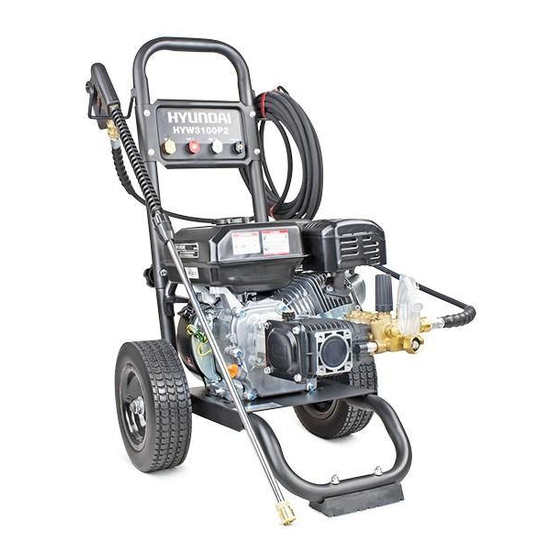
3.3.16.3. Tie up long hair and remove jewellery. 3.3.17. WARNING Unintentional sparking can result in fire or electric shock. 3.3.17.1. When Adjusting or Making Repairs to Your Pressure Washer 3.3.17.1.1. Disconnect the spark plug cap from the spark plug and place it where it cannot contact spark plug. - Page 12 4. PRESSURE WASHER COMPONENTS Read this operating manual and safety rules before operating your pressure washer. 1. Nozzles 2. High Pressure 3. Pressure 4. Water Inlet 5. High Pressure Detergent, 0°, Hose Connect Control Knob Connection for Outlet 15°, 40° & Turbo one end to water Varies pressure garden hose.
-
Page 13: Assembly
5. ASSEMBLY 5.1. Your pressure washer requires some assembly and is ready for use after it has been properly filled with both the recommended oil and fuel. 5.2. If you have any problems with the assembly of your pressure washer, please call the help line. -
Page 14: Pre-Operation Check List
6. PRE OPERATION CHECK LIST 6.1. Follow the Checklist Below Prior to Using the Machine Each Time 6.1.1. Check to ensure the engine oil is at the proper level. 6.1.2. Use SAE 15W40 Oil 6.1.3. Check the 2 handle knobs to ensure they are tight and will not vibrate loose. 6.1.4. - Page 15 7.4. Choose desired nozzle, pull back nozzle extension collar, insert nozzle and release collar. Tug on nozzle to make sure it is securely in place. See Nozzle Selection Section. 7.5. Uncoil high pressure hose and attach quick connect end of hose to base of spray gun.
- Page 16 7.11. IMPORTANT If drawing water from a barrel, it is advisable to have a gravity- fed supply. Use ONLY cold water (less than 38°C/100°F). 7.12. Connect the garden hose to the water inlet. Tighten by hand. 7.13. To start the machine, locate the engine switch on the side of the engine, and switch it to the ON position.
- Page 17 7.20. WARNING The high pressure stream of water that this equipment produces can cut through skin and its underlying tissues, leading to serious injury and possible amputation. Spray gun traps high water pressure, even when engine is stopped and water is disconnected, which can cause injury. 7.20.1.
-
Page 18: Quick Release Nozzles
8.3. WARNING The high pressure stream of water that this equipment produces can cut through skin and its underlying tissues, leading to serious injury and possible amputation. Spray gun traps high water pressure, even when engine is stopped and water is disconnected, which can cause injury. 8.3.1. - Page 19 9.3.2.4. Pull back on collar, insert new nozzle and release collar. Tug on nozzle to make sure it is securely in place. 9.4. Usage tips. 9.4.1. For most effective cleaning, keep nozzle from 8 to 24 inches away from cleaning surface. 9.4.2.
-
Page 20: Troubleshooting
10. TROUBLESHOOTING 10.1. If you are experiencing a problem that is not listed in this chart, or have checked all the possible cause listed and you are still experiencing the problem, contact Aftersales on 01646 687880. 10.2. Petrol engine trouble shooting. Problem Cause Correction... -
Page 21: Troubleshooting
10.3. Pump troubleshooting. Problem Causes Correction Using wrong nozzle Insert black soaper nozzle No low pressure detergent delivery Siphon hose or filter is plugged Unplug siphon hose Check supply hose, faucet and inlet water filter. Must be connected to Restricted or insufficient water water source which provides 6GPM supply. -
Page 22: Storage
storage. Run the engine for a short time to circulate stabilizer throughout the fuel system. Engine and fuel can then be stored up to 24 months. 11.4.3. If petrol is drained, the use of a fuel stabilizer in the storage container is still recommended to maintain freshness. -
Page 23: Parts Breakdown
12. PARTS BREAKDOWN NOTE Pressure washer HYW3100P (uses same pump and engine as the HYW2500P but with traditional style frame like HYW4000P). NOTE Pressure washer HYW3100P2 (which uses the same pump and engine as the HYW3000P but with the traditional style frame like the HYW4000P). - Page 24 Turbo Nozzle 85.600.125-02.2 Decal Plate 85.600.125-02R2 Handle Assembly 85.660.050B 12” Wheel 85.600.125-01R3 Frame Sub Assembly DH1004 Hyundai Engine - HY420 RSV4G40 AR Triplex Pump 85.300.119 Adaptor Kit 3/8” Male 85.300.102 Coupler 1/4” QD Female 85.400.005 Soap Hose Assembly - 1m DN1028 HP Rubber Hose - 15m 85.300.103...
- Page 25 12.3. Pressure Washer Pump (HYW2500P). Code Description Code Description 800220 Screw 3700220 Valve 2841620 Head 3700210 Spring 2840830 Screw 800560 O-ring 600180 O-ring 3700200 Injector 2841530 Plug 2841220 Fitting 740290 O-ring 2841230 Fitting 2849050 Complete valve 1266330 Filter 1470210 O-ring...
- Page 26 A = KIT 42123 VALVES E = KIT 42701 O-RINGS E = KIT 42701 O-RINGS B = KIT 42161 PISTONS C = KIT 42127 OIL SEALS D = KIT 2235 OIL SEALS Page 26 Rev 7 HYW2500P_HYW3000P_HYW3100P_HYW3100P2_HYW4000P Combined user manual Rev 7.pdf 26 16/12/2015 11:43:51...
- Page 27 12.4. Annovi Reverberi Pump HYW3000P Code Description Code Description Code Description 1060120 801080 Screw 802190 Screw 2840970 Screw 1381550 Washer 2760110 Rear cover 1980390 Handle insert 2761050 Head 1321190 Bearing 1980220 Plate spring 880581 Plug 1321080 Snap ring Pump head 2760410 Spring 2760180...
- Page 28 A = KIT 2186 VALVES E = KIT 2190 O-RINGS B = KIT 2187 PISTONS C = KIT 2188 OIL SEALS F = KIT 2191 SUPPORT RINGS D = KIT 2235 WATER SEALS Page 28 Rev 7 HYW2500P_HYW3000P_HYW3100P_HYW3100P2_HYW4000P Combined user manual Rev 7.pdf 28 16/12/2015 11:43:51...
- Page 29 12.5. Annovi Reverberi Pump HYW4000P. Code Description Code Description Code Description 1060120 1381550 Washer 1321190 Bearing 2840970 Screw 2761050 Head 1321080 Snap ring Pump head 1980390 Handle insert 880581 Plug 2769225 pre-ass. 1980220 Plate spring 2761450 Plug 480671 Seal Complete 2760410 Spring 2769054...
- Page 30 A = KIT 42666 VALVES E = KIT 2190 O-RINGS B = KIT 2187 PISTONS C = KIT 2188 OIL SEALS F = KIT 2191 SUPPORT RINGS D = KIT 2189 WATER SEALS Page 30 Rev 7 HYW2500P_HYW3000P_HYW3100P_HYW3100P2_HYW4000P Combined user manual Rev 7.pdf 30 16/12/2015 11:43:51...
-
Page 31: Maintenance
13. MAINTENANCE 13.1. The user should take the table below into consideration make sure the machine is kept in perfect working condition. FREQUENCY First Every Every 6 Every Item Check Every Time Month or season or months or year or 20 hours 50 hours 100 hours... -
Page 32: Declaration Of Conformity
14. DECLARATIONS of CONFORMITY 14.1. Genpower Ltd confirms that this Hyundai petrol pressure washer conforms to the following CE directives: 14.1.1. 2006/42/EC Machinery directive 14.1.2. 2004/108/EC EMC directive 14.1.3. 2000/14/EC Noise emissions directive 14.1.4. 97/68/EC NRMM Emissions directive Page 32 Rev 7 HYW2500P_HYW3000P_HYW3100P_HYW3100P2_HYW4000P Combined user manual Rev 7.pdf 32... -
Page 33: Contact Details
15. CONTACT DETAILS Address Genpower Limited, Isaac Way, Pembroke Dock, Pembrokeshire, SA72 4RW, UK. Telephone +44 (0) 1646 687880 Fax. +44 (0) 1646 686198. Email contact; Technical service@genpower.co.uk Web site; www.hyundaipowerequipment.co.uk Page 33 Rev 7 HYW2500P_HYW3000P_HYW3100P_HYW3100P2_HYW4000P Combined user manual Rev 7.pdf 33 16/12/2015 11:43:51... - Page 34 Page 34 Rev 7 HYW2500P_HYW3000P_HYW3100P_HYW3100P2_HYW4000P Combined user manual Rev 7.pdf 34 16/12/2015 11:43:51...
- Page 35 Page 35 Rev 7 HYW2500P_HYW3000P_HYW3100P_HYW3100P2_HYW4000P Combined user manual Rev 7.pdf 35 16/12/2015 11:43:51...
- Page 36 Isaac Way, London Road Pembroke Dock, UNITED KINGDOM, SA72 4RW T: +44 (0) 1646 687 880 F: +44 (0) 1646 686 198 info@hyundaipowerequipment.co.uk www.hyundaipowerequipment.co.uk HYW2500P_HYW3000P_HYW3100P_HYW3100P2_HYW4000P Combined user manual Rev 7.pdf 36 16/12/2015 11:43:51...
Need help?
Do you have a question about the HYW2500P and is the answer not in the manual?
Questions and answers