
Related Manuals for Vodavi Starplus DHS


Summary of Contents for Vodavi Starplus DHS
- Page 1 Feature Package 3 /DHS-E The Answer To Your Company’s Growing Communication Needs Technical Manual...
- Page 2 EATURE ACKAGE ® ™ ™ STARPLUS and DHS-E Technical Manual Issue 2—March 2000 Part Number: SP7050-03...
- Page 3 VODAVI reserves the right to make changes in specifications at any time and without notice. The information furnished by VODAVI in this material is believed to be accurate and reliable, but is not warranted to be true in all cases.
-
Page 4: Table Of Contents
Contents Introduction Regulatory Information (U.S.A.) ......................1-1 Telephone Company Notification ....................1-1 Incidence of Harm ..........................1-1 Changes in Service ..........................1-2 Maintenance Limitations .........................1-2 Hearing Aid Compatibility ......................1-2 UL/CSA Safety Compliance ......................1-2 Notice of Compliance ........................1-2 Toll Fraud and DISA Disclaimer ......................1-3 DHS Description and Installation DHS General Description ........................2-1 System Technology ...........................2-1 System Components .........................2-1... - Page 5 March 2000 Contents DHS-E Description and Installation DHS-E Description .............................3-1 System Technology ...........................3-1 KSU Components ..........................3-1 Telephone Components ........................3-2 System Administration ........................3-3 Key Service Unit ..........................3-3 Power Supply ............................3-4 Central Processor Unit (CPU) ......................3-4 Modem ..............................3-4 3 x 8 Module ............................3-4 DHS-E Technical Specification Tables ....................3-6 DHS-E Installation ...........................
- Page 6 March 2000 Contents No Answer ............................4-21 Busy ..............................4-21 Busy/No Answer ..........................4-21 Idle ................................ 4-21 Direct (All Call) ..........................4-21 Follow Me ............................4-22 Cancel ..............................4-22 Caller Identification (ICLID) ......................... 4-24 Name/Number Caller ID <FP3> ....................4-25 Calling Number/Name SMDR .....................
- Page 7 March 2000 Contents Feature Button Programming ......................4-55 Flexible Line Assignment ........................4-58 Flexible Receive Assignment ......................4-59 Flexible Ring Assignment ........................4-59 Forced Intercom Call Forward ......................4-59 Forced Tone Ringing ..........................4-60 Headset Mode ............................4-61 Hold ................................4-62 Abandon (Loop Supervision) ......................
- Page 8 March 2000 Contents Reminder Tones ............................4-86 Ringing Line Priority ..........................4-87 Save Dialed Number (SDN) ......................... 4-87 Station Message Detail Recording (SMDR) ................... 4-88 Resource - SMDRX_RATE ......................4-90 Speed Dialing ............................4-90 Station Feature Status Check ......................4-92 Station Groups ............................
- Page 9 March 2000 Contents Busy Station ............................5-8 Busy CO Line ............................5-8 CO Line Access ............................5-8 Line Group ............................5-8 Specific Line ............................5-9 Do Not Disturb (DND) ..........................5-9 Flash ................................5-10 Hold ................................5-10 Flash ..............................5-10 Retrieve ............................... 5-11 Retrieve from Another Station ....................5-11 Hot Line (Ring Down) ..........................
- Page 10 March 2000 Contents Account Code Forced ........................6-15 Station Groups ..........................6-15 Warning Tone ........................... 6-15 Drop Time-Out ..........................6-16 Station Position ..........................6-16 Voice Mail Port ..........................6-16 DSS Owner ............................6-16 CO Line Configuration .......................... 6-17 CO Line Parameters ........................6-17 Dialing Type Selection ........................
- Page 11 viii March 2000 Contents Resource Configuration ........................6-29 Ring Scheme ............................. 6-29 Letter Type ............................6-29 Attendant ............................6-30 Alternate Attendant ........................6-30 System Alarm ............................ 6-31 Nite Start ............................. 6-31 Nite End .............................. 6-31 Database Password ........................6-31 User Password ..........................6-32 User Names ............................
- Page 12 March 2000 Figures Figures DHS Unit (cover removed) ..........................2-3 3 x 8 Module ................................2-5 6-Port CO Module ............................... 2-5 MOH/BGM Module ............................. 2-6 Option Module ..............................2-6 Basic Key Telephone ............................2-7 Enhanced Key Telephone ..........................2-8 Executive Key Telephone ..........................2-9 DSS Console ...............................
- Page 13 March 2000 Figures 1/8 in. Phono Jack ............................3-32 Motherboard Components .......................... 3-33 Loud Bell Control Installation ........................3-34 2-Port Analog Adapter ........................... 3-36 Motherboard ..............................3-38 Soft Buttons ................................4-1 System Configuration ............................. 4-24 F3 Soft Button ..............................4-25 Database Programming Functions—Station and CO Line ..............
- Page 14 March 2000 Tables Tables FCC Compliance ..............................1-1 System Configurations ............................2-2 Digital Hybrid System Capacities ....................... 2-13 Electrical Specifications ..........................2-16 Environmental Specifications ........................2-17 Unit Specifications ............................2-18 Maximum Cable Length ..........................2-19 Dialing Specifications ............................. 2-19 FCC Registration Numbers ..........................2-19 Audible Signals ..............................
- Page 15 March 2000 Tables SMDR (Data Examples) ........................... 4-89 Voice Announce ............................... 4-97 SLT Feature Access Codes ..........................5-1 SLT Port Numbering (DHS) ........................... 5-15 SLT Port Numbering (DHS-E) ........................5-16 Database Programming Table ........................6-4 System Ring Scheme ............................6-29 Letter Type ................................
-
Page 16: Introduction
Introduction The information necessary to install, program, operate, and maintain the ® STARPLUS systems is addressed in this manual. DHS/DHS-E™... -
Page 18: Regulatory Information (U.s.a.)
Regulatory Information (U.S.A.) Regulatory Information (U.S.A.) The Federal Communications Commission (FCC) has established rules that allow the direct connection of the DHS/DHS-E™ systems to the telephone network. Certain actions must be undertaken or understood before the connection of customer provided equipment is completed. -
Page 19: Changes In Service
Regulatory Information (U.S.A.) Changes in Service The local telephone company may make changes in its communications facilities or procedures. If these changes affect the use of the DHS/DHS-E system or compatibility with the network, the telephone company must give written notice to the user to allow uninterrupted service. -
Page 20: Toll Fraud And Disa Disclaimer
Vodavi has made every reasonable effort to ensure that this product works in most business environments. However, there may be some environments (RFI and EFI) in which this product may not work properly. - Page 21 Toll Fraud and DISA Disclaimer...
-
Page 22: Dhs Description And Installation
DHS Description and Installation Digital Hybrid System is a full-featured digital key STARPLUS DHS/DHS-E™ telephone system. The common system architecture supports three digital telephone models, a Direct Station Selector (DSS) <FP3> and an expandable analog adaptor interface. The is designed to meet the telecommunications needs of... -
Page 24: Dhs General Description
DHS General Description DHS General Description System Technology product line incorporates state of the art digital technology for voice switching and call processing utilizing Pulse Code Modulation and Time Division Multiplexing (PCM/TDM). The family is engineered to allow migration of the digital terminals and terminal accessories throughout the entire product line. -
Page 25: External Components
DHS General Description Two 3 x 8 Modules may be added to the initial 3 x 8 module in the Basic KSU. Alternately, a 6-Port CO Module may be substituted for one 3 x 8 module for greater flexibility. The maximum capacity is either 9 CO lines x 24 stations, or 12 CO lines x 16 stations. -
Page 26: System Administration
DHS General Description System Administration The system default customer data base can be entered and changed, under password control, from any Executive Key Telephone. All Customer information is protected by an internal rechargeable NiCad or NiMh battery. Programmable password protection is allowed for each station, system administrator and external (DISA) callers. -
Page 27: Power Supply
DHS General Description Power Supply The power supply circuitry of the incorporates a linear design transformer with a choice of input voltage taps. The transformer primary windings are shipped wired for 117V AC applications; a factory insulated tap wire may alternatively be connected for 230V AC applications. -
Page 28: 6-Port Co Module
DHS General Description Figure 2-2: 3 x 8 Module 6-Port CO Module The 6-Port CO Module may be installed in place of a 3 x 8 module in the last card position. The 6-Port CO Module interfaces with 6 loop-start CO lines. No digital station interface is provided on this module. -
Page 29: Standard Moh/Bgm Module
DHS General Description Standard MOH/BGM Module The standard MOH/BGM Module is installed at the factory and used to interface with one external music source via an 1/8 in. phono type connector. This module must be removed if the optional module is installed. Figure 2-4: MOH/BGM Module Option Module The Option Module replaces the standard MOH/BGM Module. -
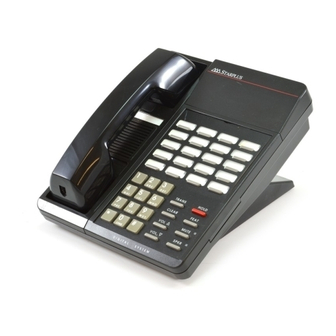
Page 30: Digital Key Telephones
DHS General Description Digital Key Telephones DHS-E support three proprietary digital key telephones (Basic, Enhanced and Executive). All key telephone models operate on one single twisted pair and provide D/A and A/D conversion at the terminal. These key telephones support hot key pad for dialing digits at any time. - Page 31 DHS General Description Enhanced Key Telephone The Enhanced Key Telephone is fully equipped for hands-free, speakerphone operation. This key telephone is expanded to 28 buttons. Eight fixed function buttons remain consistent with those of the Basic Key Telephone. Twenty buttons are user-programmable feature buttons equipped and dual color LED with pre-assigned default settings for quick power up operation.
- Page 32 DHS General Description Executive Key Telephone The Executive Key Telephone model has a 2 x 16, 32-character Super Twist LCD display, with three interactive Soft Buttons to enhance system features operation. The Super Twist LCD eliminates the need for contrast adjustment and enhances angled viewing position clarity of displayed data.
-
Page 33: Direct Station Selector (Dss) Console
2-10 DHS General Description Direct Station Selector (DSS) Console <FP3> Previously only available on the DHS-E, the Direct Station Selector (DSS) Console is now also available on the DHS. One DSS Console may be assigned to a station. Each DSS Console uses one Digital Station Port. -
Page 34: 2-Port Analog Adapter
DHS General Description 2-11 2-Port Analog Adapter A 2-Port Analog Adapter is optionally available which will support most auxiliary equipment within a business environment such as fax machines, answering devices and Single Line Telephones (SLT). Each adapter requires an unused digital station port and will yield two analog device interfaces. -
Page 35: Two-Port Analog Expander
2-12 DHS General Description Two-Port Analog Expander A 2-Port Analog Expander module is optionally available and is designed to be installed inside the 2-Port Analog Adapter housing. The 2-Port Analog Expander provides the same interface capabilities of the 2-Port Analog Adapter and is in fact comprised of the same circuit board used inside the 2-Port Analog Adapter. -
Page 36: Dhs Technical Specification Tables
DHS Technical Specification Tables 2-13 DHS Technical Specification Tables Table 2-2: Digital Hybrid System Capacities Component Description System Programming Memory Protection 300 Hours on a fully-charged battery (internal Nicad/Nimh battery requires 14 continuous- powered hours of system operation to become fully charged.) Ports: CO/PBX/Centrex Lines 12 (Note: 16 stations max. -
Page 37: Digital Hybrid System Capacities
2-14 DHS Technical Specification Tables Table 2-2: Digital Hybrid System Capacities System Attendants 1 + 1 Alternate position for overflow call handling. Hunt Groups Members per Group Group Types Pilot Hunt Group (HG), All Ring Group, or Voice Mail (VM) Group Voice Mail Groups: 1 (Selected as VM type from HG) Members (ports) - Page 38 DHS Technical Specification Tables 2-15 Table 2-2: Digital Hybrid System Capacities Callback Request Per Station Camp On By A Busy Station Stations Camped On To Station Stations Camped On To Busy Line Message - Executive Notification 6 Preprogrammed; 1 Personal per station Message - Executive Preprogrammed 6 Preprogrammed;...
-
Page 39: 1/8 In. Phono Jack
2-16 DHS Technical Specification Tables Table 2-3: Electrical Specifications Component Description AC Power Source Dedicated 117/230V AC + 15% (47-63 Hz single phase) Power consumption 1.5A max. at 120V AC (180 W) Power Supply fuse: AC input 2A 250V DC output 1A 125V Idle Channel Noise -74 dB... -
Page 40: Environmental Specifications
DHS Technical Specification Tables 2-17 Table 2-4: Environmental Specifications Requirements In Operation In Storage Temperature KSU 32 to 104 -40 to 185 0 to 40 -40 to 85 Recommended Operating 70 to 78 Temperature Temperature Station Instruments 32 to 113 -40 to 185 0 to 45 -40 to 85... -
Page 41: Basic Key Telephone
2-18 DHS Technical Specification Tables Table 2-5: Unit Specifications Part # Description Dimensions Weight SP7000-00 Basic KSU ( 18.4 in. 460 mm 4.0 Kg 10.8 in. 270 mm 8.8 lb 4.2 in. 105 mm SP7100-00 3 x 8 Module 8.6 in. 215 mm 0.4 Kg 5.2 in. -
Page 42: Dialing Specifications
DHS Technical Specification Tables 2-19 Table 2-6: Maximum Cable Length Digital Key Telephone 26 AWG - (850 ft) 255 m (Distance measures in linear ft. of cable from KSU 24 AWG - (1416 ft) 425 m to DKT.) 22 AWG - (1983 ft) 700 m Standard SLT 26 AWG - (650 ft) 195 m (Distance measures in linear ft. -
Page 43: Audible Signals
2-20 DHS Technical Specification Tables Table 2-9: Audible Signals Signal Frequency Cadence CO Line Ringing: Scheme 0 300 ms On, 400 ms Off, 300 ms On, 4 seconds Off Scheme 1 1 second On, 3 seconds Off Scheme 2 1 second On, 3 seconds Off Distinctive 1 SLT bell Follows ring cadence of Ring Scheme selected... -
Page 44: X 8 Module
DHS Technical Specification Tables 2-21 Table 2-10: Mean Time Between Failure Analysis Component MTBF (hr) Case Assembly 100.0 Power Supply Unit 193.0 CPU Module 3095.0 Standard Music On Hold Module 325.7 3 x 8 Module 5744.0 6-Port CO Line Module 7201.2 Option Module 2866.0... -
Page 45: Preparation For Dhs Installation
2-22 Preparation for DHS Installation Preparation for DHS Installation Installation Overview 1. Plan the installation, including the KSU and Main Distribution Frame (MDF) location, station locations, cable runs, and optional equipment. 2. Mount a backboard in the designated MDF location. 3. -
Page 46: General Site Considerations
Preparation for DHS Installation 2-23 General Site Considerations The first step of installation, is to locate an acceptable site for the common equipment (KSUs, boards, etc.). When locating a mounting site for the KSUs, the following points must be considered: KSUs are designed for wall mounting and should not be mounted directly to a masonry or plasterboard wall. - Page 47 2-24 Preparation for DHS Installation Six conductor modular jack assemblies for all station instruments (recommended). Standard punch-down terminal block(s), 66M1-50 type, as required. Industry-standard, 25-pair cable(s) with a 50-pin male amphenol/AMP type connector for connection from each equipped 3 x 8 module to the MDF. AC voltage surge/spike protector.
-
Page 48: Dhs Installation
DHS Installation 2-25 Verify On-Site Equipment Once the equipment installation site is identified and a dedicated AC outlet, earth ground, adequate lighting and ventilation are available, verify that all equipment required is on-site and was not damaged during shipping: Unpacking the KSU - The Key Service Unit is shipped in its own protective carton and contains the following: Basic KSU One mounting template... - Page 49 2-26 DHS Installation 2. KSU Grounding To ensure that the system will operate properly, a good earth ground is recommended. The Telco protector ground terminal or a metallic COLD water pipe will usually provide a reliable ground path. If cold water pipe is used, carefully check that the pipe does not contain insulated joints that could isolate the ground.
-
Page 50: Battery Sizing Chart
DHS Installation 2-27 Table 2-11: Battery Sizing Chart Battery Power (Hr) Configuration 12 AH 20 AH 40 AH 3 x 8 6 x 16 9 x 24 Cautionary Steps To reduce the risk of fire or injury to persons, read and follow these tips: Use only the following type and size battery(ies) listed here as the maximum battery type and size: 24vdc, 40 AH. -
Page 51: 6-Port Co Module
2-28 DHS Installation KSU power transformer (where the KSU AC power cord is located) is positioned in the upper left corner. The power switch and Power/Heartbeat LED are positioned at the left side of the KSU toward the bottom. It is very important that the KSU be correctly mounted to allow proper power supply heat dissipation. -
Page 52: Dhs Components
DHS Installation 2-29 1/8 in. Phono Jack for MOH/BGM AC Power Transformer Option Module Standard MOH 117/230V AC Connector BGM Module Spare Fuses (2) 3 x 8 Module DC Fuse AC Fuse CPU Module System Software Eprom socket "U9" Power Connector 25 Pair Champ Connector Power Switch... - Page 53 2-30 DHS Installation 5. Remove one of the module-securing screws only so the existing board stays in place, and retain the screw for later use. 6. Insert one of the stand-off posts into the screw position where the screw from Step 5 was removed.
-
Page 54: 6-Port Co Module
DHS Installation 2-31 6-Port CO Module The 6-Port CO Module is installed to increase system capacity of CO lines. The 6-Port CO Module is shipped with two 6-conductor cords, two surface-mount modular jacks and four stand-off posts. Regardless of how many 3 x 8 modules are installed, only one 6-Port CO Module may be installed. -
Page 55: Ksu Expansion Module Installation
2-32 DHS Installation 9. Connect two 6-Conductor Line Cords into Jacks on 6-Port CO Module, and feed the Cables through the opening in the lower left of the cabinet. 10. Mark CO Line Cords. 11. Replace the KSU cover and secure it with cover screws. 12. -
Page 56: Option Module
DHS Installation 2-33 Option Module The Option Module provides advanced call processing features like External Call Forward, Automatic Busy Redial, etc. (Generally, features that require enhanced call monitoring via Tone Detectors and DTMF receivers). The Option Module is equipped with two DTMF receivers and two Tone Detectors. -
Page 57: Option Module
2-34 DHS Installation BGM Volume Page Volume MOH Volume SMDR Ext. Page ICLID/PC Loudbell Programming Figure 2-16: Option Module... -
Page 58: Ksu Option Module Installation
DHS Installation 2-35 Figure 2-17: KSU Option Module Installation Standard MOH/BGM Module The Standard MOH/BGM Module is shipped installed in the KSU. In the event that the Option Module was installed and the Standard MOH/BGM Module is to be re-installed, follow these steps: 1. -
Page 59: Standard Moh/Bgm Module
2-36 DHS Installation Figure 2-18: Standard MOH/BGM Module 6. Terminating Connections 3 x 8 Module(s) 1. The CO line connections (as well as station connections) are made to the 3 x 8 Standard Module and Expansion Module(s) via the 25-pair connector located along the bottom edge of the installed module. -
Page 60: Wiring Designations For 3 X 8 Modules
DHS Installation 2-37 Figure 2-19: Wiring Designations for 3 x 8 Modules 6-Port CO Module 1. CO line interface to the 6-Port CO Module is made through two RJ25 type modular connectors on the 6-Port CO Module located along the bottom edge of the installed module. -
Page 61: Co Lines Connections, 6-Port Co Module
2-38 DHS Installation Table 2-12: CO Lines Connections, 6-Port CO Module 6-Port CO Module Jack Cable Pair Jack Wire Designation Module Jack Color (if applicable) CO (1-3) White/Blue Green CO line port 1 Tip Blue/White CO line port 1 Ring White/Orange Black CO line port 2 Tip... -
Page 62: Maximum Cable Length
DHS Installation 2-39 7. Station Cabling Floor plans should be developed to aid in proper station cabling in a star (home run) configuration from the KSU. The cables are run from the station locations to the STN block at the MDF. Both ends of each cable should be labeled with the station's circuit number. -
Page 63: Station Location Cable Terminations
2-40 DHS Installation Terminating Cables at Station Locations At each station location, terminate station cables on 4-conductor modular jack assemblies. Although only one pair is required for key telephone operation, the second pair is wired through to the ADP jack for a variety of applications at the desktop. For exception, refer to Table 2-13 Table 2-13: Station Location Cable Terminations... -
Page 64: High Profile Mount
DHS Installation 2-41 High Profile Mount For the High Profile Mounted position, reference the illustration below and attach the Base Mount wedges. Figure 2-20: High Profile Mount 1. The small wedge is always used for the various telephone mounting positions. 2. -
Page 65: Low Profile Mount
2-42 DHS Installation 3. Position the smaller wedge as in the illustration at the right for wall mounting. Once in position, the smaller wedge and key telephone bottom housing provide for standard 630 type wall mount wall jacks. Low Profile Mount When the key telephone is to be desk mounted in the Low Profile position: Figure 2-22: Low Profile Mount 1. -
Page 66: Key Telephone Modular Jack Locations
DHS Installation 2-43 Jack Jack Hinge-anchors for mounting Lock-anchors for mounting base base Rubber Skid-stops Figure 2-23: Key Telephone Modular Jack Locations ADP Jack - When wired at the MDF, the second pair of the telephone line cord/cable will activate this jack for any analog device function. This jack and wiring are completely independent of the key telephone operation and may be used for system resources. - Page 67 2-44 DHS Installation 5. Press Show. 6. Then press Next until DSS Owner displays, as shown: DS S O wner : bk sp nex t 7. Press Chg, and enter the correct Station Number that will be used with the DSS. 8.
-
Page 68: Rs-232C Db-9 Connector
DHS Installation 2-45 Table 2-14: RS-232C DB-9 Connector Male DB-9 Designation Consult your peripheral device documentation for additional information. 10. Connecting and Programming Caller ID The purpose of this service is to provide calling party identification to the dialed party. This information can be the calling party’s phone number, name, or a combination of this information. -
Page 69: Caller Id Connection
2-46 DHS Installation Male DB-9 Connection Male DB-9 Caller ID 1480-00 Switch Settings: 1440-00 Switch Settings: Figure 2-24: Caller ID Connection Programming Caller ID Perform the following steps to program the 1480-00 Caller ID data collection module for system. From any executive station: 1. - Page 70 DHS Installation 2-47 At any executive station: 1. [FEAT] + [#] + [ ] + [000000] (default password) 2. Press [SHOW] 3. Press [NEXT] until RESOURCE displays 4. Press [SHOW] 5. Press [NEXT] until RMT X RATE displays 6. Press [CHG] until 1200 7.
-
Page 71: External Paging Equipment Installation
2-48 DHS Installation Page Volume External Page Figure 2-26: External Paging Equipment Installation Conditions If the one-way paging equipment requires DTMF signaling from the key telephone, then an unused CO Line should be dedicated for proper page interface. For Talk-back Paging or Multi-zone External Paging, the manufacturer recommends using a vacant CO line port for best operation. - Page 72 DHS Installation 2-49 12. External Music Source The Basic KSU is shipped with the Standard MOH/BGM Module. This module is located on a stand-off post toward the upper right corner of the CPU Module when viewing the installed KSU. The module provides a 1/8 in. phono jack (refer to Figure 2-25: 1/8 in.
-
Page 73: Loud Bell Control Installation
2-50 DHS Installation To set a desirable MOH level: Set the trim POT (labeled VR1 MOH VOL) at about mid-point. Access an idle CO line, and dial into the system on another CO line. When the system begins to ring, press [HOLD] to place the first call on hold. Answer the ringing CO line. - Page 74 DHS Installation 2-51 5. Terminate the other end of the cable on an industry standard 66M1-50 block for interconnection to the loud bell and power source. 6. Terminate the Loud Bell and power supply leads on an industry standard 66M1-50 block.
- Page 75 2-52 DHS Installation B2 voice channel station number is 59 (the adapter’s channel station number plus the difference of 48). Use this relationship in numbering to determine the B2 channel station number, or simply dial an Executive Key Telephone from the B2 station port and read the display.
-
Page 76: System Check-Out
System Check-Out 2-53 16. Headset Installation The system supports integrated headset operation. Customers may take advantage of this standard system feature at any key telephone. Most headsets will operate without extra equipment or need for additional steps in user operation. Installation 1. -
Page 77: Feature Upgrade Procedure
5. Carefully remove the new software EPROM from its packing material and inspect for damage (if any damage is noticeable please contact Vodavi Customer Service). 6. Install the new EPROM into the vacated U9 socket with extreme care so that no EPROM pins are bent when inserted. -
Page 78: Dhs Components
Feature Upgrade Procedure 2-55 1/8 in. Phono Jack for MOH/BGM AC Power Transformer Option Module Standard MOH 117/230V AC Connector BGM Module Spare Fuses (2) 3 x 8 Module DC Fuse AC Fuse CPU Module 25 Pair Champ Power Switch Connector Initialization System... - Page 79 2-56 Feature Upgrade Procedure...
-
Page 80: Dhs-E Description And Installation
DHS-E Description and Installation The STARPLUS ® Digital Hybrid System is a full-featured digital key DHS-E™ telephone system. The common system architecture supports three digital key telephone models (refer to Chapter 2, DHS Description and Installation, Digital Key ) a Direct Station Selector (DSS), and an expandable analog adaptor Telephones interface. -
Page 82: System Technology
DHS-E Description DHS-E Description System Technology Incorporating state-of-the-art digital technology for voice switching and call processing, DHS-E utilizes Pulse Code Modulation and Time Division Multiplexing (PCM/TDM). DHS-E family is engineered to allow migration of digital telephones and accessories throughout the entire product line (refer to Digital Key Telephones, in Chapter 2, DHS Description and Installation). -
Page 83: Telephone Components
DHS-E Description DHS-E is expandable to meet a variety of applications. Regardless of the configuration, the system has sufficient resources to allow completely non-blocked access to all facilities (intercom and CO lines). An external music source may be connected to each BGM/MOH Jacks via a 1/8 in. phono plug for BGM/MOH listening. -
Page 84: System Administration
DHS-E Description System Administration The system's default customer data base can be entered and changed, under password control, from any Executive Key Telephone. All Customer information is protected by an internal rechargeable NiCad or NiMh battery. Programmable password protection is allowed for each station, system administrator and external (DISA) callers. -
Page 85: Power Supply
DHS-E Description Power Supply The power supply circuitry of the DHS-E incorporates a linear design transformer with a choice of input voltage taps. The transformer primary windings are shipped wired for 117V AC applications. Since the power supply is linear in design the output voltage varies between 21.6V DC and 32V DC depending on load and stability of the input voltage. - Page 86 This pre-qualification will prevent noise problems on stations that can result from a firmware incompatibility issue. This issue can Figure 3-2: Firmware be corrected by obtaining the correct firmware from Vodavi (refer to Caution for further information).
-
Page 87: Dhs-E Technical Specification Tables
DHS-E Technical Specification Tables DHS-E Technical Specification Tables Table 3-2: Digital Hybrid System Capacities Component Description Customer Database memory protection 300 hr on a fully charged battery (the internal Nicad/Nimh battery requires 14 hr, of continuous system operation power be fully charged.) Ports: CO/PBX/Centrex Lines Digital Stations... - Page 88 DHS-E Technical Specification Tables Table 3-2: Digital Hybrid System Capacities (Continued) Hunt Groups: Members per group Group Types Pilot Hunt Group, All Ring Group or Voice Mail Group Voice Mail Groups: 1 (Selected as VM type from HG.) Members (ports) Integration Method: In-band VM Message Waiting...
- Page 89 DHS-E Technical Specification Tables Table 3-2: Digital Hybrid System Capacities (Continued) Save Number Redial 16 digits per station User Saved Number Redial 20 digits per station Callback request per station Camp On by a busy station Stations Camped on to a station Stations Camped on to a busy line Message - Executive Notification: 6 preprogrammed...
-
Page 90: Electrical Specifications
DHS-E Technical Specification Tables Table 3-3: Electrical Specifications Component Description AC Power source: Dedicated 117V AC (+10%), 60Hz single phase Power consumption: 1.5A max. at 120V AC (180 W) Power Supply fuse: AC input 2A 250V DC output 1A 125V Idle Channel Noise: -74 dB Cross Talk Attenuation:... - Page 91 3-10 DHS-E Technical Specification Tables Table 3-5: Unit Specifications Part Number Description Dimensions Weight DHS-E SP7000-10 Basic KSU ( 25.13 in 25.8 lbs 13.62 in 4.80 in SP7100-00 3 x 8 Module 8.6 in. 0.88 lbs. 5.2 in. 0.88 in. SP7310-XX DSS Console 8.88 in...
-
Page 92: Dialing Specifications
DHS-E Technical Specification Tables 3-11 Table 3-6: Maximum Cable Length 26 AWG - 850 ft. Digital Key Telephone 24 AWG - 1416 ft. (Distance measures in linear feet of cable from KSU to DKT.) 22 AWG - 1983 ft. Standard Single Line Telephone 26 AWG - 650 ft. -
Page 93: Audible Signals
3-12 DHS-E Technical Specification Tables Table 3-9: Audible Signals Signal Frequency Cadences CO Line Ringing: Scheme 0 300ms ON, 400ms OFF, 300ms ON, 4 seconds OFF Scheme 1 1 second ON, 3 seconds OFF Scheme 2 1 second ON, 3 seconds OFF Distinctive 1 SLT bell Follows ring cadence of Ring Scheme selected... -
Page 94: X 8 Module
DHS-E Technical Specification Tables 3-13 Table 3-10: Mean Time Between Failure Analysis Component MTBF (hr) DHS-E System 2 (3 x 8) Modules (6 x 16) 72347.9 Case Assembly 109.0 Power Supply Unit 193.0 CPU Module 7399.1 Modem Board 377.0 3 x 8 Module 5744.0 Basic Key Telephone 2988.3... -
Page 95: Dhs-E Installation
3-14 DHS-E Installation DHS-E Installation Installation Overview 1. Plan the installation, including the Key Service Unit (KSU) and main distribution frame (MDF) location, station locations, cable runs, ground location, and optional equipment. 2. Mount the Backboard, and sketch placement of all components. 3. -
Page 96: Necessary Tools And Supplies
DHS-E Installation 3-15 General Site Considerations The first step of DHS-E installation is to locate an acceptable site for the common equipment (KSUs, boards, etc.). When locating a mounting site for the KSUs, the following points must be considered: KSUs are designed for wall mounting and should not be mounted directly to a masonry or plasterboard wall. - Page 97 3-16 DHS-E Installation Six conductor modular jack assemblies for all station instruments (recommended). Standard punch-down terminal block(s), 66M1-50 type, as required. Industry-standard, 25-pair cable(s) with a 50-pin male amphenol/AMP type connector for connection from each equipped 3 x 8 module to the MDF. AC voltage surge/spike protector.
-
Page 98: Dhs-E Installation
DHS-E Installation 3-17 Check that the type and quantity of boards received is correct. DO NOT unpack the individual boards at this time. Verify optional equipment is received and is in good condition. Verify that a Power Line Surge Protector is on-site. If any equipment is damaged or missing, notify the appropriate personnel to correct the situation. -
Page 99: Battery Sizing Chart
3-18 DHS-E Installation Clamp voltage transients at 300V within 5 nsec. when exposed to wave-forms as described in the ANSI/IEEE Standard C62.41-1980 (IEEE 587). Reduce RFI/EMI noise by at least 20 dB at frequencies between 5 kHz and 30 MHz. 3. - Page 100 DHS-E Installation 3-19 Charge the battery(ies) provided with or identified for use with this product only in accordance with the instructions and limitations specified in this manual. Observe proper polarity orientation between the battery(ies) and battery charger. Do not mix old and new batteries in this product (applies to products employing more than one user replaceable secondary battery).
-
Page 101: Dhs-Ecpu Board
3-20 DHS-E Installation 3. Installing 3 x 8 Modules DHS-E The 6-Port CO Module CANNOT be used in the system. System Software Program/ICLID Page Loud Bell BGM Potentiometer SMDR MOH Potentiometer Modem Initialize EXP Potentiometer 3 x 8 Module DHS-E Figure 3-4: CPU Board DHS-E... - Page 102 DHS-E Installation 3-21 System power should be OFF before plugging in the station cable or while working on the station punch-down block. (Although each port is over-current protected, unnecessary shorting should be avoided). The cable is then routed out of the KSU through an opening at the lower left of the KSU housing.
- Page 103 3-22 DHS-E Installation Figure 3-5: 3 x 8 Module 5. Terminating Connections 3 x 8 Module(s) 1. The CO line connections (as well as station connections) are made to the 3 x 8 Module via the male 25-pair connector located along the edge of the installed module (refer Table 3-12 2.
-
Page 104: M1-50 Wiring Designations For The 3 X 8 Modules
DHS-E Installation 3-23 Table 3-12: 66M1-50 Wiring Designations for the 3 x 8 Modules Cable 3 x 8 Modules Pair Color Designation Pair 26/1 White/Blue 27/2 White/Orange CO Line / Port 3 CO 3 CO 6 CO 9 CO 12 CO 15 CO 18 28/3... - Page 105 3-24 DHS-E Installation Conditions It is the installer’s responsibility to assure that CO line connections are made in such a way that proper CO Hunting will sequence from the first CO line button to the last, in order on key telephones. Typically, the Telco service provider provides lightning protection on the premises at the service entrance.
-
Page 106: Station Location Cable Terminations
DHS-E Installation 3-25 used for key telephones. Key telephones should always be isolated in separate dedicated cable runs. Do not exceed the measurements for the station cable lengths (using 26AWG wire) listed in Table 3-6. The ohm values are loop measurements; feet (meter) values are the maximum one-way distances from the KSU. -
Page 107: High Profile Mount
3-26 DHS-E Installation The two wedge mount assemblies (large and small) are affixed at the factory. This configuration is used for High Profile Desk Mounting. Remove the components from the carton and determine which mounting components are required. Most telephones are installed with both mounting wedges. High Profile Mount For the High Profile Mounted position, reference the illustration below and attach the Base Mount wedges. -
Page 108: Low Profile Mount
DHS-E Installation 3-27 1. Remove the two small screws that secure the small and large wedges together. 2. Store the larger wedge for possible use later (the large wedge is not used when wall mounting the key telephone). 3. Position the smaller wedge as in the illustration at the right for wall mounting. Once in position, the smaller wedge and key telephone bottom housing provide for standard 630 type wall mount wall jacks. -
Page 109: Key Telephone Modular Jack Locations
3-28 DHS-E Installation Jack Jack Hinge-anchors for mounting Lock-anchors for mounting base base Rubber Skid-stops Figure 3-9: Key Telephone Modular Jack Locations ADP Jack - When wired at the MDF, the second pair of the telephone line cord/cable will activate this jack for any analog device function. This jack and wiring are completely independent of the key telephone operation and may be used for system resources. - Page 110 DHS-E Installation 3-29 6. Then press Next until DSS Owner displays, as shown: DS S O wner : bk sp nex t 7. Press Chg, and enter the correct Station Number that will be used with the DSS. 8. Press the Soft Button labeled Save to record the selection. 9.
-
Page 111: Rs-232C Db-9 Connector
3-30 DHS-E Installation Table 3-14: RS-232C DB-9 Connector Male Designation DB-9 The SMDR port baud rate is programmable from 110 to 19,200 BPS. Data Format is: 8 data bits, 1 stop bit, No parity bit. Connection of the SMDR serial port to a computer for call accounting is usually quite simple, since a straight-through cable will typically mate the devices. -
Page 112: Caller Id Connection
DHS-E Installation 3-31 Male DB-9 Connection Male DB-9 Caller ID 1480-00 Switch Settings: 1440-00 Switch Settings: Figure 3-10: Caller ID Connection Programming Caller ID Perform the following steps to program the caller ID box for the DHS-E System: At any executive station: 1. - Page 113 3-32 DHS-E Installation At any executive station: 1. [FEAT] + [#] + [ ] + [000000] (default password) 2. Press [SHOW] 3. Press [NEXT] until RESOURCE displays 4. Press [SHOW] 5. Press [NEXT] until RMT X RATE displays 6. Press [CHG] until 1200displays 7.
-
Page 114: Motherboard Components
DHS-E Installation 3-33 Page Loud Bell Figure 3-12: Motherboard Components Conditions If the one-way paging equipment requires DTMF signaling from the key telephone, then an unused CO Line should be dedicated for proper page interface. For Talk-back Paging or Multi-zone External Paging, the manufacturer recommends using a vacant CO line port for best operation. -
Page 115: Loud Bell Control Installation
3-34 DHS-E Installation 3. When the system begins to ring, press [HOLD] to place the first call on hold. 4. Answer the ringing CO line. You should hear the MOH from the previous (now holding) CO line. 5. Adjust the music level at the source. That is, use the volume control of the radio (or other music source) to adjust the MOH level to a desirable level. - Page 116 DHS-E Installation 3-35 7. Using cross-connect (jumper) wire connect each of the three LBC components (contact, bell and power source) in series fashion. The LBC output on the KSU provides only interrupted dry contact closure, during the ringing period of incoming CO Lines. DHS-E Relay contact on are rated at 24V DC, 1.0 amp.
-
Page 117: Port Analog Adapter
3-36 DHS-E Installation 2 Port Analog Expander 2 Port Analog Adapter Figure 3-17: 2-Port Analog Adapter 16. Two-Port Analog Expander Installing a 2-port Analog Expander converts two digital ports to analog. One 2-Port Analog Expander may be installed on top of the 2-Port Analog Adapter. Installation 1. -
Page 118: System Check-Out
System Check-Out 3-37 17. Headset Installation The system supports integrated headset operation. Customers may take advantage of this standard system feature at any key telephone. Most headsets will operate without extra equipment or need for additional steps in user operation. Installation 1. - Page 119 3-38 System Check-Out 5. Allow the system and switch to remain in this state for approximately two minutes. 6. Operate the INITIALIZATION (SW1) to the ON (right) position. 7. Restore system power. 8. Observe the CPU/Power LED. After approximately 4 - 6 sec., the LED should begin to flash.
-
Page 120: Keystation Features And Operation
Keystation Features and Operation ® The System and Key Station features of the STARPLUS DHS/DHS-E™ Systems are listed and described in this chapter. An abbreviated feature index is provided in , full-feature descriptions are provided alphabetically Table 4-1: Feature Access Codes following Table 4-2: System Numbering Plan... -
Page 122: General Conventions
General Conventions General Conventions Press the [CLEAR] button to cancel the current operation. The [FEAT] button joined with dial key codes will appear throughout the text. This button is used to access most system features. System resources are accessed using directory numbers to dial access the resource (station numbering, Hunt Group numbering, etc.). -
Page 123: Soft Button Prompts
General Conventions Soft Button Prompts bksp: When the new programming data entry is not desired, the station user may press the backspace [bksp] button to erase the last data entered and return to the immediately preceding prompt. save: When the new data is entered, the system will check the entered data automatically. - Page 124 General Conventions Table 4-1: Feature Access Codes DHS-E Feature Non-Display Non-Display Account Code Forced F+[7]+[1]+aaa F+[7]+[1]+aaa F+[7]+[1]+aaa F+[7]+[1]+aaa +save +✳ +save Unforced F+[7]+[1]+✳ F+[7]+[1]+✳ F+[7]+[1]+✳ F+[7]+[1]+✳ Alarm Station (Hour/ F+[9]+[2] + F+[9]+[2] + F+[9]+[2] + F+[9]+[2] + Minute) soft button hh mm soft button hh mm...
- Page 125 General Conventions Table 4-1: Feature Access Codes DHS-E Feature Non-Display Non-Display Cancel F+[2] F+[2] F+[2] F+[2] Direct (all modes) F+[2] + soft F+[2] + [2] + ss F+[2] + soft F+[2] +[2] + button button Display <FP3> F+#+[6] F+#+[6] F+#+[6] F+#+[6] Idle F+[2] + soft...
-
Page 126: Dss Console
General Conventions Table 4-1: Feature Access Codes DHS-E Feature Non-Display Non-Display Conference Forced Release F+[7]+[4] F+[7]+[4] F+[7]+[4] F+[7]+[4] Forced Release CO F+[7]+[4] + cc F+[7]+[4] + cc F+[7]+[4] + F+[7]+[4] + Forced Release F+[7]+[4] + ss F+[7]+[4] + ss F+[7]+[4] + F+[7]+[4] + Station Supervised... - Page 127 General Conventions Table 4-1: Feature Access Codes DHS-E Feature Non-Display Non-Display Page All Stations F+[5]+[0] + F+[5]+[0]+[0] F+[5]+[0] + F+[5]+[0]+[0] soft button soft button All (Station and F+[5]+[0] + F+[5]+[0]+[2] F+[5]+[0] + F+[5]+[0]+[2] External) soft button soft button Deny F+[9]+[9] F+[9]+[9] F+[9]+[9] F+[9]+[9]...
- Page 128 General Conventions Table 4-1: Feature Access Codes DHS-E Feature Non-Display Non-Display Unlock F+[9]+[7] F+[9]+[7] + F+[9]+[7] F+[9]+[7] + pppp[ pppp[ System Programming F+#+✳ + Unavailable F+#+✳+ Unavailable pppppp pppppp User Saved Number F+[5]+✳ F+[5]+✳ F+[5]+✳ F+[5]+✳ Redial (Memo pad saved number) Voice Mail Monitor F+[6]+[4]...
-
Page 129: Account Code
Account Code Table 4-2: System Numbering Plan DHS-E PARAMETERS 01-12 700-717 CO Line Range 10-81 100-195 Station Numbers 82-89 800-807 Hunt Groups / Voice Mail Group CO Line Group Access Code (9 is the default code for CO Line access.) Operator Code (0 is the default system Operator Attendant code.) Account Code... -
Page 130: Adp Modular Jack
ADP Modular Jack 3. Dial [7] +[1]. 4. Dial account code. 5. From an Enhanced Telephone, press [✳]. From an Executive Telephone, press [save]. 6. If an error occurs, you may re-dial a new account code by returning to Step 1 in this procedure. -
Page 131: Canceling An Alarm
4-10 Alarm - Station Executive Telephones To turn ON a signaling alarm: 1. Press [FEAT] 2. Dial [9] + [2] 3. Press CHG 4. Dial HHMM where HH is hour, MM is minute (24-hour clock). 5. Press [SAVE] To turn OFF a signaling alarm: When the alarm time is reached, you will hear tone ringing and the display will show: AL A RM R EAC H ED... -
Page 132: Alarm - System
Alarm - System 4-11 Alarm - System Description The system administrator may establish system-wide alarm notifications through system programming for various desired events. There are eight system alarm times that are maintained in the system programming. These alarms occur continuously, for the desired times, 7 days a week. -
Page 133: Attendant
4-12 Attendant Attendant Description One primary attendant is provided in the system for support of necessary services like Line Recall, Forced Incoming Intercom Call Forward and Manual Night Service operation. A second, or alternate, attendant position may be established for common sharing of incoming CO calls or load sharing during peak traffic periods. - Page 134 Attendant Administration 4-13 System Service Mode System Date and Time System Speed Dial Numbers System Service Mode 1. Press [svc]. The display shows: SE R VICE ba ck nex t 2. Press [chg] to select between DAY, NITE, and TIME. 3.
-
Page 135: Authority Code - Traveling Class Of Service
4-14 Authority Code - Traveling Class of Service 5. Dial the number to be stored in the bin. 6. Press [save] 7. Press [back] to return to Step 4 and continue programming speed dial numbers or press [next] to return to the main menu, or press [chg] if the speed dial number was incorrectly entered. -
Page 136: Automatic Busy Redial
Automatic Busy Redial 4-15 4. Dial your password. 5. Press [save]. The display shows: AUT HOR IT Y ACCEPT 6. You may now dial according to your COS. Conditions When setting Traveling COS, the temporary COS accessed will be effective for one minute before the original station COS is restored. -
Page 137: Automatic Line Selection
4-16 Automatic Line Selection Automatic Line Selection Description This feature allows you to access a specific outside line or intercom (ICM) automatically when you lift the handset or press [SPKR]. A line will not be accessed automatically when your telephone is receiving an incoming call (outside or intercom) or a line is recalling at your telephone. -
Page 138: Background Music
Background Music 4-17 Background Music Description When your telephone is idle and the feature is enabled and activated, you can hear background music (BGM) through the loudspeaker. You can use the feature code to select between BGM Channel 1, BGM Channel 2 (if the system is so equipped), and No BGM. -
Page 139: Call Back
4-18 Call Back Call Back Description This feature allows you to queue a station which is busy, in Do Not Disturb (DND), or idle. When you send a Call Back to a busy station, the Call Back process will begin when the busy station hangs up. -
Page 140: Call Forward
Call Forward 4-19 To answer a Call Back: 1. When the Call Back process begins your, telephone will ring a special Call Back ring for 30 seconds. The display will show: C AL L BAC K TO xx reply d el 2. -
Page 141: Station
4-20 Call Forward 3. The setting is a toggle; the LCD shows either “FWD MSG DSP ON” or “FDW MSG DSP OFF.” 4. When OFF, the LCD will show normal Time and Date display even when Call Forwarding is invoked. Station Description There are many Call Forward choices:... -
Page 142: No Answer
Call Forward 4-21 No Answer 1. Press [na]. The display will show: N O A N S FW D TO bk sp s ave 2. Dial the station number where calls will be forwarded, then press [save]. 3. Optional: Press CHG until desired value is displayed. Busy 1. -
Page 143: Follow Me
4-22 Call Forward Follow Me 1. Press [follow]. The display shows:: FOLLO W FROM bk sp save 2. Dial the station number from which calls are to be forwarded. 3. Press [save]. The display shows: C HK PS W D bk sp save 4. - Page 144 Call Forward 4-23 Conditions When Call Forward is active at any telephone, Special (stutter) Dial Tone is heard when the user accesses intercom dial tone. Call Forward cannot be activated at a telephone in Do Not Disturb (DND). If DND is currently active, you will hear an error tone and the display on an Executive Telephone will show RELEASE DND.
-
Page 145: Caller Identification (Iclid)
Caller ID Box Figure 4-2: System Configuration Operation In the following example, the caller name is Vodavi Communications Systems, Inc. Since the telephone company can only provide 15 characters for any caller’s name, the likely resulting display would be: L N1... -
Page 146: Name/Number Caller Id
Caller Identification (ICLID) 4-25 The display for the name can vary depending upon the actual data input for the caller’s name. When you answer the call, the display changes as follows: CO L IN E 2 0 0:0 3 Vo davi Most caller names will be available in the data received from the telephone company. - Page 147 4-26 Caller Identification (ICLID) 1. After call is answered, press the <F3> Soft Button to toggle between the incoming call number and name. Calling Number/Name Display Essentially, whenever an incoming call is received at the system, the name and number received along with the ringing signal will be stored in the line control tables and used at various points in the processing of the call.
-
Page 148: Calling Number/Name Smdr
Caller Identification (ICLID) 4-27 At the Executive Key Telephone receiving this intercom call, the following message is displayed (internal ring, the calling party's number “nn” is displayed): STA nn CAL L I NG 2. Or when a station User Name is programmed for the calling/called station that name will appear in the display as follows: TOM CA LL I NG Calling Number/Name SMDR... -
Page 149: Answered Call Table
USE VOL +/- KEYS 3. Press either the [volume up] or [volume down] button to begin reviewing calls. ✱ d ial VODAVI more d el Answered Calls are displayed with an asterisk in the upper right of the display screen. -
Page 150: Unanswered Call Table
2. Dial [#] + [9]. The display will show: U N AN S C AL L TA B LE USE VOL +/- KEYS 3. Press either the [volume up] or [volume down] button to begin reviewing calls. VODAVI d ial more d el To dial the name/number displayed (long distance call): 1. -
Page 151: Call Park
4-30 Call Park Call Park Description This feature allows you to have calls parked at your telephone that can be retrieved from any telephone in the system. Calls are parked and retrieved by dialing the Call Park code followed by the pre-assigned station number. Operation During a call on Line 1: 1. -
Page 152: Answer
Call Pickup 4-31 Answer Operation You may retrieve a parked call by using one of the 3 following methods: 1. Dial [FEAT] + [7] + [3] followed by the associated station number DHS (10-82) and DHS-E (100-195), 1. Dial [FEAT] + [7] + [3] followed by the CO line number (1-12 DHS) (700-717 DHS-E), 1. -
Page 153: Direct
4-32 Call Waiting If several calls of the same priority are ringing at the station, the calls are answered in the order they are received. Direct 1. Press [FEAT]. 2. Dial [5] + [3]. At an Executive Telephone, the display will show: DI RE CT P ICKUP 3. -
Page 154: Camp On
Camp On 4-33 3. Station 16 hears one ring tone and the display shows: 12 WA IT reply rej ec t 4. Station 16 can either reply or reject the call: To reply: Press [reply]. The display at Station 16 shows: CON NE CT STA 1 2 The original call at Station 16 is placed on Hold automatically if Auto Hold Allow is enabled, or disconnected if not enabled. - Page 155 4-34 Camp On Operation Basic and Enhanced Telephones 1. Press the busy line button. You will hear busy tone. 2. Press [FEAT]. 3. Dial [9] + [3]. You will hear error tone if the line is already camped-on. You will hear ringing when the line becomes available and the lamp for the line will flash.
-
Page 156: Busy Station
Camp On 4-35 Camp On at a station using a Pooled Group button for access of CO lines, is the same as that of a station with CO line button appearances, except that, to answer a Camp On, the user must lift the handset to be connected to the camped CO line. During the time that the Camp On is recalling the initiator, a new incoming call will take precedence over Camp On and will be answered when the station goes off- hook. -
Page 157: Class Of Service
4-36 Class of Service Class of Service Day/Night Description The system provides eight COSs for assignment of outside line dialing privileges. Each system station may be assigned one Day COS and one Night COS. The station COS is primarily used for restriction and control of long distance dialing. Toll restriction tables allow customized dialing privileges to be assigned to any or all COSs. -
Page 158: Co Line Pool
CO Line Pool 4-37 CO Line Pool Description The CO Line Pool assignment preserves feature buttons and reduces the number of individual CO line appearances required at a key telephone. The CO Line Pool allows random CO line outgoing access and becomes a virtual Answer button, with illumination, for receiving incoming or transferred calls. -
Page 159: Co Line Signaling
4-38 CO Line Signaling Pressing an idle CO line group button to originate/answer a CO line call will affect the LED indication of an individual CO line button (i.e., CO line status will be indicated on both CO line group button and an individual CO line button). The LED indication on a CO line group button and an individual CO line button will be treated in the same way. -
Page 160: Conference
Conference 4-39 operations for handling PBX Station-to-Station calls and PBX trunk calls, separately. When a programmed PBX trunk access code is dialed, the system is alerted that the user is accessing a telephone company facility to make a network call. When this occurs, the system monitors digits dialed after the PBX access code and compares them against the Allowed Digit Interval Table in the COS for that station. -
Page 161: Unsupervised
4-40 Conference 2. Dial the fourth party. 3. Press [FEAT]. 4. Dial [6] + [0]. The conference initiator may force-release a conference member or talk privately with a conference member. Basic and Enhanced Telephones To force-release: 1. Press [FEAT]. 2. Dial [7] + [4]. 3. -
Page 162: Dial Pulse To Dtmf Conversion
Dial Pulse to DTMF Conversion 4-41 conference. To establish an Unsupervised conference, you must first build a Supervised conference. Unsupervised Conference requires the Option Module for operation on the DHS system. Operation 1. Two CO lines are conferenced (F+[6]+[0]) at your station: L Nx L Nx private fo rced... -
Page 163: Direct Inward System Access (Disa)
4-42 Direct Inward System Access (DISA) Direct Inward System Access (DISA) Description This feature allows you to remotely access system features such as System Speed Dial, Line Access for long distance calling, CO Line-to-CO Line Conferencing, and Intercom dialing. Any number of DISA lines may be assigned incoming DISA access based on the system service mode (Day, Night or Always). - Page 164 Direct Inward System Access (DISA) 4-43 To place an intercom call: 1. Dial [3]. 2. Dial the Station Number If you do not dial the station number within the 10-second time-out period, your call will be transferred to the attendant station. To disconnect a CO line DISA call: 1.
-
Page 165: Directory Dial
4-44 Directory Dial <FP3> Directory Dial <FP3> Description Enables station users to obtain a directory of station users and have the system dial the extension shown in the display. The DHS system provides locations for up to 200 names each consisting of a maximum of 12 characters. Directory Dial also enables users to program a name along with a speed dial bin for use in later locating a speed dial number. -
Page 166: Distinctive Ringing - Station
Distinctive Ringing - Station <FP3> 4-45 Distinctive Ringing - Station <FP3> Description You may choose from four distinctive ringing tones to signal incoming calls. This allows you to easily distinguish your calls from calls ringing at other stations near you. Operation Basic and Enhanced Telephones 1. -
Page 167: Do Not Disturb (Dnd)
4-46 Do Not Disturb (DND) Do Not Disturb (DND) Description DND allows you to temporarily block and discontinue ringing from incoming CO calls and intercom calls. You can activate DND while your telephone is idle or busy. Some stations with a higher COS may override a station's DND condition. When you have activated DND, you will hear a special intercom (stutter) reminder tone when you lift the handset or use the speakerphone. -
Page 168: Dnd Override
DND Override 4-47 DND Override Description If you have an Executive Telephone you may override a station in DND if you have a higher COS. When you override a station in DND that station will hear tone ringing. Operation Let’s assume Station 16 is in DND: 1. -
Page 169: Drop Time-Out
4-48 Drop Time-Out Drop Time-Out Description This feature is enabled in the system programming on a per station basis. When enabled, any outgoing CO line will be automatically timed and then dropped, after the system Warning Tone Timed is exceeded. This feature is normally used to control outgoing call traffic. -
Page 170: Co Line Flex Button Codes
DSS Console <FP3> 4-49 Operation Enhanced Telephones To program DSS console buttons: 1. Press [FEAT] 2. Dial [#] + [5] 3. Press a Programmable Feature Button. To program a system feature button: 1. Dial [2] 2. Press [FEAT] 3. Dial the system feature code. 4. - Page 171 4-50 DSS Console <FP3> To erase the contents of a programmable feature button: 1. Press [FEAT] 2. Dial [#] + [5] 3. Press the Programmable Feature Button. 4. Dial [0] 5. Press [HOLD] Executive Telephones To program DSS console buttons: 1.
- Page 172 DSS Console <FP3> 4-51 To program a BLF/DSS button: 1. On the DHS, press [STA], then chg. 2. Dial the Station number. 3. Press [save] 1. On the DHS-E, Press [DIR]. The display shows: DI R N O. : 10 2 bk sp save chg 2.
-
Page 173: Emergency Numbers
4-52 Emergency Numbers Any feature button programmed with a code previously assigned to a different feature button will cause the previously programmed feature button to become unassigned. Programmable feature buttons cannot be programmed for CO line group operation when the system is configured for KEY system operation. Emergency Numbers Description DHS/DHS-E... -
Page 174: External Call Forward (Ecf)
External Call Forward (ECF) 4-53 External Call Forward (ECF) Description Assuming that one line has been programmed as the ECF Incoming CO line and another line has been programmed as the ECF Outgoing CO line and System Speed Dial bin 99 contains a telephone number where calls will be forwarded: Operation When the ECF Incoming CO line is ringing, the system:... -
Page 175: Feature Button Inquiry
4-54 Feature Button Inquiry 3. At an Executive Telephone, the display returns to the CO line connected display following the flash time-out or 10 seconds later. CO L IN E 1 xx:xx Conditions The Flash code may be stored in any speed dial bin. The Flash code may be stored in the Last Number Redial buffer. -
Page 176: Feature Button Programming
Feature Button Programming 4-55 Feature Button Programming Description Depending upon the telephone model, 8 or 20 programmable feature buttons are available. The Basic model has eight dual-colored feature buttons for CO line, station, or feature access code assignments. The Enhanced and Executive models have 20 dual- colored programmable feature buttons. -
Page 177: Co Line Feature Button Codes
4-56 Feature Button Programming Table 4-6: CO Line Feature Button Codes DHS-E 00 =Any Group 02 = CO Line Grp 2 200 = CO Line Grp 1 202 = CO Line Grp 3 01 = CO Line Grp 1 03 = CO Line Grp 3 201 = CO Line Grp 2 203 = CO Line Grp 4 04 = CO Line Grp 4... - Page 178 Feature Button Programming 4-57 3. Press a programmable feature button. The current contents of that button is displayed. For this example, let’s use button 20. show chg DHS-E The following sequence of steps applies to only: M ESS AG E WAIT D IR N O.
-
Page 179: Flexible Line Assignment
4-58 Flexible Line Assignment To program a system feature: 1. Press [FEAT]. The display shows: FTR COD E:__ bk sp save chg 2. Press [FEAT]. F will appear on the display: FTR COD E: F bk sp save chg 3. Dial the feature code. 4. -
Page 180: Flexible Receive Assignment
Flexible Receive Assignment 4-59 Flexible Receive Assignment Description Stations may be allowed to answer or retrieve from hold, specific CO lines assigned in system programming. Receive assignments should be assigned to any stations that need to answer incoming calls. A station does not have to hear ringing or be programmed with Flexible Ring Assignment in order to answer an incoming CO line. -
Page 181: Forced Tone Ringing
4-60 Forced Tone Ringing Conditions If the intercom (ICM) call in progress is with the attendant, Forced Intercom Call Forward will not operate. When DND is enabled, standard DND operation is followed. If forced DND is activated, the operation is treated as if the calling party makes a new ICM call to the attendant. -
Page 182: Headset Mode
Headset Mode 4-61 Headset Mode Description When the headset is installed, the [SPKR] button is used to turn the headset ON and OFF (switch between headset and speakerphone modes). If the [SPKR] button is pressed while the telephone is idle, the headset is turned ON. When the [SPKR] button is pressed again, the speakerphone mode is activated. -
Page 183: Hold
4-62 Hold Conditions While using the headset, you may pick up Intercom Voice calls by pressing [SPKR]. Incoming CO line calls may be answered by pressing [SPKR] (for automatic priority ring selection) or by pressing the specific CO line button. Other features like background music and muted ring continue to operate in the same manner while you are off-hook. -
Page 184: Automatic
Hold 4-63 Automatic Description You may enable this feature on your telephone to simplify call handling, avoid accidental lost calls, and assist call transfers. Automatic Hold will occur when you skip from line button to line button or intercom call to outside call and vice-versa. For instance, if you are currently on a call on Line 1 and press Line 2, the call on Line 1 will be placed on Hold automatically. -
Page 185: Exclusive
4-64 Hold Line appearance is not required for station to put call on hold. Exclusive Description When using the [FEAT] button and the [HOLD] button together, you may place an outside call on private hold. The held line will appear in use at other stations. Operation 1. -
Page 186: Hour Mode Selection
Hour Mode Selection 4-65 Operation While on a line, the green lamp for that line is I-Use flashing (double wink rate): 1. Press [HOLD]. The green lamp now flashes at a slow rate and the call is placed on System Hold. Any party who is placed on Hold will hear music, only if available through the external music source connection. -
Page 187: I-Use Indication
4-66 I-Use Indication I-Use Indication Description When you are using a CO line, the associated lamp will light green and flash at a double- wink rate at your telephone. This lamp will light steady red at other telephones. Intercom Call Description DHS-E All intercom calls are made by dialing the station unique 2-digit... -
Page 188: Last Number Redial (Lnr)
Last Number Redial (LNR) 4-67 Other Displays: When the station is in DND: DN D If the station number dialed is not connected: OUT OF S ER VI C E If the called station is your own station number. YOUR NUM BER Intercom calls to key telephones selected for Voice Announce Hands Free or Voice Announce Private ([FEAT] + [9] + [8]) are logically answered by the system at the called station. - Page 189 4-68 Last Number Redial (LNR) 4. In the event that all CO lines are busy, you will hear busy tone and if you have an Executive Telephone, it will display: AL L CO L IN E S B U S Y 5.
-
Page 190: Letter Scheme
Letter Scheme 4-69 Letter Scheme Description Station User Names (programmed into the customer database) may be enhanced for special requirements using the choices available in the Letter Schemes. The end user may select from six different lettering schemes that can be programmed for use at any one installation. -
Page 191: Message
4-70 Message Message Outgoing Description You may send a message waiting, a customized message, or one of 6 pre-programmed messages to other Executive Key Telephone users on the system. A basic message waiting is sent by pressing the soft [call me] button. You may customize the first message by using the dial pad and selecting letters (16 characters maximum) to spell your message. -
Page 192: Dial Pad Key Programming
Message 4-71 Table 4-8: Dial Pad Key Programming ✳ Depressions: † ‡ Letter Scheme Dial Key [1] is used to select special characters. Refer to . Depending on the Letter Scheme selected (programmed), Dial Key 1 may be used to insert various special characters. †... -
Page 193: Executive Notify
4-72 Message Executive Notify Description Executive Notify provides you with a method to inform intercom callers of the reason you are away from your telephone. An Executive Notify message can be pre-programmed in the system database and may contain up to 16 characters or digits. There are six pre- programmed messages and one private message which may be edited at your telephone according to your personal preference. -
Page 194: Message Waiting
Message Waiting 4-73 When another Executive Key Telephone user calls you, the message OUT FOR LUNCH will be displayed on the caller’s telephone display:. O U T F O R LUN C H cbck The caller has the option of using the Call Back feature or leaving a message for you. Message Waiting Description A busy or unattended station may be notified of a call attempt via the Message Waiting... - Page 195 4-74 Message Waiting 3. Press [msg]. M ESS AG E T YPE ca ll prepro g 4. Press [call me]. You will hear confirmation tone. M SG TO S TA To answer a single Message Waiting: 1. Your telephone display shows the following and the Message Waiting lamp (if a button is programmed) will flash: M SG FR OM S TA nn reply...
-
Page 196: Music-On-Hold (Moh)
Music-on-Hold (MOH) 4-75 Music-on-Hold (MOH) Description Any intercom or CO line call placed on Hold will hear music, if the system is equipped with an External Music Source. This music source can be monitored at an idle station as BGM music. There is one music source interface connector in the standard DHS configuration. -
Page 197: Name In Display
4-76 Name In Display Name In Display Description The station user name or department can be programmed to appear on the LCD of an Executive Key Telephone. The station intercom number will also be displayed when a name has been programmed. The name may consist of upper and lower case letters, plus numbers. -
Page 198: On Hook Dialing
On Hook Dialing 4-77 On Hook Dialing Description You may make outgoing calls without lifting the handset and monitor the dialing status through the built-in speaker. The [SPKR] button lamp is lit when monitoring a call. The Basic key telephone can monitor outside calls and receive one-way paging announcements, but cannot reply unless the handset is lifted. - Page 199 4-78 Page To perform group paging: 1. Press [FEAT]. 2. Dial [5] + [0] +[3]. 3. Dial Group Number (1-8). Executive Key Telephones 1. Press [FEAT]. 2. Dial [5] + [0]. This display will show: PAG IN G a ll ex ter n nex t To perform internal paging:...
-
Page 200: External
Page 4-79 External Description The system provides one-way, dedicated paging access to a paging amplifier. The External Paging Zone may be accessed individually or with all 8 Internal Paging Zones as an All Call Page. Operation Basic and Enhanced Telephones 1. -
Page 201: Meet Me
4-80 Page The Page Allow/Deny feature code may be stored on a feature button. Conditions Stations initiating internal pages may receive error tone if not stations are available in page group. External paging in unaffected. Meet Me Description Anyone paging internally or externally may be answered for a private Meet Me connection. -
Page 202: Pause
Pause 4-81 Pause Description You can insert a pause to generate an intentional delay in dialing on outgoing CO line calls. A pause or a combination of pauses may be stored in the Speed Dial bins to allow timed access to special services, while allowing you to monitor the progress of the call. A pause will appear as P on an Executive Telephone display. -
Page 203: Station Lock/Unlock
4-82 Station Lock/Unlock DHS-E CO L IN E 1 CO L IN E 7 0 0 2. If the digit [9] is dialed, the DHS is aware that this call is being placed on a PBX trunk (outgoing call). 3. A hyphen (-) is inserted automatically after dialing 9 for better display clarity. Subsequent digits dialed are displayed after the hyphen. - Page 204 Station Lock/Unlock 4-83 3. Dial your password. 4. Dial [#]. To unlock the telephone: 1. Press [FEAT]. 2. Dial [9] + [7]. 3. Dial your password. 4. Dial [✳]. To change your password: 1. Press [FEAT]. 2. Dial [9] + [7]. 3.
-
Page 205: Privacy
4-84 Privacy 3. Press [save]. The Phone Lock feature code may be programmed on a programmable feature button. Conditions When your telephone is locked you can only make intercom calls. You may still answer calls and held lines while your telephone is locked. This includes speed dial access and CO lines marked as toll override. -
Page 206: Private Line
Private Line 4-85 1. Press that CO line button. A conference is established and the user that originated the call is the conference controller. The controller display reads: private fo rced 2. Your telephone display shows: Where “ss” in each display indicates the station numbers that are joined in the call. Conditions If there are already four parties joined together, further attempts by other stations to join the CO line conversation will receive busy indication. -
Page 207: Recall (Transfer Recall)
4-86 Recall (Transfer Recall) Operation 1. As you dial on a dial pulse CO line, dial [✳]. All subsequent digits will be sent as DTMF digits. Pulse to Tone Switch-Over can be programmed in any Speed Dial bin. Conditions The dialing conversion can only be from Pulse Mode to Tone (DTMF) mode. Recall (Transfer Recall) Description Transferred CO lines will recall to the transferring station if the call is unanswered after... -
Page 208: Ringing Line Priority
Ringing Line Priority 4-87 Ringing Line Priority Description Ringing Line Priority is a system-wide feature that automatically connects incoming calls based on a predetermined priority. The ringing station is automatically connected to the priority ringing facility, upon lifting the handset or pressing the [SPKR] button. Ringing Line Priority can be overridden at the station by first pressing a direct appearing line, CO line group, feature button or by dialing an intercom number on hook. -
Page 209: Station Message Detail Recording (Smdr)
4-88 Station Message Detail Recording (SMDR) Conditions The SDN is a maximum of 16 digits. If the SDN buffer is empty, the display will show NO SAVED NUMBER. If all CO lines are busy, the display will show ALL CO LINES BSY. Save Dialed Number feature code may be stored on any feature button. -
Page 210: Smdr (Data Examples)
11:15:36 00:00:52 00:00 01/02 11:15:36 00:00:47 443-6000 01/02 01:53:36 00:00:33 602-443-6000 00:03 01/02 02:53:36 00:00:39 VODAVI COMM 00:03 01/02 02:53:36 00:00:39 UNANSWERED CALLER ID SMDR OUTPUT SAMPLE RECORD (FEATURE PACKAGE 2) DGT_DIALED RING DATE TIME DURATION ACCOUNT 602-555-1212 00:53 01/01... -
Page 211: Resource - Smdrx_Rate
4-90 Speed Dialing Resource - SMDRX_RATE Operation 1. A user at station 10 dials [555-1212] from CO Line 6 and talks 45 seconds: CO L IN E 6 0 0 :4 5 2. Press the [CLEAR] button or go on hook and disconnect the CO line call. A call record is generated. - Page 212 Speed Dialing 4-91 Speed bins may be chained. Pauses and Flashes may be stored in Speed Dial. Chaining Pauses and Flashes each occupy one character position: Pause = [feat] + [7] + [0] = P; Flash = [feat] + [3] To erase the contents of a Speed Dial bin: 1.
-
Page 213: Station Feature Status Check
4-92 Station Feature Status Check To dial a number stored in Speed Dial: You may choose to first press an idle [CO line] or you may let the system automatically select the line. 1. Press [FEAT]. 2. Dial [1]. At an Executive Key Telephone, the display shows the following: SP EED N O : _ _ 3. -
Page 214: Station Groups
Station Groups 4-93 Phone Lock Voice Announce Call Wait Setting Page Receive Night Station Station Groups Description The system provides eight Station Groups for partitioning the system into separate departments or related features. Members of a Station Group have the ability to pick up incoming or transferred calls from other associated members in the same group, via the Call Pickup Group code [FEAT] + [5] + [4]. -
Page 215: Toll Restriction
4-94 Toll Restriction Toll Restriction Description provides sophisticated monitoring of digits dialed on CO lines. If a digit or range of digits dialed on a CO line does not correlate with the Allow Digit Interval table, the CO line is released immediately. On any non-allowed call, the station user will receive error tone and the CO line button LED will extinguish. -
Page 216: Transfer
Transfer 4-95 Conditions A longer tone duration or inter-digit duration time will cause a slower output of manual or automatic system-dialed numbers. A longer DTMF ON time and/or inter-digit tone time can be used to ensure more reliable interaction with remote voice mail and similar remote DTMF dial pad actuated devices. -
Page 217: User Name Programming
4-96 User Name Programming Conditions Ring transfer recall time for any CO line call is programmable, between 16, 30, 60, 90, and 120 seconds. When a transferred CO line recalls, the line number and station number where the call was transferred will be displayed. Once the outside line changes from Hold to Transfer status, the outside party will hear Music-on-Hold change to a system-provided Ring Back tone. -
Page 218: Voice Announce (Hands-Free Or Privacy)
Voice Announce (Hands-Free or Privacy) 4-97 3. Enter the desired number to be stored. 4. Press [SAVE]. To Dial: 1. Press [FEAT]. 2. Dial [5] + [✳]. Conditions The USNR is a maximum of sixteen (16) digits. If the USNR is empty, the display will show NO SAVED NUMBER. Station COS is applied a the time of use. -
Page 219: Voice Mail Button
4-98 Voice Mail Button Operation When your telephone is set for VA-HF mode: 1. The call is automatically connected and your display shows: C AL L 2. The display at the calling station reads: VOIC E C A L L In VA-Privacy mode, the call can come in with mute on. - Page 220 Voice Mail Integration 4-99 Operation When the Voice Mail system has messages for any station, the Voice Mail button will flash. The display at Executive Key Telephones will show: VM FR OM M AI L BOX R EP LY To retrieve a voice mail message: 1.
-
Page 221: Voice Mail Monitor
4-100 Voice Mail Monitor Voice Mail Monitor Description Similar to a basic answering machine, you can monitor your forwarded calls at the telephone where they were forwarded during the first few seconds after they are answered by a voice mail port. When you forward calls to voice mail, your telephone will alert you when a call is being answered at the voice mail. -
Page 222: Voice Over Busy
Voice Over Busy 4-101 Conditions You may press [MUTE] while monitoring a call to be connected to the caller. When you answer a call the programmed Disconnect Digits Table digits are sent to the voice mail port. You will hear the alert tone regardless of whether your telephone is idle or busy or in speakerphone or handset mode. - Page 223 4-102 Voice Over Busy Executive Telephones To place a Voice Over Busy: 1. Call any busy telephone. You will hear busy tone and your telephone displays: BUSY cbck ms g nex t 2. Press [next]. The display shows: BUSY ca mp voice 3.
-
Page 224: Voice Recorder
Voice Recorder 4-103 Voice Recorder Description If you have an integrated voice mail system, this feature will allow you to record internal and external conversations. When the Voice Recorder is activated, a conference is established between the call and the system voice mail group The conversation is recorded in your voice mail box when the feature is enabled. -
Page 225: Warning Tone
4-104 Warning Tone volume adjustment allows for four volume levels. All other modes allow for eight volume levels. You may adjust the ringing volume while the telephone is not in use or while it is ringing. If you adjust the volume while the telephone is idle, you will hear a single ring burst to confirm your selection. -
Page 226: Slt Features And Operation
SLT Features and Operation The System and Single Line Telephone Features of the STARPLUS® DHS/DHS-E™ Systems are listed and described in alphabetical order. Features described here pertain to Single Line Telephones and Analog devices (FAX, modem, cordless phone, etc.) connected to the via the 2-Port Analog Adapter and 2-Port Analog DHS/DHS-E Expander. -
Page 228: Slt Feature Access Codes
Table 5-1: SLT Feature Access Codes FEATURE DHS-E Authority Code #55+ SS +PPPP #55 + SSS+ PPPP Call Back Cancel #✳91 #✳91 Call Brokering Call Forward Busy #21 + SS #21 + SSS † Busy/No Answer #25 + SS #25 + SS + T Cancel Direct (all modes) #22 + SS... - Page 229 Table 5-1: SLT Feature Access Codes FEATURE DHS-E Do Not Disturb (Set/Clear) Hold F + wait F + wait ✳6 ✳6 Retrieve ✳7 + SS ✳7 + SSS Retrieve from Another Station Hot Line Cancel CO Line ##4 + T +✳3 + n ##4 + T + nnn (nnn = 700-717) External Page...
- Page 230 Table 5-1: SLT Feature Access Codes FEATURE DHS-E Speed Dial ✳1 + bb ✳1 + bb Dialing ‡‡ Storing #1 + bb #1 + bb + n + F Station Alarm Cancel #✳92 #✳92 #92 + hhmm #92 + hhmm Station Lock #97 + PPPP + # #97 + PPPP + #...
-
Page 231: Authority Code
Authority Code Authority Code Description Any station user may use his own station Class of Service using another station for CO line dialing. [ss] = XX for DHS or XXX for DHS-E. Operation 1. Lift handset 2. Dial [#] + [5] + [5] + [ss] + [pppp] Where: ss = the station with the desired authority) pppp = that station’s password... -
Page 232: Call Brokering
Call Brokering Call Brokering Description Single Line Telephone (SLT) station users may connect to a second party and alternate between connections. This feature is desirable when an SLT user wants to maintain the connection of the parties and at the same time keep them separate from each other. Operation While engaged on an intercom or CO line call: 1. -
Page 233: Cancel
Call Operator (Call Attendant) Cancel 1. Lift handset 2. Dial [#] + [2] Direct (All Call) 1. Dial [#] + [2] + [2] + [xx] Where: xx = destination desired Follow Me Forward 1. Dial [#] + [2] + [3] + [ss] + [pppp] Where: ss = station number to forward to this location pppp = password of the station to forward... -
Page 234: Call Park Answer
Call Park Answer Call Park Answer Description SLT users can retrieve calls that have been placed into Call Park status, by dialing the Call Park Answer Feature Code plus the station number or the CO Line number. Operation 1. Lift handset 2. -
Page 235: Camp On
Camp On Camp On Busy Station Description An SLT station may Camp On to a busy station. While listening to busy tone after dialing the station number, the SLT user dials the Camp On feature code. Operation When the called station is busy: 1. -
Page 236: Specific Line
Do Not Disturb (DND) Specific Line To access a specific CO Line: 1. Lift handset 2. Dial [✳] + [3] + [c] Where c = the CO line number/code for the desired CO line: 1-9 = CO lines (1-9), 0 = CO line 10, [✳] = CO line 11 and # = CO line 12. Conditions An SLT station may dial access any CO line that has been allowed in database programming. -
Page 237: Flash
5-10 Flash Flash Description This feature allows CO/PBX line users working behind a Centrex or PBX line to generate a hook-flash over that line to access features or transfer calls. It is recommended that SLT stations installed be equipped with a TAP or FLASH button and the guaranteed disconnect feature. -
Page 238: Retrieve
Hold 5-11 To answer Hold Recall at an SLT, lift the handset (refer to Chapter 4, Keystation Features and Operation, “Transfer”). This feature may need to be adjusted on some telephones for proper operation (refer Chapter 6, System Programming, “Call Handling Configuration”). -
Page 239: Hot Line (Ring Down)
5-12 Hot Line (Ring Down) Hot Line (Ring Down) Description This feature allows you to use the associated single line telephone (SLT) port for automatic signaling to a predetermined destination. When the feature is enabled, the destination will be signaled whenever that SLT goes off-hook. You may hook-flash at the SLT where the feature is enabled so that you can request intercom dial tone to perform other functions and change or disable the feature when no delay time is programmed. -
Page 240: Cancel
Intercom Call 5-13 Cancel 1. Lift the handset 2. Dial [#] + [#] + [4] Operation 1. Go off-hook 2. Wait for the delay time to expire. Conditions Operation of Hot Line to a Station, Speed Dial Bin or CO line, that is not valid or programmed, results in an error tone. -
Page 241: Message Waiting
5-14 Message Waiting Message Waiting Description The user is able to send messages to a station and return messages left at their station by dialing a feature code. When there is a message waiting, the user will hear special Intercom Reminder tone signifying that there is a message. -
Page 242: Port Numbering
Port Numbering 5-15 Operation When a page announcement is heard: 1. Lift the handset 2. Dial [#] + [5] + [9] Port Numbering Description DHS/DHS-E Adding SLT stations to the has the significant advantage of port-gain. When the SLT interfaces are installed (2-Port Analog Adapter and 2-Port SLT Expansion), the station numbering and available station ports are expanded at a ratio of 2-to-1. -
Page 243: Slt Port Numbering (Dhs-E)
5-16 Port Numbering Table 5-3: SLT Port Numbering (DHS-E) Card 1 Card 2 Card 3 Digital B1 Sta B2 Sta Digital B1 Sta B2 Sta Digital B1 Sta B2 Sta Port Number Number Port Number Number Port Number Number Card 4 Card 5 Card 6 Digital... -
Page 244: 2-Port Analog Adapter
Port Numbering 5-17 When setting the feature status, the SLT will receive error tone if the feature access code combination is incorrect. When error tone is heard, the SLT must hang up and lift the handset again to attempt any further operation. SLT features DND, Call Forward, and Message Waiting (when a Message Waiting indication has been left at the SLT) alert the SLT user that the feature is active by an interrupted (stutter) dial tone. -
Page 245: Speed Dialing
5-18 Speed Dialing Speed Dialing Description Speed Dialing (SPD) allows SLT users to store frequently dialed numbers. These numbers can easily be selected by dialing the Features Access Code plus the Bin Number desired. Each station can store twenty (20) Station SPD Numbers in memory Bins (00-19). Each SPD Bin may contain up to sixteen (16) digits. -
Page 246: Cancel
Station Lock 5-19 Cancel 1. Lift handset 2. Dial [#] + [✳] + [9] + [2] Station Alarm setting is cancelled after each use. Station Lock Description The Station Lock/Unlock feature is used to prevent unauthorized outside calling from a station that is unattended. -
Page 247: Transfer
5-20 Transfer Transfer Description Transfer a call from your station to another station while connected to current call. Operation While on a CO Line call: 1. Press Hook Flash 2. Dial Station number within 5 seconds (call will be disconnected after 5 seconds have elapsed if station number is not entered). -
Page 248: System Programming
System Programming It is very important to load default customer data when a system is first installed, when upgrading software feature packages or when severe power disturbances cause reason to doubt the customer database integrity. If any of these conditions exist, please use the information in Power Up Initialization... -
Page 250: Pc Programming
PC Programming PC Programming ® STARPLUS The Feature Package 3 software allows the service technician to program the DHS/DHS-E™ system using an external, PC-based, Windows software programming tool. The Windows software tool streamlines programming and allows for database printout and reserve storage. Operation of the Windows software is not covered in this text. -
Page 251: Program Mode Entry
Program Mode Entry Program Mode Entry To make changes in the customer database, you must enter Database Programming from an idle Executive (display model) Key Telephone. (Any Executive Key Telephone connected to any station port will serve as the programming entry terminal). Depending on initial setup, the system may operate only as a Key system and utilize the Key system (KF) FCC Registration Number, or as a hybrid PBX system which requires a different unique FCC (MF) Registration Number. - Page 252 Program Mode Entry If customer changes system type from PBX to KEY system, the contents in programmable feature keys where CO line group number had been programmed before will not be affected or changed. Consequently, depression of those feature keys associated with KEY type mode will not operate.
-
Page 253: Database Programming Table
Program Mode Entry Conditions Only one Executive key telephone can be used at a time to perform system programming or attendant administration. Otherwise, a warning message will be received. System Type appears following DB Programming entry and the DB Programming password. - Page 254 Program Mode Entry Table 6-1: Database Programming Table (Continued) FEATURES RANGE DEFAULT Call Abandon CO Line Type CO/PBX/OPN Loud Bell CO Line Group 1–4 Private To 10–81 100–195 Empty Toll Override Distinct Tone 0–4 0 (None) ICLID Port 0–12 0–18 0 (None) CALL HANDLING ATTRIBUTES Privacy RLS (Release)
-
Page 255: Letter Type
Program Mode Entry Table 6-1: Database Programming Table (Continued) FEATURES RANGE DEFAULT External Call Forward None Unsupervised Conference Operator Code Unsupervised Conference Time 1/2/3/5/15 min 1 min Auto Busy Redial Call Abandon Time 600 sec Ring Alt Position 30/60/90/120/180 sec 30 sec CO Line Preset Call Forward None... - Page 256 Program Mode Entry Table 6-1: Database Programming Table (Continued) FEATURES RANGE DEFAULT Station Copy Feature Button Copy System Time Default date Account Code Table Data Link Manual/Auto Directory Dial Distinctive Ring RMT X_Rate 110/300/...19200 9600 bps SMDR X_Rate 110/300/...19200 9600 bps Hour Mode 12/24 Hr 12 Hr...
-
Page 257: Database Programming Procedural Flow
Program Mode Entry Database Programming Procedural Flow The flowchart on the following pages can be used as a guide when performing database programming. There are six programming functions as shown in Figure 6-1: Database Programming Functions—Station and CO Line. Details of these programming functions are shown in the subsequent figures. -
Page 258: Database Programming Functions-Station And Co Line
Program Mode Entry Day Class:0 back next chg [feat] + [#] + [✳] + password + [show] Nite Class: 0 back next chg [hold] CO Line x: Y CO Line Assign [next] [show] back next chg back next show [hold] CO Line x: Y PBX/Key Receive Assignment... -
Page 259: Database Programming Functions-Call Handling
6-10 Program Mode Entry [hold] Privacy RLS: N 3. Call Handling back next show [show] Privacy RLS Tone: Y back next chg EX_Hold Time: 4 back next chg Flash Time: 0.7 back next chg Remind Time: 30 back next chg Park Remind: 30 back next chg Pause Time: 2... -
Page 260: Database Programming Functions-Resource
Program Mode Entry 6-11 Ring Scheme: 2 [hold] 4. Resource back next chg Leter Type: 0 [show] back next chg Attendant: 10 back next chg Call Operator Alternate Attendant back next chg back next chg [hold] Alarm: 1 Call Home System Alarm back next chg [show]... -
Page 261: Database Programming Functions-Restriction And System Application
6-12 Program Mode Entry [hold] [hold] DGT Interval ### CO Call Discr 5. Restriction bksp show chg back next show [show] [show] back next chg back next chg COS 0: Y Day Allowed back next chg back next chg COS 1: N Nite Allowed back next chg back next chg... -
Page 262: Station Programming
Station Programming 6-13 Station Programming If the system is in the programming mode, continue using the [back] and [next] Soft Buttons to scroll to the desired programming field. If starting to program here, enter the programming mode. Refer to “Program Mode Entry”. Also refer to Table 6-1: Database Programming Table the complete list of programmable features and their default values. -
Page 263: Night Cos
6-14 Station Programming Release feature. COS 0 is considered the highest level where COS 7 is the lowest. COS also dictates the stations ability to use System Speed Dial. Default DHS/DHS-E station Day Class of Service is set to [0], and the range is 0-7. Related Programming Refer to “Privacy... -
Page 264: Account Code Forced
Station Programming 6-15 Receive Assignment must also be set to Y for a station to answer a ringing CO. Default CO Lines (1-12) DAY ring for Station 10 only, all others are NONE, and DHS-E CO Lines (700-705) BOTH ring for Station 100 only, all others are NONE. CO range is 1-12 (D/N/ B/NONE). -
Page 265: Drop Time-Out
6-16 Station Programming Drop Time-Out Similar to Warning Tone above, Drop Time-Out may be applied to any station where outgoing call length is to be restricted. When set to Y this station will receive a warning tone over the connected voice path when the Warning Time (refer to Call Handling Configuration) has expired, and 10 sec later the current call will be terminated. -
Page 266: Co Line Configuration
CO Line Configuration 6-17 CO Line Configuration If the system is in the programming mode, continue using the [back] and [next] Soft Buttons to scroll to the desired programming field. If starting to program here, enter the programming mode. Refer to Program Mode Entry. -
Page 267: Co Line Type Assignment
6-18 CO Line Configuration CO Line Type Assignment A CO Line Type is selected to identify specific CO lines. Type CO designates a typical CO line connection. Type PBX designates a CO line position that is connected to a PBX line (an extension off of another telephone system). -
Page 268: Private To
CO Line Configuration 6-19 Private To Private To is a programming time saver. This parameter allows the programmer to assign a specific CO to one station for their personal exclusive use. This setting over-rides CO Line Assignment programming. When a station is assigned as the Private To station of a CO line, that station exclusively receives ringing and access privileges to that CO line. -
Page 269: Call Handling Configuration
6-20 Call Handling Configuration Call Handling Configuration If the system is in the programming mode, continue using the [back] and [next] Soft Buttons to scroll to the desired programming field. If starting to program here, enter the programming mode. Refer to “Program Mode Entry”. -
Page 270: Exclusive Hold Time
Call Handling Configuration 6-21 Exclusive Hold Time Calls placed on Exclusive Hold will remain on Exclusive Hold for the duration of this timer. When the timer expires the holding line will change from Exclusive Hold flash to Recall Flash and alert the station user with one tone ring over the telephone speaker. When the timer expires a second time and the CO line remains on hold the station will receive a second alert tone and the CO line holding condition will change to System Hold so that any station may access the holding line. -
Page 271: Pause Time
6-22 Call Handling Configuration Pause Time Whenever the system Pause code is manually dialed while connected to a CO line or when it is programmed into a speed dial bin, the system will pause dialing digits for the length of time programmed here. Default DHS/DHS-E Pause Time is set for 2.0 sec, and is variable from 1.5/2/3.5/5 sec. -
Page 272: Vm Dialing Ratio
Call Handling Configuration 6-23 VM Dialing Ratio There are two VM Dialing Ratio parameters that may be programmed; TONE TIME and INT_DGT TIME. Default DHS/DHS-E TONE TIME and INT_DGT TIME are set at 120 msec, and the adjustable range is from 60 - 150 msec. Related Programming Refer to “Voice Mail”... -
Page 273: Direct Inward System Access (Disa)
6-24 Call Handling Configuration Default DHS/DHS-E START field is set for 300 msec, and the END field is set for 800 msec. The programmable range for the START field is: 100/200/300/400/500/600/700/800/900/1000/1100/1200/1300/1400 The programmable range for the END field is: 400/500/600/700/800/900/1000/1100/1200/1300/1400/1500 Direct Inward System Access (DISA) Description Any CO line(s) may be programmed as DISA lines. -
Page 274: Ext Call Forward (Ecf)
Call Handling Configuration 6-25 Programmable Range DISA data fields: ACCESS CODE = Range 1-24 DISA Lines DHS = 1-12 programmable range DISA Lines DHS-E = 1-18 programmable range DISA DAY COS = Range 0-7 DISA NITE COS = Range 0-7 SERVICE = Never/day/nite/always TALK TIME = 1/2/3/5/10/15 minutes EXT Call Forward (ECF) -
Page 275: Uns Conference Time
6-26 Call Handling Configuration Related Programming Refer to “System Speed Dialing”. System Speed Dial bin 99 must be programmed with a telephone number that will be used as the ECF destination number for this feature to operate. UNS Conference Time CO lines that are left unattended in conference (Unsupervised Conference) will be allowed to remain in this status for the duration of the Unsupervised Conference Time. -
Page 276: Call Abandon Time
Call Handling Configuration 6-27 The ABR ATTEMPTS determines how many attempts will be made to reach a busy number before the system aborts the feature. The ABR INTERVAL determines how often attempts are made (time between attempts). Default The default settings for the DHS/DHS-E three ABR data fields are listed below: ABR Attempts = 10 (no attempt = 0) -
Page 277: Wait (Iclid)
6-28 Call Handling Configuration There are three data fields associated to CO Line Preset Call Forward CO P-FWD TIME—One timer referenced by all CO lines set for Preset Forward. COxx DEST—Destination set for the CO line being programmed. COxx VMID—A 6-digit field that can be programmed with a digit string used when the forward destination is a VM type Hunt Group. -
Page 278: Resource Configuration
Resource Configuration 6-29 Resource Configuration If the system is in the programming mode, continue using the [back] and [next] Soft Buttons to scroll to the desired programming field. If starting to program here, enter the programming mode. Refer to “Program Mode Entry”. -
Page 279: Attendant
6-30 Resource Configuration Table 6-3: Letter Type Character for n depressions of dial key "1". Scheme 0 Scheme 1 Scheme 2 Scheme 3 Scheme 4 Scheme 5 Default DHS/DHS-E Letter Scheme is [0] and has a programmable range of 0/1/2/3/4/5. Attendant One station may be assigned the attendant station. -
Page 280: System Alarm
Resource Configuration 6-31 Programmable range: Alternate Attd DHS = 10-81 Alternate Attd DHS-E = 100-195 Related Programming Refer to “Ring ALT Position” in the Call Handling Configuration section of this Chapter. System Alarm The alert signals may be scheduled. When an alert time is reached all system stations will receive BGM over the telephone speaker for one minute. -
Page 281: User Password
6-32 Resource Configuration User Password Each station in the system is assigned a default password of 0000. This may be changed if the associated security feature operation (Phone Lock, Remote COS, etc.) is required. This allows the password to be viewed but not modified. Default DHS/DHS-E User Password is 0000, and has a programmable range from 0000-9999. -
Page 282: Preprogrammed Messages
Resource Configuration 6-33 Preprogrammed Messages Two types of Preprogrammed Messages; OUTGOING MESSAGE and EXECUTIVE NOTIFY. The OUTGOING MESSAGE works with Message Wait and allows the Executive Key Telephone user to leave a text message at another Executive Key Telephone. EXECUTIVE NOTIFY is a message that may be enabled to notify other Executive Key Telephone callers of the users status. -
Page 283: Background Music (Bgm)
6-34 Resource Configuration Default By default, all DHS/DHS-E System Speed Bins are EMPTY, and the allowable programmable digits are: Digits (0-9) [✳], [#], pause (F + [7] +[0])Flash (F + [3]), and (F + [1]+ nn) for chaining (up to 16 characters). Background Music (BGM) A second music source may be connected to the system for listening at key telephone stations. -
Page 284: System Time
Resource Configuration 6-35 System Time Provided to set system time and date information. Use the prompts displayed to set the fields: YEAR MONTH WEEKDAY HOUR MINUTE System Time can be set through Attendant Administration using the Attendant Station password. Account Code Table When a station is Forced Account Code (must enter an account code to dial any outside telephone number), the account code entered is verified against the entries in this table. -
Page 285: Data Link
RMT X_RATE is 9600 baud, and the range is programmable from 110/300/ 600/1200/2400/4800/9600/19200. system requires the Option Module to be installed for this capability. Vodavi only guarantees a connection at 9600 baud. SMDR X_RATE The DB-9 RS232 port labeled SMDR can be connected to a serial printer, personal computer or other call accounting collection device to collect Station Message Detail Recording. -
Page 286: Dial Wait Time
Restriction Configuration 6-37 Default DHS/DHS-E Dial Tone Detect is set to (N) disabled, and can be toggled from (Y/N). Dial Tone Detect requires the Option Module on the DHS to function. However, if CO dial tone is slow and dialed digits are being sent before CO dial tone is ready, the Dial Wait Time may be used to eliminate the problem by imposing a fixed wait period before digits are sent. -
Page 287: Restriction Data (Example)
6-38 Restriction Configuration The words From and To are not displayed, rather the From table is denoted with a “>” symbol following the table entry and the To table is denoted with a > symbol preceding the table entry. Consider the default entry in Table bin 001 where the From entry is 0 and the To entry is 9 (refer to Table 6-5 ). -
Page 288: System Applications
System Applications 6-39 System Applications If the system is in the programming mode, continue using the [back] and [next] Soft Buttons to scroll to the desired programming field. If starting to program here, enter the programming mode. Refer to “Program Mode Entry”. -
Page 289: Voice Mail
6-40 System Applications Call Forward—Busy No Answer may affect operation of this feature. Group members in a Voice Mail Hunt Group must be set to Voice Mail-type “Yes”. Related Programming Refer to “Voice Mail Port” in the Station Programming section of this Chapter. Voice Mail Description When a voice mail system is connected to the... - Page 290 System Applications 6-41 Default DHS/DHS-E default settings of associated (Voice Mail Integration) data fields are listed below: ICM PREFIX Empty RECORD DGT= Empty ICM SUFFIX Empty XFR SUFFIX Empty DIS DGT Empty Programmable Range The programmable range for the DHS/DHS-E Voice Mail Integration fields are listed below: ICM PREFIX = 0000-9999,####, ✳✳✳✳✳...
-
Page 291: Numbering Plan (Dhs-E Only)
6-42 System Applications Numbering Plan (DHS-E Only) The Installer can customize the Numbering Plan. The default Ranges for each Item are 1- 8. As each subsequent item is reviewed, the scrollable options available will be the one currently selected for that Item plus any unassigned codes. By default, 1, 2, 7 and 8 are used which leaves 3, 4, 5, and 6, plus the number currently assigned to that Item in the scroll list. -
Page 292: Maintenance/Troubleshooting
Maintenance/ Troubleshooting The System troubleshooting procedures is a logical approach to fault identification, analysis, and correction. The key system may generate symptoms of problems that actually occur outside of the office environment. -
Page 294: Introduction
Introduction Introduction ® STARPLUS Maintaining the DHS/DHS-E™ digital telephone system is a combination of customer database changes, facilities and apparatus moves, adds and changes. These requirements are handled properly by practicing the techniques, illustrations and step- by-step instructions listed in the previous sections of this manual. When installed properly the DHS/DHS-E performs relatively maintenance-free. -
Page 295: Central Processor Unit (Cpu)
CPU/Power LED Table 7-1: Central Processor Unit (CPU) SYMPTOM DIAGNOSTIC AID CAUSE CORRECTIVE ACTION No system operation No AC input Check commercial AC outlet. KSU Cord Verify that both ends of AC cord are plugged in. LCD telephones Heartbeat/Power have no display Power On Switch the KSU AC power switch to the ON LED Not Lit... -
Page 296: Key Telephone / Slt Telephones Dead
CPU/Power LED Table 7-2: Key Telephone / SLT Telephones Dead DIAGNOSTIC SYMPTOM CAUSE CORRECTIVE ACTION 1. At MDF, remove cross connect (jumper) Telephones/station CPU Heartbeat / Shorted Station apparatus dead. Power LED Lit Pair(s) wires at the punch-down (66M1-50) block going to all affected stations. -
Page 297: Erratic Key Telephone Operation
CPU/Power LED Table 7-3: Erratic Key Telephone Operation SYMPTOM DIAGNOSTIC AID CAUSE CORRECTIVE ACTION Erratic operation: Digital Volt/OHM Cable distance is too If a key telephone is not receiving clear meter long for gauge of 2B+D signal from KSU, test as follows: LCD Display and cable used. -
Page 298: Key Telephone (Cannot Hear)
CPU/Power LED Table 7-5: Key Telephone (cannot hear) SYMPTOM DIAGNOSTIC AID CAUSE CORRECTIVE ACTION 1. Verify MUTE is not lit. Cannot hear Key Telephone Component Failure (handset) 2 Lift handset, ICM tone should be heard over the handset. 3 Press [SPKR] key, observe red LED and place handset on hook. -
Page 299: Static/Noise During Conversation
CPU/Power LED Table 7-8: Static/Noise During Conversation SYMPTOM DIAGNOSTIC AID CAUSE CORRECTIVE ACTION Static and/or noise Logic of If you can hear the static, is it on can be heard during elimination intercom handset to handset calls? a conversation If yes, do you hear the static when you call any other ICM stations? (The problem may be the telephone called or calling you). -
Page 300: Lines Stay Busy
CPU/Power LED Table 7-9: CO Line Problems SYMPTOM DIAGNOSTIC AID CAUSE CORRECTIVE ACTION Lines on Hold, no System If the customer complains of seeing one there. Programming many holding lines, and when accessed no one is on the other end, calls may be left in an abandoned state. -
Page 301: Btn Programming Is Lost/Changed At Key Telephone
CPU/Power LED Table 7-11: Btn Programming is Lost/Changed at Key Telephone SYMPTOM DIAGNOSTIC AID CAUSE CORRECTIVE ACTION 1. See if customer has a User Guide and Previously Executive Key Unauthorized programmed feature Telephone Display customer understands feature button buttons now do not reprogramming programming. -
Page 302: A Database Programming Forms
Database Programming Forms Use the following forms to complete the customer specific programming applications prior to actual system programming. For several database fields some forms do not provide an entry area for all possible programming, since the majority of installation applications will not require changes to all data in all program fields. -
Page 304: Programming Work Sheets
Programming Work Sheets Programming Work Sheets You may photocopy these forms to use as actual programming work sheets. Table A-1: System Type DATA PARAMETER FORMAT CUSTOMER DATA DEFAULT System Type PBX/KEY Table A-2: System Application Numbering Plan (DHS-E only) DATA PARAMETER FORMAT CUSTOMER DATA DEFAULT... -
Page 305: Co Line Data
Programming Work Sheets Table A-3: CO Line Data CO Line Numbers DATA RANGE DEFAULT FIELD 700 701 702 703 704 705 706 707 708 709 710 711 712 713 714 715 716 717 Dialing Tone/ Empty Type Pulse Call Abandon CO Line Type PBX/... -
Page 306: Station Data (Dhs
Programming Work Sheets Table A-4: Station Data (DHS) STATION NUMBERS DATA FIELD RANGE DEFAULT Day COS Night COS CO Line Assignment CO Line Receive Assignment... - Page 307 Programming Work Sheets Table A-4: Station Data (DHS) (Continued) STATION NUMBERS DATA FIELD RANGE DEFAULT CO Line Ring day/night/ Station - 10 Assignment both/none Both Account Code Forced Station Group (1-8) Warning Tone Drop Time-out Station Position (10-81) (10-81) VM Port DSS Owner (10-81) (none)
-
Page 308: Station Data (Dhs-E)
Programming Work Sheets Table A-5: Station Data (DHS-E) STATION NUMBERS DATA FIELD RANGE DEFAULT Day COS Night COS CO Line Assignment... - Page 309 Programming Work Sheets Table A-5: Station Data (DHS-E) (Continued) STATION NUMBERS DATA FIELD RANGE DEFAULT CO Line Receive Assignment...
- Page 310 Programming Work Sheets Table A-5: Station Data (DHS-E) (Continued) STATION NUMBERS DATA FIELD RANGE DEFAULT CO Line Ring day/night/ Station - 100 both/none Both Assignment Account Code Forced Station Group (1-8) Warning Tone Drop Time-out Station Position (100-195) (100-195) VM Port DSS Owner (100-195) (none)
-
Page 311: Call Handling Data
Programming Work Sheets Table A-6: Call Handling Data DATA PARAMETER FORMAT CUSTOMER DATA DEFAULT Privacy Release Privacy Release Tone Exclusive Hold Time 0-8 minutes 4 min Flash Time 0.1-1.5 Remind Time 0/10/30/60/90 Park Remind 30/60/90/120/150/180 Pause Time 1.5/2/3.5/5 PBX Code PBX Auto Pause Dialing Ratio Tone Time 50/60/70...150... -
Page 312: Co Line Attributes
Programming Work Sheets Table A-7: CO Line Attributes CO LINE NUMBERS DATA RANGE DEFAULT FIELD 700 701 702 703 704 705 706 707 708 709 710 711 712 713 714 715 716 717 DISA 0000- Empty Access 9999 Code DISA Line Night Service... -
Page 313: External Call Forward - Auto Busy Redial Parameters
A-10 Programming Work Sheets Table A-9: External Call Forward - Auto Busy Redial Parameters DATA FIELD RANGE CUSTOMER DATA DEFAULT External Call Forward Incoming 0 (None) None DHS 1-12 DHS-E 700-717 Outgoing 0 (None) None DHS 1-12 DHS-E 700-717 Service never/day/ Never night/always... -
Page 314: System Application Data
Programming Work Sheets A-11 Table A-10: System Application Data DATA FIELD RANGE NEW DATA DEFAULT Station Hunt Hunt Group Type Hunt/VM/AllRing Hunt Group Group Group Member 10-81 / 100-195 Empty 10-81 / 100-195 Empty 10-81 / 100-195 Empty 10-81 / 100-195 Empty 10-81 / 100-195 Empty... - Page 315 A-12 Programming Work Sheets Table A-10: System Application Data DATA FIELD RANGE NEW DATA DEFAULT Station Hunt Hunt Ring day/night/ None Assignment both/none Group Group 10 709 11 710 12 711 Voice Mail ICM Prefix 0000-9999,P,S,# Empty XFR Prefix Empty Record DGT Empty ICM Suffix...
-
Page 316: Restriction Data
Programming Work Sheets A-13 Table A-11: Restriction Data CO CALL DAY ALLOWED (COS) NIGHT ALLOWED (COS) DESCRIMINATION FROM Interval: (10 digits max.) (10 digits max.) 0 1 2 3 4 5 6 7 0 1 2 3 4 5 6 7 (default shown) Y N N N N N N N Y N N N N N N N... - Page 317 A-14 Programming Work Sheets Table A-11: Restriction Data (Continued) CO CALL DAY ALLOWED (COS) NIGHT ALLOWED (COS) DESCRIMINATION FROM Interval: (10 digits max.) (10 digits max.) 0 1 2 3 4 5 6 7 0 1 2 3 4 5 6 7 (default shown)
- Page 318 Programming Work Sheets A-15 Table A-11: Restriction Data (Continued) CO CALL DAY ALLOWED (COS) NIGHT ALLOWED (COS) DESCRIMINATION FROM Interval: (10 digits max.) (10 digits max.) 0 1 2 3 4 5 6 7 0 1 2 3 4 5 6 7 (default shown)
- Page 319 A-16 Programming Work Sheets Table A-11: Restriction Data (Continued) CO CALL DAY ALLOWED (COS) NIGHT ALLOWED (COS) DESCRIMINATION FROM Interval: (10 digits max.) (10 digits max.) 0 1 2 3 4 5 6 7 0 1 2 3 4 5 6 7 (default shown)
-
Page 320: Resource Data
Programming Work Sheets A-17 Table A-12: Resource Data DATA PARAMETER RANGE CUSTOMER DATA DEFAULT Ring Scheme 1/2/3/4 Letter Type 0/1/2/3/4/5 Attendant DHS (10-81) DHS-E (100-195) Alternate DHS (10-81) Empty DHS-E (100-195) System Alarm 00:00-23:59 Empty 00:00-23:59 Empty 00:00-23:59 Empty 00:00-23:59 Empty 00:00-23:59 Empty... - Page 321 A-18 Programming Work Sheets Table A-12: Resource Data (Continued) DATA PARAMETER RANGE CUSTOMER DATA DEFAULT User Password xxxx x=(0-9) 0000 xxxx x=(0-9) 0000 xxxx x=(0-9) 0000 xxxx x=(0-9) 0000 xxxx x=(0-9) 0000 xxxx x=(0-9) 0000 xxxx x=(0-9) 0000 xxxx x=(0-9) 0000 xxxx x=(0-9) 0000...
- Page 322 Programming Work Sheets A-19 Table A-12: Resource Data (Continued) DATA PARAMETER RANGE CUSTOMER DATA DEFAULT User Names 7 Alphanumeric Empty 7 Alphanumeric Empty 7 Alphanumeric Empty 7 Alphanumeric Empty 7 Alphanumeric Empty 7 Alphanumeric Empty 7 Alphanumeric Empty 7 Alphanumeric Empty 7 Alphanumeric Empty...
- Page 323 A-20 Programming Work Sheets Table A-12: Resource Data (Continued) DATA PARAMETER RANGE CUSTOMER DATA DEFAULT Executive Notify 16 Alphanumeric Out For Lunch 16 Alphanumeric Be Back Soon 16 Alphanumeric Left For The Day 16 Alphanumeric In a Meeting 16 Alphanumeric Out Of Office 16 Alphanumeric On Vacation...
-
Page 324: System Speed Dial
Programming Work Sheets A-21 Table A-13: System Speed DIal TELEPHONE TELEPHONE TELEPHONE TELEPHONE BIN # BIN # BIN # BIN # NUMBER NUMBER NUMBER NUMBER When External Call Forward is used, System Speed DIal Bin 99 is used exclusively for the number to dial when calls are routed via ECF. -
Page 325: Account Codes (Up To 8-Digits
A-22 Programming Work Sheets Table A-14: Account Codes (up to 8-digits) TELEPHONE TELEPHONE TELEPHONE TELEPHONE BIN # BIN # BIN # BIN # NUMBER NUMBER NUMBER NUMBER... - Page 326 Part Numbers...
-
Page 328: Dhs-Eksu
® STARPLUS DHS/DHS-E™ Table 2-1: Part Numbers SP7000-00 DHS-E SP7000-10 Option Module* SP7110-00 3 x 8 Expansion Module SP7100-00 6-Port CO Module * SP7100-10 2-Port Analog Adapter SP7420-00 2-Port Analog Expansion SP7440-00 Dark Gray-Executive Key Telephone SP7314-71 Dark Gray-Enhanced Key Telephone SP7312-71 Dark Gray-Basic Key Telephone SP7311-71... - Page 330 Index Numerics 2-Port Analog Adapter 2-11, 5-17 back 4-2, 6-1 Installation 2-51 Backboard 2-25, 3-17 2-Port Analog Expander 2-12, 3-36 Background Music (BGM) 2-6, 2-35, 2-49, 4-17, Installation 2-52 6-34 Installation 2-49, 3-33 refer to 2-Port Analog Adapter refer to Music on Hold (MOH) 3 x 8 Module 2-4, 2-36, 3-4, 3-20, 3-22 Volume 4-103 Installation 2-28...
- Page 331 January 2000 Index Call Handling Configuration 6-20 Central Processor Unit (CPU) 2-4, 3-4, 7-2 Power LED 7-1 Automatic Busy Redial 6-26 Call Abandon 6-27 chg 4-2, 6-1 CO Preset Forward 6-27 Class Of Service (COS) Authority Code 4-14 Conference 6-26 Day 6-13 Dialing Ratio 6-22 Day/Night 4-36...
- Page 332 January 2000 Index Warning Tone 4-104 Specifications 2-13, 2-16, 2-17, 2-18 Station 2-39, 2-40, 6-13 Conference Supervised 4-39 System 2-1, 2-3, 2-13, 2-53 Unsupervised 4-40, 6-26 DHS-E 3 x 8 Module 3-4, 3-20 Call Handling Configuration 6-20 Central Processor Unit (CPU) 3-4 Data Link 6-36 CO Line Configuration 6-17 Database...
- Page 333 January 2000 Index Troubleshooting 7-4, 7-5 Direct Inward System Access (DISA) 1-3, 4-42, General Conventions 4-1, 4-1 6-24 General Site Considerations 2-23, 3-15 Attendant 4-42 Ground 2-26, 2-26, 3-17 Night Service 4-76 Direct Station Selector (DSS) 4-17 Console 4-48 Hands-Free Installation 2-43, 3-28 refer to Voice Announce Owner 6-16...
- Page 334 January 2000 xvii Index Revision 6-37 External Equipment (Optional) 2-47, 3-32 Meet Me 4-80, 5-14 Key Telephones Installation High Profile Mount 3-26 Password 6-31, 6-32 Low Profile Mount 3-27 Change 5-19 Wall Mount 3-26 Pause 4-81, 4-81 Time 6-22 Auto Pause 6-22 Last Number Redial (LNR) 4-67 Code 6-22 Pause 4-81...
- Page 335 RS-232C DB-9 Connector 2-45, 3-30 Storing 5-18 System 6-33 Standard MOH/BGM Module safety 1-2 Installation 2-28 save 4-2, 6-1 Starplus DHS/DHS-E Part Numbers B-1 Service Mode 6-31 Static / Noise During Conversation 7-6 show 4-2, 6-1 Station Single Line Telephone (SLT) Account Code 6-15...
- Page 336 January 2000 Index Feature 4-92 Transfer 4-95, 5-20 Recall 4-86 Group 4-93, 6-15 Hunt Group 4-65, 6-39 Troubleshooting Button Programming 7-8 Installation 2-40 Central Processor Unit (CPU) 7-2 Lock 5-19 CO Line 7-7 Lock/Unlock 4-82 Mute Ringing 4-75 CPU/Power LED 7-1 Numbering Plan 4-93 Digital Key Telephone 7-3 Parameters 6-13...
- Page 337 January 2000 Index...
- Page 338 ©2000 Vodavi Technology, Inc. Vodavi is a registered trademark of Vodavi Technology, Inc. SP7050-03...
Need help?
Do you have a question about the Starplus DHS and is the answer not in the manual?
Questions and answers