Table of Contents
Advertisement
Available languages
Available languages
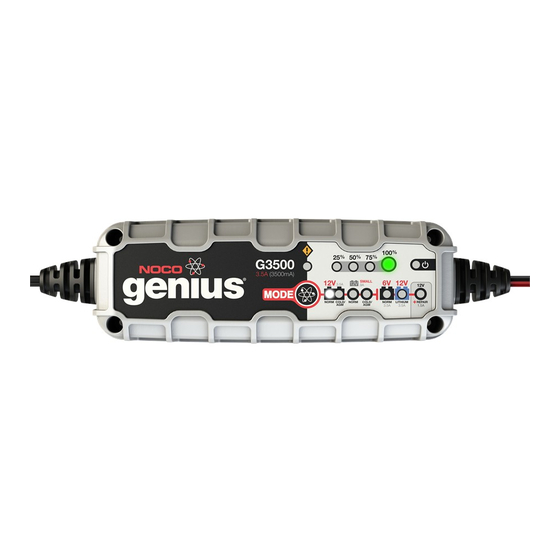
G3500
DANGER
Welcome.
G3500. Read and understand the User Guide before
operating the charger. For questions regarding our
chargers, view our comprehensive support information at
www.no.co/support. To contact NOCO for personalized
support (not available in all areas), visit www.no.co/connect.
What's In The Box.
• G3500 Smart Charger
• (1) Battery Clamp Connectors
• (1) Eyelet Terminal Connectors
• User Guide
• Information Guide and Warranty
User Guide
PRIOR TO USE, READ AND UNDERSTAND
PRODUCT SAFETY INFORMATION.
Failure to follow the instructions may result
in ELECTRICAL SHOCK, EXPLOSION,
or FIRE, which may result in SERIOUS
INJURY, DEATH, DAMAGE TO DEVICE or
PROPERTY. Do not discard this information.
Thank you for buying the NOCO Genius
V2.0
®
Advertisement
Table of Contents

Related Manuals for NOCO Genius G3500 V2.0 Genius


Summary of Contents for NOCO Genius G3500 V2.0 Genius
-
Page 1: User Guide
FIRE, which may result in SERIOUS INJURY, DEATH, DAMAGE TO DEVICE or PROPERTY. Do not discard this information. Welcome. Thank you for buying the NOCO Genius ® G3500. Read and understand the User Guide before operating the charger. For questions regarding our chargers, view our comprehensive support information at www.no.co/support. -
Page 2: Getting Started
Mailing Address: 30339 Diamond Parkway, #102 Glenwillow, OH 44139 United States of America About G3500. The NOCO Genius G3500 represents ® some of the most innovative and advanced technology on the market, making each charge simple and easy. It is quite possibly the safest and most efficient charger you will ever use. - Page 3 indicated on the charger by a red line. It is important to understand the differences and purpose of each charge mode. Do not operate the charger until you confirm the appropriate charge mode for your battery. Below is a brief description: Mode Explanation In Standby mode, the charger is not...
- Page 4 Mode Explanation For charging 6-volt Wet Cell, Gel Cell, Enhanced Flooded, Maintenance-Free and Calcium batteries. When selected, a NORM white LED will illuminate. 7.25V | 3.5A | 2-120Ah Batteries Press & Hold For charging 12-volt lithium-ion batteries, including lithium iron phosphate. When selected, a blue LED will illuminate.
-
Page 5: Connecting To The Battery
BATTERIES MAY BE UNSTABLE AND UNSUITABLE FOR CHARGING. Using 12V Repair. [Press & Hold] 12V Repair is an advanced battery recovery mode for repairing and storing, old, idle, damaged, stratified or sulfated batteries. Not all batteries can be recovered. Batteries tend to become damaged if kept at a low charge and/or never given the opportunity to receive a full charge. -
Page 6: Begin Charging
1.) Connect the positive (red) battery clamp or eyelet terminal connector to the positive (POS,P,+) battery terminal. 2.) Connect the negative (black) battery clamp or eyelet terminal connector to the negative (NEG,N,-) battery terminal or vehicle chassis. 3.) Connect the battery charger’s AC power plug into a suitable electrical outlet. - Page 7 Understanding Charge LEDs. The charger has four (4) Charge LEDs - 25%, 50%, 75% and 100%. These Charge LEDs indicate the connected battery(s) state-of-charge (SOC). See the explanation below: Explanation The 25% Charge LED will slowly Red LED pulse “on” and “off”, when the battery is less than 25% fully charged.
- Page 8 Understanding Advanced Diagnostics. Advanced Diagnostics is used when displaying Error Conditions. It will display a series of blink sequences that help you identify the cause of the error and potential solutions. All Error Conditions are displayed with the Error LED and Standby LED flashing back and forth.
- Page 9 Memory Returns to last selected mode when restarted Interactive Alters the charging process based on organic battery feedback Recovery Applies a high-voltage pulse charge when low-voltage, sulfation or lost capacity is detected Safe Protects against reverse polarity, sparks, overcharging, overcurrent, open-circuits, short-circuits and overheating Fast Charges two times faster than traditional...
- Page 10 Optimization Stabilizes internal battery chemistry for increased performance and longevity Maintenance Plus Keeps the battery fully charged without overcharging allowing the charger to be safely connected indefinitely Energy Save Minimizes energy consumption when full power is not needed Load Tracking Charge LEDs dynamically track the batteries state-of-charge when a load outpaces the charge current...
-
Page 11: Charging Steps
Charging Steps. Voltage (V) Step Current (A) Step 1 & 2: Analyze & Diagnose Checks the battery’s initial condition, including voltage, state-of-charge and health, to determine if the battery is stable before charging. Step 3: Recovery Initializes the Recovery desulfation process (if needed) for deeply discharged or sulfated batteries by pulsing small amounts of current. -
Page 12: Step 8: Maintenance
Step 8: Maintenance Continuously monitors the battery to determine when a maintenance charge should be initiated. If the battery voltage falls below its target threshold, the charger will restart the Maintenance cycle until voltage reaches its optimal state and then discontinues the charge cycle. The cycle between Optimization and Maintenance is repeated indefinitely to keep the battery at full charge. -
Page 13: Technical Specifications
Technical Specifications. Input Voltage AC: 110-120 VAC, 50-60Hz Working Voltage AC: 85-130 VAC, 50-60Hz Efficiency: 85% Approx. Power: 60W Max Charging Voltage: Various Charging Current: 3.5A (12V & 6V), .9A (12V Small) Low-Voltage Detection: 2V (12V), 2V (6V) Back Current Drain: <5mA Ambient Temperature: 0°C to +40°C... -
Page 15: Manuel D'utilisation
MORT ou ENDOMMAGER L’APPAREIL ou d’autres OBJETS. N’ignorez pas les informations contenues ici. Bienvenue. Merci pour l’achat d’un NOCO Genius ® G3500. Veuillez lire et comprendre le manuel d’utilisation avant d’utiliser l’appareil. Pour toutes questions concernant nos chargeurs, veuillez consulter nos informations exhaustives à... -
Page 16: Premiers Pas
Adresse postale : 30339 Diamond Parkway, #102 Glenwillow, OH 44139 United States of America À propos de G3500. Le NOCO Genius G3500 dispose ® des technologies parmi les plus innovantes et avancées du marché, rendant chaque chargement simple et facile. - Page 17 toute votre attention avant de les déclencher. “Appuyer et charger” sont indiqués sur le chargeurs sur une ligne rouge. Il est important de comprendre les différences et les avantages de chaque mode de chargement. Il est important de charger jusqu’à ce que vous confirmiez le mode de chargement de votre batterie.
- Page 18 Modo Explication Pour charger une batterie humide, à gel, NORME EFB (enhanced flooded battery), sans entretien et au calcium. Lorsqu’il est choisi, un LED blanc s’allume. Appuyer & maintenir 7.25V | 3.5A | 2-120Ah Batteries Pour charger des batteries 12 volt LITHIUM lithium-ions, y compris lithium fer phosphate.
- Page 19 DE GESTION DE BATTERIES (BMS). CONSULTEZ LE FABRICANT DE BATTERIES LITHIUM AVANT DE CHARGER ET RENSEIGNEZ-VOUS SUR LES TAUX DE CHARGEMENT ET DE TENSION. CERTAINES BATTERIES LITHIUM-IONS PEUVENT ÊTRE INSTABLES ET INADAPTÉES AU CHARGEMENT. Utilisation du mode de réparation 12V. Appuyer &...
- Page 20 Connecter la batterie. Ne connectez pas la prise de courant AC jusqu’à ce que toutes les autres connections soient faites. Identifiez la bonne polarité des bornes de la batterie sur la batterie. La borne positive de la batterie est généralement indiquée par ces lettres ou symboles (POS, P, +).
- Page 21 5.) Les LEDs correspondant au mode de chargement s’allumeront, ainsi que les LEDs indiquant la progression du chargement (selon l’état de la batterie). 6.) Le chargeur peut maintenant rester connecté à la batterie à tout moment pour fournir un chargement d’entretien.
- Page 22 Comprendre les LEDs de chargement. Le chargeur dispose de quatre (4) LEDs de chargement -25%, 50%, 75% et 100%. Ces LEDs de chargement indiquent l’état de chargement (state of charge SOC) de la ou les batteries connectées. Voyez l’explication ci-dessous : Explanation Le LED de chargement 25 % LED rouge...
- Page 23 Mémoire Revient au dernier mode sélectionné lorsqu’elle est redémarrée Interaction Modifie le processus de chargement en se basant sur le retour organique de la batterie Rétablissement Donne une pulsation de chargement de haute tension lorsque est détecté une tension basse, un sulfatage ou une perte de capacité...
- Page 24 Murs coupe-feu Barrières de sécurité de plusieurs niveaux empêchant les conditions d’utilisation anormales et peu sûres Optimisation Stabilise la composition chimique interne de la batterie pour une performance et une longévité augmentée Entretien Plus Maintient la batterie pleinement chargée sans la surcharger, permettant au chargeur d’être branché...
- Page 25 Étapes de chargement. Tension (V) Étape Courant (A) Étape 1 & 2 : Analyse & Diagnostic Vérifie l’état initial de la batterie, y compris la tension, l’état du chargement et le cycle de vie pour déterminer si la batterie est apte à être chargée. Étape 3 : Rétablissement Initie le processus rétablissement désulfatage (si nécessaire) pour des batteries très déchargées ou...
-
Page 26: Étape 8 : Entretien
d’avoir une durée de cycle et une performance optimisées. Le chargeur basculera en mode entretien si la batterie indique au chargeur qu’elle nécessite plus de courant. Étape 8 : Entretien Supervise en continu la batterie pour vérifier si une charge d’entretien doit être initiée. -
Page 27: Spécifications Techniques
Spécifications techniques Tension d’entrée AC: 110-120 VAC, 50-60Hz Working Voltage AC: 85-130 VAC, 50-60Hz Efficacité: 85% Anviron. Puissance: 60W Max Tension de chargement: Divers Courant de chargement: 3.5A (12V & 6V), .9A (12V Small) Détection de tension basse : 2V (12V), 2V (6V) Courant de fuite: <5mA Température ambiante:... -
Page 29: Guía De Usuario
LESIONES GRAVES, MUERTE o DAÑOS MATERIALES o AL DISPOSITIVO. No tire esta información. Bienvenido. Gracias por comprar NOCO Genius ® G3500. Asegúrese de que lee y entiende la guía de usuario antes de usar el cargador. Si tiene alguna pregunta sobre nuestros cargadores, consulte nuestra completa sección de soporte técnico en www.no.co/... -
Page 30: Primer Paso
Dirección postal: 30339 Diamond Parkway, #102 Glenwillow, OH 44139 United States of America Acerca de G3500. El NOCO Genius G3500 incorpora ® de la más innovadora y avanzada tecnología del mercado, lo que simplifica y facilita cada carga. Es posiblemente el cargador más seguro y eficaz que utilizará... - Page 31 su atención completa antes de ser seleccionados. Los modos “Press and Hold” se indican en el cargador con una línea roja. Es importante entender las diferencias entre los distintos modos de carga y el propósito de cada uno. No haga funcionar el cargador hasta que haya confirmado el modo de carga adecuado para su batería.
- Page 32 Modo Explicación Para cargar baterías de 6 V húmedas, de gel, con tecnología EFB, de libre mantenimiento y de calcio. Al seleccionar NORM este modo de carga se iluminará un led blanco. pulse continuamente 7.25V | 3.5A | 2-120Ah Batería Para cargar baterías de ión de litio de 12 V, incluidas baterías con tecnología LFP LITHIUM...
- Page 33 FORMAS Y PUEDE QUE ALGUNAS NO CONTENGAN UN SISTEMA DE CONTROL DE LA BATERÍA. CONSULTE CON EL FABRICANTE DE LA BATERÍA DE LITIO ANTES DE CARGARLA Y AVERIGÜE CUÁLES SON LOS NIVELES DE CARGA Y VOLTAJES RECOMENDADOS. ALGUNAS BATERÍAS DE IÓN DE LITIO PUEDEN SER INESTABLES Y NO APTAS PARA CARGAR.
- Page 34 Conexión a la batería. No conecte el cable de alimentación de corriente alterna hasta que haya hecho el resto de las conexiones. Averigüe la polaridad correcta de los terminales en la batería. El polo positivo de la batería está marcado generalmente con estas letras o símbolos (POS, P, +).
- Page 35 5.) El led de modo iluminará el modo de carga seleccionado y los ledes de carga LED se iluminarán (dependiendo del estado de la batería) indicando que el proceso de carga ha comenzado. 6.) Ahora el cargador se puede dejar siempre conectado a la batería para suministrar carga de mantenimiento.
- Page 36 Significado de los ledes de carga. El cargador tiene cuatro (4) ledes de carga por entrada: 25%, 50%, 75% y 100%. Estos ledes de carga indican el estado de carga de la(s) batería(s) conectada(s). Vea la siguiente explicación: Explicación El led de carga 25% se encenderá y LED rojo apagará...
- Page 37 Memoria Vuelve al último modo seleccionado cuando se reinicia Interactivo Modifica el proceso de carga basándose en información suministrada por la propia batería Recuperación Aplica una carga de alto voltaje cuando detecta bajo voltaje, sulfatación o pérdida de capacidad Seguro Protege contra polaridad inversa, chispas, sobrecarga, sobretensión, circuitos abiertos, cortocircuitos y sobrecalentamiento...
- Page 38 Optimización Estabiliza la composición química interna de la batería para incrementar su rendimiento y duración Mantenimiento extra Mantiene la batería completamente cargada sin sobrecargarla y permite que el cargador quede conectado indefinidamente con toda seguridad Ahorro de energía Minimiza el consumo de energía cuando no es necesario usar la máxima potencia Seguimiento de la carga Los ledes de carga siguen el estado...
- Page 39 Pasos de carga. Voltaje (V) Paso Corriente (A) Pasos 1 y 2: Análisis y diagnóstico Comprueba el estado inicial de la batería, incluido el voltaje, el estado de carga y el estado general para determinar si la batería es estable antes de cargarla. Paso 3: Recuperación Inicia el proceso de recuperación de la desulfatación (en caso de ser necesario) en baterías profundamente...
-
Page 40: Paso 8: Mantenimiento
específica de la batería. De este modo se incrementa la duración y el rendimiento de la batería. El cargador cambiará al paso de mantenimiento si la batería le indica que necesita más corriente. Paso 8: Mantenimiento Supervisa continuamente la batería para determinar cuándo deber iniciarse una carga de mantenimiento. -
Page 41: Especificaciones Técnicas
Especificaciones técnicas. Voltaje de entrada CA: 110-120 VAC, 50-60Hz Voltaje normal de trabajo CA: 85-130 VAC, 50-60Hz Eficacia: 85% Aprox. Energía: 60W Max Voltaje de carga: Vario Drenaje de corriente: 3.5A (12V & 6V), 12V Small Detección de bajo voltaje: 2V (12V), 2V (6V) Corriente de carga: <5mA... - Page 42 1.800.456.6626 support@no.co 30339 Diamond Parkway, #102 Glenwillow, OH 44139 United States of America no.co NPD02022016E...
Need help?
Do you have a question about the G3500 V2.0 Genius and is the answer not in the manual?
Questions and answers