NOCO Genius GENIUS5 User Manual & Warranty
Hide thumbs
Also See for GENIUS5:
- User manual & warranty (24 pages) ,
- User manual & warranty (48 pages) ,
- User manual & warranty (68 pages)
Table of Contents
Advertisement
Available languages
Available languages
Quick Links
GENIUS5
User Guide & Warranty
DANGER
READ AND UNDERSTAND ALL SAFETY INFORMATION BEFORE USING THIS PRODUCT. Failure to
follow these safety instructions may result in ELECTRICAL SHOCK, EXPLOSION, FIRE, which may
result in a SERIOUS INJURY, DEATH, or PROPERTY DAMAGE.
Electrical Shock. Product is an electrical device that can shock and cause serious injury. Do not cut power
cords. Do not submerge in water or get wet.
Explosion. Unmonitored, incompatible, or damaged batteries can explode if used with product. Do not
leave product unattended while in use. Do not attempt to jump start a damaged or frozen battery. Use
product only with batteries of recommended voltage. Operate product in well ventilated areas.
Fire. Product is an electrical device that emits heat and is capable of causing burns. Do not cover product.
Do not smoke or use any source of electrical spark or fire when operating product. Keep product away from
combustible materials.
Eye Injury. Wear eye protection when operating product. Batteries can explode and cause flying debris.
For more information
Battery acid can cause eye and skin irritation. In the case of contamination of eyes or skin, flush affected
and support visit:
area with running clean water and contact poison control immediately.
Explosive Gases. Working in the vicinity of a lead-acid is dangerous. Batteries generate explosive gases
www.no.co/support
during normal battery operation. To reduce risk of battery explosion, follow all safety information instructions
and those published by the battery manufacturer and manufacturer of any equipment intended to be used
in the vicinity of battery. Review cautionary markings on these products and on engine.
Advertisement
Table of Contents

Related Manuals for NOCO Genius GENIUS5


Summary of Contents for NOCO Genius GENIUS5
- Page 1 GENIUS5 User Guide & Warranty DANGER READ AND UNDERSTAND ALL SAFETY INFORMATION BEFORE USING THIS PRODUCT. Failure to follow these safety instructions may result in ELECTRICAL SHOCK, EXPLOSION, FIRE, which may result in a SERIOUS INJURY, DEATH, or PROPERTY DAMAGE.
-
Page 2: Important Safety Warnings
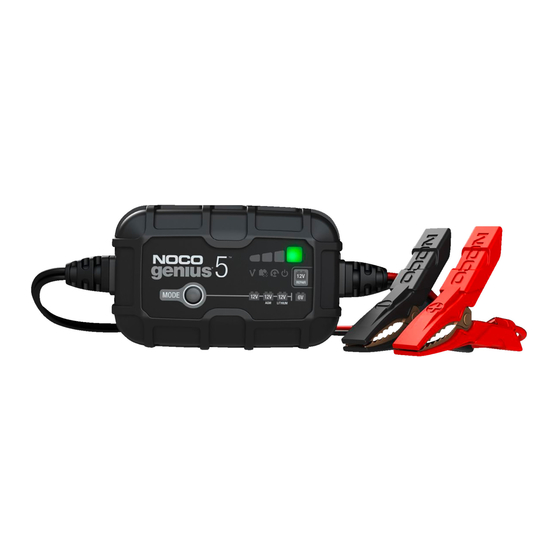
About GENIUS5. The NOCO GENIUS5 represents some of the most innovative and advanced technology on the market, making each charge simple and easy. It is quite possibly the safest and most efficient charger you will ever use. The GENIUS5 is designed for charging all types of 6V & 12V lead-acid batteries, including Lithium (LiFePO4), Wet (Flooded), Gel, MF (Maintenance-Free), CA (Calcium), EFB (Enhanced Flooded Battery), and AGM (Absorption Glass Mat) batteries. - Page 3 Such emissions from the product can negatively affect the operation of other electronic equipment, causing them to malfunction. Model Number: Genius5 This device complies with Part 15 of the FCC Rules. Operation is subject to the following two conditions: (1) this device may not cause harmful interference, and (2) this device must accept any interference received, including interference that may cause undesired operation.
-
Page 4: How To Use
Charging Modes. The GENIUS5 has seven (7) modes: Standby, 12V, 12V AGM, 12V LITHIUM, 6V, REPAIR and FORCE. Some charge modes must be pressed and held for three (3) to five (5) seconds to enter the mode. These “Press and Hold” modes are advanced charging modes that require your full attention before selecting. It is important to understand the differences and purpose of each charge mode. - Page 5 Using 6V. [Press & Hold for 3 seconds] 6V charge mode is designed for 6-volt lead-acid batteries only, like Wet Cell, Gel Cell, Enhanced Flooded, Maintenance-Free and Calcium batteries. Press and hold for three (3) seconds to enter 6V Charge Mode. Consult the battery manufacturer before using this mode. Using 12V Lithium.
-
Page 6: Connecting To The Battery
Connecting to the Battery. Do not connect the AC power plug until all other connections are made. Identify the correct polarity of the battery terminals on the battery. The positive battery terminal is typically marked by these letters or symbol (POS, P, +). The negative battery terminal is typically marked by these letters or symbol (NEG, N, -). Do not make any connections to the carburetor, fuel lines, or thin, sheet metal parts. -
Page 7: Begin Charging
4.) Position yourself and free end of cable as far away from battery as possible - then connect NEGATIVE (BLACK) battery clamp or eyelet terminal connector to free end of cable. 5.) Connect the battery charger into a suitable electrical outlet. Do not face the battery when making this connection. 6.) When disconnecting charger, always do so in reverse sequence of connecting procedure and break first connection while as far away from battery as practical. -
Page 8: Charging Times
Actual data may differ due to battery conditions. The time to charge a normally discharged battery is based on a 50% DOD. Temperature will also impact charging times. The GENIUS5 features thermal compensation 12.0 12.0 that automatically adjusts charging profiles to maximize charging performance. -
Page 9: Maintenance
Understanding Charge LEDs. Explanation The 25% Charge LED will slowly pulse “on” and “off”, when the battery is less than 25% fully charged. When the battery is 25% charged, the red Charge LED will be solid. Red LED The 50% Charge LED will slowly pulse “on” and “off”, when the battery is less than 50% fully charged. When the battery is 50% charged, the red Charge LED will be solid. - Page 10 1.) Mode Button Push to cycle through charging Modes. 6.) Standby LED Illuminates when the charger is in Standby Mode, the charger is not charging or providing any power to the battery. 2.) Overvoltage Error LED Illuminates solid Red; Battery Voltage is above 7.) Repair Mode LED When selected, a red LED will illuminate and flash.
-
Page 11: Technical Specifications
Technical Specifications Input Voltage AC: 120-240 VAC, 50-60Hz Working Voltage AC: 120-240 VAC, 50-60Hz Output Power: 75 W Max Charging Voltage: Various Charging Current: 5A (12V), 5A (6V) Low-Voltage Detection: 1V (12V), 1V (6V) Back Current Drain: <0.5mA Operating Temperature: 4°F to 104°F (-20°C to 40°C) Storage Temperature: -22°F to 140°F (-30°C to 60°C) - Page 12 TO THE EXTENT PERMITTED BY LAW, THIS WARRANTY AND THE REMEDIES SET FORTH ARE EXCLUSIVE AND IN LIEU OF ALL OTHER WARRANTIES, REMEDIES, AND CONDITIONS, WHETHER ORAL, WRITTEN, STATUTORY, EXPRESS, OR IMPLIED. NOCO DISCLAIMS ALL STATUTORY AND IMPLIED WARRANTIES, INCLUDING, WITHOUT LIMITATION, WARRANTIES OF MERCHANTABILITY AND FITNESS FOR A PARTICULAR PURPOSE AND WARRANTIES AGAINST HIDDEN OR LATENT DEFECTS, TO THE EXTENT PERMITTED BY LAW.
- Page 13 GENIUS5 Guide d’utilisation et garantie DANGER LISEZ ATTENTIVEMENT TOUTES LES CONSIGNES DE SÉCURITÉ AVANT D’UTILISER CE PRODUIT. La non- Français application des consignes de sécurité peut résulter en UN CHOC ÉLECTRIQUE, UNE EXPLOSION, DU FEU, ce qui peut conduire à de GRAVES BLESSURES, LA MORT ou des DÉGÂTS MATÉRIELS.
-
Page 14: Indications De Sécurité Importantes
À propos de GENIUS5. Le NOCO GENIUS5 représente l’une des technologies les plus innovatrices et avancées sur le marché, rendant chaque recharge simple et facile. Il s’agit peut-être du chargeur le plus sécuritaire et efficace que vous utiliserez jamais. Le GENIUS5 est conçu pour recharger tous les types de piles 6 V et 12 V plomb-acide, incluant celles au lithium (LiFePO4), les piles liquides (innondées), au gel, MF (sans entretien), CA (calcium), EFB (pile innondées améliorées) et AGM (fond... - Page 15 être conforme aux réglementations des fréquences radio. Les rayonnements du produit peuvent avoir un effet négatif sur le fonctionnement d’autres appareils électriques, provoquant un dysfonctionnement. Numéro du modèle : Genius5. Cet appareil est conforme à la partie 15 de la réglementation FCC. L’utilisation est soumise aux deux conditions suivantes : (1) l’appareil ne devra pas causer d’interférences dommageables et (2) l’appareil doit pouvoir subir des interférences y compris...
- Page 16 Modes de chargement. Le GENIUS5 possède sept (7) modes : Veille, 12 V, 12 V AGM, 12 V LITHIUM, 6 V, Réparation et Mode Contrainte. Certains modes de charge nécessitent d’enfoncer et de maintenir un bouton pendant trois (3) à cinq (5) secondes pour les activer. Ces modes « Appuyer et maintenir » sont des modes de charge avancés qui requièrent toute votre attention avant de les sélectionner.
- Page 17 Mode 6 V. [Appuyez et maintenez enfoncé pendant 3 secondes] Le mode 6V est conçu uniquement pour les batteries au plomb-acide de 6 V, comme les batteries à cellule humide, à cellule à gel, humides améliorées, sans entretien, et les batteries au calcium.
- Page 18 Connexion à la batterie. Ne branchez pas la fiche d’alimentation secteur avant d’avoir procédé à toutes les autres connexions. Identifiez la polarité des bornes de la batterie sur la batterie. La borne positive est généralement indiquée par ces lettres ou symboles (POS, P, +). La borne négative est généralement indiquée par ces lettres ou symboles (NEG, N, -).
- Page 19 SUIVEZ CES ÉTAPES LORSQUE LA BATTERIE SE TROUVE À L’EXTÉRIEUR DU VÉHICULE. AVERTISSEMENT : UNE ÉTINCELLE À PROXIMITÉ DE LA BATTERIE PEUT PROVOQUER SON EXPLOSION. POUR RÉDUIRE LE RISQUE D’UNE ÉTINCELLE À PROXIMITÉ DE LA BATTERIE : 1.) Vérifiez la polarité des bornes de la batterie. Le diamètre de la borne POSITIVE (POS, P, +) est généralement plus grand que celui de la borne NÉGATIVE (NEG, N, -). 2.) Fixez au moins un câble de batterie isolé...
-
Page 20: Mémorisation Automatique
Le temps de charge d’une batterie normalement déchargée est basé sur une profondeur de décharge de 50 %. La température influencera 12,0 12,0 également le temps de chargement. Le GENIUS5 dispose d’une compensation thermique qui ajuste automatiquement les profiles de chargement pour 15,0 15,0 maximiser la performance. - Page 21 Comprendre les LEDs de chargement. Explication DEL rouge La DEL indiquant 25 % de charge clignote lentement, lorsque la batterie est à moins de 25 % de la charge complète. Lorsque indiquant 25 % la batterie est chargée à 25 %, la DEL de charge est rouge est constante. de charge DEL rouge La DEL indiquant 50 % de charge clignote lentement, lorsque la batterie est à...
- Page 22 1.) Bouton du mode Poussez pour faire défiler les modes de charge. 6.) Mode Veille S’allume lorsque le chargeur est en mode Veille, le chargeur ne charge pas ou ne fournit aucune alimentation à la batterie. 2.) DEL d’erreur de surtension DEL rouge et constante; la tension de la 7.) DEL du mode de Réparation Lorsque cette option est sélectionnée, une batterie dépasse la tension de protection.
-
Page 23: Spécifications Techniques
Spécifications Techniques Tension d’entrée AC: 120-240, 50-60 Hz Tension de travail AC: 120-240, 50-60 Hz Courant de sortie : 75 W Max Tension de chargement: Divers Courant de chargement: 5 A (12 V), 5A (6 V) Détection de tension basse: 1 V (12 V), 1V (6 V) Courant de fuite: <0,5 mA Température de fonctionnement:... - Page 24 Garantie limitée NOCO de trois (3) ans IMPORTANT : EN UTILISANT CE PRODUIT, VOUS ACCEPTEZ D’ÊTRE LIÉ(E) AUX CONDITIONS DE LA GARANTIE LIMITÉE DE TROIS (3) ANS («LA GARANTIE ») DE NOCO, TELLE QUE DÉFINIE CI-DESSOUS. N’UTILISEZ PAS LE PRODUIT AVANT D’AVOIR LU LES CONDITIONS DE GARANTIE. SI VOUS N’ÊTES PAS D’ACCORD AVEC LES CONDITIONS DE GARANTIE, N’UTILISEZ PAS LE PRODUIT ET RENVOYEZ-LE.
- Page 25 Si, pendant la période de garantie, vous faites une réclamation, NOCO aura le choix entre les options suivantes : (a) réparer le produit ayant été testé et répondant à nos exigences en matière de fonctionnalités, (b) remplacer le produit par un produit de remplacement du même modèle (ou, avec votre consentement, par un produit possédant les mêmes caractéristiques ou des caractéristiques similaires pour l’essentiel) neuf ou comme neuf, ayant été...
- Page 26 GENIUS5 Guía de usuario y garantía PELIGRO ASEGÚRESE DE QUE LEE Y ENTIENDE TODA LA INFORMACIÓN DE SEGURIDAD ANTES DE USAR Español ESTE PRODUCTO. El incumplimiento de estas instrucciones de seguridad podría resultar en DESCARGA ELÉCTRICA, EXPLOSIÓN o INCENDIO, que podrían causar LESIONES GRAVES, MUERTE o DAÑOS MATERIALES.
-
Page 27: Advertencias Importantes De Seguridad
Acerca de GENIUS5. El NOCO GENIUS5 representa algunas de las tecnologías más innovadoras y avanzadas del mercado, lo que hace que cada carga sea simple y fácil. Es posiblemente el cargador más seguro y eficiente que jamás utilizará. El GENIUS5 está diseñado para cargar todo tipo de baterías de plomo-ácido de 6 V y 12 V, incluyendo litio (LiFePO4), húmeda (inundada), gel, MF (sin mantenimiento), CA (calcio), EFB (batería inundada mejorada), y baterías AGM (alfombrilla de absorción de... - Page 28 Tales emisiones del producto pueden afectar al funcionamiento de otros aparatos electrónicos y hacer que funcionen incorrectamente. Modelos: GENIUS5. Este dispositivo cumple con el artículo 15 de las normas de la Comisión Federal de Comunicaciones (FCC).
-
Page 29: Instrucciones De Uso
Modos de carga. El GENIUS5 dispone de siete (7) modos: modo de espera, 12 V, 12 V AGM, 12 V LITIO, 6 V, REPARACIÓN y FORCE. Para algunos modos de carga se debe presionar y mantener durante tres (3) a cinco (5) segundos para acceder al modo. Estos modos de “presionar y mantener presionado” son modos de carga avanzados que requieren toda su atención antes de seleccionarlos. - Page 30 Uso de 6 V [Mantener presionado durante 3 segundos] El modo de carga de 6 V está diseñado solo para baterías de ácido-plomo de 6 voltios, como las baterías de celda húmeda, de celda de gel, electrolito líquido avanzado, sin mantenimiento y de calcio.
-
Page 31: Conectar La Batería
Conectar la batería No conecte el enchufe de alimentación de CA hasta que se hayan realizado todas las demás conexiones. Identifique la polaridad correcta de los terminales de la batería. El terminal positivo de la batería se suele identificar mediante los siguientes símbolos o letras: POS, P, +. El terminal negativo de la batería se suele identificar mediante los siguientes símbolos o letras: NEG, N, -. - Page 32 2.) Conecte un cable aislado para batería de al menos calibre 6 (AWG) y 60 cm (24 pulgadas) de largo al terminal NEGATIVO (NEG, N, -) de la batería. 3.) Conecte la abrazadera POSITIVA (ROJA) para batería o el conector de terminal redondo desde el cargador de batería al terminal POSITIVO (POS, P. +) de la batería. 4.) Tanto usted como los extremos libres del cable deben encontrarse lo más lejos posible de la batería.
-
Page 33: Tiempos De Carga
El tiempo para cargar una batería descargada con normalidad está basado en una DOD del 50 %. 12.0 12.0 La temperatura también afectará a los tiempos de carga. El GENIUS5 cuenta con compensación térmica que ajusta automáticamente los perfiles de carga 15.0 15.0 para maximizar el rendimiento de carga. - Page 34 Significado de los ledes de carga. Explicación El LED de carga del 25 % parpadeará lentamente entre “on” (encendido) y “off” (apagado), cuando la batería esté cargada por 25 % LED rojo debajo del 25 %. Cuando la batería esté cargada al 25 %, el LED rojo de carga permanecerá fijo. El LED de carga del 50 % parpadeará...
- Page 35 1.) Botón de modo Presionar para recorrer los modos de carga. 6.) LED de espera Se ilumina cuando el cargador se encuentra en modo de espera, el cargador no se está cargando ni proporciona energía a la batería. 2.) LED de error de sobretensión Se ilumina en rojo constante; el voltaje de la batería se encuentra por encima del voltaje de protección.
-
Page 36: Especificaciones Técnicas
Especificaciones técnicas Voltaje de entrada CA: 120-240 VAC, 50-60 Hz Voltaje normal de trabajo CA: 120-240 VAC, 50-60 Hz Potencia de salida: 75 W Max Voltaje de carga: Vario Corriente de carga: 5 A (12 V), 5 A (6 V) Detección de bajo voltaje: 1 V (12 V), 1 V (6 V) Corriente de carga: <0.5mA... - Page 37 NOCO Tres (3) años de garantía limitada IMPORTANTE: AL UTILIZAR ESTE PRODUCTO, USTED ACEPTA ESTAR OBLIGADO POR LOS TÉRMINOS DE LA GARANTÍA LIMITADA DE TRES (3) AÑOS DE NOCO («GARANTÍA») COMO SE ESTABLECE A CONTINUACIÓN. NO UTILICE EL PRODUCTO HASTA HABER LEÍDO LOS TÉRMINOS DE LA GARANTÍA. SI NO ACEPTA LOS TÉRMINOS DE LA GARANTÍA, NO UTILICE EL PRODUCTO Y DEVUÉLVALO.
- Page 38 Si, durante el Período de garantía, presenta una reclamación, NOCO, a su elección: (a) reparará el Producto que haya sido probado y haya superado nuestros requisitos funcionales, (b) reemplazará el Producto con un producto de reemplazo del mismo modelo (o con su consentimiento, un producto que tenga las mismas o sustancialmente similares características que el Producto original, por ejemplo, un modelo diferente con las mismas características), que sea nuevo o como nuevo y haya sido probado y superado nuestros requisitos funcionales, o (c) cambiará...
- Page 39 For patent information visit www.no.co/ip 30339 Diamond Parkway, Kabelweg 57, 18 Soho Square, Rialto, West Podium, 5F Okura Bekkan #102, Glenwillow, OH 1014BA Amsterdam, London W1D 3QL, Level Mezzanine 2 (M2), 3-4-1 Ginza Chuo-ku 44139 USA. The Netherlands. United Kingdom 525 Collins Street, Tokyo, 104-0061 Melbourne, Australia 3000...
- Page 40 GENIUS5.02072024A T 3.15A...
Need help?
Do you have a question about the GENIUS5 and is the answer not in the manual?
Questions and answers
I need a replacment clip i broke the wire right at the plug. So sad
You can get a replacement clip for the NOCO Genius 5 by purchasing the NOCO GC001 X-Connect Battery Clamp Accessory. This set includes gator clamps and integrated M6 eyelets compatible with NOCO chargers.
This answer is automatically generated